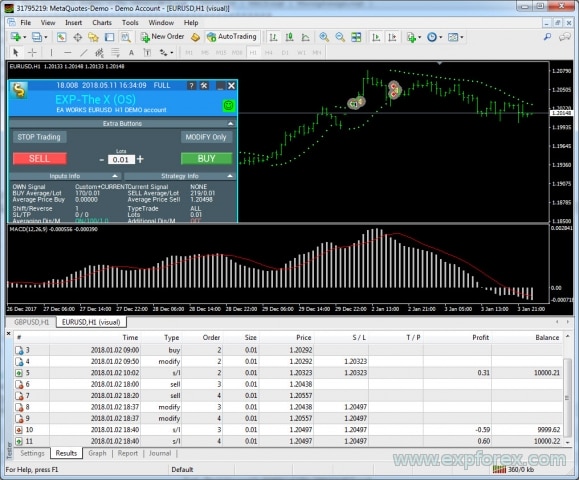
ポジションの平均化。利益の総トレーリングストップ機能を使用して、トレンドに沿っておよびトレンドに逆らって追加ポジションを開設! アドバイザーはトレンドに沿っておよびトレンドに逆らって追加ポジションを開設できます! 一連のポジションに対する平均トレーリングストップを含む! ロットの増減。…
EA SUPER TESTER Expert Advisor 用のマルチスレッド テスト プログラム。

Table of Contents (click to show)
List
- 説明
- オープンソース
- 私たちのアドバイザーの真の価値
- あなたのForexトレーディング戦略をプログラミングする
- MetaTrader 5用 THE X のプログラミング
- MetaTrader 5 ステップ 0:インジケーターをリソースに読み込む!
- MetaTrader 5 ステップ 1:シグナル名を指定する!
- MetaTrader 5 ステップ 2:シグナル表示名を指定する!
- MetaTrader 5 ステップ 3:フィルター名を指定する!
- MetaTrader 5 ステップ 4:インジケーターまたは戦略のパラメーターを外部変数で指定する!
- MetaTrader 5 ステップ 5:エキスパートアドバイザーに読み込むインジケーターハンドルを作成する!
- MetaTrader 5 ステップ 6:戦略のインジケーターを読み込む変数を宣言する!
- MetaTrader 5 ステップ 7:インジケーターデータを保存する変数を宣言する!
- MetaTrader 5 ステップ 8:ポジションを開くための戦略とシグナルを作成する!
- エラーコード
- MetaTrader 5 ステップ 9:インジケーターからフィルターを指定するか、インジケーターを戦略のフィルターとして使用する!
- MetaTrader 5 ステップ 10:これが最後のステップです!
- MetaTrader 5 の結論と戦略の検証
- MetaTrader 4用 THE X のプログラミング
- MetaTrader 4 ステップ 0:インジケーターをリソースに読み込む
- MetaTrader 4 ステップ 1:シグナル名を指定する
- MetaTrader 4 ステップ 2:画面に表示するシグナル名を指定する
- MetaTrader 4 ステップ 3:フィルター名を指定する
- MetaTrader 4 ステップ 4:インジケーターまたは戦略のパラメーターを外部変数で指定する
- MetaTrader 4 ステップ 5、6、7:リラックス!
- MetaTrader 4 ステップ 8:ポジションを開くための戦略とシグナルの作成
- MetaTrader 4 ステップ 9:インジケーターからフィルターを指定するか、インジケーターを戦略のフィルターとして使用する
- MetaTrader 4 ステップ 10:これが最後のステップです!
- MetaTrader 4 の結論と戦略の確認
- エキスパートアドバイザーで他に何が変更できますか?
- 戦略のデバッグ
説明
私たちは、最も興味深く不可欠なすべての機能を含むユニバーサルエキスパートアドバイザーを開発しました。
さらに、標準インジケーターを利用したシグナルモジュールが組み込まれています。
これは戦略ビルダーであり、あなた自身の戦略をプログラムすることができます。
それは大きな人気を得たプロジェクトとして始まりました。15年間、私たちはアルゴリズムを改良し、新しい機能やインジケーターを追加し、機能エラーを修正してきました。
この記事では、戦略のプログラミング、アドバイザーへのインジケーターの統合、新しいシグナルやフィルターの追加について説明します。
オープンソース
私たちが受け取るよくある質問は次のとおりです:
- 自分のインジケーターをアドバイザーに統合できますか?
- エキスパートアドバイザーのオープンソースコードはいくらですか?
私たちのアドバイザーのオープンソースコードを販売していることは秘密ではありません。これは、独自のアドバイザーを開発したり、独自のシグナルを構築したりしたいトレーダーを対象としています。
さらに、トレーダーは独自の戦略を実装し、アドバイザーを再販するためにオープンソースコードを購入することがよくあります。
- アドバイザー The X のオープンソースコードは、私たちのトレードアドバイザーマーケットで購入できます。
- Open Source The X for MetaTrader 5 (利用不可)
- Open Source The X for MetaTrader 4 (利用不可)
- ちなみに、私たちのアドバイザーには多くのオープンソースコードがあります。セクション:戦略アドバイザー (オープンソース)
- オープンソーステンプレートをお試しください。
インジケーターを使ったアドバイザーのプログラミングは複雑なプロセスです。
私たちはトレードアドバイザーのプログラミングサービスを提供しています。しかし、クライアントが必要な機能を確信していないため、開発プロセスが遅れることがよくあります。
The X は、世界中で利用されているFOREX市場での取引のためのブロックと機能のコレクションです。私たちは頻繁に使用される機能を開発し、アドバイザーが各トレーダーのニーズの90%を満たすことを可能にしました。
当然ながら、経験豊富なプログラマーが開発する必要のある独自の戦略もあります。
そのような戦略はまれであり、細心の注意を払った準備が必要です。この作業のコストはその複雑さによって異なります。
私たちのアドバイザーの真の価値
プログラマーの仕事のコストに関する私たちの記事から始めると、私たちのトレーディングロボット The X のおおよそのコストを見積もることができます:
私たちのEAには10,000行を超えるコードが含まれています。これは広範囲に見えるかもしれませんが、PL/SQL (Programming Language/Structured Query Language) を使用してアドバイザーを作成していないため、管理可能です。なぜでしょうか? なぜなら、OOP (オブジェクト指向プログラミング) は多くの人にとって馴染みがなく、OOP の取り扱いは非常に困難な場合があるからです!
それでは、計算してみましょう:
- プログラマーが機能とアルゴリズムをプログラミングする際の1時間の作業コスト = 20ドル。
- 1時間のエラー修正コスト = 5ドル。
- テキストとビデオの作成コスト = 10ドル (この価格はインターネット料金に基づいています。私はすべての指示とビデオを自分で作成しています)。
- The X の機能とブロックの作成に1,000時間以上かかったと仮定します!
- インジケーターを使用したシグナルのプログラミングは簡単です。したがって、10時間かかったと仮定します!
ただし、すぐに完了できない側面もあります:
- 機能のデバッグには、さらに1,000時間かかる場合があります!
- 指示、ビデオ、プロモーションの開発にも1,000時間必要です!
合計で、3,000時間以上を投資しました!
もし私たちがそのようなアルゴリズムを委託された場合、私たちは辞退するでしょう。それは合理的でも収益性もありません。
このようなカスタムエキスパートアドバイザーの総コストは35,000ドル以上です!しかし、私たちのアドバイザーは10分の1の価格で販売されています!!!!
私たちのオープンソースのコストは10分の1です!
このようなカスタムオーダーは決して実行されません:
- 第一に、顧客はそのような多額の資金を投資することに消極的だからです。
- 第二に、プログラマーは開発に多くの時間を費やすことに消極的だからです。
このような複雑なトレーディングロボットのプログラミングは、トレーディング戦略を作成するよりも多くの時間が必要であることを保証します。
すべてのブロックと機能のデバッグには長期間を要します。
過去5年間にわたり間違いを特定し、修正を提供してくださったお客様、そしてアドバイザー THE X の機能を強化するために機能やインジケーターを提供してくださったお客様に心から感謝しています。
あなたのForexトレーディング戦略をプログラミングする
まず、エキスパートアドバイザーのコードを更新したことをお伝えしたいと思います。今では非常に理解しやすく、コメントも充実しています。
すべての機能を詳細に掘り下げる必要はありません。わずか10ステップで戦略をプログラムできます。
私たちのオープンソースを扱うための非常にユーザーフレンドリーな方法を用意しました。
覚えておいてください:私たちはアドバイザーのための戦略を無料でプログラムしません。あなたの戦略のためのコードを開発したい場合は、注文をするためにプログラミングセクションを参照してください!
最初のステップ:
- アドバイザーマーケットで購入したアドバイザーのオープンソースコードを開きます;
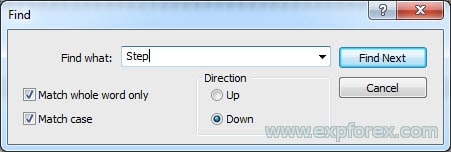
- 検索バーをアクティブにするために Ctrl + F を押します;
- 用語 Step を入力します – このキーワードは、ソースコードをナビゲートし、戦略をすばやく作成するのに役立ちます。
- 各ステップには十分なコメントがあり、例が提供されています。
- 戦略のプログラミング方法を学ぶために、アスタリスク // * でマークされた行のコメントを徐々に解除できます。
アドバイザーがあなたのインジケーターと連携するためのオープンソースコードには、合計10のステップがあります。
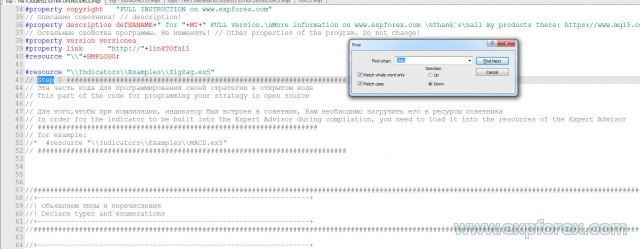
各ステップを詳細に分析します!
MT4とMT5ターミナルではプログラミングが異なるため、記事を2つの部分に分けます:
MT4ターミナル用のアドバイザー THE X を使用している場合は、MetaTrader 4ターミナルのThe Xのプログラミングセクションに直接進むことができます。
MetaTrader 5用 THE X のプログラミング
既存のファイル(例:インターネット上のエキスパートアドバイザー)のインジケーターを使用して戦略を開発したり、既製の戦略を追加したりするには、基本的なプログラミングルールを理解する必要があります。
MetaTrader 5 用のアドバイザーのプログラミングは、MetaTrader 4 用よりも複雑です。ただし、MT5ターミナルでは、より強力な戦略を作成でき、より高度な戦略テスターを備えています。
いずれにせよ、ターミナルが動作するオープンソースコードを購入する必要があります。
MetaTrader 5 ステップ 0:インジケーターをリソースに読み込む!
// ステップ 0 ##############################################
// このコード部分は、オープンソースで戦略をプログラミングするためのものです
//
// コンパイル中にインジケーターをエキスパートアドバイザーに埋め込むには、エキスパートアドバイザーのリソースに読み込む必要があります
//
// 例:
// * #resource "\\Indicators\\Examples\\MACD.ex5"
// ################################################ ###########################
ここで、必要なインジケーターをリソースに追加する必要があります。
これにより、アドバイザーをマーケット用にコンパイルでき、コンパイルされたアドバイザーが別のコンピューターで目的のインジケーターを見つけられないという不要な問題を回避できます。
マーケットでの命名規則: Indicators で始まる完全なフォルダー名を使用してください!
フォルダーは \\ で示されます。
例:
インジケーターへのパスが次のようになっている場合:
C:\ROBO MT5\MQL5\Indicators\Examples\MACD.ex5
このインジケーターへのパスは、プログラミング言語で次のように記述されます:
“\\Indicators\\Examples\\MACD.ex5”
MetaTrader 5 ステップ 1:シグナル名を指定する!
// ステップ 1 ##############################################
// このコード部分は、オープンソースで戦略をプログラミングするためのものです
//
// // の後にシグナル名を入力してください
// ################################################ ####################
// 例:
// * Custom = 77, // オープンソース用シグナル
// ################################################ ############################
このステップでは、エキスパートアドバイザーの可能なシグナルのリストにシグナルまたは戦略を追加する必要があります。
これにより、エキスパート設定フェーズでのシグナルの管理が容易になります。
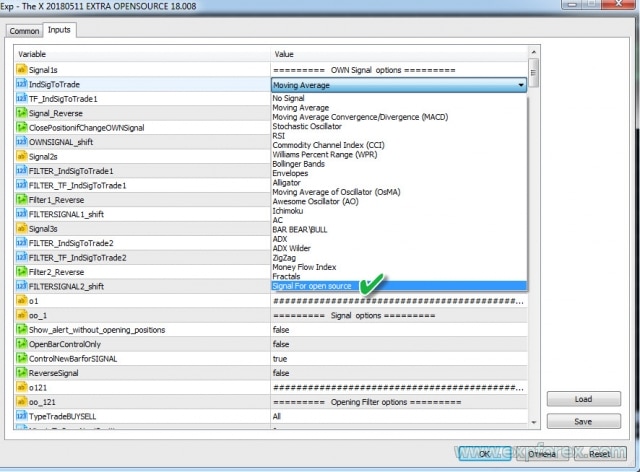
例:
- 戦略に MY STRATEGY という名前を付けたい
- 戦略番号も一意である必要があります。標準インジケーターからのシグナルは、最初の22個の番号を占有します!後で必要になるため、この番号を覚えておいてください。
- 名前も一意である必要があります。例:MYSTRATEGY1
最終的に、コードには次のように記述する必要があります:
MYSTRATEGY1 = 77, // MY STRATEGY
さらに戦略を追加して、次のように記述することもできます:
- MYSTRATEGY1 = 77, // MY STRATEGY a
- MYSTRATEGY2 = 78, // MY STRATEGY b
- MYSTRATEGY3 = 79, // MY STRATEGY c
MetaTrader 5 ステップ 2:シグナル表示名を指定する!
// ステップ 2 ##############################################
// このコード部分は、オープンソースで戦略をプログラミングするためのものです
//
// // の後に画面に表示されるシグナル名を入力してください
// ################################################ ####################
// 例:
// * if (i == 77) s1 = "Custom";
// ################################################ ###########################
このステップは、EAPADpro EAパネル に戦略の名前を表示するためのものです。
簡単です!ただし、前のステップの番号を使用する必要があります。
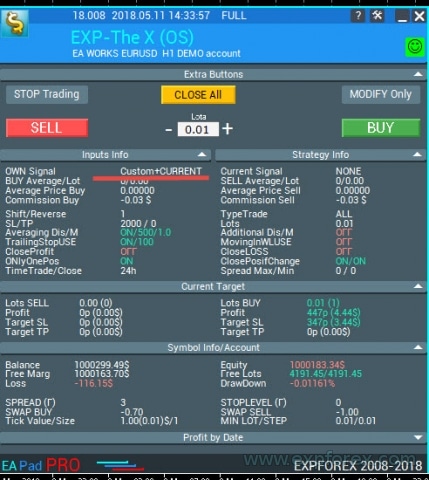
例:
- if (i == 77) s1 = “My1”;
- if (i == 78) s1 = “My2”;
- if (i == 79) s1 = “My3”;
MetaTrader 5 ステップ 3:フィルター名を指定する!
// ステップ 3 ##############################################
// このコード部分は、オープンソースで戦略をプログラミングするためのものです
//
// // の後にフィルター名を入力してください
// ################################################ ####################
// 例:
// * FILTERCustom = 77, // オープンソース用フィルター
// ################################################ ###########################
このステップでは、エキスパートアドバイザーの可能なフィルターのリストにフィルターを追加する必要があります。
これにより、エキスパート設定フェーズでのフィルターの便利な管理が保証されます。
通常、フィルターはシグナルと同じインジケーターを使用しますが、フィルターがシグナルの現在の位置を決定し、シグナルが実際のシグナルを反映するという条件があります。
例:
- フィルターに MY FILTER という名前を付けたいですか?
- フィルター番号も戦略番号と一致する必要があります(これは、将来他の数値との混同を防ぐためです)。フィルターは、標準インジケーターからの最初の22個の番号を占有します!後で必要になるため、この番号を覚えておいてください。
- 名前も一意である必要があります。例:MYFILTER1
最終的に、コードには次のように記述する必要があります:
MYFILTER1 = 77, // MY FILTER
さらにフィルターを追加して、次のように記述することもできます:
- MYFILTER1 = 77, // MY FILTER a
- MYFILTER2 = 78, // MY FILTER b
- MYFILTER3 = 79, // MY FILTER c
MetaTrader 5 ステップ 4:インジケーターまたは戦略のパラメーターを外部変数で指定する!
// ステップ 4 ##############################################
// このコード部分は、オープンソースで戦略をプログラミングするためのものです
//
// 戦略で使用されるインジケーターまたはインジケーターのすべての外部変数を指定します
//
// 例:
// * input string IndicatorName = "-------- Custom Indicator ----------------";
// * input int CUSTOMMAFastPeriod = 1;
// * input int CUSTOMMASlowPeriod = 100;
// * input ENUM_APPLIED_PRICE CUSTOMMAprice = PRICE_CLOSE;
// ################################################ ###########################
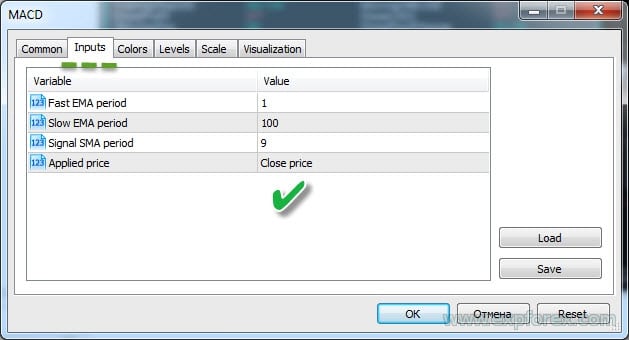
このステップでは、エキスパートアドバイザーから変更できる、戦略内のインジケーターのすべての外部設定を入力する必要があります。これは最適化の目的で役立ちます。
さらに、ここで特定の戦略パラメーターを抽出できます。たとえば、ラインが交差するレベル、チャート上のMAX価格とMIN価格へのインジケーターの操作の制限などです。
インジケーターのすべてのパラメーターを入力する必要はありません。将来 エキスパートアドバイザー の設定から変更したいものだけを作成すれば十分です。他のすべてのパラメーターはデフォルト値に設定できます。
MetaTrader 5 ステップ 5:エキスパートアドバイザーに読み込むインジケーターハンドルを作成する!
// ステップ 5 ##############################################
// このコード部分は、オープンソースで戦略をプログラミングするためのものです
//
// エキスパートアドバイザーが初期化中にインジケーターハンドルを割り当てられるように、配列にエントリを作成します
//
// 例:
// * case 77:
// * h_custom[tf_num][sym_num] = iCustom(array_symbol, array_tf, "::Indicators\\Examples\\MACD", CUSTOMMAFastPeriod, CUSTOMMASlowPeriod, 9, CUSTOMMAprice);
// * if (h_custom[tf_num][sym_num] == INVALID_HANDLE)
// * {
// *     PrintToLogs("Could not get MACD indicator handle");
// *     return(INIT_FAILED);
// * }
// ################################################ ###########################
このステップにより、エキスパートアドバイザーの初期化中にインジケーターが1回読み込まれます。MetaTrader 5 では、チャートにインジケーターを常に読み込む必要はありません。
ハンドルを作成するときは、将来使用するために既に開いているインジケーターのハンドルを保存します。
ここでは十分に注意してください。ハンドルを作成するときは、インジケーターのすべての外部変数を指定し、正しい名前を使用する必要があります。そうしないと、エキスパートアドバイザーはインジケーターを読み込めません。
インジケーターをエキスパートアドバイザーのリソースに読み込んだことを忘れないでください。したがって、リソースからインジケーターを呼び出します!
iCustomを使用したインジケーターの呼び出しに関するMQL5ドキュメントを参照できます。
このコードを記述するには、戦略番号も必要です。戦略で複数のインジケーターを使用する場合は、各インジケーターを同じ番号で指定する必要があります。これにより、アドバイザーが戦略を正しく読み込むようになります。
上記の例によれば、次のようにする必要があります:
case 77:
h_custom[tf_num][sym_num] = iCustom(array_symbol, array_tf, "::Indicators\\Examples\\MACD", CUSTOMMAFastPeriod, CUSTOMMASlowPeriod, 9, CUSTOMMAprice);
if (h_custom[tf_num][sym_num] == INVALID_HANDLE)
{
    PrintToLogs("Could not get MACD indicator handle");
    return(INIT_FAILED);
}
break;
ここでは、明示的に2つの外部パラメーターのみを指定しました。プログラミングの本質を示すために、このインジケーターのパラメーター InpSignalSMA をデフォルトの数値に置き換えました!
同様に、複数のインジケーターとハンドルを追加できます。
戦略で複数のインジケーターを使用する場合は、それぞれを宣言する必要があります。
例:
case 77:
h_custom[tf_num][sym_num] = iCustom(array_symbol, array_tf, "::Indicators\\Examples\\MACD", CUSTOMMAFastPeriod, CUSTOMMASlowPeriod, 9, CUSTOMMAprice);
h_custom2[tf_num][sym_num] = iCustom(array_symbol, array_tf, "::Indicators\\Examples\\MACD", CUSTOMMAFastPeriod, CUSTOMMASlowPeriod, 15, CUSTOMMAprice);
if (h_custom[tf_num][sym_num] == INVALID_HANDLE || h_custom2[tf_num][sym_num] == INVALID_HANDLE)
{
    PrintToLogs("Could not get MACD indicator handle");
    return(INIT_FAILED);
}
break;
さらに、エキスパートアドバイザーに統合したい他の戦略についても同様です!
MetaTrader 5 ステップ 6:戦略のインジケーターを読み込む変数を宣言する!
// ステップ 6 ##############################################
// このコード部分は、オープンソースで戦略をプログラミングするためのものです
//
// ハンドル配列変数を宣言します
//
// 例:
// * int h_custom[6][12];
// * int h_custom2[6][12];
// ################################################ ###########################
ここで、上記で作成したハンドルの名前を指定します!
簡単です。
ハンドルは、EA で多通貨をサポートし、最大6つのシグナルまたはフィルターを同時に指定できるように配列として作成されます!
MetaTrader 5 ステップ 7:インジケーターデータを保存する変数を宣言する!
// ステップ 7 ##############################################
// このコード部分は、オープンソースで戦略をプログラミングするためのものです
//
// インジケーター値の配列変数を宣言します
//
// 例:
// * double custom1_buffer[];
// * double custom2_buffer[];
// ################################################ ###########################
ここで、データバッファの名前を指定します!
簡単です。
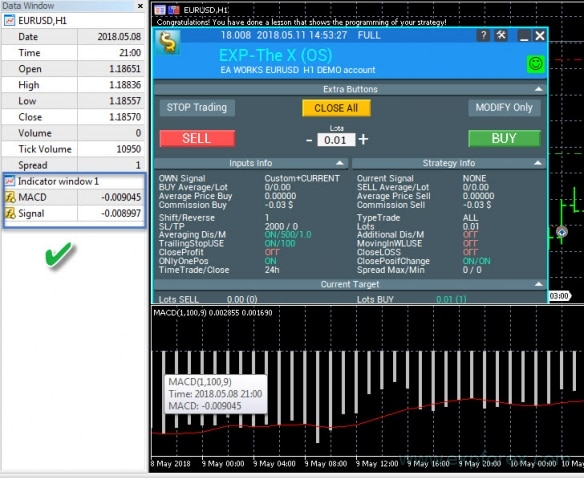
これらの配列は、各バーのインジケーター値に関するデータを保存します。複数のバッファを使用する必要がある場合は、複数の変数を宣言できます。
たとえば、私たちの場合、MACDインジケーターのシグナルラインとメインライン用に2つのバッファが必要です。
MetaTrader 5 ステップ 8:ポジションを開くための戦略とシグナルを作成する!
このステップは、エキスパートアドバイザーにとって非常に重要です。他のすべてのステップは必須ですが、このステップがなければ、アドバイザーは機能しません。
各部分を説明するために、コードにコメントを含めました!
戦略番号は、前のステップで使用した番号と一致する必要があります!
- 各戦略とシグナルのコードを個別にプログラムします。それは、選択した戦略とインジケーターによって異なります。戦略のバッファの処理には…
- このブロックでは、任意の戦略を指定できることに注意してください。
- ハンドルで宣言されたすべてのインジケーターはメモリに読み込まれ、戦略の構築に使用されます。
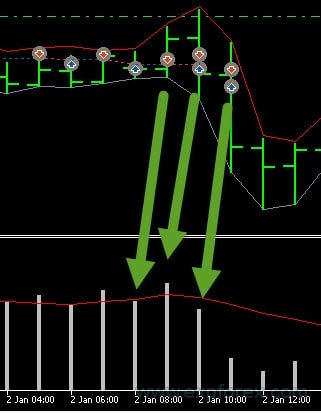
このステップは、3つのサブステップに分けることができます:
- 1. データバッファをデータセットにコピーする必要があります。コピーパラメーターで、行番号を指定する必要があります(私たちの場合、これらは MACDインジケーターのラインです)。
- MAIN と SIGNAL の2つのラインを使用します。
- CopyBuffer関数のドキュメントを読むことができます。
- 2. 戦略のプログラミング。この場合、2つのラインの交差です。
- 重要:BUYシグナルは 1、SELLシグナルは -1 です。
- 3. ここでは、シグナルに基づいてポジションが開かれたときにログに表示される情報を記録します。戦略情報。
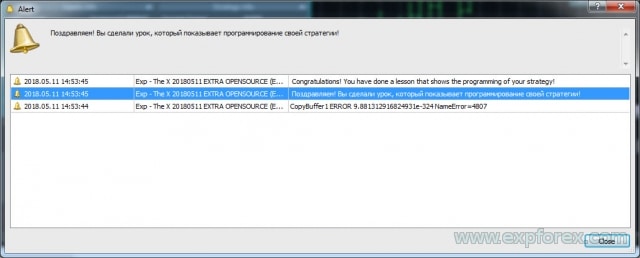
すべてのハンドルとバッファを正しく入力した場合、画面に次のように表示されます:
Alert(“おめでとうございます、戦略のプログラミングを示すレッスンを完了しました!”);
Alert(“おめでとうございます!戦略のプログラミングを示すレッスンを完了しました!”);
エラーメッセージが表示された場合は、このエラーの原因を特定して解決する必要があります。
エラーコード
最も一般的なエラー:
| ERR_INDICATOR_UNKNOWN_SYMBOL | 4801 | 不明なシンボル |
| ERR_INDICATOR_CANNOT_CREATE | 4802 | インジケーターを作成できません |
| ERR_INDICATOR_NO_MEMORY | 4803 | インジケーターを追加するためのメモリが不足しています |
| ERR_INDICATOR_CANNOT_APPLY | 4804 | インジケーターを別のインジケーターに適用できません |
| ERR_INDICATOR_CANNOT_ADD | 4805 | インジケーターの追加中にエラーが発生しました |
| ERR_INDICATOR_DATA_NOT_FOUND | 4806 | 要求されたデータが見つかりませんでした |
| ERR_INDICATOR_WRONG_HANDLE | 4807 | 不正なインジケーターハンドル |
| ERR_INDICATOR_WRONG_PARAMETERS | 4808 | インジケーター作成時のパラメーター数が不正です |
| ERR_INDICATOR_PARAMETERS_MISSING | 4809 | インジケーター作成時にパラメーターがありません |
| ERR_INDICATOR_CUSTOM_NAME | 4810 | 配列の最初のパラメーターはカスタムインジケーターの名前でなければなりません |
| ERR_INDICATOR_PARAMETER_TYPE | 4811 | インジケーター作成時の配列内のパラメータータイプが不正です |
| ERR_INDICATOR_WRONG_INDEX | 4812 | 要求されたインジケーターバッファのインデックスが不正です |
MetaTrader 5 ステップ 9:インジケーターからフィルターを指定するか、インジケーターを戦略のフィルターとして使用する!
このステップのプログラミングコードは簡単で、前のステップと似ています。
唯一の違いは、この段階ではインジケーターをフィルターとしてプログラムすることです。
インジケーターを使用してシグナルを指定することはできませんが、フィルターのみを指定するか、またはその逆も可能です!それはすべて戦略次第です。
MetaTrader 5 ステップ 10:これが最後のステップです!
// ステップ 10 ############################################## ######################
// オープンソースで戦略をプログラミングするためのこのコード部分
// オープンソースで戦略をプログラミングするためのこのコード部分
//
// これでコードは終わりです。このステップに到達した場合、戦略を作成したことになります。
// 例えば、秘密の戦略を入力しました。すべて正しく行った場合、画面にアラートとして結果が表示されます!
// 当社の製品をお選びいただきありがとうございます。私たちはあなたのために働いています!
//
// 当社のウェブサイト:
// 当社のストア:/shop
// MQL5ストア:https://www.mql5.com/users/vladon/seller
//
//
// これでコードは終わりです。このステップに到達した場合、戦略を作成したことになります。
// 例えば、秘密の戦略を入力しました。すべて正しく行った場合、画面にアラートとして結果が表示されます!
// 当社の製品をお選びいただきありがとうございます。私たちはあなたのために働いています!
//
// 当社のウェブサイト:
// 当社のストア:/shop
// MQL5ストア:https://www.mql5.com/users/vladon/seller
// ################################################ ###########################
これは、戦略のプログラミングが完了したことを示します。
幸運と利益がありますように!
MetaTrader 5 の結論と戦略の検証
すべて正しく行えば、あなたの戦略はエキスパートアドバイザーに統合され、私のアドバイザーを使用して取引できるようになります。
次に、アドバイザーと戦略をテストする必要があります。
- ターミナルをロードします;
- デモ口座を開きます;
- エキスパートアドバイザーをチャートにアタッチします;
- すべてがOKであれば、戦略の追加が成功したことを示すメッセージが表示されます:
- またはエラーが表示されます。その場合は、コードを注意深く確認し、すべてのステップを繰り返す必要があります!
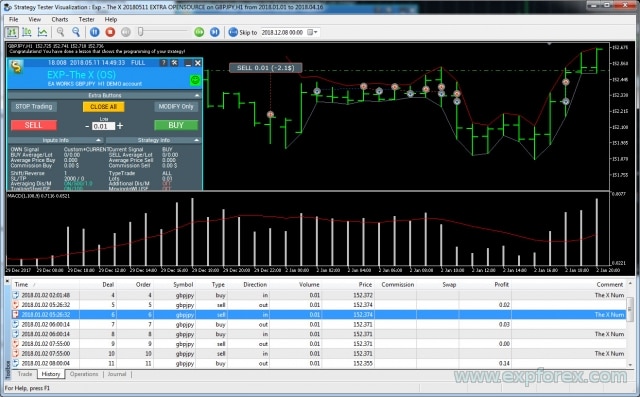
ストラテジーテスターでエキスパートアドバイザーを確認する:
- ターミナルを開きます;
- ストラテジーテスターを開きます;
- エキスパートアドバイザー、通貨ペア、時間枠、日付範囲を選択します。実際のティックに基づいて全ティックテストを有効にします;
- 設定タブを開きます;
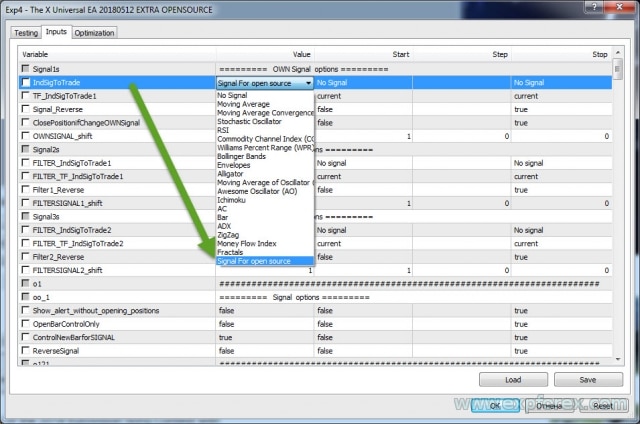
- 戦略を選択します;
- ビジュアライゼーションを有効にします;
- START を押します;
- グラフが開くはずです;
- エキスパートアドバイザーがポジションを開けば、すべて正しく行ったことになります!
MetaTrader 4用 THE X のプログラミング
既存のファイル(例:インターネット上のエキスパートアドバイザー)のインジケーターを使用して戦略を作成したり、既製の戦略を追加したりするには、基本的なプログラミングルールを理解する必要があります。
MetaTrader 5 用のエキスパートアドバイザーのプログラミングは、MetaTrader 4 用よりも複雑です。ただし、MT5ターミナルでは、より強力な戦略を作成でき、より高度なストラテジーテスターを備えています。
一方、MetaTrader 4 ターミナルで利用できる戦略やインジケーターはオンライン上に多数あります。したがって、MT4用のコードを使用できます!
もう一つの重要な注意点:MT4での戦略のコーディングは、MT5でのコーディングよりもはるかに簡単です!
いずれにせよ、作業するターミナルに基づいたオープンコードを購入する必要があります。
MetaTrader 4 ステップ 0:インジケーターをリソースに読み込む
// ステップ 0 ############################################## ######################
    // オープンソースで戦略をプログラミングするためのこのコード部分
    // オープンソースで戦略をプログラミングするためのこのコード部分
    //
    // コンパイル中にインジケーターをエキスパートアドバイザーに埋め込むには、エキスパートアドバイザーのリソースに読み込む必要があります
    // コンパイル中にインジケーターをエキスパートアドバイザーに埋め込むには、エキスパートアドバイザーのリソースに読み込む必要があります
    // ################################################ ####################
    // 例:
    // * #resource "\\ Indicators \\ MACD.ex4"
    // ################################################ ###########################
ここで、必要なインジケーターをリソースに追加する必要があります。
これにより、マーケット用のアドバイザーをコンパイルでき、コンパイルされたエキスパートアドバイザーが別のコンピューターで目的のインジケーターを見つけられないという不要な問題を回避できます!
インジケーターパスの記述ルール:Indicators で始まる完全なフォルダー名を使用してください!
フォルダーは \\ で示されます
例:
インジケーターへのパスが次のようになっている場合:
C:\ROBO MT4\MQL4\Indicators\Examples\MACD.ex4
このインジケーターへのパスは、プログラミング言語で次のように記述されます:
“\\Indicators\\Examples\\MACD.ex4”
MetaTrader 4 ステップ 1:シグナル名を指定する
// ステップ 1 ############################################## ######################
    // オープンソースで戦略をプログラミングするためのこのコード部分
    // オープンソースで戦略をプログラミングするためのこのコード部分
    //
    // // の後にシグナル名を入力してください
    // // の後にシグナル名を入力してください
    // ################################################ ####################
    // 例:
    // * Custom = 77, // オープンソース用シグナル
    // ################################################ ############################
このステップでは、アドバイザーの可能なシグナルのリストにシグナルまたは戦略を追加する必要があります。
これにより、エキスパートアドバイザー設定フェーズでのシグナルの管理が容易になります。
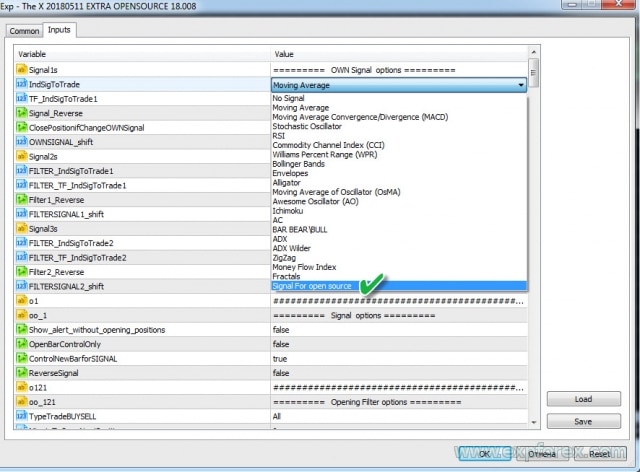
例:
- 戦略に MY STRATEGY という名前を付けたい
- 戦略番号も一意である必要があります。標準インジケーターからのシグナルは、最初の22個の番号を占有します!後で参照するために、この番号を覚えておいてください。
- 名前も一意である必要があります。例:MYSTRATEGY1
最終的に、コードには次のように記述する必要があります:
MYSTRATEGY1 = 77, // MY STRATEGY
さらに戦略を追加して、次のように記述することもできます:
- MYSTRATEGY1 = 77, // MY STRATEGY a
- MYSTRATEGY2 = 78, // MY STRATEGY b
- MYSTRATEGY3 = 79, // MY STRATEGY c
MetaTrader 4 ステップ 2:画面に表示するシグナル名を指定する
// ステップ 2 ############################################## ######################
// オープンソースで戦略をプログラミングするためのこのコード部分
// オープンソースで戦略をプログラミングするためのこのコード部分
//
// 画面に表示されるシグナル名を // の後に入力してください
// 画面に表示されるシグナル名を // の後に入力してください
// ################################################ ####################
// 例:
// * if (i == 77) s1 = "Custom";
// ################################################ ###########################
このステップは、EApadpro EA パネルに戦略の名前を表示するためのものです。
複雑なことは何もありません!ただし、前のステップの番号を使用する必要があります。
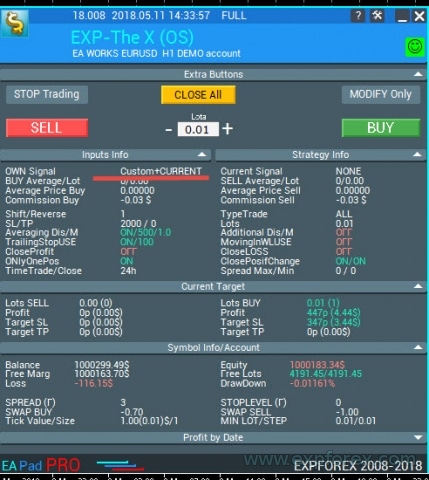
例:
- if (i == 77) s1 = “My1”;
- if (i == 78) s1 = “My2”;
- if (i == 79) s1 = “My3”;
MetaTrader 4 ステップ 3:フィルター名を指定する
// ステップ 3 ############################################## ######################
// オープンソースで戦略をプログラミングするためのこのコード部分
// オープンソースで戦略をプログラミングするためのこのコード部分
//
// // の後にフィルター名を入力してください
// // の後にフィルター名を入力してください
// ################################################ ####################
// 例:
// * FILTERCustom = 77, // オープンソース用フィルター
// ################################################ ###########################
このステップでは、エキスパートアドバイザーの可能なフィルターのリストにフィルターを追加する必要があります。
これにより、エキスパートアドバイザー設定フェーズでのフィルターの便利な管理が可能になります。
通常、フィルターはシグナルと同じインジケーターを使用し、フィルターがシグナルの現在の位置を決定し、シグナルが取引アクションを確認するという条件があります。
例:
- フィルターに MYFILTER という名前を付けたいですか?
- フィルターの番号も戦略の番号と一致する必要があります(これは、将来標準インジケーター番号との混同を避けるためです)。フィルターは、標準インジケーター用に予約されている最初の22個の番号を占有します!後で参照するために、この番号を覚えておいてください。
- 名前も一意である必要があります。例:MYFILTER1
最終的に、コードには次のように記述する必要があります:
MYFILTER1 = 77, // MY FILTER
さらにフィルターを追加して、次のように記述することもできます:
- MYFILTER1 = 77, // MY FILTER a
- MYFILTER2 = 78, // MY FILTER b
- MYFILTER3 = 79, // MY FILTER c
MetaTrader 4 ステップ 4:インジケーターまたは戦略のパラメーターを外部変数で指定する
// ステップ 4 ############################################## ######################
// オープンソースで戦略をプログラミングするためのこのコード部分
// オープンソースで戦略をプログラミングするためのこのコード部分
//
// 戦略で使用されるインジケーターまたはインジケーターのすべての外部変数を指定します
// 戦略で使用されるインジケーターまたはインジケーターのすべての外部変数を指定します
// ################################################ ####################
// 例:
// * input string IndicatorName = "-------- Custom Indicator ----------------";
// * input int CUSTOMMAFastPeriod = 1;
// * input int CUSTOMMASlowPeriod = 100;
// ################################################ ###########################
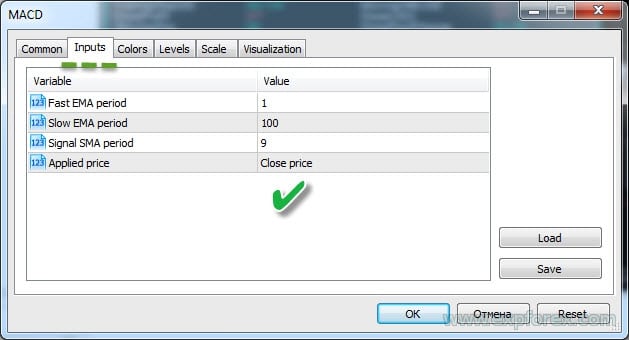
このステップでは、エキスパートアドバイザーから変更できる、戦略で使用されるインジケーターのすべての外部設定を入力する必要があります。これは最適化に役立ちます。
さらに、ラインの交差レベル、チャート上のMAX価格とMIN価格に基づくインジケーターの操作の制限など、戦略の特定のパラメーターを抽出できます。
インジケーターのすべてのパラメーターを入力する必要はありません。将来 エキスパートアドバイザー の設定から変更したい可能性のあるものを含めるだけで十分です。他のすべてのパラメーターについては、インジケーターをデフォルト設定のままにしておくことができます。
MetaTrader 4 ステップ 5、6、7:リラックス!
// ステップ 5 ############################################## ######################
// オープンソースで戦略をプログラミングするためのこのコード部分
// オープンソースで戦略をプログラミングするためのこのコード部分
//
// ステップ 5 は MT5 ターミナルにのみ必要です。したがって、このステップではリラックスしてコーヒーを飲むことができます
// ステップ 5 は MT5 ターミナルにのみ必要です。したがって、このステップではリラックスしてコーヒーを飲むことができます
// ################################################ ###########################

// ステップ 6 ############################################## ######################
// オープンソースで戦略をプログラミングするためのこのコード部分
// オープンソースで戦略をプログラミングするためのこのコード部分
//
// ステップ 6 は MT5 ターミナルにのみ必要です。したがって、このステップではリラックスしておやつを食べることができます
// ステップ 6 は MT5 ターミナルにのみ必要です。したがって、このステップではリラックスしておやつを食べることができます
// ################################################ ###########################

// ステップ 7 ############################################## ######################
// オープンソースで戦略をプログラミングするためのこのコード部分
// オープンソースで戦略をプログラミングするためのこのコード部分
//
// ステップ 7 は MT5 ターミナルにのみ必要です。運動休憩を取ってください
// ステップ 7 は MT5 ターミナルにのみ必要です。運動休憩を取ってください
// ################################################ ###########################
注: MetaTrader 4 では、さらなる作業のためにインジケーターをメモリに読み込む必要はありません。MT4でインジケーターが再度呼び出されると、エキスパートアドバイザーは同じハンドルを使用します。
MetaTrader 4 ステップ 8:ポジションを開くための戦略とシグナルの作成
このステップは、エキスパートアドバイザーにとって非常に重要です。他のすべてのステップは必須ですが、このステップがなければ、アドバイザーは機能しません。
コードにコメントを追加しました!
戦略番号は、前のステップの番号と一致します!
- 戦略とシグナルのプログラミングコードは個別に。選択した戦略とインジケーターによって異なります。戦略バッファの設定…
- このブロックでは、任意の戦略を指定できることに注意してください。
- ハンドルで宣言したすべてのインジケーターはメモリに読み込まれ、戦略の構築に使用されます。
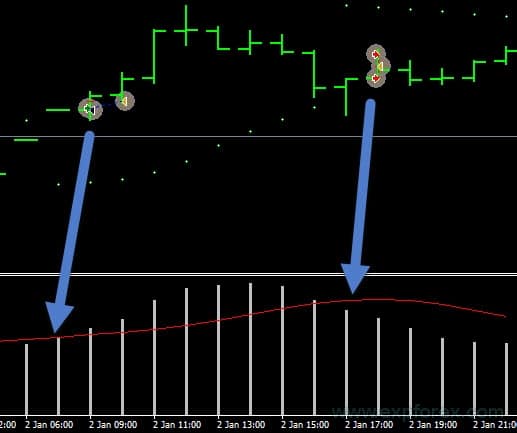
このステップは、2つのサブステップに分けることができます:
- 1. 戦略のプログラミング。 この場合、2つのラインの交差です。
- 重要: BUY のシグナルは 1、SELL のシグナルは -1 です。
- 2. ポジションが開かれたときにログに表示される情報を記録します。戦略情報
エラーメッセージが表示された場合は、エラーの原因を特定する必要があります。
最も一般的なエラー:
| ERR_INDICATOR_UNKNOWN_SYMBOL | 4801 | 不明なシンボル |
| ERR_INDICATOR_CANNOT_CREATE | 4802 | インジケーターを作成できません |
| ERR_INDICATOR_NO_MEMORY | 4803 | インジケーターを追加するためのメモリが不足しています |
| ERR_INDICATOR_CANNOT_APPLY | 4804 | インジケーターを別のインジケーターに適用できません |
| ERR_INDICATOR_CANNOT_ADD | 4805 | インジケーターの追加中にエラーが発生しました |
| ERR_INDICATOR_DATA_NOT_FOUND | 4806 | 要求されたデータが見つかりませんでした |
| ERR_INDICATOR_WRONG_HANDLE | 4807 | 不正なインジケーターハンドル |
| ERR_INDICATOR_WRONG_PARAMETERS | 4808 | インジケーター作成時のパラメーター数が不正です |
| ERR_INDICATOR_PARAMETERS_MISSING | 4809 | インジケーター作成時にパラメーターがありません |
| ERR_INDICATOR_CUSTOM_NAME | 4810 | 配列の最初のパラメーターはカスタムインジケーターの名前でなければなりません |
| ERR_INDICATOR_PARAMETER_TYPE | 4811 | インジケーター作成時の配列内のパラメータータイプが不正です |
| ERR_INDICATOR_WRONG_INDEX | 4812 | 要求されたインジケーターバッファのインデックスが不正です |
MetaTrader 4 ステップ 9:インジケーターからフィルターを指定するか、インジケーターを戦略のフィルターとして使用する
このステップのコードプログラミングには複雑なことは何もなく、前のステップと似ています。
唯一の違いは、この段階ではインジケーターをフィルターとしてプログラムすることです。
インジケーターを使用してシグナルを指定することはできませんが、フィルターのみを指定するか、またはその逆も可能です!それはすべて戦略次第です。
MetaTrader 4 ステップ 10:これが最後のステップです!
// ステップ 10 ############################################## ######################
// オープンソースで戦略をプログラミングするためのこのコード部分
// オープンソースで戦略をプログラミングするためのこのコード部分
//
// これでコードは終わりです。このステップに到達した場合、戦略を作成したことになります。
// 例えば、秘密の戦略を入力しました。すべて正しく行った場合、画面にアラートとして結果が表示されます!
// 当社の製品をお選びいただきありがとうございます。私たちはあなたのために働いています!
//
// 当社のウェブサイト:
// 当社のストア:/shop
// MQL5ストア:https://www.mql5.com/users/vladon/seller
//
//
// これでコードは終わりです。このステップに到達した場合、戦略を作成したことになります。
// 例えば、秘密の戦略を入力しました。すべて正しく行った場合、画面にアラートとして結果が表示されます!
// 当社の製品をお選びいただきありがとうございます。私たちはあなたのために働いています!
//
// 当社のウェブサイト:
// 当社のストア:/shop
// MQL5ストア:https://www.mql5.com/users/vladon/seller
// ################################################ ###########################
このステップは、検索を使用するときに迷わないように作成されました。
これは、戦略のプログラミングが完了したことを示します。
幸運と利益がありますように!
MetaTrader 4 の結論と戦略の確認
すべて正しく行えば、あなたの戦略はエキスパートアドバイザーに統合され、私のアドバイザーを使用して取引できるようになります。
次に、アドバイザーと戦略をテストする必要があります。
- ターミナルをロードします;
- デモ口座を開きます;
- エキスパートアドバイザーをチャートにアタッチします;
ストラテジーテスターでエキスパートアドバイザーを確認する:
- ターミナルを開きます;
- ストラテジーテスターを開きます;
- エキスパートアドバイザー、通貨ペア、時間枠、日付範囲を選択します。実際のティックに基づいて全ティックテストを有効にします;
- 設定タブを開きます;
- 戦略を選択します;
- ビジュアライゼーションを有効にします;
- START を押します;
- グラフが開くはずです;
- エキスパートアドバイザーがポジションを開けば、すべて正しく行ったことになります!
エキスパートアドバイザーで他に何が変更できますか?
もちろん、戦略をパーソナライズし、アドバイザーに独自の外観を与えたい場合もあるでしょう!
自由に
変更できるパラメーター:
 // 変更 1:エキスパートアドバイザーのバージョン // EA のバージョン
#define versionea "18.008"
// 変更 2:アドバイザーのロゴ // EA のロゴ
#define BMPLOGO "Images\\dollar.bmp"
// 変更 3:エキスパートアドバイザーのアイコン // EA のアイコン
// #property icon "\\Images\\dollar.bmp"
// 変更 4:チャート上のエキスパートアドバイザーの名前 // チャート上の EA の名前
#define defEANAME "EXP-The X (OS)"
// 変更 5:完全な手順へのリンク // 完全な手順へのリンク
#define linkTOfull "www.expforex.com/ja/publ/4-1-0-166"
// 変更 6:エキスパートアドバイザーのデモ版。デモ口座または USDJPY ペアのライブ口座でのみ動作します // アドバイザーのデモ版。デモ口座または USDJPY ペアのライブ口座でのみ動作します
bool DEMO = false;
他のすべてのパラメーターは、エキスパートアドバイザーの機能を妨げる可能性があるため、変更しないことをお勧めします!
戦略のデバッグ
次のステップは、The X をテストして最適化し、最適な設定を見つけることです。
または、戦略をデバッグしてアップグレードします。
数日または数週間かかることもあります。数ヶ月かかることもあります。
Forex市場 – リスク通知! これは非常にリスクの高い収益方法です。戦略を改善してください。
幸運と利益を!
戦略ブロックへの追加情報の出力
これは、オープンソースコードのオプション機能です。
EAPADPRO 戦略ブロックに任意のパラメーターの任意の値を出力できます。
1. これを行うには、ローカル変数を作成します。
例:double EAPADPRO_StrategyValue1 = 0; double EAPADPRO_StrategyValue2 = 0;
2. この変数に値を割り当てます。
例:ATRインジケーターの値を割り当てます(double atr = iATR の行を見つけます):
EAPADPRO_StrategyValue1 = atr;
EAPADPRO_StrategyValue2 = atrma;
完全なフィルターコード:
3. 次に、変数の値を情報出力ブロックに追加します:
コード内の CreateStrategy() 関数を見つけて、新しい行を追加します:
ArrayAddStrategy("StrategyValue1", DoubleToString(EAPADPRO_StrategyValue1, 5), "", "");

ArrayAddStrategy("StrategyValue2", DoubleToString(EAPADPRO_StrategyValue2, 5), "", "");
関数の最初のパラメーターは、変数の名前です。
関数の2番目のパラメーターは、便利な形式の変数の値です!
注意! 画面にきれいに表示されるように、偶数個のパラメーターを追加してください!
関連記事
The xCustomEA Advisor on the PipFinite Trend PRO. 自動EA
明 PipFinite Trend PROインジケーターのストラテジーをプログラムし、当社のユニバーサルトレーディングシステムExp – The xCustomEAを使用して取引する例。 この記事では、PipFinite Trend PROカスタムインジケーターを詳細に分析します。これは、MQL5マーケットからダウンロードされたものです。 インジケーターの操作方法と、当社のエキスパートアドバイザー Exp – The xCustomEAでの呼び出しオプションを分析しましょう。 開始 Exp – The xCustomEA エキスパートアドバイザーを開発する際、ほとんどのユーザーがプログラミングを学ばないことを知っていました! しかし、インジケーターで取引するためにプログラミング知識が必要ですか? 当社のエキスパートアドバイザーの使用を簡単かつ手頃な価格にするために、あらゆる手段を講じました。 インジケーター上でエキスパートアドバイザーをプログラムするのに20分?簡単です! 特に、全体のプログラムコードが長い間問題なく実行されてきた場合はなおさらです。 当社のExp – The xCustomEAの説明書では、ストラテジーのプログラミングの手順を最も明確に記述しています! 最初に使用するインジケーターは偶然ではありません。 実際、MQL5マーケットには多くのMT5およびMT4用インジケーターがあります。 しかし、当社は市場で最も人気のあるインジケーターの一つを選びました。これは1000件のレビューがあり、MT4およびMT5ターミナル向けに配布されています。 インジケーターの作者はシグナルバッファを隠し、これらのバッファ番号も記述しました!インジケーター上でエキスパートアドバイザーを開発する際に非常に重要なことは何でしょうか? PipFinite Trend…
The X – 標準インディケーターを使用したForex用ユニバーサルエキスパートアドバイザー (EA)
MetaTrader用の機能豊富なユニバーサルエキスパートアドバイザー (EA) エキスパートアドバイザーThe XはMetaTrader用の多用途なトレーディングツールであり、幅広い機能とカスタマイズ可能な設定を提供します。 標準インディケーターと連携し、内蔵のストラテジービルダーを含んでいるため、トレーダーは自分のニーズに合わせて戦略を作成および調整できます。…
Duplicator – MetaTraderターミナル上での取引/ポジションの複製
Exp-Duplicatorは、自動的なエキスパートアドバイザーであり、MetaTraderアカウント上で取引とポジションを事前設定された回数だけ複製するように設計されています。 手動で開かれたものでも他のEAによって開かれたものでも、すべてのポジションをシームレスにコピーし、これらのポジションのロットサイズ(ボリューム)を増やすことができます。…
CLP CloseIfProfitorLoss。トレイリングプロフィットによる総利益または損失の管理。
エキスパートアドバイザー(EA)は、MetaTraderでのポジション管理およびクローズに関する高度な機能を提供し、特に事前に設定された総利益または損失のレベルに達した際に機能します。 利益トレイリング機能が有効になっている場合、EAは利益が増加するにつれて動的にストップレベルを調整して利益を確保します。…
Copylot – MetaTrader用の外為取引のコピーソフト。ターミナル間のコピア
MetaTrader用トレードコピア。 あらゆるアカウントから外為の取引、ポジション、オーダーをコピーします。 COPYLOT MT4バージョンの中でMT4-MT4, MT5-MT4の最高のトレードコピアの1つです(またはCOPYLOT MT5バージョンのMT4-MT5, MT5-MT5に対応しています)。 独自のコピーアルゴリズムは、すべての取引をマスターアカウントからクライアントアカウントに正確にコピーします。…
EAPadPRO – 私たちのエキスパート向け情報パネル。エキスパートアドバイザーのダッシュボード
MetaTraderターミナル用のすべてのアドバイザーおよびユーティリティの情報パネル。 当社の取引エキスパートアドバイザーでEAPADPROパネルを管理および使用する基本についての詳細な指示。 当社のユーティリティを便利かつ成功裏に使用するための親しみやすく直感的なユーザーインターフェース。 戦略テスターでも!…
VirtualTradePad (VTP) 取引パネル。チャートとキーボードからワンクリックで取引できるトレードパッド
VirtualTradePad または VTP – MetaTrader ターミナルでワンクリックで取引するためのコントロール パネル。Forex でのスキャルピングと手動取引用のプログラム。…
TickSniper MetaTrader用自動エキスパートアドバイザー。Tick scalper
Exp-TickSniperは、高速なTickスキャルパーで、各通貨ペアのパラメーターを自動的に選択します。 このEAは、ほぼ10年のEAプログラミング経験に基づいて開発されました。 このEAは、スマートトレーリングストップを使用して短期取引を行い、現在の通貨ペアデータ、その見積もり、仕様、およびスプレッドに基づいています。…
Partial Close and Trailing. ロールバック時の部分クローズ
Partial Close and Trailingは、ロールバック中にポジションの一部(ロットの一部)をクローズするEAアシスタントです。 価格が最初に利益の方向に動き、その後リトレースすると、EAは利益の出ているポジションを部分的にクローズします。…
MQLオープンソーステンプレート. エキスパートアドバイザー作成用テンプレート
概要 エキスパートアドバイザー(EA)を作成し、任意のインジケーターを使用して戦略をテストすることは、テンプレートやオープンソースリソースを利用することで簡素化できます。オープンソースの利点を活用して、効果的な戦略を構築しましょう。 以下は、Expforex.comのMQLオープンソーステンプレートを使用して、わずか5分でEAを作成するためのステップバイステップガイドです。 オープンソーステンプレートを使用したEA作成のステップバイステップガイド オープンソーステンプレートのダウンロード: Expforex.comにアクセスし、オープンソースセクションに移動します。ここでMetaTrader 4 (MT4)およびMetaTrader 5 (MT5)用のMQLテンプレートを見つけることができます。 プラットフォーム(MT4またはMT5)に適したEAテンプレートを、使用したいインジケーターに基づいてダウンロードします。 テンプレート構造の理解: テンプレートには、インジケーターからのシグナルに基づいてポジションの初期化、オープン、クローズなどの基本的なEA機能を処理する事前に記述されたコードが含まれています。 テンプレートの主な要素には以下が含まれます: …
X と xCustomEA: テストと最適化
説明 The X と The xCustomEA は、過去5年間で広く人気を博した フォレックス (Forex) トレーディングコミュニティにおける2つの際立った エキスパートアドバイザー (EAs) です。これらのツールは、トレーディング戦略 を カスタマイズ したいトレーダーに対応し、テスト と 最適化 に焦点を当ててパフォーマンスを向上させ、様々な 市場の状況 に適応するよう設計されています。 主な特徴: The…
EA The xCustomEA:ユニバーサルトレーディングアドバイザー。カスタムストラテジービルダー
MetaTrader用のカスタムインディケーターに対応するユニバーサルトレーディングアドバイザー。 Exp – The xCustomEA ユニバーサルトレーディングアドバイザーはカスタムインディケーターで動作します。The xCustomEA はカスタムインディケーターと連携し、MT5およびMT4ターミナル用の取引戦略をプログラムできます。 言い換えれば:The xCustomEA はインターネットやmql5マーケットからダウンロード可能なカスタムインディケーターと接続されています。 インターネット上の任意のカスタムインディケーター! ストラテジービルダー。…
Forex Tester Padは、ストラテジーテスター用の取引シミュレーターです。インジケーターを使用した取引。
ストラテジーテスターのチャートでワンクリック取引。ユーティリティを使用すると、ストラテジーテスターで戦略を手動でテストできます。ビジュアライゼーションチャートでのワンクリック取引。 取引スキルをテストするための便利で完全な機能がストラテジーテスターにも利用可能になりました。…
EAPADPROライブラリ – 当社のパネルをEAに追加する
EAPADPROライブラリ – 当社の情報パネルでエキスパートアドバイザー(EA)を強化 EAPADPROライブラリは、MetaTraderプラットフォーム上でエキスパートアドバイザー(EA)の機能を向上させたいトレーダーにとって、堅牢なソリューションを提供します。…
この記事は次の言語でもご覧いただけます: English Portuguese Español Deutsch Français Русский Українська Indonesian Italiano العربية Chinese 日本語 한국어 Türkçe ไทย Tiếng Việt


