


설명 우리는 전문가 TickSniper, Good Santa, Tick Hamster, The X, 의 요약 및 상세 거래 결과를 실제 거래 계좌에서 요약했습니다. 우리의 전문가 어드바이저의 거래 통계입니다. 보고서를 자세히…
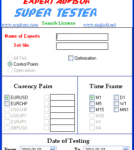
EA SUPER TESTER Expert Advisor를 위한 멀티스레드 테스트 프로그램

Table of Contents (click to show)
List
- 설명
- 오픈 소스
- 우리 어드바이저의 진정한 가치
- 당신의 Forex 트레이딩 전략 프로그래밍하기
- MetaTrader 5용 THE X 프로그래밍
- MetaTrader 5 단계 0: 인디케이터를 리소스에 로드하기!
- MetaTrader 5 단계 1: 시그널 이름 지정하기!
- MetaTrader 5 단계 2: 시그널 표시 이름 지정하기!
- MetaTrader 5 단계 3: 필터 이름 지정하기!
- MetaTrader 5 단계 4: 인디케이터 또는 전략의 매개변수를 외부 변수에 지정하기!
- MetaTrader 5 단계 5: 엑스퍼트 어드바이저에 로드할 인디케이터 핸들 생성하기!
- MetaTrader 5 단계 6: 전략의 인디케이터를 로드할 변수 선언하기!
- MetaTrader 5 단계 7: 인디케이터 데이터를 저장할 변수 선언하기!
- MetaTrader 5 단계 8: 포지션 오픈을 위한 전략 및 시그널 생성하기!
- 오류 코드
- MetaTrader 5 단계 9: 인디케이터에서 필터를 지정하거나 인디케이터를 전략의 필터로 사용하기!
- MetaTrader 5 단계 10: 마지막 단계입니다!
- MetaTrader 5 결론 및 전략 검증
- MetaTrader 4용 THE X 프로그래밍
- MetaTrader 4 단계 0: 인디케이터를 리소스에 로드하기
- MetaTrader 4 단계 1: 시그널 이름 지정하기
- MetaTrader 4 단계 2: 화면에 표시할 시그널 이름 지정하기
- MetaTrader 4 단계 3: 필터 이름 지정하기
- MetaTrader 4 단계 4: 인디케이터 또는 전략 매개변수를 외부 변수에 지정하기
- MetaTrader 4 단계 5, 6, 7: 휴식!
- MetaTrader 4 단계 8: 포지션 오픈을 위한 전략 및 시그널 생성
- MetaTrader 4 단계 9: 인디케이터에서 필터를 지정하거나 인디케이터를 전략의 필터로 사용하기
- MetaTrader 4 단계 10: 마지막 단계입니다!
- MetaTrader 4 결론 및 전략 확인
- 엑스퍼트 어드바이저에서 또 무엇을 변경할 수 있나요?
- 전략 디버깅
설명
우리는 가장 흥미롭고 필수적인 모든 기능을 포함하는 유니버설 엑스퍼트 어드바이저(Universal Expert Advisor)를 개발했습니다.
또한, 표준 인디케이터를 활용하는 시그널 모듈이 통합되었습니다.
이것은 전략 빌더로, 자신만의 전략을 프로그래밍할 수 있게 해줍니다.
이 프로젝트는 상당한 인기를 얻으며 시작되었습니다. 15년 동안 우리는 알고리즘을 개선하고, 새로운 기능과 인디케이터를 추가하며, 기능 오류를 수정해왔습니다.
이 글은 자신만의 전략을 프로그래밍하고, 인디케이터를 어드바이저에 통합하며, 새로운 시그널과 필터를 추가하는 과정을 안내할 것입니다.
오픈 소스
자주 받는 질문은 다음과 같습니다:
- 내 인디케이터를 어드바이저에 통합할 수 있나요?
- 엑스퍼트 어드바이저(Expert Advisor)의 오픈 소스 코드는 얼마인가요?
우리가 어드바이저의 오픈 소스 코드를 판매한다는 것은 비밀이 아닙니다. 이는 자신만의 어드바이저를 개발하거나 자신만의 시그널을 만들고 싶은 트레이더를 위한 것입니다.
또한, 트레이더들은 종종 자신들의 독점적인 전략을 구현하고 어드바이저를 재판매하기 위해 오픈 소스 코드를 구매합니다.
- 어드바이저 The X의 오픈 소스 코드는 우리의 트레이드 어드바이저 마켓에서 구매할 수 있습니다.
- MetaTrader 5용 오픈 소스 The X (사용 불가)
- MetaTrader 4용 오픈 소스 The X (사용 불가)
- 참고로, 우리 어드바이저를 위한 많은 오픈 소스 코드가 있습니다. 섹션: 전략 어드바이저 (오픈 소스)
- 우리의 오픈 소스 템플릿을 사용해 보세요.
인디케이터를 사용하여 어드바이저를 프로그래밍하는 것은 복잡한 과정입니다.
우리는 트레이드 어드바이저를 위한 프로그래밍 서비스를 제공합니다. 그러나 클라이언트가 필요한 기능을 확신하지 못하기 때문에 개발 과정이 종종 지연됩니다.
The X는 전 세계적으로 활용되는 FOREX 시장에서의 트레이딩을 위한 블록과 기능의 모음입니다. 우리는 자주 사용되는 기능을 개발하여 어드바이저가 각 트레이더의 요구 사항 중 90%를 충족할 수 있도록 했습니다.
물론, 숙련된 프로그래머가 개발해야 하는 독특한 전략들도 있습니다.
그러한 전략은 드물며 세심한 준비가 필요합니다. 이 작업의 비용은 복잡성에 따라 달라집니다.
우리 어드바이저의 진정한 가치
프로그래머의 작업 비용에 대한 우리의 기사에서 시작하여, 우리 트레이딩 로봇 The X의 대략적인 비용을 추정할 수 있습니다:
우리 EA는 10,000줄 이상의 코드를 포함하고 있습니다. 이것이 방대해 보일 수 있지만, 우리는 PL/SQL (프로그래밍 언어/구조화된 쿼리 언어)을 사용하여 어드바이저를 작성하지 않기 때문에 관리가 가능합니다. 왜냐하면? OOP (객체 지향 프로그래밍)는 많은 사람들에게 익숙하지 않으며, OOP를 다루는 것은 꽤 어려울 수 있기 때문입니다!
자, 계산해 봅시다:
- 프로그래머가 기능과 알고리즘을 프로그래밍하는 데 드는 1시간 작업 비용 = $20.
- 1시간의 오류 수정 비용 = $5.
- 텍스트 및 비디오 작성 비용 = $10 (이 가격은 인터넷 요금을 기준으로 하며, 모든 지침과 비디오는 제가 직접 만듭니다).
- The X를 위한 기능과 블록 작성에 1,000시간 이상 걸렸다고 가정합니다!
- 인디케이터를 사용한 시그널 프로그래밍은 간단합니다. 따라서 10시간이 걸렸다고 가정합니다!
그러나 일부 측면은 즉시 완료될 수 없습니다:
- 기능 디버깅에 추가로 1,000시간이 걸릴 수 있습니다!
- 지침, 비디오, 프로모션 개발에도 1,000시간이 필요합니다!
총 3,000시간 이상을 투자했습니다!
만약 우리가 이러한 알고리즘을 의뢰받았다면, 우리는 거절했을 것입니다. 합리적이지도 수익성이 있지도 않습니다.
이러한 맞춤형 엑스퍼트 어드바이저의 총 비용은 $35,000 이상입니다! 하지만 우리 어드바이저는 10분의 1 가격에 판매됩니다!!!!
우리 오픈 소스의 비용은 10배 저렴합니다!
이러한 맞춤형 주문은 절대 이행되지 않습니다:
- 첫째, 고객들이 그렇게 큰 금액을 투자하려 하지 않기 때문입니다.
- 둘째, 프로그래머들이 개발에 그렇게 많은 시간을 할애하는 것을 꺼리기 때문입니다.
이렇게 복잡한 트레이딩 로봇을 프로그래밍하는 것은 트레이딩 전략을 만드는 것보다 더 많은 시간이 필요하다는 것을 확신합니다.
모든 블록과 기능을 디버깅하는 데는 오랜 시간이 걸립니다.
지난 5년 동안 실수를 발견하고 수정을 제공해 주신 고객들, 그리고 어드바이저 THE X의 기능을 향상시키기 위해 자신들의 기능과 인디케이터를 기여해주신 고객들께 진심으로 감사드립니다.
당신의 Forex 트레이딩 전략 프로그래밍하기
먼저, 엑스퍼트 어드바이저의 코드를 업데이트했음을 말씀드리고 싶습니다. 이제 매우 이해하기 쉽고 주석도 잘 달려 있습니다.
모든 기능을 자세히 살펴볼 필요는 없습니다. 단 10단계만으로 전략을 프로그래밍할 수 있습니다.
우리는 오픈 소스로 작업할 수 있는 매우 사용자 친화적인 방법을 준비했습니다.
기억하세요: 우리는 어드바이저를 위한 전략을 무료로 프로그래밍하지 않습니다. 전략을 위한 코드를 개발하고 싶다면, 주문을 위해 프로그래밍 섹션을 참조하십시오!
첫 단계:
- 어드바이저 마켓에서 구매한 어드바이저의 오픈 소스 코드를 엽니다;
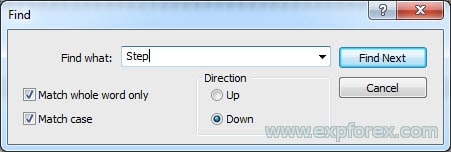
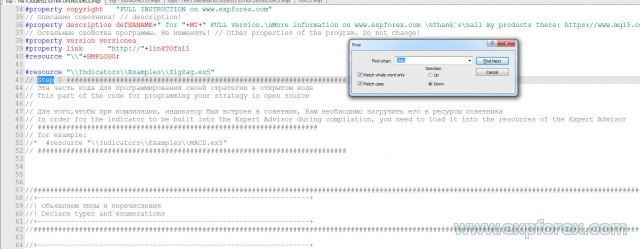
- 검색창을 활성화하려면 Ctrl + F를 누릅니다;
- Step이라는 용어를 입력합니다 – 이 키워드는 소스 코드를 탐색하고 전략을 빠르게 작성하는 데 도움이 됩니다.

- 각 단계는 주석이 잘 달려 있으며 예시를 제공합니다.
- 전략 프로그래밍 방법을 배우려면 별표(// *)로 표시된 줄의 주석을 점진적으로 해제할 수 있습니다.
어드바이저가 인디케이터와 함께 작동하도록 오픈 소스 코드에는 총 10개의 단계가 있습니다.
각 단계를 자세히 분석해 보겠습니다!
MT4와 MT5 터미널 간의 프로그래밍이 다르기 때문에, 이 글을 두 부분으로 나누겠습니다:
MT4 터미널용 어드바이저 THE X를 사용 중이라면, MetaTrader 4 터미널의 The X용 프로그래밍 섹션으로 바로 이동할 수 있습니다.
MetaTrader 5용 THE X 프로그래밍
전략을 개발하거나 기존 파일(예: 인터넷의 엑스퍼트 어드바이저)의 인디케이터를 사용하여 기성 전략을 추가하려면 기본 프로그래밍 규칙을 이해해야 합니다.
MetaTrader 5용 어드바이저 프로그래밍은 MetaTrader 4용보다 더 복잡합니다. 하지만 MT5 터미널은 더 강력한 전략을 생성할 수 있게 해주며 더 진보된 전략 테스터를 갖추고 있습니다.
어쨌든, 터미널이 작동할 오픈 소스 코드를 구매해야 합니다.
MetaTrader 5 단계 0: 인디케이터를 리소스에 로드하기!
// 단계 0 ##############################################
// 이 코드 부분은 오픈 소스에서 전략을 프로그래밍하기 위한 것입니다
//
// 컴파일 중에 인디케이터를 엑스퍼트 어드바이저에 포함시키려면, 엑스퍼트 어드바이저의 리소스에 로드해야 합니다
//
// 예:
// * #resource "\\Indicators\\Examples\\MACD.ex5"
// ################################################ ###########################
여기서는 우리가 필요로 하는 인디케이터를 리소스에 추가해야 합니다.
이렇게 하면 어드바이저를 마켓용으로 컴파일할 수 있으며, 컴파일된 어드바이저가 다른 컴퓨터에서 원하는 인디케이터를 찾지 못하는 불필요한 문제를 방지할 수 있습니다.
마켓에서의 이름 지정 규칙: Indicators로 시작하는 전체 폴더 이름을 사용하십시오!
폴더는 \\로 표시됩니다.
예:
인디케이터 경로가 다음과 같은 경우:
C:\ROBO MT5\MQL5\Indicators\Examples\MACD.ex5
프로그래밍 언어에서 이 인디케이터의 경로는 다음과 같이 작성됩니다:
“\\Indicators\\Examples\\MACD.ex5”
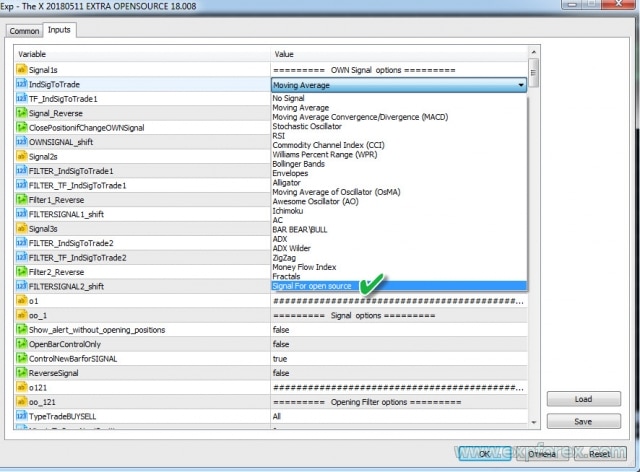
MetaTrader 5 단계 1: 시그널 이름 지정하기!
// 단계 1 ##############################################
// 이 코드 부분은 오픈 소스에서 전략을 프로그래밍하기 위한 것입니다
//
// // 뒤에 시그널 이름을 입력하십시오
// ################################################ ####################
// 예:
// * Custom = 77, // 오픈 소스용 시그널
// ################################################ ############################
이 단계에서, 우리는 엑스퍼트 어드바이저의 가능한 시그널 목록에 우리의 시그널이나 전략을 추가해야 합니다.
이는 엑스퍼트 설정 단계에서 시그널을 편리하게 관리할 수 있게 해줍니다.
예:
- 전략 이름을 MY STRATEGY로 하고 싶습니다
- 전략 번호도 고유해야 합니다. 표준 인디케이터의 시그널은 처음 22개 번호를 차지합니다! 나중에 필요하므로 이 번호를 기억하십시오.
- 이름도 고유해야 합니다. 예: MYSTRATEGY1
결국, 코드에는 다음과 같이 작성해야 합니다:
MYSTRATEGY1 = 77, // MY STRATEGY
더 많은 전략을 추가하고 다음과 같이 작성할 수도 있습니다:
- MYSTRATEGY1 = 77, // MY STRATEGY a
- MYSTRATEGY2 = 78, // MY STRATEGY b
- MYSTRATEGY3 = 79, // MY STRATEGY c
MetaTrader 5 단계 2: 시그널 표시 이름 지정하기!
// 단계 2 ##############################################
// 이 코드 부분은 오픈 소스에서 전략을 프로그래밍하기 위한 것입니다
//
// // 뒤에 화면에 표시될 시그널 이름을 입력하십시오
// ################################################ ####################
// 예:
// * if (i == 77) s1 = "Custom";
// ################################################ ###########################
이 단계는 EAPADpro EA 패널에 전략 이름을 표시하기 위한 것입니다.
간단합니다! 하지만 이전 단계의 번호를 사용해야 합니다.

예:
- if (i == 77) s1 = “My1”;
- if (i == 78) s1 = “My2”;
- if (i == 79) s1 = “My3”;
MetaTrader 5 단계 3: 필터 이름 지정하기!
// 단계 3 ##############################################
// 이 코드 부분은 오픈 소스에서 전략을 프로그래밍하기 위한 것입니다
//
// // 뒤에 필터 이름을 입력하십시오
// ################################################ ####################
// 예:
// * FILTERCustom = 77, // 오픈 소스용 필터
// ################################################ ###########################
이 단계에서, 우리는 엑스퍼트 어드바이저의 가능한 필터 목록에 우리의 필터를 추가해야 합니다.
이는 엑스퍼트 설정 단계에서 필터를 편리하게 관리할 수 있도록 합니다.
일반적으로 필터는 시그널과 동일한 인디케이터를 사용하지만, 필터가 시그널의 현재 위치를 결정하고 시그널이 실제 시그널을 반영한다는 조건이 있습니다.
예:
- 필터 이름을 MY FILTER로 하고 싶습니까?
- 필터 번호도 전략 번호와 일치해야 합니다 (이는 나중에 다른 숫자와 혼동되는 것을 방지합니다). 필터는 표준 인디케이터의 처음 22개 번호를 차지합니다! 나중에 필요하므로 이 번호를 기억하십시오.
- 이름도 고유해야 합니다. 예: MYFILTER1
결국, 코드에는 다음과 같이 작성해야 합니다:
MYFILTER1 = 77, // MY FILTER
더 많은 필터를 추가하고 다음과 같이 작성할 수도 있습니다:
- MYFILTER1 = 77, // MY FILTER a
- MYFILTER2 = 78, // MY FILTER b
- MYFILTER3 = 79, // MY FILTER c
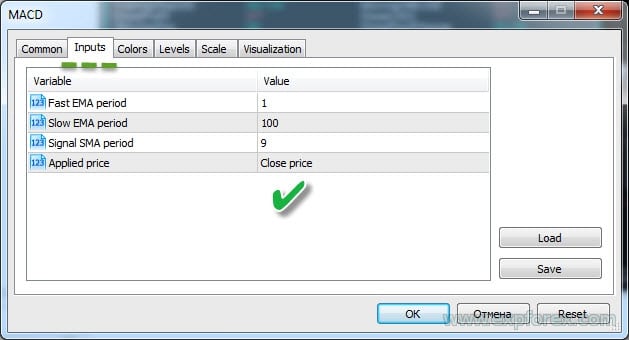
MetaTrader 5 단계 4: 인디케이터 또는 전략의 매개변수를 외부 변수에 지정하기!
// 단계 4 ##############################################
// 이 코드 부분은 오픈 소스에서 전략을 프로그래밍하기 위한 것입니다
//
// 전략에서 사용할 인디케이터 또는 인디케이터의 모든 외부 변수를 지정하십시오
//
// 예:
// * input string IndicatorName = "-------- Custom Indicator ----------------";
// * input int CUSTOMMAFastPeriod = 1;
// * input int CUSTOMMASlowPeriod = 100;
// * input ENUM_APPLIED_PRICE CUSTOMMAprice = PRICE_CLOSE;
// ################################################ ###########################
이 단계에서는 엑스퍼트 어드바이저에서 수정할 수 있는, 전략의 인디케이터에 대한 모든 외부 설정을 입력해야 합니다. 이는 최적화 목적에 유용합니다.
또한, 여기에서 특정 전략 매개변수를 추출할 수 있습니다. 예를 들어, 라인이 교차하는 레벨, 차트의 MAX 및 MIN 가격으로 인디케이터 작동 제한 등입니다.
인디케이터의 모든 매개변수를 입력할 필요는 없습니다. 나중에 엑스퍼트 어드바이저 설정에서 변경하고 싶을 수 있는 것들만 만들면 충분합니다. 다른 모든 매개변수는 기본값으로 설정할 수 있습니다.
MetaTrader 5 단계 5: 엑스퍼트 어드바이저에 로드할 인디케이터 핸들 생성하기!
// 단계 5 ##############################################
// 이 코드 부분은 오픈 소스에서 전략을 프로그래밍하기 위한 것입니다
//
// 엑스퍼트 어드바이저가 초기화 중에 인디케이터 핸들을 할당할 수 있도록 배열에 항목을 만듭니다
//
// 예:
// * case 77:
// * h_custom[tf_num][sym_num] = iCustom(array_symbol, array_tf, "::Indicators\\Examples\\MACD", CUSTOMMAFastPeriod, CUSTOMMASlowPeriod, 9, CUSTOMMAprice);
// * if (h_custom[tf_num][sym_num] == INVALID_HANDLE)
// * {
// *     PrintToLogs("Could not get MACD indicator handle");
// *     return(INIT_FAILED);
// * }
// ################################################ ###########################
이 단계는 엑스퍼트 어드바이저 초기화 중에 인디케이터가 한 번 로드되도록 보장합니다. MetaTrader 5에서는 차트에 인디케이터를 지속적으로 로드할 필요가 없습니다.
핸들을 생성할 때, 나중에 사용하기 위해 이미 열린 인디케이터의 핸들을 저장합니다.
여기서 매우 주의해야 합니다. 핸들을 생성할 때 인디케이터의 모든 외부 변수를 지정하고 올바른 이름을 사용해야 합니다. 그렇지 않으면 엑스퍼트 어드바이저가 인디케이터를 로드할 수 없습니다.
인디케이터를 엑스퍼트 어드바이저 리소스에 로드했음을 기억하십시오. 따라서 리소스에서 인디케이터를 호출할 것입니다!
iCustom을 사용한 인디케이터 호출에 대한 MQL5 문서를 참조할 수 있습니다.
이 코드를 작성하려면 전략 번호도 필요합니다. 전략이 여러 인디케이터를 사용하는 경우 각 인디케이터를 동일한 번호로 지정해야 합니다. 이렇게 하면 어드바이저가 전략을 올바르게 로드할 수 있습니다.
위의 예에 따라 다음을 수행해야 합니다:
case 77:
h_custom[tf_num][sym_num] = iCustom(array_symbol, array_tf, "::Indicators\\Examples\\MACD", CUSTOMMAFastPeriod, CUSTOMMASlowPeriod, 9, CUSTOMMAprice);
if (h_custom[tf_num][sym_num] == INVALID_HANDLE)
{
    PrintToLogs("Could not get MACD indicator handle");
    return(INIT_FAILED);
}
break;
여기서는 두 개의 외부 매개변수만 명시적으로 지정했습니다. 프로그래밍의 본질을 보여주기 위해 이 인디케이터의 매개변수인 InpSignalSMA를 기본 번호로 대체했습니다!
마찬가지로 여러 인디케이터와 핸들을 추가할 수 있습니다.
전략이 여러 인디케이터를 사용하는 경우 각각을 선언해야 합니다.
예:
case 77:
h_custom[tf_num][sym_num] = iCustom(array_symbol, array_tf, "::Indicators\\Examples\\MACD", CUSTOMMAFastPeriod, CUSTOMMASlowPeriod, 9, CUSTOMMAprice);
h_custom2[tf_num][sym_num] = iCustom(array_symbol, array_tf, "::Indicators\\Examples\\MACD", CUSTOMMAFastPeriod, CUSTOMMASlowPeriod, 15, CUSTOMMAprice);
if (h_custom[tf_num][sym_num] == INVALID_HANDLE || h_custom2[tf_num][sym_num] == INVALID_HANDLE)
{
    PrintToLogs("Could not get MACD indicator handle");
    return(INIT_FAILED);
}
break;
또한 엑스퍼트 어드바이저에 통합하려는 다른 전략에 대해서도 마찬가지입니다!
MetaTrader 5 단계 6: 전략의 인디케이터를 로드할 변수 선언하기!
// 단계 6 ##############################################
// 이 코드 부분은 오픈 소스에서 전략을 프로그래밍하기 위한 것입니다
//
// 핸들 배열 변수를 선언합니다
//
// 예:
// * int h_custom[6][12];
// * int h_custom2[6][12];
// ################################################ ###########################
여기서는 위에서 생성한 핸들의 이름을 지정합니다!
간단합니다.
핸들은 EA에서 다중 통화를 지원하고 최대 6개의 시그널 또는 필터를 동시에 지정할 수 있도록 배열로 생성됩니다!
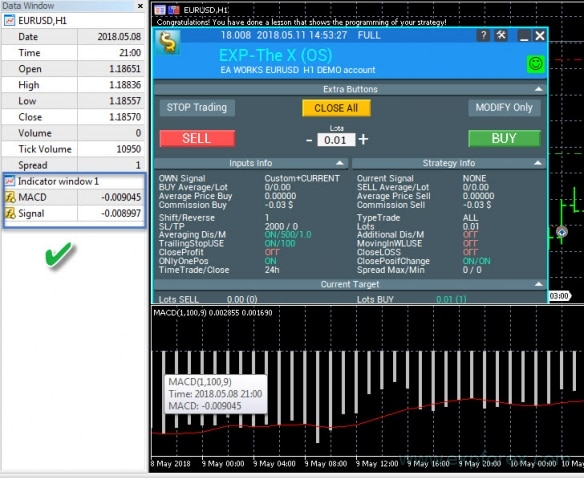
MetaTrader 5 단계 7: 인디케이터 데이터를 저장할 변수 선언하기!
// 단계 7 ##############################################
// 이 코드 부분은 오픈 소스에서 전략을 프로그래밍하기 위한 것입니다
//
// 인디케이터 값에 대한 배열 변수를 선언합니다
//
// 예:
// * double custom1_buffer[];
// * double custom2_buffer[];
// ################################################ ###########################
여기서는 데이터 버퍼의 이름을 지정합니다!
간단합니다.
이 배열은 각 바(bar)의 인디케이터 값에 대한 데이터를 저장합니다. 여러 버퍼를 사용해야 하는 경우 여러 변수를 선언할 수 있습니다.
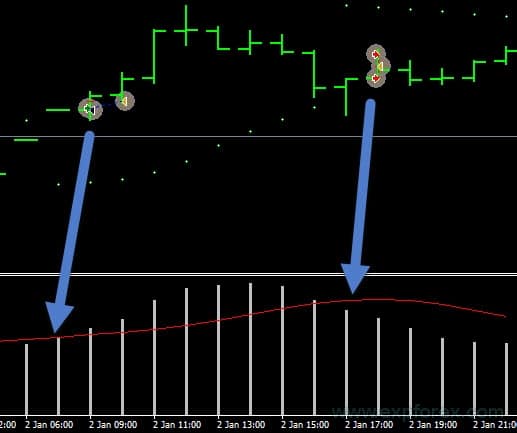
예를 들어, 우리 경우에는 MACD 인디케이터의 시그널 라인과 메인 라인을 위한 두 개의 버퍼가 필요합니다.
MetaTrader 5 단계 8: 포지션 오픈을 위한 전략 및 시그널 생성하기!
이 단계는 엑스퍼트 어드바이저에 매우 중요합니다. 다른 모든 단계가 필수적이긴 하지만, 이 단계 없이는 어드바이저가 작동하지 않습니다.
각 부분을 설명하기 위해 코드에 주석을 포함시켰습니다!
전략 번호는 이전 단계에서 사용한 번호와 일치해야 합니다!
- 각 전략과 시그널에 대한 코드를 개별적으로 프로그래밍합니다. 이는 선택한 전략과 인디케이터에 따라 다릅니다. 전략을 위한 버퍼 처리에는…
- 이 블록에서는 어떤 전략이든 지정할 수 있습니다.
- 핸들에서 선언된 모든 인디케이터는 메모리에 로드되어 전략을 구축하는 데 사용됩니다.
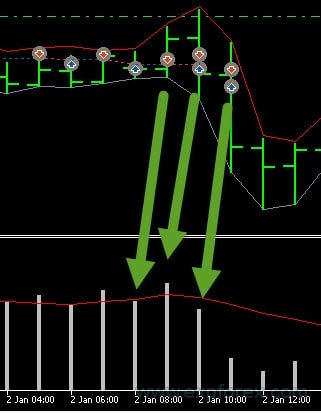
이 단계는 세 가지 하위 단계로 나눌 수 있습니다:
- 1. 데이터 버퍼를 데이터 세트로 복사해야 합니다. 복사 매개변수에서 라인 번호를 지정해야 합니다 (우리 경우, 이것은 MACD 인디케이터 라인입니다).
- MAIN과 SIGNAL 두 라인을 사용합니다.
- CopyBuffer 함수에 대한 문서를 읽을 수 있습니다.
- 2. 전략 프로그래밍. 이 경우, 두 라인의 교차입니다.
- 중요: BUY(매수) 시그널은 1이고, SELL(매도)은 -1입니다.
- 3. 여기서는 시그널에 따라 포지션이 열릴 때 로그에 표시될 정보를 기록합니다. 전략 정보.
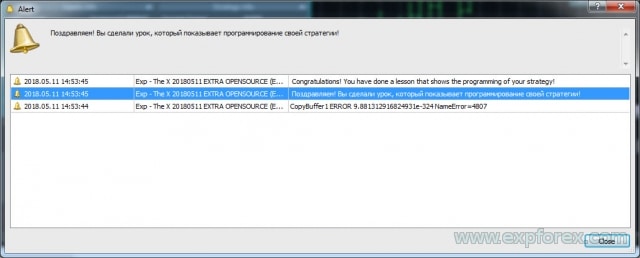
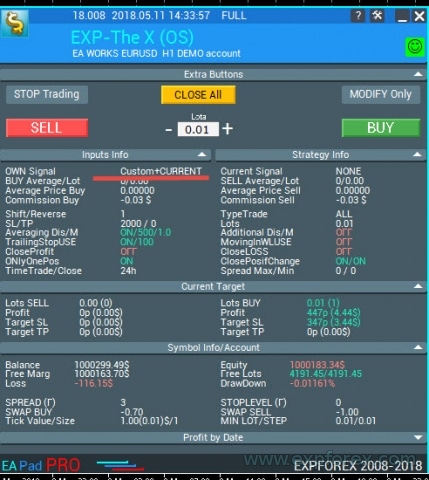
모든 핸들과 버퍼를 올바르게 채웠다면, 화면에 다음과 같이 표시되어야 합니다:
Alert(“축하합니다, 전략 프로그래밍을 시연하는 수업을 완료했습니다!”);
Alert(“축하합니다! 전략 프로그래밍을 시연하는 수업을 완료했습니다!”);
오류 메시지가 표시되면, 이 오류의 원인을 찾아 해결해야 합니다.
오류 코드
가장 일반적인 오류:
| ERR_INDICATOR_UNKNOWN_SYMBOL | 4801 | 알 수 없는 심볼 |
| ERR_INDICATOR_CANNOT_CREATE | 4802 | 인디케이터를 생성할 수 없습니다 |
| ERR_INDICATOR_NO_MEMORY | 4803 | 인디케이터를 추가할 메모리가 부족합니다 |
| ERR_INDICATOR_CANNOT_APPLY | 4804 | 인디케이터를 다른 인디케이터에 적용할 수 없습니다 |
| ERR_INDICATOR_CANNOT_ADD | 4805 | 인디케이터 추가 중 오류 |
| ERR_INDICATOR_DATA_NOT_FOUND | 4806 | 요청한 데이터를 찾을 수 없습니다 |
| ERR_INDICATOR_WRONG_HANDLE | 4807 | 잘못된 인디케이터 핸들 |
| ERR_INDICATOR_WRONG_PARAMETERS | 4808 | 인디케이터 생성 시 매개변수 개수가 잘못되었습니다 |
| ERR_INDICATOR_PARAMETERS_MISSING | 4809 | 인디케이터 생성 시 매개변수가 누락되었습니다 |
| ERR_INDICATOR_CUSTOM_NAME | 4810 | 배열의 첫 번째 매개변수는 사용자 정의 인디케이터의 이름이어야 합니다 |
| ERR_INDICATOR_PARAMETER_TYPE | 4811 | 인디케이터 생성 시 배열의 매개변수 유형이 잘못되었습니다 |
| ERR_INDICATOR_WRONG_INDEX | 4812 | 요청한 인디케이터 버퍼의 인덱스가 잘못되었습니다 |
MetaTrader 5 단계 9: 인디케이터에서 필터를 지정하거나 인디케이터를 전략의 필터로 사용하기!
이 단계의 프로그래밍 코드는 간단하며 이전 단계와 유사합니다.
유일한 차이점은 이 단계에서는 인디케이터를 필터로 프로그래밍한다는 것입니다.
인디케이터를 사용하여 시그널을 지정할 수는 없지만, 필터만 지정하거나 그 반대로 할 수 있습니다! 이는 모두 전략에 달려 있습니다.
MetaTrader 5 단계 10: 마지막 단계입니다!
// 단계 10 ############################################## ######################
// 오픈 소스에서 전략을 프로그래밍하기 위한 이 코드 부분
// 오픈 소스에서 전략을 프로그래밍하기 위한 이 코드 부분
//
// 이것으로 우리 코드는 끝입니다. 이 단계에 도달했다면 전략을 생성한 것입니다.
// 예를 들어, 비밀 전략을 입력했습니다. 모든 것을 올바르게 수행했다면 화면에 알림 형태로 결과를 받게 될 것입니다!
// 저희 제품을 선택해 주셔서 감사합니다. 저희는 당신을 위해 일합니다!
//
// 저희 웹사이트:
// 저희 스토어: /shop
// MQL5 스토어: https://www.mql5.com/users/vladon/seller
//
//
// 이것으로 우리 코드는 끝입니다. 이 단계에 도달했다면 전략을 생성한 것입니다.
// 예를 들어, 비밀 전략을 입력했습니다. 모든 것을 올바르게 수행했다면 화면에 알림 형태로 결과를 받게 될 것입니다!
// 저희 제품을 선택해 주셔서 감사합니다. 저희는 당신을 위해 일합니다!
//
// 저희 웹사이트:
// 저희 스토어: /shop
// MQL5 스토어: https://www.mql5.com/users/vladon/seller
// ################################################ ###########################
이는 전략 프로그래밍이 완료되었음을 나타냅니다.
행운과 수익을 빕니다!
MetaTrader 5 결론 및 전략 검증
모든 것을 올바르게 수행하면 전략이 엑스퍼트 어드바이저에 통합되어 제 어드바이저를 사용하여 거래할 수 있습니다.
이제 어드바이저와 전략을 테스트해야 합니다.
- 터미널을 로드합니다;
- 데모 계좌를 엽니다;
- 엑스퍼트 어드바이저를 차트에 첨부합니다;
- 모든 것이 정상이면 전략이 성공적으로 추가되었다는 메시지를 받게 됩니다:
- 또는 오류가 발생합니다. 이 경우 코드를 주의 깊게 검토하고 모든 단계를 반복해야 합니다!
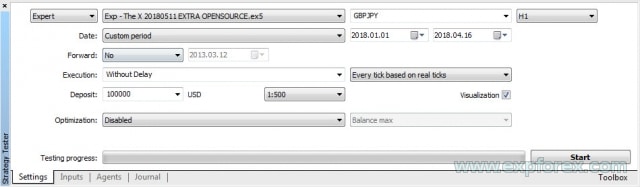
스트래티지 테스터에서 엑스퍼트 어드바이저 확인하기:
- 터미널을 엽니다;
- 스트래티지 테스터를 엽니다;
- 엑스퍼트 어드바이저, 통화 쌍, 타임프레임, 날짜 범위를 선택합니다. 실제 틱을 기반으로 한 모든 틱 테스트를 활성화합니다;
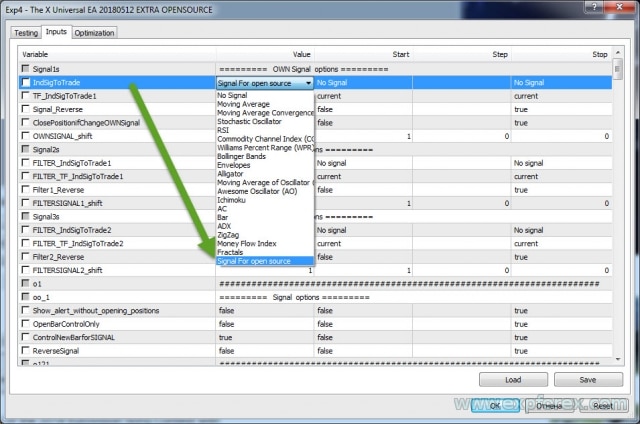
- 설정 탭을 엽니다;
- 전략을 선택합니다;
- 시각화를 활성화합니다;
- 시작을 누릅니다;
- 그래프가 열려야 합니다;
- 엑스퍼트 어드바이저가 포지션을 열면, 모든 것을 올바르게 수행한 것입니다!
MetaTrader 4용 THE X 프로그래밍
기존 파일(예: 인터넷의 엑스퍼트 어드바이저)의 인디케이터에 대한 전략을 작성하거나 기성 전략을 추가하려면 기본 프로그래밍 규칙을 이해해야 합니다.
MetaTrader 5용 엑스퍼트 어드바이저 프로그래밍은 MetaTrader 4용보다 더 복잡합니다. 하지만 MT5 터미널은 더 강력한 전략을 생성할 수 있게 해주며 더 진보된 스트래티지 테스터를 갖추고 있습니다.
반면에, MetaTrader 4 터미널에서 사용할 수 있는 수많은 전략과 인디케이터가 온라인에 있습니다. 따라서 MT4용 코드를 사용할 수 있습니다!
또 다른 중요한 알림: MT4에서 전략을 코딩하는 것이 MT5에서 코딩하는 것보다 훨씬 쉽습니다!
어쨌든, 작업할 터미널을 기반으로 한 오픈 코드를 구매해야 합니다.
MetaTrader 4 단계 0: 인디케이터를 리소스에 로드하기
// 단계 0 ############################################## ######################
    // 오픈 소스에서 전략을 프로그래밍하기 위한 이 코드 부분
    // 오픈 소스에서 전략을 프로그래밍하기 위한 이 코드 부분
    //
    // 컴파일 중에 인디케이터를 엑스퍼트 어드바이저에 포함시키려면, 엑스퍼트 어드바이저의 리소스에 로드해야 합니다
    // 컴파일 중에 인디케이터를 엑스퍼트 어드바이저에 포함시키려면, 엑스퍼트 어드바이저의 리소스에 로드해야 합니다
    // ################################################ ####################
    // 예:
    // * #resource "\\ Indicators \\ MACD.ex4"
    // ################################################ ###########################
여기서는 우리가 필요로 하는 인디케이터를 리소스에 추가해야 합니다.
이렇게 하면 마켓용 어드바이저를 컴파일할 수 있으며, 컴파일된 엑스퍼트 어드바이저가 다른 컴퓨터에서 원하는 인디케이터를 찾지 못하는 불필요한 문제를 방지할 수 있습니다!
인디케이터 경로 작성 규칙: Indicators로 시작하는 전체 폴더 이름을 사용하십시오!
폴더는 \\로 표시됩니다
예:
인디케이터 경로가 다음과 같은 경우:
C:\ROBO MT4\MQL4\Indicators\Examples\MACD.ex4
프로그래밍 언어에서 이 인디케이터의 경로는 다음과 같이 작성됩니다:
“\\Indicators\\Examples\\MACD.ex4”
MetaTrader 4 단계 1: 시그널 이름 지정하기
// 단계 1 ############################################## ######################
    // 오픈 소스에서 전략을 프로그래밍하기 위한 이 코드 부분
    // 오픈 소스에서 전략을 프로그래밍하기 위한 이 코드 부분
    //
    // // 뒤에 시그널 이름을 입력하십시오
    // // 뒤에 시그널 이름을 입력하십시오
    // ################################################ ####################
    // 예:
    // * Custom = 77, // 오픈 소스용 시그널
    // ################################################ ############################
이 단계에서, 우리는 어드바이저의 가능한 시그널 목록에 우리의 시그널 또는 전략을 추가해야 합니다.
이는 엑스퍼트 어드바이저 설정 단계에서 시그널을 편리하게 관리할 수 있게 해줍니다.

예:
- 전략 이름을 MY STRATEGY로 하고 싶습니다
- 전략 번호도 고유해야 합니다. 표준 인디케이터의 시그널은 처음 22개 번호를 차지합니다! 나중에 참조할 수 있도록 이 번호를 기억하십시오.
- 이름도 고유해야 합니다. 예: MYSTRATEGY1
결국, 코드에는 다음과 같이 작성해야 합니다:
MYSTRATEGY1 = 77, // MY STRATEGY
더 많은 전략을 추가하고 다음과 같이 작성할 수도 있습니다:
- MYSTRATEGY1 = 77, // MY STRATEGY a
- MYSTRATEGY2 = 78, // MY STRATEGY b
- MYSTRATEGY3 = 79, // MY STRATEGY c
MetaTrader 4 단계 2: 화면에 표시할 시그널 이름 지정하기
// 단계 2 ############################################## ######################
// 오픈 소스에서 전략을 프로그래밍하기 위한 이 코드 부분
// 오픈 소스에서 전략을 프로그래밍하기 위한 이 코드 부분
//
// 화면에 표시될 시그널 이름을 // 뒤에 입력하십시오
// 화면에 표시될 시그널 이름을 // 뒤에 입력하십시오
// ################################################ ####################
// 예:
// * if (i == 77) s1 = "Custom";
// ################################################ ###########################
이 단계는 EApadpro EA 패널에 전략 이름을 표시하기 위한 것입니다.
복잡한 것은 없습니다! 하지만 이전 단계의 번호를 사용해야 합니다.
예:
- if (i == 77) s1 = “My1”;
- if (i == 78) s1 = “My2”;
- if (i == 79) s1 = “My3”;
MetaTrader 4 단계 3: 필터 이름 지정하기
// 단계 3 ############################################## ######################
// 오픈 소스에서 전략을 프로그래밍하기 위한 이 코드 부분
// 오픈 소스에서 전략을 프로그래밍하기 위한 이 코드 부분
//
// // 뒤에 필터 이름을 입력하십시오
// // 뒤에 필터 이름을 입력하십시오
// ################################################ ####################
// 예:
// * FILTERCustom = 77, // 오픈 소스용 필터
// ################################################ ###########################
이 단계에서, 우리는 엑스퍼트 어드바이저의 가능한 필터 목록에 우리의 필터를 추가해야 합니다.
이는 엑스퍼트 어드바이저 설정 단계에서 필터를 편리하게 관리할 수 있게 해줍니다.
일반적으로 필터는 시그널과 동일한 인디케이터를 사용하며, 필터가 시그널의 현재 위치를 결정하고 시그널이 거래 행위를 확인한다는 조건이 있습니다.
예:
- 필터 이름을 MYFILTER로 하고 싶습니까?
- 필터 번호도 전략 번호와 일치해야 합니다 (이는 나중에 표준 인디케이터 번호와 혼동되는 것을 피하기 위함입니다). 필터는 표준 인디케이터를 위해 예약된 처음 22개 번호를 차지합니다! 나중에 참조할 수 있도록 이 번호를 기억하십시오.
- 이름도 고유해야 합니다. 예: MYFILTER1
결국, 코드에는 다음과 같이 작성해야 합니다:
MYFILTER1 = 77, // MY FILTER
더 많은 필터를 추가하고 다음과 같이 작성할 수도 있습니다:
- MYFILTER1 = 77, // MY FILTER a
- MYFILTER2 = 78, // MY FILTER b
- MYFILTER3 = 79, // MY FILTER c
MetaTrader 4 단계 4: 인디케이터 또는 전략 매개변수를 외부 변수에 지정하기
// 단계 4 ############################################## ######################
// 오픈 소스에서 전략을 프로그래밍하기 위한 이 코드 부분
// 오픈 소스에서 전략을 프로그래밍하기 위한 이 코드 부분
//
// 전략에서 사용할 인디케이터 또는 인디케이터의 모든 외부 변수를 지정합니다
// 전략에서 사용할 인디케이터 또는 인디케이터의 모든 외부 변수를 지정합니다
// ################################################ ####################
// 예:
// * input string IndicatorName = "-------- Custom Indicator ----------------";
// * input int CUSTOMMAFastPeriod = 1;
// * input int CUSTOMMASlowPeriod = 100;
// ################################################ ###########################
이 단계에서는 엑스퍼트 어드바이저에서 변경할 수 있는, 전략에서 사용되는 인디케이터의 모든 외부 설정을 입력해야 합니다. 이는 최적화에 유용합니다.
또한, 라인 교차 레벨, 차트의 MAX 및 MIN 가격에 기반한 인디케이터 작동 제한 등 전략의 특정 매개변수를 추출할 수 있습니다.
인디케이터의 모든 매개변수를 입력할 필요는 없습니다. 나중에 엑스퍼트 어드바이저 설정에서 변경하고 싶을 수 있는 것들만 포함하면 충분합니다. 다른 모든 매개변수에 대해서는 인디케이터를 기본 설정으로 둘 수 있습니다.

MetaTrader 4 단계 5, 6, 7: 휴식!
// 단계 5 ############################################## ######################
// 오픈 소스에서 전략을 프로그래밍하기 위한 이 코드 부분
// 오픈 소스에서 전략을 프로그래밍하기 위한 이 코드 부분
//
// 단계 5는 MT5 터미널에만 필요합니다. 따라서 이 단계에서는 휴식을 취하고 커피를 마실 수 있습니다
// 단계 5는 MT5 터미널에만 필요합니다. 따라서 이 단계에서는 휴식을 취하고 커피를 마실 수 있습니다
// ################################################ ###########################

// 단계 6 ############################################## ######################
// 오픈 소스에서 전략을 프로그래밍하기 위한 이 코드 부분
// 오픈 소스에서 전략을 프로그래밍하기 위한 이 코드 부분
//
// 단계 6은 MT5 터미널에만 필요합니다. 따라서 이 단계에서는 휴식을 취하고 간식을 먹을 수 있습니다
// 단계 6은 MT5 터미널에만 필요합니다. 따라서 이 단계에서는 휴식을 취하고 간식을 먹을 수 있습니다
// ################################################ ###########################

// 단계 7 ############################################## ######################
// 오픈 소스에서 전략을 프로그래밍하기 위한 이 코드 부분
// 오픈 소스에서 전략을 프로그래밍하기 위한 이 코드 부분
//
// 단계 7은 MT5 터미널에만 필요합니다. 운동 휴식을 취하십시오
// 단계 7은 MT5 터미널에만 필요합니다. 운동 휴식을 취하십시오
// ################################################ ###########################
참고: MetaTrader 4는 추가 작업을 위해 인디케이터를 메모리에 로드할 필요가 없습니다. MT4에서 인디케이터가 다시 호출되면 엑스퍼트 어드바이저는 동일한 핸들을 사용합니다.
MetaTrader 4 단계 8: 포지션 오픈을 위한 전략 및 시그널 생성
이 단계는 엑스퍼트 어드바이저에 매우 중요합니다. 다른 모든 단계가 필수적이긴 하지만, 이 단계 없이는 어드바이저가 작동하지 않습니다.
코드에 주석을 추가했습니다!
전략 번호는 이전 단계의 번호와 일치합니다!
- 전략 및 시그널 프로그래밍 코드는 개별적으로. 선택한 전략과 인디케이터에 따라 다릅니다. 전략 버퍼 설정…
- 이 블록에서는 어떤 전략이든 지정할 수 있습니다.
- 핸들에서 선언한 모든 인디케이터는 메모리에 로드되어 전략을 구축하는 데 사용됩니다.
이 단계는 2개의 하위 단계로 나눌 수 있습니다:
- 1. 전략 프로그래밍. 이 경우, 두 라인의 교차입니다.
- 중요: BUY(매수) 시그널은 1이고, SELL(매도)은 -1입니다.
- 2. 포지션이 열릴 때 로그에 표시될 정보를 기록합니다. 전략 정보
오류 메시지가 표시되면, 오류의 원인을 식별해야 합니다.
가장 일반적인 오류:
| ERR_INDICATOR_UNKNOWN_SYMBOL | 4801 | 알 수 없는 심볼 |
| ERR_INDICATOR_CANNOT_CREATE | 4802 | 인디케이터를 생성할 수 없습니다 |
| ERR_INDICATOR_NO_MEMORY | 4803 | 인디케이터를 추가할 메모리가 부족합니다 |
| ERR_INDICATOR_CANNOT_APPLY | 4804 | 인디케이터를 다른 인디케이터에 적용할 수 없습니다 |
| ERR_INDICATOR_CANNOT_ADD | 4805 | 인디케이터 추가 중 오류 |
| ERR_INDICATOR_DATA_NOT_FOUND | 4806 | 요청한 데이터를 찾을 수 없습니다 |
| ERR_INDICATOR_WRONG_HANDLE | 4807 | 잘못된 인디케이터 핸들 |
| ERR_INDICATOR_WRONG_PARAMETERS | 4808 | 인디케이터 생성 시 매개변수 개수가 잘못되었습니다 |
| ERR_INDICATOR_PARAMETERS_MISSING | 4809 | 인디케이터 생성 시 매개변수가 누락되었습니다 |
| ERR_INDICATOR_CUSTOM_NAME | 4810 | 배열의 첫 번째 매개변수는 사용자 정의 인디케이터의 이름이어야 합니다 |
| ERR_INDICATOR_PARAMETER_TYPE | 4811 | 인디케이터 생성 시 배열의 매개변수 유형이 잘못되었습니다 |
| ERR_INDICATOR_WRONG_INDEX | 4812 | 요청한 인디케이터 버퍼의 인덱스가 잘못되었습니다 |
MetaTrader 4 단계 9: 인디케이터에서 필터를 지정하거나 인디케이터를 전략의 필터로 사용하기
이 단계의 코드 프로그래밍에는 복잡한 것이 없으며, 이전 단계와 유사합니다.
유일한 차이점은 이 단계에서는 인디케이터를 필터로 프로그래밍한다는 것입니다.
인디케이터를 사용하여 시그널을 지정할 수는 없지만, 필터만 지정하거나 그 반대로 할 수 있습니다! 이는 모두 전략에 달려 있습니다.
MetaTrader 4 단계 10: 마지막 단계입니다!
// 단계 10 ############################################## ######################
// 오픈 소스에서 전략을 프로그래밍하기 위한 이 코드 부분
// 오픈 소스에서 전략을 프로그래밍하기 위한 이 코드 부분
//
// 이것으로 우리 코드는 끝입니다. 이 단계에 도달했다면 전략을 생성한 것입니다.
// 예를 들어, 비밀 전략을 입력했습니다. 모든 것을 올바르게 수행했다면 화면에 알림 형태로 결과를 받게 될 것입니다!
// 저희 제품을 선택해 주셔서 감사합니다. 저희는 당신을 위해 일합니다!
//
// 저희 웹사이트:
// 저희 스토어: /shop
// MQL5 스토어: https://www.mql5.com/users/vladon/seller
//
//
// 이것으로 우리 코드는 끝입니다. 이 단계에 도달했다면 전략을 생성한 것입니다.
// 예를 들어, 비밀 전략을 입력했습니다. 모든 것을 올바르게 수행했다면 화면에 알림 형태로 결과를 받게 될 것입니다!
// 저희 제품을 선택해 주셔서 감사합니다. 저희는 당신을 위해 일합니다!
//
// 저희 웹사이트:
// 저희 스토어: /shop
// MQL5 스토어: https://www.mql5.com/users/vladon/seller
// ################################################ ###########################
이 단계는 검색을 사용할 때 길을 잃지 않도록 만들어졌습니다.
이는 전략 프로그래밍이 완료되었음을 나타냅니다.
행운과 수익을 빕니다!
MetaTrader 4 결론 및 전략 확인
모든 것을 올바르게 수행하면 전략이 엑스퍼트 어드바이저에 통합되어 제 어드바이저를 사용하여 거래할 수 있습니다.
이제 어드바이저와 전략을 테스트해야 합니다.
- 터미널을 로드합니다;
- 데모 계좌를 엽니다;
- 엑스퍼트 어드바이저를 차트에 첨부합니다;
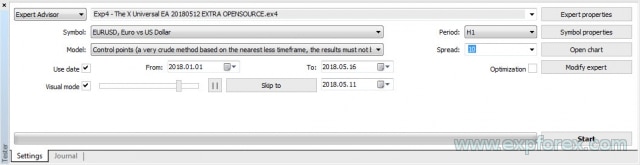
스트래티지 테스터에서 엑스퍼트 어드바이저 확인하기:
- 터미널을 엽니다;
- 스트래티지 테스터를 엽니다;
- 엑스퍼트 어드바이저, 통화 쌍, 타임프레임, 날짜 범위를 선택합니다. 실제 틱을 기반으로 한 모든 틱 테스트를 활성화합니다;
- 설정 탭을 엽니다;
- 전략을 선택합니다;
- 시각화를 활성화합니다;
- 시작을 누릅니다;
- 그래프가 열려야 합니다;
- 엑스퍼트 어드바이저가 포지션을 열면, 모든 것을 올바르게 수행한 것입니다!
엑스퍼트 어드바이저에서 또 무엇을 변경할 수 있나요?
물론, 전략을 개인화하고 어드바이저에 독특한 모습을 부여하고 싶을 수도 있습니다!
자유롭게 변경할 수 있는 매개변수:
 // 변경 1: 엑스퍼트 어드바이저 버전 // EA 버전
#define versionea "18.008"
// 변경 2: 어드바이저 로고 // EA 로고
#define BMPLOGO "Images\\dollar.bmp"
// 변경 3: 엑스퍼트 어드바이저 아이콘 // EA 아이콘
// #property icon "\\Images\\dollar.bmp"
// 변경 4: 차트의 엑스퍼트 어드바이저 이름 // 차트의 EA 이름
#define defEANAME "EXP-The X (OS)"
// 변경 5: 전체 지침 링크 // 전체 지침 링크
#define linkTOfull "www.expforex.com/ko/publ/4-1-0-166"
// 변경 6: 엑스퍼트 어드바이저 데모 버전. 데모 계정 또는 USDJPY 쌍의 라이브 계정에서만 작동합니다 // 어드바이저 데모 버전. 데모 계정 또는 USDJPY 쌍의 라이브 계정에서만 작동합니다
bool DEMO = false;
다른 모든 매개변수는 엑스퍼트 어드바이저의 기능을 방해할 수 있으므로 변경하지 않는 것이 좋습니다!
전략 디버깅
다음 단계는 The X를 테스트하고 최적화하여 최상의 설정을 찾는 것입니다.
또는 전략을 디버깅하고 업그레이드하십시오.
때로는 며칠 또는 몇 주가 걸립니다. 때로는 몇 달이 걸리기도 합니다.
Forex 시장 – 위험 알림! 이것은 매우 위험한 수익 창출 방법입니다. 전략을 개선하십시오.
행운과 수익을 빕니다!
전략 블록에 추가 정보 출력하기
이것은 우리 오픈 소스 코드의 선택적 기능입니다.
EAPADPRO 전략 블록에서 모든 매개변수의 모든 값을 출력할 수 있습니다.
1. 이를 위해 지역 변수를 생성합니다,
예: double EAPADPRO_StrategyValue1 = 0; double EAPADPRO_StrategyValue2 = 0;
2. 이 변수에 값을 할당합니다,
예를 들어, ATR 인디케이터의 값을 할당합니다 (double atr = iATR 라인 찾기):
EAPADPRO_StrategyValue1 = atr;
EAPADPRO_StrategyValue2 = atrma;
전체 필터 코드:
3. 다음으로, 변수 값을 정보 출력 블록에 추가합니다:
코드에서 CreateStrategy() 함수를 찾아 새 줄을 추가합니다:
ArrayAddStrategy("StrategyValue1", DoubleToString(EAPADPRO_StrategyValue1, 5), "", "");

ArrayAddStrategy("StrategyValue2", DoubleToString(EAPADPRO_StrategyValue2, 5), "", "");
함수의 첫 번째 매개변수는 변수의 이름입니다.
함수의 두 번째 매개변수는 편리한 형식의 변수 값입니다!
주의! 화면에 깔끔하게 표시되도록 짝수 개의 매개변수를 추가하십시오!
관련 게시물
Partial Close and Trailing. 롤백 시 부분 청산
Partial Close and Trailing은 롤백 중에 포지션의 일부(즉, 로트의 일부)를 청산하는 EA 어시스턴트입니다. 가격이 먼저 이익 방향으로 움직였다가 되돌아갈 때, EA는…

Duplicator – MetaTrader 터미널에서 거래/포지션 복제
Exp-Duplicator는 MetaTrader 계정에서 거래 및 포지션을 미리 설정된 횟수만큼 복제하도록 설계된 자동 전문가 고문(Expert Advisor)입니다. 수동으로 열리든 다른 EA에 의해 열리든…

Copylot – MetaTrader용 외환 거래 복사기. 터미널 간 복사기
MetaTrader용 트레이드 복사기. 모든 계정에서 외환 거래, 포지션, 주문을 복사합니다. COPYLOT MT4 버전에서 MT4-MT4, MT5-MT4 간 최고의 트레이드 복사기 중 하나입니다 (또는…
CLP CloseIfProfitorLoss. 트레일링 프로핏을 사용한 총 이익 또는 손실 관리.
Expert Advisor (EA)는 MetaTrader에서 포지션을 관리하고 종료하기 위한 고급 기능을 제공하며, 특히 사전에 설정된 총 이익 또는 손실 수준에 도달할…

VirtualTradePad(VTP) 트레이딩 패널. 차트와 키보드에서 원클릭 트레이딩을 위한 트레이드 패드
VirtualTradePad 또는 VTP – MetaTrader 터미널에서 원클릭으로 거래하기 위한 제어판. 외환에서 스캘핑과 수동 거래를 위한 프로그램입니다.. 차트와 키보드에서 원클릭 트레이딩을…

Market Time Pad. 거래 세션이 포함된 MetaTrader용 지표
타임 인디케이터는 주요 글로벌 시장의 현재 시간을 표시하고 활성 거래 세션을 강조합니다. 사용이 간편하며 차트에서 공간을 최소화하여 Expert Advisors…

The X – 표준 지표를 사용하는 Forex용 유니버설 전문가 어드바이저
MetaTrader용 광범위한 기능을 갖춘 유니버설 전문가 어드바이저 (EA) 전문가 어드바이저 The X는 MetaTrader용 다목적 트레이딩 도구로, 다양한 기능과 사용자…

MetaTrader용 InfoPad, 온라인 정보 패널
InfoPad는 MetaTrader 터미널에서 선택한 특정 통화 쌍에 대한 중요한 정보를 제공하도록 설계된 매우 유용한 정보 패널입니다. 이 패널은 현재 매수 및…

MQL 오픈 소스 템플릿. Expert Advisor 생성 템플릿
개요 어떤 지표 (indicator)를 사용하여 전략을 테스트하기 위한 Expert Advisors (EAs)를 만드는 것은 템플릿 (templates)과 오픈 소스 자원 (open-source resources)을 사용하여…
Averager. 거래 포지션 평균화. 추세에 반대하고 추세에 맞춰 거래 개시!
포지션 평균화. 일반적인 트레일링 스톱 기능을 사용하여 추세에 맞춰 및 추세에 반대하여 추가 포지션을 개설! 어드바이저는 추세에 맞춰 및…

EA The xCustomEA: 범용 거래 어드바이저. 맞춤형 전략 빌더
MetaTrader용 맞춤형 지표에 대한 범용 거래 어드바이저. Exp – The xCustomEA 범용 거래 어드바이저는 맞춤형 지표에서 작동합니다. The xCustomEA는 맞춤형 지표와…

X와 xCustomEA: 테스트 및 최적화
설명 The X과 The xCustomEA는 지난 5년 동안 Forex(포렉스) 거래 커뮤니티에서 두드러진 Expert Advisors (EAs)입니다. 이러한 도구들은 customize(커스터마이즈)하고자 하는 트레이더들을 위해…

Assistant – 실제/가상 스탑로스 / 테이크프로핏 / 트레일링 스탑을 지원하는
스탑로스, 테이크프로핏, 트레일링 스탑, 브레이크이븐 레벨 자동 설정, 가상 스탑 활성화. Exp Assistant는 포지션 유지 관리를 조직하는 데 도움을 줍니다. 이 전문가…

EAPadPRO – 전문가를 위한 정보 패널. 전문가 어드바이저용 대시보드
모든 어드바이저 및 MetaTrader 터미널용 유틸리티를 위한 정보 패널. 우리의 거래 전문가 어드바이저에서 EAPADPRO 패널을 관리하고 사용하는 기본 사항에…
이 게시물은 다음 언어로도 제공됩니다: