AI Sniper는 MT4 및 MT5 단말기를 위해 설계된 지능적이고 자기 최적화가 가능한 거래 로봇입니다. 스마트 알고리즘과 고급 거래 전략을 활용하여…

TickSniper MetaTrader용 자동 전문가 어드바이저. Tick 스캘퍼

Copylot – MetaTrader용 외환 거래 복사기. 터미널 간 복사기

홈
문서
설정
자주 묻는 질문
변경 기록
리뷰
댓글
Extra
xCustomEA 소개
MetaTrader의 맞춤형 지표를 위한 범용 트레이딩 어드바이저. 빌더 xCustomEA
MetaTrader 4 및 MetaTrader 5용 맞춤형 트레이딩 솔루션을 찾고 계신가요? Exp – The xCustomEA를 소개합니다. 이는 MT4 및 MT5의 iCustom 기능을 통해 맞춤형 지표와 원활하게 작동하는 범용 트레이딩 어드바이저입니다.
최신 트레이딩 어드바이저인 The xCustomEA는 입증된 The X – Universal EA의 기반 위에 구축되었으며, 주요 개선 사항으로 맞춤형 지표와의 완전한 통합을 통해 트레이더가 개인화된 트레이딩 전략을 자동화할 수 있는 기능을 제공합니다.
왜 The xCustomEA를 선택해야 하나요?
The xCustomEA는 널리 사용되는 어드바이저 The X의 모든 기능을 제공하지만, 추가로 어떤 맞춤형 지표와도 연결하고 거래할 수 있는 능력을 갖추고 있습니다. MQL5 마켓의 지표를 사용하든 인터넷에서 다운로드한 지표를 사용하든, xCustomEA는 MetaTrader 4 및 MetaTrader 5를 위한 맞춤형 트레이딩 전략을 설계하고 실행할 수 있는 힘을 제공합니다.
The xCustomEA는 어떻게 작동하나요?
- 맞춤형 지표와의 호환성. The xCustomEA는 온라인에서 사용 가능한 모든 맞춤형 지표 또는 MQL5 마켓을 통해 제공되는 지표와 통합되어, 지표 신호를 기반으로 완전 자동화된 거래를 가능하게 합니다. 이는 트레이딩 전략을 맞춤화하려는 트레이더에게 다용도 도구입니다.
- 간편한 전략 빌더. 선택한 지표의 이름과 그 지표의 화살표 및 신호 버퍼를 입력하기만 하면 xCustomEA가 나머지를 처리하여 지표에서 생성된 신호를 기반으로 거래를 자동화합니다.
- 고급 트레이딩 기능. 맞춤형 지표 외에도 xCustomEA는 트레이딩 전략을 강화하고 최적화하기 위한 다양한 내장 기능을 제공합니다. 거래 실행, 스톱 로스, 테이크 프로핏 등을 완전히 커스터마이즈할 수 있는 완전한 제어 권한을 가집니다.
The xCustomEA의 장점
- 모든 맞춤형 지표와 호환. MQL5 마켓에서 다운로드한 것이든 인터넷의 다른 소스에서 가져온 것이든, xCustomEA는 선택한 맞춤형 지표의 신호 버퍼를 읽고 이를 기반으로 거래합니다.
- 완전 자동화된 거래. xCustomEA를 사용하면 MetaTrader 4 및 MetaTrader 5 플랫폼 모두에서 전략을 자동화할 수 있어 거래가 정확하고 효율적으로 실행되도록 보장합니다.
- 완전한 전략 제어. xCustomEA의 포괄적인 기능 세트를 사용하여 리스크 관리 도구와 고급 트레이딩 로직을 포함한 트레이딩 전략을 쉽게 커스터마이즈할 수 있습니다.
- MetaTrader 4 및 MetaTrader 5 지원. MT4를 사용하든 MT5를 사용하든, xCustomEA는 원활한 호환성을 제공하여 트레이더에게 다양한 플랫폼 간의 유연성을 제공합니다.
The xCustomEA는 MetaTrader 4 및 MetaTrader 5와 함께 작동하는 맞춤형 트레이딩 어드바이저를 찾는 트레이더에게 완벽한 솔루션입니다. 어떤 맞춤형 지표든 연결하고 필요에 맞는 자동화된 전략을 생성하는 기능을 통해 트레이딩 잠재력을 극대화하세요.
xCustomEA는 어떻게 작동하나요?
사람들이 빌더 xCustomEA에 대해 무엇이라고 말하나요?
무료로 빌더 xCustomEA를 다운로드할 수 있습니다!
무료로 시작하세요!
저희 프로그램을 무료로 다운로드하고 설치할 수 있습니다!
그리고 DEMO 계정에서 시간 제한 없이 테스트할 수 있습니다!
또한 USDJPY 심볼을 사용하여 REAL 계정에서 무료로 프로그램을 테스트할 수도 있습니다!
빌더 xCustomEA의 전체 버전을 구매할 수 있습니다!

거래 계좌
컴퓨터 / 활성화
MT4 전체 버전
MetaTrader 4용
250 $
MT5 전체 버전
MetaTrader 5용
250 $
3개월 대여
MetaTrader 4용
60 $
3개월 대여
MetaTrader 5용
60 $
구매하기 전에 원활한 경험을 보장하기 위해 설명서와 FAQ 섹션을 검토하는 것을 강력히 권장합니다.
Links
유용한 링크
목차 (클릭하여 표시)
xCustomEA 설명
Exp – xCustomEA, 커스텀 지표 (iCustom)를 위한 보편적인 거래 자문가입니다.
iCustom과 함께 전략을 위한 포렉스 빌더입니다.
새로운 자문가인 The xCustomEA는 자문가 The X – Universal EA를 기반으로 합니다.
보편적인 거래 자문가인 The xCustomEA의 기능은 자문가 The X의 모든 매개변수를 정확히 복제하지만, 한 가지 주요 차이점이 있습니다:
The xCustomEA는 커스텀 지표 (iCustom)을 사용하여 작동하며, MT5 및 MT4 단말기 모두에서 거래 전략을 프로그래밍할 수 있습니다.
다시 말해, The xCustomEA는 인터넷 또는 mql5 시장에서 다운로드할 수 있는 커스텀 지표 (iCustom)와 연결되어 있습니다.
인터넷에서 제공되는 모든 커스텀 지표 (iCustom)!
서문
The X와 The xCustomEA의 차이점은 무엇인가요?
xCustomEA: 커스텀 지표 거래를 위한 유연한 솔루션
프리랜서 주문을 통해 전문가 어드바이저 (EAs)를 프로그래밍할 때, 요청의 90%가 지표를 중심으로 구축된 전략에 기반한다는 것을 알게 되었습니다. 이러한 수요를 충족시키기 위해, 초기 초점은 커스텀 지표를 어드바이저 작성 템플릿에 통합하는 것이었습니다.
하지만 템플릿 제작, 개발 시간, 오픈 소스 접근 제공 등의 시스템 구축 비용이 너무 높다는 것이 종종 문제였습니다. 많은 트레이더들은 특히 지표가 수익성이 없을 경우, 단일 커스텀 지표를 위한 어드바이저를 만드는 데 비용이 많이 든다고 느꼈습니다. 이러한 경우, 다른 지표를 기반으로 한 완전히 새로운 어드바이저를 만들어야 하여 반복적인 비용이 발생했습니다.
해결책: xCustomEA – 범용 거래 어드바이저
이 문제를 해결하기 위해, 우리는 xCustomEA를 개발했습니다. 이 범용 거래 어드바이저는 커스텀 지표와 함께 작동하며, 사용자가 선택한 모든 지표의 신호를 기반으로 거래를 완전히 커스터마이즈할 수 있습니다.
기존의 어드바이저와 달리, xCustomEA는 사전 설정된 전략을 제공하지 않습니다. 대신, 다음과 같은 기능을 제공합니다:
- 자신의 커스텀 지표를 프로그래밍하고, 그 신호를 기반으로 거래를 자동화합니다.
- xCustomEA를 사용하여 선택한 지표의 신호에 따라 포지션을 개시할 수 있으므로, 다양한 전략을 테스트하고 사용하는 트레이더에게 다용도 도구가 됩니다.
xCustomEA의 장점
xCustomEA를 구매함으로써, 다음과 같은 유연성을 얻을 수 있습니다:
- 매일 새로운 지표에 대한 전문가 어드바이저 (EAs)를 프로그래밍하고 수정할 수 있으며, 각 새로운 전략마다 개발자를 고용할 필요가 없습니다.
- 모든 커스텀 지표마다 새로운 EA를 만드는 데 드는 높은 비용을 피할 수 있습니다.
- xCustomEA는 어떤 지표와도 호환될 수 있어, 시간과 비용을 절약할 수 있습니다.
xCustomEA를 사용하면, 어떤 커스텀 지표의 신호를 기반으로 거래할 수 있어 MetaTrader 4 (MT4) 및 MetaTrader 5 (MT5)에서 전략을 테스트하고 수정하며 쉽게 조정할 수 있는 완전한 제어권을 가질 수 있습니다. 이는 단일 범용 어드바이저로 다양한 거래 시스템을 테스트하고, 다듬고, 적응시키려는 트레이더에게 이상적인 솔루션입니다.

주의: 전략 테스터에서 전문가 고문(EA)을 테스트하기 위해 지표를 구매할 필요가 없습니다.
전략 테스터에서 지표를 다운로드하여 이 지표로 우리 자문가를 테스트할 수 있습니다.
전략 테스터에서 수익성 있는 결과를 얻은 후에야 커스텀 지표를 구매하고 이 지표로 실제 또는 데모 계정에서 자문가를 실행할 수 있습니다!
Article: 최적화 및 테스트! 자문가 설정 검색!
The X와 xCustomEA의 차이점은 무엇인가요?
The X와 xCustomEA: 두 개의 어드바이저, 하나의 강력한 기반
두 The X와 The xCustomEA는 동일한 강력한 MQL 코드에 기반을 두고 있으며, 많은 동일한 기능을 공유하여 신뢰할 수 있고 유연한 거래 솔루션을 제공합니다. 그러나 지표에 대한 접근 방식이 다르므로 표준 전략과 커스텀 전략 중에서 선택할 수 있습니다.
The X – 범용 EA
- The X는 MetaTrader 4 (MT4) 및 MetaTrader 5 (MT5) 터미널에서 사용할 수 있는 표준 지표와 함께 작동하도록 설계된 범용 거래 어드바이저입니다.
- 이 어드바이저는 이동 평균 (Moving Averages), MACD, RSI, 볼린저 밴드 (Bollinger Bands) 등과 같은 표준 지표를 기반으로 약 20개의 내장 거래 전략을 제공합니다. 지표 및 필터 목록
- MetaTrader 플랫폼에 사전 설치된 익숙하고 신뢰할 수 있는 지표를 사용하는 것을 선호하는 트레이더에게 이상적입니다.
xCustomEA – 커스텀 지표를 위한 범용 어드바이저
- xCustomEA는 The X의 기반 위에 구축되었지만, 커스텀 지표와 함께 작동하도록 설계되었습니다. 이를 통해 트레이더는 인터넷이나 mql5 마켓에서 선택한 어떤 지표든 구현할 수 있는 유연성을 제공합니다.
- 커스텀 지표 호환성 외에도, xCustomEA는 The X의 20개의 표준 전략을 포함하고 있어, 표준 지표를 사용하는 사전 구축된 전략과 자신의 지표로 커스터마이즈할 수 있는 옵션을 모두 제공합니다.
- 이로 인해, 커스텀 지표를 사용하여 거래 전략을 개인화하면서도 입증된 전략에 접근할 수 있는 트레이더에게 xCustomEA는 완벽한 솔루션이 됩니다.
- The xCustomEA 최신 버전: 이동 평균 (Moving Averages), MACD, RSI, 볼린저 밴드 (Bollinger Bands) 등과 같은 표준 지표를 기반으로 약 20개의 내장 거래 전략을 제공합니다. 지표 및 필터 목록
The X 또는 xCustomEA를 선택하든, 두 어드바이저 모두 MetaTrader 4 (MT4) 및 MetaTrader 5 (MT5)에서 강력하고 커스터마이징 가능한 거래 전략을 제공합니다.
xCustomEA의 장점
- The xCustomEA: 내장된 전략 없는 맞춤형 거래
- 기존의 거래 어드바이저와 달리, The xCustomEA는 내장된 전략을 제공하지 않습니다. 대신, MetaTrader 4 (MT4) 및 MetaTrader 5 (MT5)용 커스텀 지표를 구현할 수 있는 유연성을 제공하여 거래 시스템을 완전히 제어할 수 있습니다.
- 커스텀 지표 통합
- xCustomEA를 사용하면, 화살표와 같은 신호를 제공하는 모든 커스텀 지표를 선택하고 해당 신호를 기반으로 직접 거래할 수 있습니다. 이를 통해 인터넷이나 mql5 마켓에서 제공되는 커스텀 지표를 통합하여 거래를 특정 요구에 맞게 조정할 수 있습니다.
- 자신의 거래 전략 생성 및 프로그래밍
- xCustomEA는 자신의 전략을 만들고자 하는 트레이더를 위해 설계되었습니다. 온라인에서 찾은 어떤 지표를 기반으로든 커스텀 거래 전략을 프로그래밍할 수 있어, 거래 스타일에 맞는 시스템을 구축할 수 있는 무한한 옵션을 제공합니다.
- 준비된 전략 접근
- 자신의 전략을 프로그래밍하는 것 외에도, xCustomEA와 호환되는 준비된 전략을 다운로드할 수 있습니다. 이 사전 프로그래밍된 전략 목록은 정기적으로 업데이트되어 새로운 아이디어와 기법을 쉽게 통합할 수 있습니다.
- The X 전략 활용
- 이미 The X – 범용 EA의 전략을 사용하고 계신가요? The X 전략의 모든 신호를 가져와 자신의 커스텀 수정을 적용할 수 있습니다. 이는 친숙하고 검증된 전략을 사용하면서도 접근 방식을 더욱 정교하게 다듬을 수 있는 유연성을 제공합니다.
The X의 설명서에는 모든 기본 매개변수와 기능에 대한 자세한 설명이 제공됩니다. xCustomEA 매개변수 설명
신호 및 필터 정의
신호
- 신호 – 신호에 대한 모든 조건이 충족될 때 발생하며, 예를 들어 이동 평균선의 교차 또는 ZigZag에서 새로운 점의 출현 등이 있습니다.
- 신호 – 신호 수신 순간에 나타나는 것으로, 바에 고정됩니다. 어드바이저는 신호가 발생했음을 인식합니다.
- 예시: 불이 켜집니다. 이는 불이 켜진 순간이기 때문에 신호입니다. 불이 켜지면 사람이 깨어납니다. 이것이 신호입니다.
- 포지션 개시는 신호가 발생한 후에 이루어집니다. 선이 교차한 후에 포지션이 개시됩니다. 선이 이전에 교차했다면, 이는 신호가 아닙니다. 신호가 지나갔습니다.
- The X의 20개의 표준 전략 추가 지표 및 필터 목록
필터
- 필터 – 지표의 현재 위치, 예를 들어 MA 선들의 현재 위치 상대적 위치나 ZigZag의 현재 마지막 정점과 같은 것들입니다.
- 필터는 지표가 현재 표시하고 있는 것입니다. 이는 신호가 아니며, 지표의 현재 위치입니다.
- 예시: 불이 켜져 있습니다. 이는 불이 이미 켜져 있고 현재 켜져 있기 때문에 필터입니다. 불이 켜져 있으면 사람은 더 이상 잠들어 있지 않습니다. 이것이 필터입니다.
- 지표의 현재 값이 신호를 필터링합니다.
- 빠른 MA가 느린 MA 위에 있는 경우, 이는 BUY 주문만 개시해야 한다는 필터입니다.
- The X의 20개의 표준 전략 추가 지표 및 필터 목록
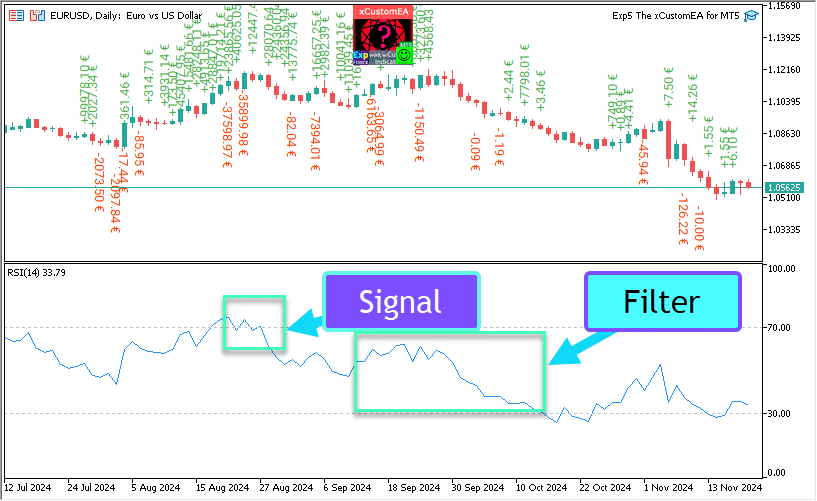
신호 및 필터에 커스텀 지표 쉽게 설치하기
전문가 고문의 세 가지 유형이 있습니다:
xCustomEA 자문가는 당신이 전략을 프로그래밍하는 우리 지표와 함께 작동합니다.
자문가를 지표와 함께 작동하도록 프로그래밍해야 하는 경우, 다음 섹션으로 진행하세요: 당신의 전략을 프로그래밍하기.
xArrow:
xArrow – EA는 EA가 사용할 수 있는 화살표 유형 버퍼가 있는 커스텀 지표와 직접 작동합니다.
예를 들어, BUY 신호가 있는 지표 버퍼와 SELL 신호가 있는 지표 버퍼가 있습니다.
이러한 버퍼는 화살표 유형이어야 합니다.
우리의 전문가 고문은 유형별로 신호를 결정합니다: 버퍼 값은 0보다 커야 하며 빈 값과 같아서는 안 됩니다.
// — 조건을 확인하고 sig 값을 설정합니다
if (xCustom_SIGNAL_BUY_buffer[OWNSIGNAL_shift] != EMPTY_VALUE && xCustom_SIGNAL_BUY_buffer[OWNSIGNAL_shift] > 0) sig = 1;
else if (xCustom_SIGNAL_SELL_buffer[OWNSIGNAL_shift] != EMPTY_VALUE && xCustom_SIGNAL_SELL_buffer[OWNSIGNAL_shift] > 0) sig = -1;
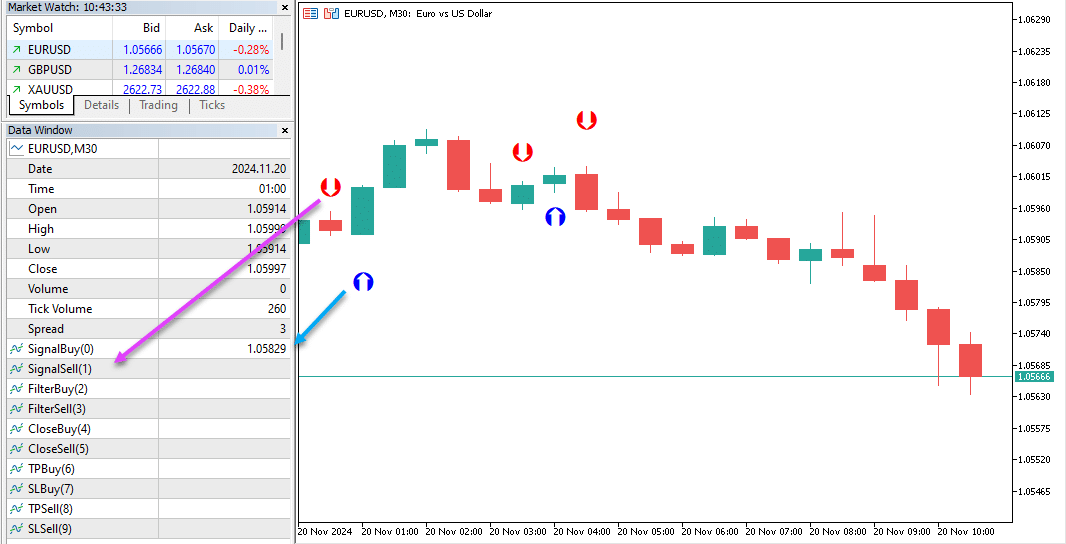
화살표를 그리기 위한 지표의 코드 예제:
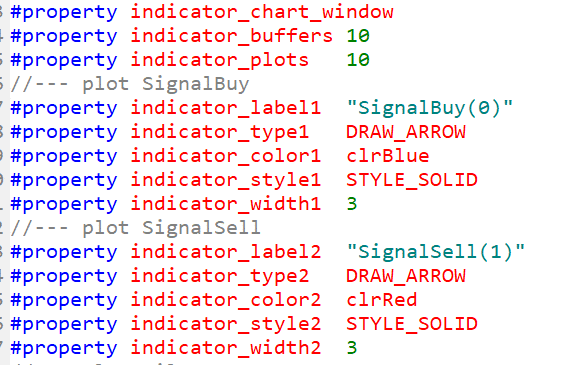
xColorArrow:
지표 신호 유형 (xColorArrow with 1 Buffer and 2 Colors), 신호 화살표에 두 가지 다른 색상이 있는 경우 (DRAW_COLOR_ARROW).
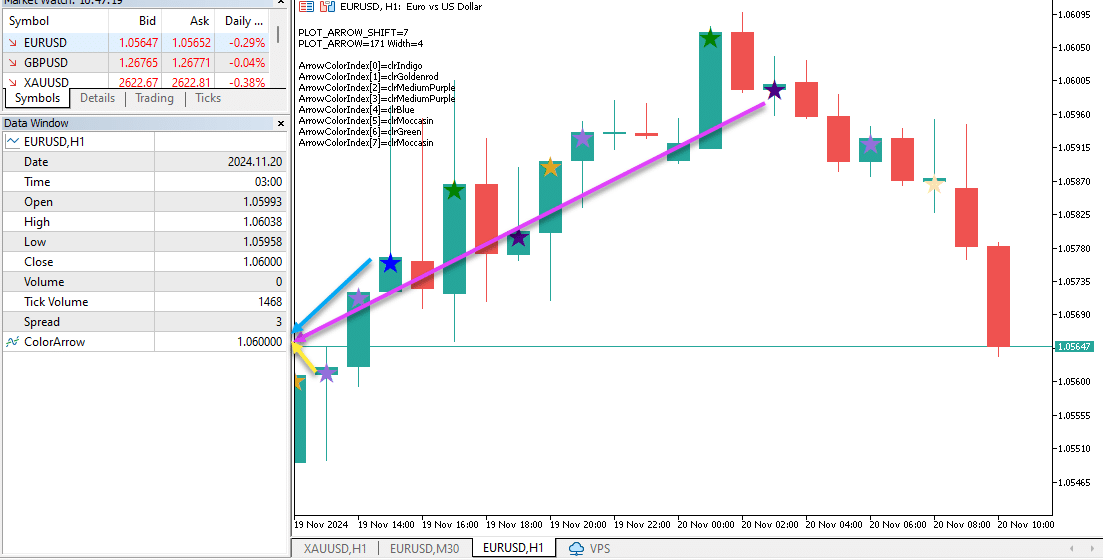
색상 화살표를 그리기 위한 지표의 코드 예제:

지표 목록:
표준 지표의 신호를 사용할 수 있습니다! 표준 지표의 신호 전략은 The X 자문가 전문가에서 추가됩니다.
- NoSignal=100, // 포지션을 개설할 신호 없음
- MA=101, // 이동 평균
- MACD=102, // 이동 평균 수렴/발산 (MACD)
- STOCH=103, // 스토캐스틱 오실레이터
- RSI=104, // 상대 강도 지수 (RSI)
- CCI=105, // 상품 채널 지수 (CCI)
- WPR=106, // 윌리엄스 퍼센트 범위 (WPR)
- BB=107, // 볼린저 밴드
- Envelopes=108, // 엔벨로프
- Alligator=109, // 앨리게이터
- OsMA=110, // 오실레이터의 이동 평균 (OsMA)
- AO=111, // 어썸 오실레이터 (AO)
- ISH=112, // 이치모쿠
- AC=113, // AC
- BAR=114, // 바 베어/불
- ADX=115, // 평균 방향 지수 (ADX)
- ZigZag=117, // 지그재그
- MFI=120, // 머니 플로우 지수 (MFI)
- Fractals=121, // 프랙탈
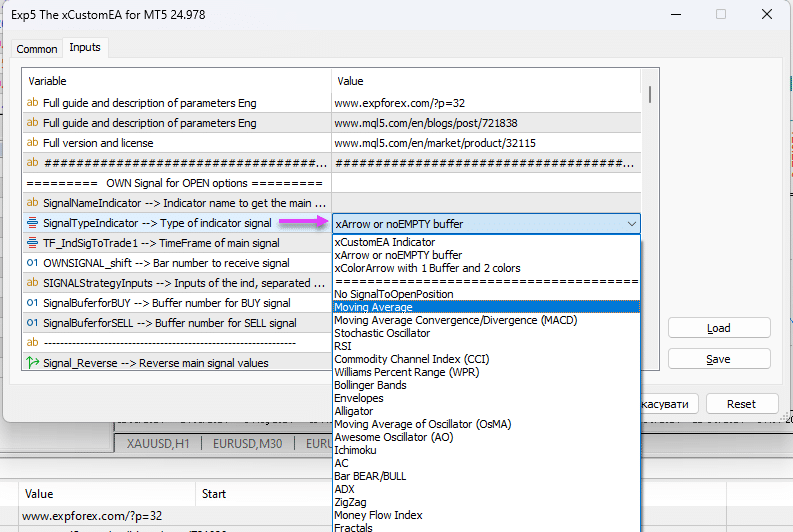
우리 xCustomEA의 입력에 iCustom 지표를 쉽게 설치하기
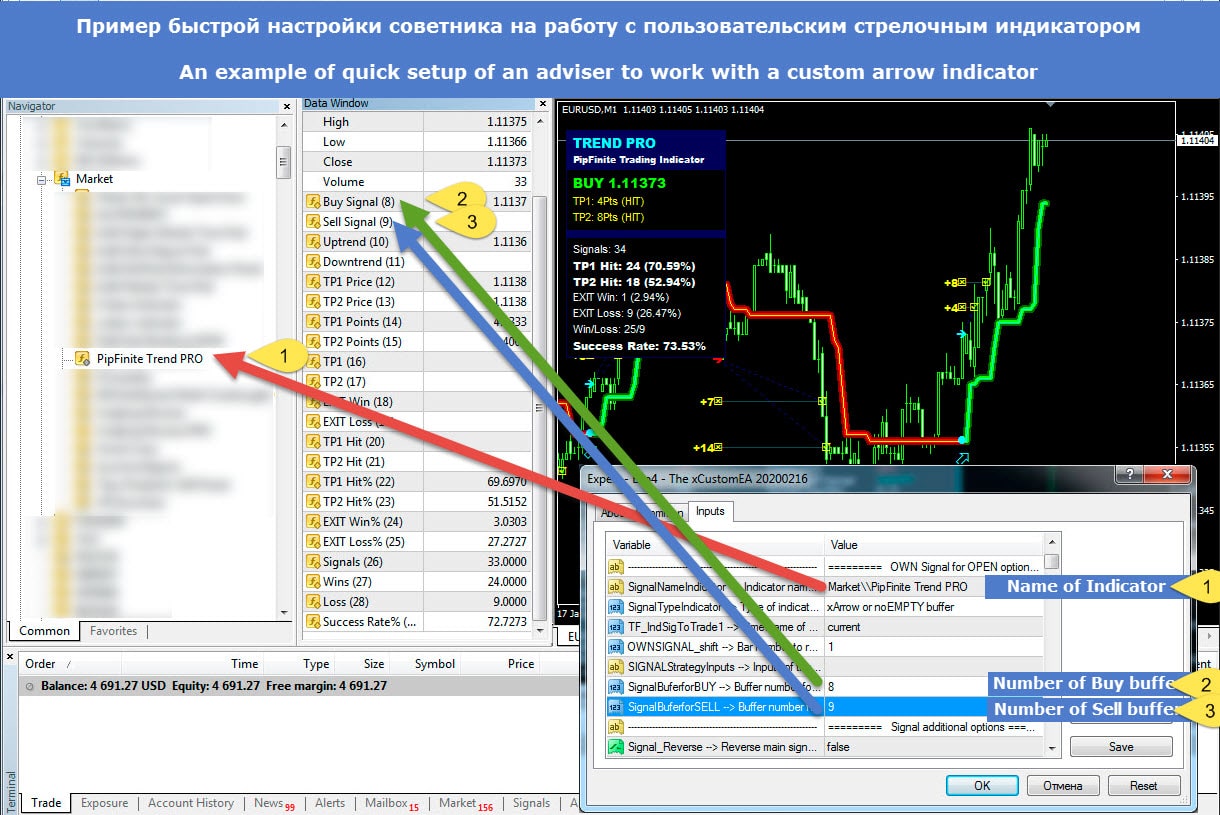
전략을 프로그래밍하고 싶지 않고 커스텀 지표가 자문가와 직접 작동할 수 있게 한다면, 지표의 이름을 지정하고 BUY 및 SELL 신호 작업을 위한 버퍼를 설정할 수 있습니다.
예를 들어:
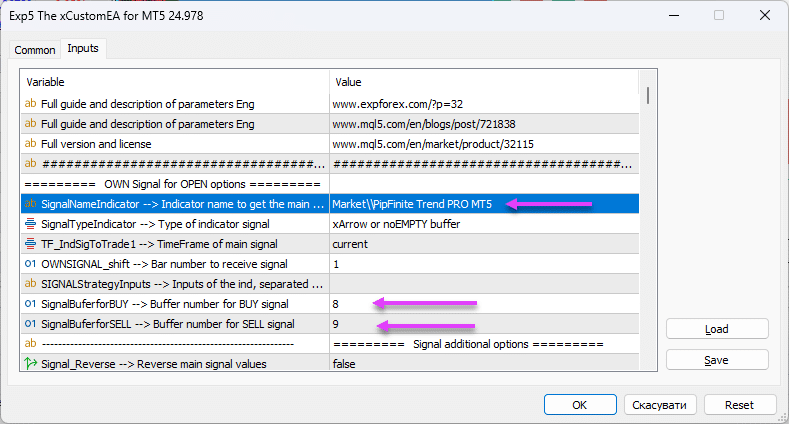
1. 커스텀 지표의 이름을 작성하세요! 이 지표가 MQL5 시장에서 다운로드된 경우, Market 폴더의 경로를 지정해야 합니다:
Market\\PipFinite Trend PRO MT5반드시 이중 백슬래시 \\를 사용하세요
2. xArrow 신호 유형을 지정하세요.
3. BUY를 개설하기 위한 신호 버퍼 수를 지정하세요 (이 예에서는 버퍼 번호 8).
4. SELL을 개설하기 위한 신호 버퍼 수를 지정하세요 (이 예에서는 버퍼 번호 9).
버퍼 번호 찾는 방법

따라서, 자문가가 작동하기 위해 지표를 프로그래밍할 필요가 없습니다.
커스텀 지표의 예제는 자문가의 작업을 위한 버퍼를 포함하고 있으며, 이를 직접 사용할 수 있습니다!
우리 섹션인 The xCustomEA 전략 예제에서는 시장에서 알려진 지표를 사용하여 전략과 자문가를 프로그래밍하는 예제를 게시할 것입니다!
예제: Pipfinite Trend Pro + xCustomEA

지표 템플릿 파일
자문가와의 사용 편의를 위해:
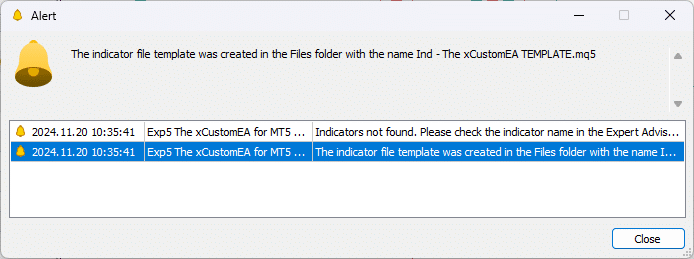
자문가를 처음 시작할 때, 터미널의 Files 폴더에 지표 템플릿 파일이 생성됩니다.
이 파일은 지표 전략을 작성하기 위한 템플릿으로 사용할 수 있습니다.
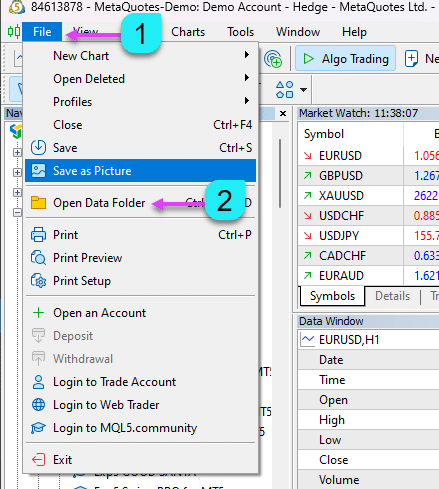
파일을 찾으려면 터미널 메뉴에서 파일 → 데이터 폴더 열기를 클릭하세요.
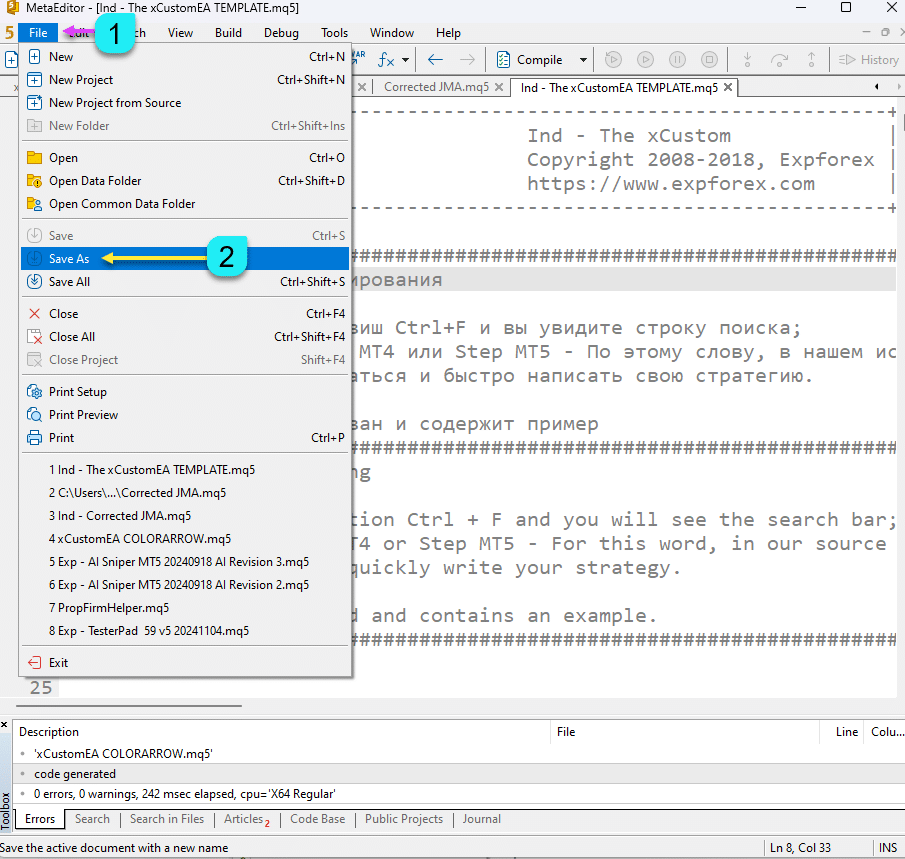
이 파일을 MQL 편집기로 엽니다.

파일에서 전략을 사용하고 프로그래밍하는 방법에 대한 예제를 볼 수 있습니다.
지표 전략을 만든 후, 이 파일을 터미널의 Indicators/ 폴더에 저장하세요.

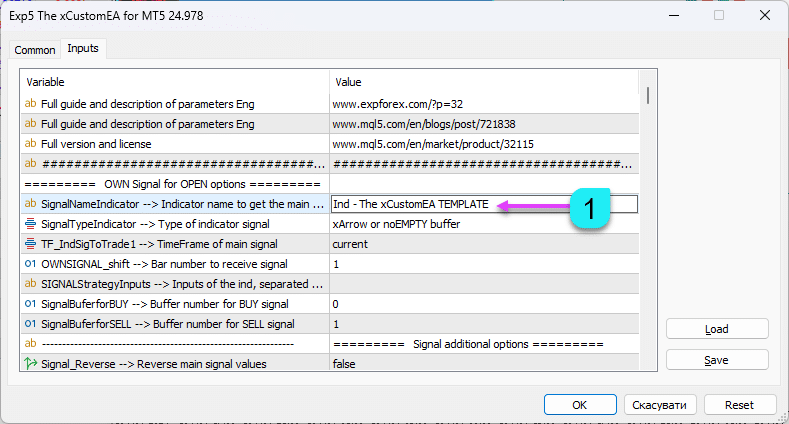
그런 다음, SignalNameIndicator 자문가의 설정에서 이 파일을 지정하세요.
xCustomEA로 전략 프로그래밍하기
전략을 작성하려면 기본 프로그래밍 규칙을 알아야 합니다.
또는 기존 파일의 지표(예: 인터넷에서 가져온 지표)를 사용하여 준비된 전략을 추가할 수 있습니다.
MetaTrader 5 (MT5)용 고문 프로그래밍은 MetaTrader 4 (MT4)용 프로그래밍보다 더 복잡합니다.
그러나 MT5 터미널은 더 강력한 전략을 만들 수 있게 해주며, 더 고급화된 전략 테스터도 갖추고 있습니다.


프로그래밍을 쉽게 하기 위해
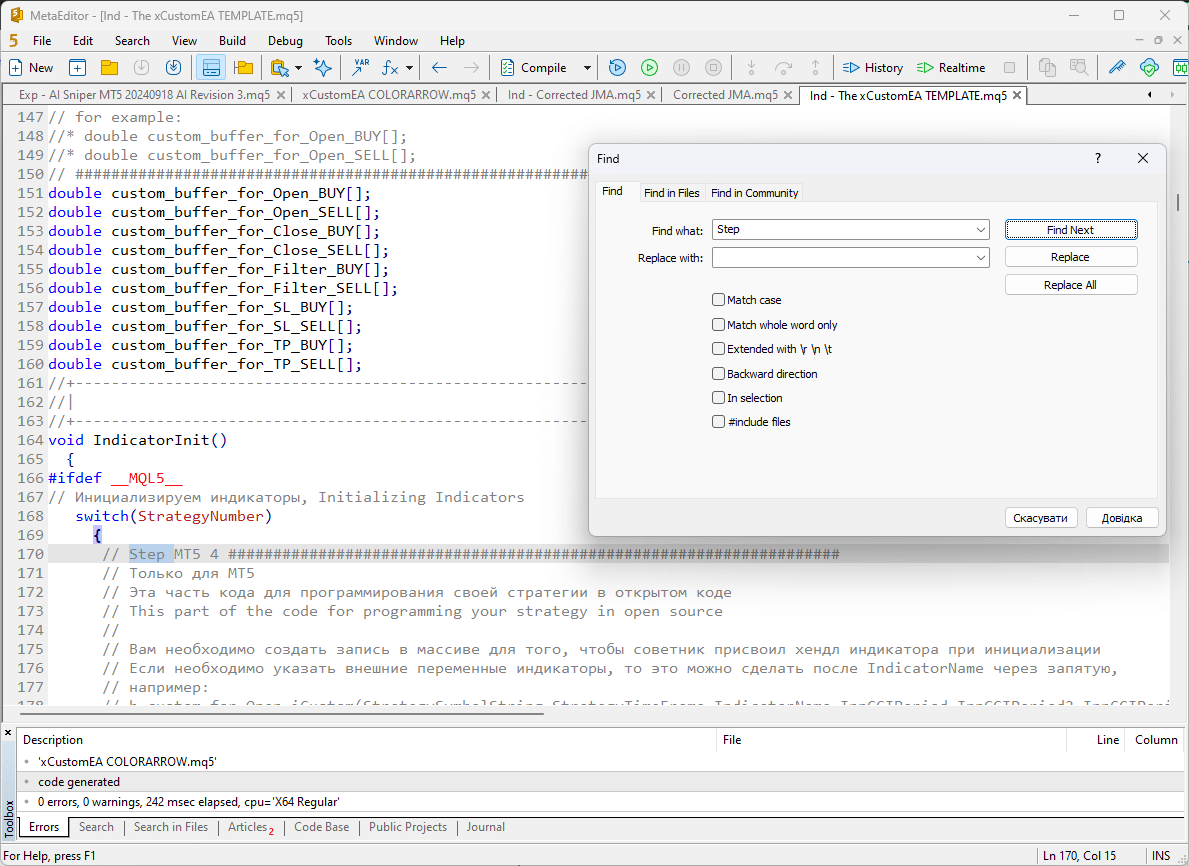
- 우리의 지표 소스 코드 Ind – The xCustomEA 또는 Ind – The xCustomEA Example TheX을 엽니다.
- 검색 창을 열기 위해 Ctrl + F 키 조합을 누릅니다.
- 이름 Step을 입력합니다 – 소스 코드에서 이 키워드를 기반으로 전략을 탐색하고 신속하게 작성할 수 있습니다.
- 각 단계는 주석이 달려 있으며 예제를 포함하고 있습니다.
- 전략을 프로그래밍하는 방법을 배우기 위해, 별표가 표시된 줄 // *을 점진적으로 주석 해제할 수 있습니다.
각 단계를 자세히 분석할 것입니다!
MetaTrader 4: MT4에서 사용자 정의 지표를 사용하여 전략 프로그래밍하기
MT4에서 사용자 정의 지표로 고문을 프로그래밍하는 것은 네 단계로 구성됩니다:
MetaTrader 4 단계 1: 리소스에 지표 로드하기
// 단계
// 이 코드 부분은 오픈 소스에서 전략을 프로그래밍하기 위한 것입니다
//
// 컴파일 중에 고문에 지표를 포함하려면 고문의 리소스에 로드해야 합니다
// 예를 들어:
// * #resource "IndicatorsMACD.ex4"
여기서는 필요한 지표를 리소스에 추가해야 합니다.
이를 통해 시장용 고문을 컴파일할 수 있으며, 컴파일된 고문이 다른 컴퓨터에서 지표를 찾지 못하는 문제를 방지할 수 있습니다.
지표 이름 작성 규칙: Indicators로 시작하는 전체 경로를 사용하세요!
폴더는
예를 들어:
지표의 경로가 다음과 같다면:
C:\ROBO\MT4\MQL4\Indicators\Examples\MACD.ex4
프로그래밍 언어에서 이 지표의 경로는 다음과 같이 작성됩니다:
Indicators\Examples\MACD.ex4
MetaTrader 4 단계 2: 포지션 개시를 위한 전략 및 신호 생성하기
// 단계
// 이 코드 부분은 오픈 소스에서 전략을 프로그래밍하기 위한 것입니다
//
// 여기서는 데이터 버퍼를 채워 포지션 개시를 위한 신호를 생성합니다
//
// 예를 들어:
// * if (sigInd == 1)
// * {
//
// 데이터 채우기
//
// * double CustomMain = iCustom(StrategySymbol, StrategyTimeFrame, "::IndicatorsMACD", periodma1, periodma2, 9, MAprice,
// * MODE_MAIN, StartCopyI + ShiftIndicator);
// * double CustomSig = iCustom(StrategySymbol, StrategyTimeFrame, "::IndicatorsMACD", periodma1, periodma2, 9, MAprice,
// * MODE_SIGNAL, StartCopyI + ShiftIndicator + 1);
//
// 여기서는 전략을 작성합니다. 이 예에서는 두 선의 교차입니다.
//
// * if (CustomMain > CustomSig && CustomMain2 < CustomSig2)
// *   sig = 1;
// * if (CustomMain < CustomSig && CustomMain2 > CustomSig2)
// *   sig = -1; //
//
// 신호에서 포지션을 개시할 때 로그에 표시될 데이터를 작성합니다.
//
// * InfoAboutSignal = "InfoAboutSignal sigInd =" + (string)sigInd + " sig =" + (string)sig
// * + " CustomMain =" + CustomMain
// * + " CustomSig =" + CustomSig
// * + " CustomMain2 =" + CustomMain2
// * + " CustomSig2 =" + CustomSig2
// *;
//
// --- 거래 신호 반환
// * return sig;
// *}
이 단계는 고문에게 매우 중요합니다. 다른 모든 단계가 필요하지만, 이 단계가 없으면 고문이 제대로 작동하지 않습니다.
코드에 주석을 추가하여 안내했습니다!
- 전략 및 신호 코드를 개별적으로 프로그래밍합니다. 이는 선택한 전략과 지표에 따라 다릅니다.
- 전략 버퍼를 가져옵니다.
- 이 블록에서는 어떤 전략이든 지정할 수 있습니다.
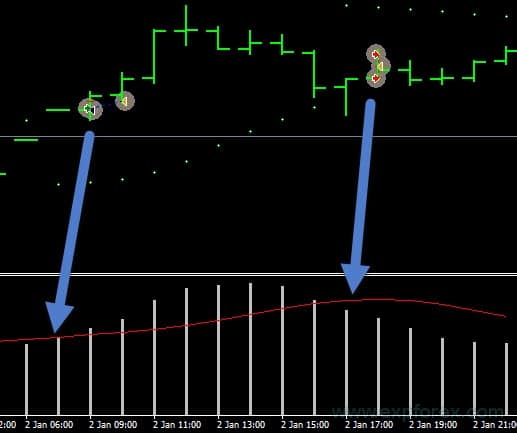
- 전략 프로그래밍, 예를 들어 두 선의 교차.
- 중요: BUY 신호는 1이고, SELL 신호는 -1입니다.
우리 포럼에 전략 예제를 게시할 것입니다!
MetaTrader 4 단계 3: 지표에서 필터 지정 또는 전략 필터로 지표 사용하기
// 단계
// 이 코드 부분은 오픈 소스에서 전략을 프로그래밍하기 위한 것입니다
//
// 여기서는 데이터 버퍼를 채워 신호를 필터링할 필터를 생성합니다
//
// 예를 들어:
// * if (sigInd == 1)
// * {
//
// 데이터 채우기
//
// * double CustomMain = iCustom(StrategySymbol, StrategyTimeFrame, "::IndicatorsMACD", periodma1, periodma2, 9, MAprice,
// * MODE_MAIN, shift);
// * double CustomSig = iCustom(StrategySymbol, StrategyTimeFrame, "::IndicatorsMACD", periodma1, periodma2, 9, MAprice,
// * MODE_SIGNAL, shift);
//
// 여기서는 전략을 작성합니다. 이 예에서는 두 선의 교차입니다.
//
// * if (CustomMain > CustomSig)
// *   sig = 1;
// * if (CustomMain < CustomSig)
// *   sig = -1; //
//
// 신호에서 포지션을 개시할 때 로그에 표시될 데이터를 작성합니다.
//
// * InfoAboutSignal = "InfoAboutSignal sigInd =" + (string)sigInd + " sig =" + (string)sig
// * + " CustomMain =" + CustomMain
// * + " CustomSig =" + CustomSig
// *;
//
// --- 거래 신호 반환
// * return sig;
// *}
이 단계에서 코드를 프로그래밍하는 것은 이전 단계와 유사하며 간단합니다.
유일한 차이점은 이 단계에서는 지표를 필터로 프로그래밍하고 있다는 것입니다.
지표에서 신호를 지정하고 동시에 필터로 사용할 수 없습니다. 이는 전략에 따라 다릅니다.
MetaTrader 5: MT5에서 사용자 정의 지표로 전략 프로그래밍하기
MetaTrader 5 단계 1: 리소스에 지표 로드하기
// 단계
// 이 코드 부분은 오픈 소스에서 전략을 프로그래밍하기 위한 것입니다
//
// 컴파일 중에 고문에 지표를 포함하려면 고문의 리소스에 로드해야 합니다
// 예를 들어:
// * #resource "IndicatorsExamplesMACD.ex5"
여기서는 필요한 지표를 리소스에 추가해야 합니다.
이를 통해 시장용 고문을 컴파일할 수 있으며, 컴파일된 고문이 다른 컴퓨터에서 지표를 찾지 못하는 문제를 방지할 수 있습니다.
지표 이름 작성 규칙: Indicators로 시작하는 전체 경로를 사용하세요!
폴더는
예를 들어:
지표의 경로가 다음과 같다면:
C:\ROBO\MT5\MQL5\Indicators\Examples\MACD.ex5
프로그래밍 언어에서 이 지표의 경로는 다음과 같이 작성됩니다:
Indicators\Examples\MACD.ex5
MetaTrader 5 단계 2: 전략 지표 핸들을 저장할 변수 선언하기
// 단계
// 이 코드 부분은 오픈 소스에서 전략을 프로그래밍하기 위한 것입니다
//
// 핸들을 처리할 배열 변수를 선언합니다
//
// 예를 들어:
// * int h_custom;
// * int h_custom2;
여기서는 위에서 생성된 핸들의 이름을 지정합니다!
여기에는 복잡한 것이 없습니다.
핸들은 고문에서 다중 통화 사용과 동시에 최대 여섯 개의 신호 또는 필터를 지정할 수 있도록 배열로 생성됩니다!
MetaTrader 5 단계 3: 지표 데이터를 저장할 변수 선언하기
// 단계 ###
// 이 코드 부분은 오픈 소스에서 전략을 프로그래밍하기 위한 것입니다
//
// 지표 값을 저장할 배열 변수를 선언합니다
//
// 예를 들어:
// * double custom1_buffer[];
// * double custom2_buffer[];
여기서는 데이터 버퍼의 이름을 지정합니다!
여기에는 복잡한 것이 없습니다.
각 바의 지표 값은 이러한 배열에 저장됩니다. 여러 버퍼를 사용해야 하는 경우 여러 변수를 생성할 수 있습니다.
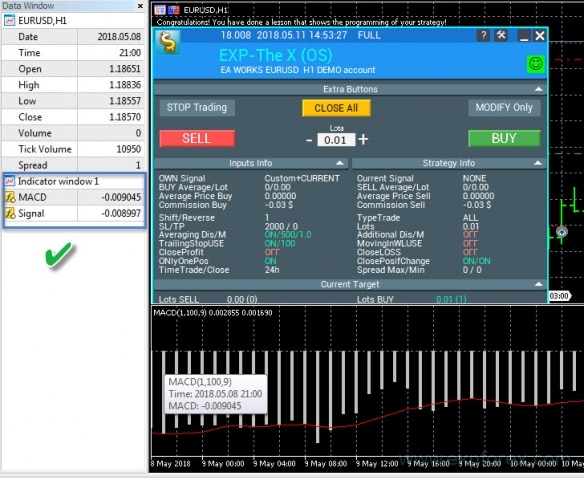
예를 들어, MACD 지표의 신호선과 메인 선을 위해 두 개의 버퍼가 필요합니다.
MetaTrader 5 단계 4: 고문에 다운로드할 지표 핸들 생성하기
// 단계 4
// 이 코드 부분은 오픈 소스에서 전략을 프로그래밍하기 위한 것입니다
//
// 고문이 초기화 중에 지표의 핸들을 할당할 수 있도록 배열에 레코드를 생성합니다
//
// 예를 들어:
// * case 1: h_custom = iCustom(StrategySymbolString, StrategyTimeFrame, "::IndicatorsExamplesMoving AverageMoving Average", MAFastPeriod, MAmethod, MAprice);
// * h_custom2 = iCustom(StrategySymbolString, StrategyTimeFrame, "::IndicatorsExamplesMoving AverageMoving Average", MASlowPeriod, MAmethod, MAprice);
// * if (h_custom == INVALID_HANDLE)
// * {
// *   Print("이동 평균 지표의 핸들을 가져오지 못했습니다");
// *   return(INIT_FAILED);
// * }
// * if (h_custom2 == INVALID_HANDLE)
// * {
// *   Print("이동 평균 지표의 핸들을 가져오지 못했습니다");
// *   return(INIT_FAILED);
// * }
// * break;
이 단계는 고문의 초기화 중에 지표를 한 번 로드하도록 하기 위해 필요합니다. MetaTrader 5에서는 차트에 지표를 지속적으로 로드할 필요가 없습니다.
핸들을 생성할 때 이미 열려 있는 지표의 핸들을 참조하고 이를 추가 작업에 사용합니다.
여기서 매우 주의해야 합니다. 핸들을 생성할 때 지표의 모든 외부 변수를 지정하고 올바른 이름을 사용해야 합니다. 그렇지 않으면 고문이 지표를 로드할 수 없습니다.
지표를 고문의 리소스에 업로드했다는 것을 기억하세요. 따라서 리소스에서 지표를 호출할 것입니다!
이 코드를 작성하려면 전략 번호가 필요합니다. 하나의 전략에 여러 지표가 있는 경우, 고문이 전략을 올바르게 로드할 수 있도록 동일한 번호로 여러 지표를 지정해야 합니다.
위의 예에서는 다음을 수행해야 합니다:
h_custom = iCustom(StrategySymbolString, StrategyTimeFrame, "::IndicatorsExamplesMoving AverageMoving Average");
h_custom2 = iCustom(StrategySymbolString, StrategyTimeFrame, "::IndicatorsExamplesMoving AverageMoving Average");
if (h_custom == INVALID_HANDLE)
{
    Print("이동 평균 지표의 핸들을 가져오지 못했습니다");
    return;
}
if (h_custom2 == INVALID_HANDLE)
{
    Print("이동 평균 지표의 핸들을 가져오지 못했습니다");
    return;
}
break;
위와 유사하게 여러 지표와 핸들을 추가할 수 있습니다.
또한 고문에 통합하려는 다른 전략을 추가하세요!
MetaTrader 5 단계 5: 포지션 개시를 위한 전략 및 신호 생성하기
// 단계 5
// 이 코드 부분은 오픈 소스에서 전략을 프로그래밍하기 위한 것입니다
//
// 여기서는 데이터 버퍼를 채워 포지션 개시를 위한 신호를 생성합니다
//
// 예를 들어:
// * if (sigInd == 1)
// * {
//
// 데이터 채우기
//
// * if (CopyBuffer(h_custom, 0, 0, 3 + ShiftIndicator, custom1_buffer) < 3 + ShiftIndicator)
// *   return(0);
// * if (!ArraySetAsSeries(custom1_buffer, true))
// *   return(0);
// * if (CopyBuffer(h_custom2, 0, 0, 2 + ShiftIndicator, custom2_buffer) < 2 + ShiftIndicator)
// *   return(0);
// * if (!ArraySetAsSeries(custom2_buffer, true))
// *   return(0);
//
// 여기서는 전략을 작성합니다. 이 예에서는 두 선의 교차입니다.
//
// * if (custom1_buffer[ShiftIndicator + 1] < custom2_buffer[ShiftIndicator + 1] && custom1_buffer[ShiftIndicator] > custom2_buffer[ShiftIndicator])
// *   sig = 1;
// * else if (custom1_buffer[ShiftIndicator + 1] > custom2_buffer[ShiftIndicator + 1] && custom1_buffer[ShiftIndicator] < custom2_buffer[ShiftIndicator])
// *   sig = -1;
// * else
// *   sig = 0;
//
// 신호에서 포지션을 개시할 때 로그에 표시될 데이터를 작성합니다.
//
// * InfoAboutSignal = "InfoAboutSignal sigInd =" + (string)sigInd + " TF =" + (string)TF + " Symbol =" + symToWork3 + " sig =" + (string)sig + " FUNCTION "
// * + " custom1_buffer[ShiftIndicator + 1] =" + (string)custom1_buffer[ShiftIndicator + 1]
// * + " custom2_buffer[ShiftIndicator + 1] =" + (string)custom2_buffer[ShiftIndicator + 1]
// * + " custom1_buffer[ShiftIndicator] =" + (string)custom1_buffer[ShiftIndicator]
// * + " custom2_buffer[ShiftIndicator] =" + (string)custom2_buffer[ShiftIndicator];
//
// --- 거래 신호 반환
// * return sig;
// *}
이 단계는 고문에게 필수적입니다.
다른 모든 단계가 필요하지만, 이 단계가 없으면 고문이 제대로 작동하지 않습니다.
코드에 주석을 추가하여 안내했습니다!
우리의 전략 번호는 이전 단계와 동일합니다!
- 전략 및 신호 코드를 개별적으로 프로그래밍합니다. 이는 선택한 전략과 지표에 따라 다릅니다.
- 전략 버퍼를 가져옵니다.
- 이 블록에서는 어떤 전략이든 지정할 수 있습니다.
- 핸들에 선언한 모든 지표가 메모리에 로드되어 전략을 구성하는 데 사용됩니다.
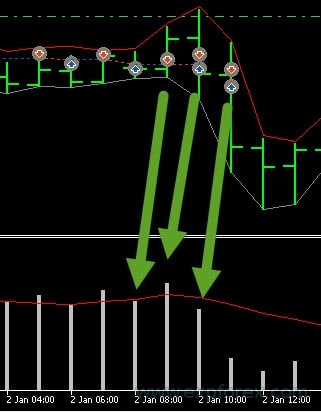
이 단계는 두 개의 하위 단계로 나눌 수 있습니다:
- 1. 데이터 버퍼를 데이터 배열에 복사해야 합니다. 복사 설정에서 선 번호를 지정해야 합니다(우리의 경우, 이는 MACD 지표 선입니다).
- 두 개의 선을 사용합니다: MAIN과 SIGNAL.
- CopyBuffer 도움말을 참조할 수 있습니다.
- 2. 전략을 프로그래밍합니다. 이 경우, 두 선의 교차입니다.
- 중요: BUY 신호는 1이고, SELL 신호는 -1입니다.
MetaTrader 5 단계 6: 지표에서 필터 지정 또는 전략 필터로 지표 사용하기
// 단계 6 ###
// 이 코드 부분은 오픈 소스에서 전략을 프로그래밍하기 위한 것입니다
//
// 여기서는 데이터 버퍼를 채워 신호를 필터링할 필터를 생성합니다
//
// 예를 들어:
// * if (sigInd == 1)
// * {
//
// 데이터 채우기
//
// * if (CopyBuffer(h_custom, 0, 0, 3 + ShiftIndicator, custom1_buffer) < 3 + ShiftIndicator)
// *   return(0);
// * if (!ArraySetAsSeries(custom1_buffer, true))
// *   return(0);
// * if (CopyBuffer(h_custom2, 0, 0, 2 + ShiftIndicator, custom2_buffer) < 2 + ShiftIndicator)
// *   return(0);
// * if (!ArraySetAsSeries(custom2_buffer, true))
// *   return(0);
//
// 여기서는 전략을 작성합니다. 이 예에서는 두 선의 교차입니다.
//
// * if (custom1_buffer[ShiftIndicator] != 0 && custom2_buffer[ShiftIndicator] != 0)
// * {
// *   Alert("축하합니다! 전략 프로그래밍을 보여주는 레슨을 완료했습니다!");
// * }
//
// * if (custom1_buffer[ShiftIndicator] > custom2_buffer[ShiftIndicator])
// *   sig = 1;
// * else if (custom1_buffer[ShiftIndicator] < custom2_buffer[ShiftIndicator])
// *   sig = -1;
// * else
// *   sig = 0;
//
// 신호에서 포지션을 개시할 때 로그에 표시될 데이터를 작성합니다.
//
// * InfoAboutSignal = InfoAboutSignal + "" + "sigInd =" + (string)sigInd + " TF =" + (string)TF + " Symbol =" + symToWork3 + " sig =" + (string)sig + "" + __FUNCTION__ + ""
// * + " custom1_buffer[ShiftIndicator] =" + (string)custom1_buffer[ShiftIndicator]
// * + " custom2_buffer[ShiftIndicator] =" + (string)custom2_buffer[ShiftIndicator];
//
// --- 거래 신호 반환
// * return sig;
// *}
이 단계에서 코드를 프로그래밍하는 것은 이전 단계와 유사하며 간단합니다.
유일한 차이점은 이 단계에서는 지표를 필터로 프로그래밍하고 있다는 것입니다.
지표에서 신호를 지정하고 동시에 필터로 사용할 수 없습니다. 이는 전략에 따라 다릅니다.
설정 빌더 xCustomEA
목차 (클릭하여 표시)
List
- xCustomEA 설명
- The X와 The xCustomEA의 차이점은 무엇인가요?
- 설정 빌더 xCustomEA
- 커스텀 인디케이터 (커스텀 전략)을 우리의 전문가 어드바이저 (EA)에 연결하는 블록
- 기능 및 매개변수 (Function and Parameters)
- 신호 옵션 (Signal Options): 추가 신호 처리 (Signal Processing) 단위
- 개시 필터 옵션 (Opening Filter Options)
- 종료 옵션 (Closing Options)
- 대기 주문 옵션 (Pending Orders Option)
- 거래 옵션 (Trading Options)
- 스톱 옵션 (Stops Options)
- 랏 옵션 (Lots Options)
- 평균화 옵션 (Averager Options): 포지션 평균화, 추세에 반대하는 포지션 개시를 위한 기능 블록
- 추가 개시 (Additional Opening): 추세에 따른 포지션 개시를 위한 추가 개시 기능 블록 (Block of Functions for Additional Opening of Positions on a Trend)
- 거래 시간 옵션 (Time Trade Options): 거래 시간 관리 및 시간 제한을 위한 기능 블록 (The Block for Managing Trade Time and Time Limits)
- 브레이크이븐 없이 손실 옵션 (BreakEven Without LOSS Options): 특정 순간에 브레이크이븐 설정을 위한 기능 블록 (Block of Functions for Breakeven (Set Stop Loss to Break-Even at a Specific Moment))
- 표준 트레일링 옵션 (Standard Trailing Options)
- Parabolic SAR을 이용한 트레일링 스톱 (TrailingStop by SAR): Parabolic SAR
- 총 이익 또는 손실 시 전체 종료 옵션 (CloseALL When Profit or LOSS Options)
- 손실 및 이익 제한 (Limiting Losses and Profits)
- 드로우다운 옵션 (Drawdown Options)
- 가상 출금 (Virtual Withdrawal)
- OnTester_Custom
EA용 최적화 파일을 다운로드할 수 있습니다.
커스텀 인디케이터 (커스텀 전략)을 우리의 전문가 어드바이저 (EA)에 연결하는 블록
업데이트된 전문가 어드바이저 (EA)에 커스텀 전략/인디케이터용 블록이 새로 추가되었습니다.
| 매개변수 | 설명 |
|---|---|
OWN 시그널 옵션 | |
| SignalNameIndicator | 포지션 개시에 대한 주요 시그널을 받는 커스텀 인디케이터의 이름입니다. 기본값: “Ind – The xCustomEA“ 이는 우리의 예제를 따라 전략을 프로그래밍할 수 있는 표준 빈 인디케이터입니다! 또한 The X 시그널을 기반으로 한 커스텀 인디케이터 예제를 만들었습니다. “Ind – The xCustomEA Example The X“ 표준 인디케이터를 사용하여 시그널을 받기 위해 우리의 예제를 사용할 수 있습니다. The X 표준 전략 설명 |
| SignalTypeIndicator | 시그널용 인디케이터의 유형입니다. 전문가 어드바이저 (EAs)의 세 가지 유형과 The X의 20개 표준 인디케이터가 있습니다. xCustomEA – 우리의 인디케이터와 함께 작동하며, 전략을 프로그래밍할 수 있는 전문가 어드바이저 (EA)입니다. xArrow – EA가 직접 활용할 수 있는 Arrow 유형의 버퍼를 가진 커스텀 인디케이터와 작동하는 EA입니다. 예를 들어, BUY 시그널을 위한 인디케이터 시그널 버퍼와 SELL 시그널을 위한 인디케이터 시그널 버퍼가 있을 경우; 이러한 버퍼는 Arrow 유형이어야 합니다. 우리의 전문가 어드바이저 (EA)는 시그널 유형에 따라 시그널을 결정합니다: 버퍼 값이 빈 값이 아니고 0보다 큽니다. // — 조건을 확인하고 sig 값을 설정합니다 if (xCustom_SIGNAL_BUY_buffer[OWNSIGNAL_shift] != EMPTY_VALUE && xCustom_SIGNAL_BUY_buffer[OWNSIGNAL_shift] > 0) sig = 1; else if (xCustom_SIGNAL_SELL_buffer[OWNSIGNAL_shift] != EMPTY_VALUE && xCustom_SIGNAL_SELL_buffer[OWNSIGNAL_shift] > 0) sig = -1; xColorArrow – 시그널 화살표에 두 가지 색상이 있는 (DRAW_COLOR_ARROW) 1개의 버퍼와 2개의 색상을 가진 시그널 유형을 추가했습니다. xColorArrow 시그널 유형을 사용할 때는 다음 값을 설정해야 합니다: SignalBufferForBUY = 화살표용 버퍼 번호 (인디케이터 제작자에게 확인) 또는 이 버퍼 번호를 계산하여 사용합니다. SignalBufferForSELL = 이러한 화살표용 색상 버퍼 번호 (제작자에게 확인), 보통 화살표 버퍼 다음에 옵니다. 주의! 이 유형은 두 가지 색상을 지원하며: 0 (화살표의 첫 번째 색상)은 BUY 개시 시그널입니다; 1 (화살표의 두 번째 색상)은 SELL 개시 시그널입니다; 인디케이터의 색상이 반대인 경우, Signal_Reverse 매개변수를 추가로 사용할 수 있습니다. 더 많은 정보는 DRAW_COLOR_ARROW 버퍼를 사용하는 이러한 인디케이터의 예제를 제공했습니다! The X의 20개 표준 전략 추가 인디케이터 및 필터 목록 인디케이터 목록: NoSignal = 100, // 포지션 개시 신호 없음 Ma = 101, // 이동 평균 MACD = 102, // 이동 평균 수렴/발산 (MACD) STOCH = 103, // 스토캐스틱 오실레이터 RSI = 104, // 상대 강도 지수 (RSI) CCI = 105, // 상품 채널 지수 (CCI) WPR = 106, // 윌리엄스 %R (WPR) BB = 107, // 볼린저 밴드 Envelopes = 108, // 엔벨로프 Alligator = 109, // 알리게이터 OsMA = 110, // 오실레이터의 이동 평균 (OsMA) AO = 111, // 어썸 오실레이터 (AO) ISH = 112, // 이치모쿠 AC = 113, // AC BAR = 114, // 바 BEAR/BULL ADX = 115, // 평균 방향성 지수 (ADX) ZigZag = 117, // 지그재그 MFI = 120, // 머니 플로우 지수 (MFI) Fractals = 121, // 프랙탈 |
| IndSigToTrade |
첫 번째 및 주요 포지션을 개시하기 위한 인디케이터와 시그널을 선택합니다. 커스텀 인디케이터 SignalNameIndicator의 전략 번호. 지정된 전략이 인디케이터에서 발견되지 않으면, 전문가 어드바이저 (EA)는 오류와 함께 차트에서 언로드됩니다! 0으로 설정하면, 전략 시그널이 사용되지 않고 필터만 적용됩니다! 주요 인디케이터를 사용할 때, 시그널은 현재 바에서 그대로 생성됩니다! 이는 포지션 개시 시그널이 시그널 실행의 결과로 나타난다는 것을 의미합니다. 시그널이 있고 필터가 포지션 개시를 허용하지 않으면, 시그널은 무시됩니다. No Signal: 선택 시, 어드바이저는 주요 시그널을 무시하고 필터를 기반으로 거래합니다. NoSignal을 사용할 때, EA는 주요 시그널 실행을 무시하고 필터로 작동할 수 있습니다. 필터를 사용할 때, 전문가 어드바이저 (EA)는 선택된 인디케이터의 현재 데이터를 기반으로 포지션을 엽니다. |
| TF_IndSigToTrade1 |
첫 번째 주요 인디케이터의 시간 프레임입니다. 인디케이터가 시그널을 받을 시간 프레임을 선택할 수 있습니다. Period_Current – 현재 시간 프레임. 시간 프레임이 클수록, 주요 시그널을 기다리는 시간이 더 길어집니다! 시간 프레임이 작을수록, 포지션(거래)이 더 빨리 열립니다. |
| SIGNALStrategyInputs |
커스텀 인디케이터의 외부 매개변수, SignalTypeIndicator = xArrow 모드에서! 설정 표에 작성된 대로 인디케이터의 외부 변수를 ,로 구분하여 지정할 수 있습니다! 중요: 변수의 순서와 유형을 준수해야 합니다. – int 유형: 그대로; – double 유형: 그대로; – boolean 유형: true 또는 false; – datetime 유형: D’년.월.일’ (D와 단일 따옴표 필수 표시). 특정 날짜 없이 작성해야 하는 경우, 문자열로 작성: “00:00” 또는 “23:59” D’2018.11.08′ ‘D’2015.01.01’ “00:00” “23:59” – color 유형: C’red/green/blue’ (C와 단일 따옴표 필수 표시). 예: C’0/128/128′ 또는 C’0/256/0′ – enum (list, enumeration) 유형: x (숫자) 인디케이터에 목록이 있는 경우 (목록에서 매개변수 선택), 숫자를 작성해야 합니다! – string 유형: 문자열을 지정해야 합니다 (숫자가 아닌), 예: “X”. MT4에서: 주의! MetaTrader 4 버전에서는 문자열 매개변수를 전송하는 것이 금지되어 있습니다! 문자열 매개변수를 전달할 때, 인디케이터가 올바르게 로드되지 않을 수 있습니다! 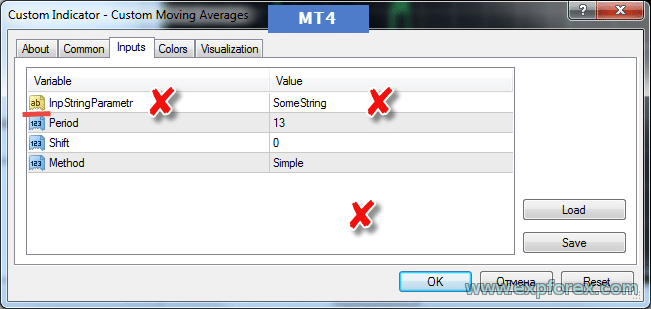 예를 들어, 인디케이터에 다음 입력 매개변수가 있는 경우: int InpCCIPeriod = 1; double InpCCIPeriod2 = 2.0; color InpCCIPeriod3 = clrGreen; string InpCCIPeriod6 = “text”; datetime InpCCIPeriod4 = D’2018.11.08′; bool InpCCIPeriod5 = false; 다음과 같이 작성됩니다: SIGNALStrategyInputs = 1,2.0,C’0/128/0′,”text”,D’2018.11.08′,false |
| Signal_Reverse |
이 주요 인디케이터의 시그널을 반전시킵니다. 이 옵션은 주요 인디케이터의 시그널만 반전시킵니다. 시그널이 Buy 개시일 경우, 전문가 어드바이저 (EA)는 Sell을 개시합니다! 시그널이 Sell 개시일 경우, 전문가 어드바이저 (EA)는 Buy을 개시합니다! |
| ClosePositionifChangeOWNSignal |
다른 필터와 매개변수의 참여 없이 주요 인디케이터의 반대 시그널에 따라 포지션을 닫는 기능을 활성화/비활성화합니다. ClosePositionifChangeOWNSignal 매개변수는 세 가지 값으로 나뉩니다: – False (비활성화) – True (활성화) – OnlyifProfit (포지션이 이익일 경우에만) |
| OWNSIGNAL_shift | 인디케이터가 생성할 시그널의 BAR 번호입니다. – 1 = 마지막으로 닫힌 바; 이 바의 시그널은 닫힌 것으로 간주됩니다. – 0 = 현재 열려 있는 바; 이 바의 시그널은 드로잉으로 간주됩니다; 주의하세요. 이 매개변수에 대해 자세히 알아보기: 시그널 바에 대한 자세한 기사 |
| SignalBufferforBUYSignalBufferforSELL |
BUY 및 SELL 시그널을 받기 위한 커스텀 인디케이터의 버퍼 번호. Ind – The xCustomEA 및 Ind – The xCustomEA Example The X의 경우 변경하지 마십시오. |
포지션 종료 옵션 | |
|
이 블록을 사용하면 커스텀 인디케이터의 시그널을 기반으로 열린 포지션을 닫을 수 있습니다. 커스텀 인디케이터가 포지션을 닫기 위한 시그널을 제공하는 경우 (새 포지션 개시 시그널과 별도로) 이를 사용할 수 있습니다. 어드바이저에서 포지션 종료 시그널을 구성해야 하는 경우, 인디케이터 이름(포지션 종료를 위한 인디케이터 이름과 동일해야 함), 매개변수 집합(기본 인디케이터 매개변수와 다른 경우), 시간 프레임, 바 시프트, 포지션 종료 시그널을 받기 위한 버퍼 번호를 지정해야 합니다. 이는 BUY 및 SELL 포지션 각각에 대해 별도로 수행되어야 합니다. 주의: 반대 시그널을 받으면 포지션을 닫으려는 경우, 이 블록을 사용할 필요가 없습니다. | |
| CloseNameIndicator | 포지션 종료를 위한 주요 시그널을 받을 커스텀 인디케이터의 이름입니다. |
| CloseTypeIndicator |
시그널용 인디케이터의 유형입니다. 어드바이저 작동 유형은 두 가지입니다: – xCustomEA – 전략 필터를 프로그래밍할 수 있는 우리의 인디케이터와 함께 작동하는 어드바이저. – xArrow – Arrow 유형의 버퍼 또는 어드바이저에서 활용할 수 있는 빈 값이 아닌 버퍼 값을 가진 커스텀 인디케이터와 직접 작동하는 전문가 어드바이저 (EA)입니다. 예를 들어: BUY 및 SELL 포지션 종료를 위한 인디케이터 시그널이 있는 버퍼. 이러한 버퍼는 Arrow 유형이어야 합니다. 우리의 전문가 어드바이저 (EA)는 시그널 유형에 따라 시그널을 결정합니다: 버퍼 값이 빈 값이 아니고 0보다 큽니다. // — 조건을 확인하고 sig 값을 설정합니다 if (xCustom_SIGNAL_BUY_buffer[OWNSIGNAL_shift] != EMPTY_VALUE && xCustom_SIGNAL_BUY_buffer[OWNSIGNAL_shift] > 0) sig = 1; else if (xCustom_SIGNAL_SELL_buffer[OWNSIGNAL_shift] != EMPTY_VALUE && xCustom_SIGNAL_SELL_buffer[OWNSIGNAL_shift] > 0) sig = -1; |
| CloseTimeFrame Close_shift CloseStrategyInputs CloseBufferforBUY CloseBufferforSELL Close_IndSigToClose | |
필터 옵션 | |
| FilterNameIndicator |
포지션 개시에 대한 필터를 받을 커스텀 인디케이터의 이름입니다. 기본값: “Ind – The xCustomEA“. 이는 우리의 예제를 따라 전략을 프로그래밍할 수 있는 표준 빈 인디케이터입니다! |
| FilterTypeIndicator |
필터용 인디케이터의 유형입니다. 어드바이저 작동 유형은 두 가지입니다: – xCustomEA – 전략 필터를 프로그래밍할 수 있는 우리의 인디케이터와 함께 작동하는 어드바이저. – xArrow – Arrow 유형의 버퍼 또는 어드바이저에서 활용할 수 있는 빈 값이 아닌 버퍼 값을 가진 커스텀 인디케이터와 직접 작동하는 전문가 어드바이저 (EA)입니다. 예를 들어: BUY 및 SELL 필터용 인디케이터 시그널이 있는 버퍼. 이러한 버퍼는 Arrow 유형이어야 합니다. 우리의 전문가 어드바이저 (EA)는 시그널 유형에 따라 필터를 정의합니다: 버퍼 값이 빈 값이 아니고 0보다 큽니다. // — 조건을 확인하고 sig 값을 설정합니다 if (xCustom_FILTER_BUY_buffer[shift] != EMPTY_VALUE && xCustom_FILTER_BUY_buffer[shift] > 0) sig = 1; else if (xCustom_FILTER_SELL_buffer[shift] != EMPTY_VALUE && xCustom_FILTER_SELL_buffer[shift] > 0) sig = -1; – 또는 우리의 표준 전략을 사용할 수 있습니다 The X 필터 인디케이터 목록: FILTERMa = 101, // 이동 평균 FILTERMACD = 102, // 이동 평균 수렴/발산 (MACD) FILTERSTOCH = 103, // 스토캐스틱 오실레이터 FILTERRSI = 104, // 상대 강도 지수 (RSI) FILTERCCI = 105, // 상품 채널 지수 (CCI) FILTERWPR = 106, // 윌리엄스 %R (WPR) FILTERBB = 107, // 볼린저 밴드 FILTEREnvelopes = 108, // 엔벨로프 FILTERAlligator = 109, // 알리게이터 FILTEROsMA = 1010, // 오실레이터의 이동 평균 (OsMA) FILTERAO = 111, // 어썸 오실레이터 (AO) FILTERISH = 112, // 이치모쿠 FILTERAC = 113, // AC FILTERBAR = 114, // 바 BEAR/BULL FILTERADX = 115, // 평균 방향성 지수 (ADX) FILTERBARrelativelyMA = 116, // 바 상대 이동 평균 FILTERZigZag = 117, // 지그재그 FILTERATR = 118, // 평균 실제 범위 (ATR) FILTERMFI = 120, // 머니 플로우 지수 (MFI) FILTERFractals = 121, // 프랙탈 |
| FILTER_IndSigToTrade |
주요 시그널을 정제하기 위한 인디케이터와 필터를 선택합니다. 커스텀 인디케이터 FilterNameIndicator의 전략 번호. 지정된 전략이 인디케이터에서 발견되지 않으면, 전문가 어드바이저 (EA)는 오류와 함께 차트에서 언로드됩니다! IndSigToTrade가 0으로 설정되면, 어드바이저는 필터만 기반으로 작동합니다! |
| FILTER_TF_IndSigToTrade |
필터의 시간 프레임입니다. 인디케이터가 필터 시그널을 받을 시간 프레임을 선택할 수 있습니다. Period_Current – 현재 시간 프레임. 예: MA를 주요 시그널로 사용하고 TF = M30인 경우, 더 높은 MA에서 TF = H4로 필터링을 활성화할 수 있습니다. |
| Filter_Reverse |
이 필터의 시그널을 반전시킵니다. 이 옵션은 이 필터의 시그널만 반전시킵니다. 예: 주요 인디케이터 MA가 BUY를 표시하지만, 오래된 MA 인디케이터가 SELL을 표시할 경우; 이 기능을 사용하면 오래된 MA의 시그널이 반전되어 BUY의 집계 시그널이 생성됩니다. |
| FILTERSIGNAL_shift | 인디케이터가 생성할 시그널의 바 번호입니다. – 1 = 마지막으로 닫힌 바; 이 바의 시그널은 닫힌 것으로 간주됩니다. – 0 = 현재 열려 있는 바; 이 바의 시그널은 드로잉으로 간주됩니다; 주의하세요. 이 매개변수에 대해 자세히 알아보기: 시그널 바에 대한 자세한 기사 |
| FilterBufferforBUYFilterBufferforSELL |
BUY 및 SELL 필터 시그널을 받기 위한 커스텀 인디케이터의 버퍼 번호를 사용합니다. Ind – The xCustomEA 및 Ind – The xCustomEA Example The X의 경우 변경하지 마십시오. |
SLTP 옵션 | |
|
이 블록을 사용하면 포지션 개시에 따라 스탑 로스 (SL) 또는 테이크 프로핏 (TP)을 설정할 수 있습니다. 이는 커스텀 인디케이터 버퍼의 값을 기반으로 할 수 있습니다. 커스텀 인디케이터에 스탑 로스 (SL) 또는 테이크 프로핏 (TP)을 얻기 위한 별도의 버퍼가 있는 경우, 이를 새 포지션을 열 때 사용할 수 있습니다. 주의: 스탑 로스 (SL) 또는 테이크 프로핏 (TP)은 새 시그널을 사용하여 새 포지션을 열 때만 설정됩니다. 평균화 및 추가 개시 기능은 과거 변수의 스탑 로스 (SL) 및 테이크 프로핏 (TP) 매개변수를 사용합니다. 평균화 및 추가 개시에서 커스텀 인디케이터로부터 얻은 스탑 로스 (SL) 및 테이크 프로핏 (TP)은 허용되지 않습니다. ForcedModifySLTP 기능을 사용할 때도 커스텀 인디케이터로부터 스탑 로스 (SL) 및 테이크 프로핏 (TP)이 설정됩니다. 어드바이저에서 커스텀 인디케이터의 스탑 로스 (SL) 및 테이크 프로핏 (TP) 값을 입력해야 합니다. 그런 다음 인디케이터 이름을 지정합니다 (포지션 개시/종료를 위한 인디케이터 이름과 동일해야 함), 매개변수 집합 (기본 인디케이터 설정과 다른 경우), 시간 프레임, 바 시프트, 값을 가져오기 위한 버퍼 번호를 지정합니다. 이는 BUY 및 SELL 포지션 각각에 대해 별도로 수행되어야 하며, 스탑 로스 (SL) 및 테이크 프로핏 (TP)에 대해 별도로 수행되어야 합니다. | |
| SLTPNameIndicator | 스탑 로스 (SL) 및 테이크 프로핏 (TP) 값을 얻기 위한 커스텀 인디케이터의 이름입니다. |
| SLTPTypeIndicator |
인디케이터 유형입니다. xPrice – 변수 (스탑 로스 (SL), 테이크 프로핏 (TP))에서 파생된 가격 값. |
| SLTPTimeFrame | |
| SLTP_shift | |
| SLTPStrategyInputs | |
| SLTPBufferforBUY_StopLoss |
BUY 포지션의 스탑 로스 (SL) 값을 가져오기 위한 버퍼 번호. -1은 이 옵션이 비활성화됨을 의미합니다. |
| SLTPBufferforSELL_StopLoss |
SELL 포지션의 스탑 로스 (SL) 값을 가져오기 위한 버퍼 번호. -1은 이 옵션이 비활성화됨을 의미합니다. |
| SLTPBufferforBUY_TakeProfit |
BUY 포지션의 테이크 프로핏 (TP) 값을 가져오기 위한 버퍼 번호. -1은 이 옵션이 비활성화됨을 의미합니다. |
| SLTPBufferforSELL_TakeProfit |
SELL 포지션의 테이크 프로핏 (TP) 값을 가져오기 위한 버퍼 번호. -1은 이 옵션이 비활성화됨을 의미합니다. |
기능 및 매개변수 (Function and Parameters)
매개변수 | 설명 |
|---|---|
신호 옵션 (Signal Options): 추가 신호 처리 (Signal Processing) 단위 | |
| Show_alert_without_opening_positions |
알림 (Alert) 이 옵션이 활성화 (TRUE)된 경우, 전문가 어드바이저 (Expert Advisor)는 신호에 따라 새로운 포지션 (position) (딜 (Deal))을 열지 않고, 새로운 신호가 나타났음을 사용자에게 알림합니다. 이 경우, 모든 다른 기능은 정상적으로 작동합니다. 이는 사용자가 어드바이저가 신호를 발행(생성)한 경우, 스스로 포지션 (position) (딜 (Deal))을 열 수 있게 합니다. 그러나 EA는 이 딜 (Deal) (포지션 (position))을 생성하지 않고, 포지션 (position) (딜 (Deal))을 열지 않고, 신호에 대해 사용자에게 알림만 보냅니다. |
| Send_Push_without_opening_positions |
푸시 알림 (Push Notification) 이 옵션이 활성화 (TRUE)된 경우, 전문가 어드바이저 (Expert Advisor)는 신호에 따라 새로운 포지션 (position) (딜 (Deal))을 열지 않고, 전화로 사용자에게 새로운 신호가 나타났음을 알림만 보냅니다. 이 경우, 모든 다른 기능은 정상적으로 작동합니다. 이는 사용자가 어드바이저가 신호를 발행(생성)한 경우, 스스로 포지션 (position) (딜 (Deal))을 열 수 있게 합니다. 그러나 EA는 이 딜 (Deal) (포지션 (position))을 생성하지 않고, 포지션 (position) (딜 (Deal))을 열지 않고, 신호에 대해 사용자에게 푸시 알림 (Push Notification)만 보냅니다. |
| OpenBarControlOnly |
어드바이저 (Advisor)가 바 열림 시에만 작동 (Start of New BAR). 이 모드는 전략 테스터에서와 같이 바 열림 시에 어드바이저의 작동을 시뮬레이션합니다. 이 모드가 활성화 (True)되면, 전문가 어드바이저 (Expert Advisor)는 OpenPriceOnly 테스트 모드와 정확히 같이 거래합니다. 모든 어드바이저 기능은 새로운 바의 열림 시에 한 번씩 실행되며(선택된 시간대에 따라), 수정, 트레일링 스톱, 평균화, 신호에 의한 딜 열기 등이 포함됩니다. |
| ControlNewBarforSIGNAL | 각 새로운 바에 대해서만 지표 신호를 확인 (각 틱에서 확인하지 않음). OWNSIGNAL_shift ≥ 1이고 IndSigToTrade ≠ 무신호 (NoSignal)인 경우에만 작동 (무신호인 경우, 전문가 어드바이저 (Expert Advisor)는 각 틱에서 필터 값을 확인합니다). ControlNewBarforSIGNAL = true일 때, 최적화 속도가 1.5배 증가합니다! 1. ControlNewBarforSIGNALType = 1 = True, 설정된 가장 작은 시간대 (TF): 새로운 모드! EA는 매개변수 TF_IndSigToTrade1, FILTER_TF_IndSigToTrade1, FILTER_TF_IndSigToTrade2 등으로 설정된 가장 작은 시간대 (TimeFrame)를 선택합니다. 이 모드에서는 EA가 현재 시간대가 아니라 지표에서 신호를 받기 위한 시간대에서 신호를 확인하지 않습니다! 이 모드는 현재 시간대 외에 TF_IndSigToTrade1, FILTER_TF_IndSigToTrade1, FILTER_TF_IndSigToTrade2를 사용하는 사람들에게 유용합니다. 2. ControlNewBarforSIGNALType = 2 = True, 현재 시간대의 현재 바: 오래된 모드! 이 모드에서는 EA가 현재 시간대의 모든 새로운 바를 신호에 대해 확인합니다! 현재 시간대 외에 TF_IndSigToTrade1, FILTER_TF_IndSigToTrade1, FILTER_TF_IndSigToTrade2를 사용하는 경우, 각 시간대의 결과가 다를 수 있습니다. 우리는 시간대 M1 (TimeFrame M1)에 전문가 어드바이저 (Expert Advisor)를 설치할 것을 권장합니다! 3. ControlNewBarforSIGNALType = 0 = False: 신호를 결정하기 위해 새로운 바 제어를 사용하지 않습니다! 주의 (Attention): 이 기능이 꺼져 있을 때 (false), EA는 신호를 각 틱마다 확인합니다! 테스트 및 최적화에 지연이 있을 수 있습니다! |
| ControlNewBarforOpenbySignal: | ControlNewBarforOpenbySignal = true: 오래된 모드! EA는 신호가 있을 때 현재 시간대 (TimeFrame)의 모든 새로운 현재 바에서만 포지션 (position) (딜 (Deal))을 엽니다! EA는 신호가 있을 때만, 현재 시간대 (TimeFrame)의 새로운 바가 도착하면 포지션 (position) (딜 (Deal))을 엽니다! ControlNewBarforOpenbySignal = false: 새로운 모드! EA는 신호 시간대 (TimeFrame)의 모든 새로운 바마다 신호에 따라 포지션 (position) (딜 (Deal))을 엽니다! EA는 신호가 있는 경우, 신호가 감지되자마자 포지션 (position) (딜 (Deal))을 엽니다. 이 모드는 현재 시간대 외에 TF_IndSigToTrade1, FILTER_TF_IndSigToTrade1, FILTER_TF_IndSigToTrade2를 사용하는 사람들에게 유용합니다. |
| ReverseSignal |
전체 전략 신호 역전 (Reverse) – 메인 지표 + 필터로부터 받은 신호를 역전! 만약 일반 신호가 매수 (Buy) 포지션을 여는 것이라면, 전문가 어드바이저 (Expert Advisor)는 매도 (Sell) 포지션을 엽니다! 만약 일반 신호가 매도 (Sell) 포지션을 여는 것이라면, 전문가 어드바이저 (Expert Advisor)는 매수 (Buy) 포지션을 엽니다! |
개시 필터 옵션 (Opening Filter Options) | |
| TypeTradeBUYSELL | 거래 방향 (Trade Direction): – 매수 및 매도 (Buy and Sell) – 매수만 (Only Buy) – 매도만 (Only Sell) 주의 (Attention): 대기 주문을 사용하고 (포지션 대신) 한 방향으로만 운영할 경우, 새로운 신호가 수신될 때마다 이전 대기 주문이 삭제되고 새로운 가격으로 새 대기 주문이 설정됩니다. |
| MinuteToOpenNextPosition |
마지막 열린 포지션 이후 다음 신호를 열 수 있는 권한 (Permission to Open the Next Signal After the Last Open Position) 열려있는 포지션 (position) (딜 (Deal))이 없으면, 전문가 어드바이저 (Expert Advisor) (EA)는 마지막으로 닫힌 포지션 이후의 시간 (분 단위 (in minutes))을 고려합니다. 시간은 동일한 유형으로 간주됩니다. 매수 (BUY) 신호인 경우: 마지막으로 열린/닫힌 매수 (BUY) 이후의 시간… 매도 (SELL) 신호인 경우: 마지막으로 열린/닫힌 매도 (SELL) 이후의 시간… 지표 신호에 따라 다음 딜 (Deal)을 여는 데 필요한 분 수. OnlyOnePosbySignal = false를 사용할 때 거래를 필터링할 수 있습니다. |
| DistanceToOpenNextPosition |
주 신호에 따라 다음 포지션을 열기 위한 최소 거리 (Minimum Distance to Open the Next Position on the Main Signal) (OnlyOnePosbySignal = false 및 OnePosPerDirection = false일 경우). DistanceToOpenNextPosition가 0 이상일 경우, 다음 포지션 (position) (딜 (Deal))은 신호에 따른 이전 포지션 (position) (딜 (Deal))이 DistanceToOpenNextPosition 만큼의 이익 포인트 (핍 (Pips))를 넘었을 때만 열 수 있습니다! DistanceToOpenNextPosition가 0 이하일 경우, 다음 포지션 (position) (딜 (Deal))은 신호에 따른 이전 포지션 (position) (딜 (Deal))이 이익 또는 손실의 양쪽에서 DistanceToOpenNextPosition 포인트 (핍 (Pips)) 거리일 때만 열 수 있습니다! |
| OpenOppositePositionAfterStoploss |
현재 스톱 로스를 마감할 때 반대 포지션을 여는 EA (EA Opens the Opposite Position When Closing the Current Stop Loss). 지표 신호를 사용하지 않고 이전 딜 (Deal) (포지션)의 스톱 로스를 받자마자 즉시 반대 포지션 (position) (딜 (Deal))을 엽니다. 마지막 포지션 (position)이 스톱 로스로 인해 마감되었다면, 전문가 어드바이저 (Expert Advisor)는 즉시 반대 포지션 (position)을 엽니다. |
| OnlyOnePosbySignal |
한 방향으로 현재 주요 포지션 하나만 거래 (Trade Only One Current Main Position in One Direction). 전문가 어드바이저 (Expert Advisor)가 매도 (SELL) 포지션 (position)을 열면, 다른 모든 매도 (SELL) 신호는 무시됩니다. 전문가 어드바이저 (Expert Advisor)가 매수 (BUY) 포지션 (position)을 열면, 다른 모든 매수 (BUY) 신호는 무시됩니다. |
| OnePosPerDirection |
한 방향으로 하나의 딜 열기 (Opening One Deal in One Direction), 예시: OnePosPerDirection = true이고 OnlyOnePosbySignal = false일 경우, EA는 신호 하나에 대해 하나의 매수 딜 (Buy Deal) (포지션 (position))과 하나의 매도 딜 (Sell Deal) (포지션 (position))을 열 수 있습니다; OnePosPerDirection = false이고 OnlyOnePosbySignal = true일 경우, EA는 신호당 하나의 딜 (Deal) (포지션 (position))만 열 수 있으며, 매수 (Buy) 또는 매도 (Sell) 중 하나입니다; OnePosPerDirection = false이고 OnlyOnePosbySignal = false일 경우, EA는 각 새로운 지표 신호에 대해 여러 개의 딜 (Deal) (포지션 (position))을 열 수 있습니다; |
| OnlyOnePositionPerMagic |
매직 넘버당 하나의 포지션 열기 (Opening One Position per Magic Number). 전문가 어드바이저 (Expert Advisor)는 다른 통화쌍에서 이 매직 넘버에 대한 열린 포지션 (position) (딜 (Deal))이 있는지 확인합니다. 포지션이 없을 경우, 어드바이저는 신호에 따라 딜 (Deal)을 열고, 나머지 어드바이저는 이 딜 (Deal)의 완료를 기다립니다. OnePosPerDirection = false인 경우, OnlyOnePositionPerMagic = true는 다음과 같이 작동합니다: 매직 넘버당 하나의 포지션만 허용됩니다; OnePosPerDirection = true인 경우, OnlyOnePositionPerMagic = true는 다음과 같이 작동합니다: 매직 넘버당 각 방향(매수 및 매도)의 하나의 포지션만 허용됩니다; |
| OnlyAlternateSignals |
포지션을 하나씩만 열 수 있도록 허용 (Allows Opening Positions Only One by One). 마지막으로 닫힌 포지션 (position)이 매도 (SELL)였다면, 다음 포지션은 오직 매수 (BUY)로만 열 수 있습니다! 메인 지표를 무신호 모드 (No Signal Mode) (IndSigToTrade = No Signal)에서 거래해야 합니다. |
| MAX_BUY_POSITION |
매수 딜 (BUY Deals) 최대 개수를 제한하는 매개변수 (Parameter for Limiting the Maximum Number of BUY Deals (Positions)). 지표의 신호로 열린 포지션 (position)이 고려됩니다. 평균화 및 추가 포지션은 고려되지 않습니다. |
| MAX_SELL_POSITION |
매도 딜 (SELL Deals) 최대 개수를 제한하는 매개변수 (Parameter for Limiting the Maximum Number of SELL Deals (Positions)). 지표의 신호로 열린 포지션 (position)이 고려됩니다. 평균화 및 추가 포지션은 고려되지 않습니다. |
| MaxSpreadToNotTrade |
어드바이저가 포지션을 열 수 있는 최대 스프레드 (The Maximum Spread at Which the Advisor Can Open a Position). 신호를 받을 때 현재 스프레드가 지정된 값보다 크면, 스프레드가 지정된 값보다 작아질 때까지 지표 신호가 무시됩니다. |
| MinSpreadToNotTrade | 어드바이저가 포지션을 열 수 있는 최소 스프레드 (Minimum Spread in Which the Advisor Can Open a Position). 경고 (Warning): 이 필터는 신호, 평균화 및 추가 개시로 포지션을 열 때만 사용됩니다. 모든 다른 기능은 정상적으로 작동합니다. 경고 (Warning): 이 필터는 포지션 (Positions)에만 적용됩니다! 대기 주문에는 이 필터가 적용되지 않습니다. 따라서, 이 필터는 포지션 (Positions)을 사용할 때만 작동합니다. |
| Include_Commission_Swap | 함수가 활성화되었을 때 커미션 및 스왑 계산 포함 (Consider the Author’s Calculation of Commission and Swap When Functions Are Enabled: BreakEven (Stop Loss at Breakeven Point), Trailing Stop, Averaging). 저자의 커미션 계산은 이 심볼과 매직 넘버에 대한 열린 포지션에서 1 포인트 (Pip)의 가치를 계산하는 공식을 기반으로 하며, 음수 스왑과 커미션이 계산에 포함됩니다. 이 함수는 음수 스왑과 커미션의 비용을 포인트 (Pips)로 반환하며, 브레이크이븐 기능 (Stop Loss at the Breakeven Point) 및 트레일링 스톱과 함께 작동할 때 이를 고려합니다. 주의 (Attention): 브로커와 함께 스프레드가 부동인 경우, 커미션의 정산이 브레이크이븐 기능 (Stop Loss at the Breakeven Point) 및 트레일링 스톱을 작동할 때 실행되고 설정되지만, 스프레드가 증가하여 추가 손실 포인트 (Pips)가 발생할 수 있습니다. 이는 계산 오류가 아닙니다! 또한, 스왑이 발생하면 어드바이저는 브레이크이븐 라인 (Stop Loss at the Breakeven Point)을 다시 계산하고, 서버가 허용하는 경우 새로운 스톱을 설정합니다 (브로커의 StopLevel의 최소 스톱 레벨 제한). 서버가 브레이크이븐 설정을 허용하지 않고 최소 스톱 레벨 오류를 반환하면, EA는 포지션을 수정할 수 없으며 추가 손실 포인트 (Pips)가 발생할 수 있습니다. 커미션과 음수 스왑을 사용할 때 손실이 발생하지 않도록, 브레이크이븐 (Stop Loss at the Breakeven Point) 또는 트레일링 스톱 사이의 거리를 늘릴 것을 권장합니다. 브레이크이븐 레벨 (Stop Loss at the Breakeven Point) (LevelWLoss)은 커미션을 고려하여 독립적으로 계산할 수 있습니다. 예를 들어, 포지션을 열고 닫을 때 커미션이 1 로트당 2 달러 (EURUSD)인 경우. 커미션으로 인한 손실을 보전하기 위해 LevelWLoss = 2 (핍) + 1 (컨트롤 포인트) = 3 핍으로 설정합니다. 따라서, 어드바이저는 커미션으로 인한 손실을 보전하는 +3 핍에서 브레이크이븐 (Stop Loss at the Breakeven Point)을 설정합니다. |
종료 옵션 (Closing Options) | |
| ClosePosifChange |
일반 지표 신호가 반전될 때 포지션을 종료 (Close Positions When the General Indicator Signal is Reversed). ClosePosifChange와 ClosePositionifChangeOWNSignal의 차이점은 ClosePosifChange(true)일 때 모든 필터 + 기본 (메인) 신호에 대해 신호 반전이 고려된다는 것입니다. ClosePositionifChangeOWNSignal(true)일 때, 신호 반전은 메인 지표 (Main Indicator) (IndSigToTrade)에 대해서만 고려됩니다. 또한 대기 주문에도 작동합니다. |
| ClosePosition_After_X_Minutes |
설정된 분 수 후에 포지션을 종료할 수 있는 EA (EA Can Close the Position After the Set Number of Minutes). 추가로, 전문가 어드바이저 (Expert Advisor)는 활성화된 CloseChangeOnlyInProfit 매개변수를 확인합니다: EA는 이익이 있는 포지션만 종료할 수 있습니다. |
| CloseChangeOnlyInProfit | EA는 수익을 내고 있는 현재 포지션일 때만 리턴 신호(신호 방향 변경)에 따라 딜을 종료할 수 있습니다. |
대기 주문 옵션 (Pending Orders Option) | |
| StopOrderUSE | 대기 주문 또는 리밋 주문을 포지션 대신 열기 (Open Pending Orders or Limit Orders Instead of Positions). 1. FALSE: 포지션 (Positions) 열기 (매수, 매도); 2. TRUE: 받은 신호를 StopOrderDeltaifUSE 포인트 (핍 (Pips)) 거리에서 대기 주문 또는 리밋 주문으로 열 수 있습니다. 따라서, 수익성을 위해 신호를 다시 확인합니다. 신호가 가격 움직임과 일치하면, 대기 주문은 StopOrderDeltaifUSE 포인트 (핍 (Pips))을 통해 실행됩니다. 3. 가상 스톱 주문 사용 (Use Virtual Stop Orders): StopOrderDeltaifUSE 포인트 (핍 (Pips)) 거리에서 가상 대기 스톱 주문을 설정합니다; 4. 가상 리밋 주문 사용 (Use Virtual Limit Orders): StopOrderDeltaifUSE 포인트 (핍 (Pips)) 거리에서 가상 대기 리밋 주문을 설정합니다; 주의 (Caution): (가상 스톱 주문 사용 (Use Virtual Stop Orders)) 및 (가상 리밋 주문 사용 (Use Virtual Limit Orders))은 시각화 모드 또는 터미널이 컴퓨터에서 실행 중인 라이브 차트에서만 작동합니다. 최적화 모드에서는 작동하지 않습니다! |
| StopOrderDeltaifUSE |
스톱 또는 리밋 주문을 위한 포인트 수 (Number of Points for a stop or limit order). 현재 가격에서의 거리. |
| StopOrderDayToExpiration |
StopOrderDayToExpiration = 주문이 만료될 때까지의 일 수. – 0 – ORDER_TIME_GTC: 주문이 제거될 때까지 대기열에 남아 있음; – 1 – ORDER_TIME_DAY: 주문이 현재 거래일에만 유효함; – X – ORDER_TIME_SPECIFIED: 주문이 만료일까지 유효함. Rejected 오류가 발생하고 주문을 히스토리에서 호버하면: (주문의 불완전한 FOK 정보)를 볼 수 있습니다. BCS 브로커 또는 Open 브로커를 사용하는 경우, 다음을 설정해야 합니다: TypeFilling = ImmediateOrCancel 또는 TypeFilling = Return DayToExpiration = 1 |
| StopOrderBarToExpiration | 바 단위로 대기 주문의 만료 (The Expiration of the Pending Order in Bars). StopOrderBarToExpiration = 10이고 TF = M1인 경우, 대기 주문은 설치 후 10분 후에 제거됩니다. 주의 (Attention): 각 브로커는 만료 시간에 대한 최소 시간 매개변수를 가지고 있습니다. |
| ReInstallStopOrdersNewSignalAppears |
지표에서 새로운 신호가 생성되면 대기 주문 재설정 (Reset Pending Orders if a New Signal from the Indicators is Created). 지표가 새로운 신호를 생성할 때 현재 BUYSTOP 대기 주문을 삭제하고 새로운 수준에서 새로운 BUYSTOP을 설치할 수 있습니다. |
거래 옵션 (Trading Options) | |
| Magic | 어드바이저 EA가 연 포지션의 매직 넘버 (The Magic Number of the Positions Opened by the Advisor EA). |
| Slippage |
포지션을 열고 닫을 때 가능한 최대 가격 편차 (The Maximum Possible Price Deviation When Opening and Closing Positions (in Points)). 예시: Slippage = 1 포지션을 열 때의 최대 가격 편차 = 개시 가격 ± 1 포인트 (Pip). Slippage = 100 포지션을 열 때의 최대 가격 편차 = 개시 가격 ± 100 포인트 (Pips). 예를 들어, 개시 가격이 1.12345인 경우, 하지만 포지션을 보내고 여는 동안 (딜 (Deal)), 가격이 100 포인트 (Requote) 내에서 변동하면, 포지션 (position) (딜 (Deal))은 1.12245 – 1.12445 가격 내에서 열립니다. |
| MarketWatch |
MARKET 실행 계좌의 스톱 로스 / 테이크 프로핏이 있는 열린 포지션을 위해 (For Opened Positions with Stop-Loss / Take-Profit on an Account with MARKET Execution). 먼저, EA는 포지션 (position) (딜 (Deal))을 열 수 있으며, 성공적으로 열린 후, 이 포지션 (position) (딜 (Deal))에서 StopLoss 및 TakeProfit 레벨을 수정합니다. 계좌가 ECN 또는 NDD 그룹에 있는 경우, 이 옵션을 true로 설정해야 합니다. |
| CommentToOrder |
열린 포지션에 대한 추가 댓글 (Additional Comments on the Opened Positions). 여기에서 추가 댓글을 지정할 수 있으며, 이는 열려 있는 포지션 (position)에 추가되어 설정을 구분하는 데 도움이 됩니다. 표준 댓글: “The X” + CommentToOrder |
| RoundingDigits |
EA는 주문과 포지션 (Deals)을 열고 수정할 때 모든 가격을 반올림할 수 있습니다 (EA Can Round All Prices When Opening and Modifying Orders and Positions (Deals)). 옵션: – 반올림 없음, – 1자리까지 올림, – 2자리까지 올림. 이 기능은 골드 (Gold)와 실버 (Silver)뿐만 아니라, 지정된 틱 정확도가 필요한 브로커를 위해 만들어졌습니다. 예시: 딜 개시 가격 = 1.12345 1자리까지 반올림 = 1.12340 2자리까지 반올림 = 1.12300 |
| TypeFilling |
포지션과 주문의 체결 유형 (The Type of Fill for Positions and Orders). MT5 터미널에서 사용됩니다. AUTO 모드에서는, 전문가 어드바이저 (Expert Advisor)는 체결 유형을 자동으로 결정하려고 시도합니다. 하지만, 일부 상황에서는 체결 유형을 수동으로 설정해야 합니다. 포지션을 여는 중 오류가 발생하면: 10030 TRADE_RETCODE_INVALID_FILL, 지원되지 않는 실행 유형, 브로커의 규칙에 따라 체결 유형을 설정하세요. 예시: FillOrKill 이 실행 정책은 주문이 지정된 양만큼만 실행될 수 있음을 의미합니다. 현재 시장에 충분한 양의 금융 상품이 없으면 주문은 실행되지 않습니다. 필요한 볼륨은 현재 시장에서 이용 가능한 여러 호가로 구성될 수 있습니다. ImmediateOrCancel 이는 지정된 한도 내에서 시장에서 이용 가능한 최대 볼륨으로 딜을 실행하는 데 동의함을 의미합니다. 전체 실행이 불가능한 경우, 주문은 접근 가능한 볼륨으로 실행되며, 실행되지 않은 주문 볼륨은 취소됩니다. Return 이 모드는 시장, 리밋, 스톱-리밋 주문에 사용되며, “Market Execution” 및 “Stock Execution” 모드에서만 사용됩니다. 부분 실행의 경우, 잔여 볼륨이 있는 시장 또는 리밋 주문은 철회되지 않고 계속 작동합니다. 스톱-리밋 주문의 경우, 활성화 시 Return 실행 유형의 해당 리밋 주문이 생성됩니다. |
스톱 옵션 (Stops Options) | |
| VirtualStops | 실제 스톱 로스 / 테이크 프로핏 / 트레일링 스톱 대신 가상 스톱 활성화 (Enable Virtual Stop Loss / TakeProfit / Trailing Stop Instead of Real Ones). 가상 (virtual) 레벨을 StopLoss/TakeProfit/TrailingStop/BreakEven (Stop Loss at Breakeven)에 사용합니다. 우리는 가상 StopLoss/TakeProfit/TrailingStop/BreakEven (브레이크이븐 포인트에서 스톱 로스 설정)을 위한 알고리즘을 완전히 재설계했습니다. 이제 모든 가상 스톱은 차트에 표시되며, 이러한 레벨에서 포지션을 종료할 때 핵심 역할을 합니다. 모든 가상 레벨에 대한 데이터는 차트에 선의 형태로 추가되며 글로벌 변수로도 저장됩니다. 참고 (Note): 차트에서 스톱 라인과 글로벌 변수를 삭제하면, 이 라인에서의 가상 종료가 작동하지 않습니다. 주의 (Attention): 전문가와 지표를 확인하여 차트와 글로벌 변수에서 라인을 제거하세요! 주의 (Attention): 가상 레벨은 현재 가격에서 트리거되며, 이후 종료가 발생합니다. 종료 중에는 몇 포인트의 슬리피지가 있을 수 있습니다! 주의 (Attention): MT4에서 VirtualStops는 최적화 (optimization) 모드에서 작동하지 않습니다. 주의 (Attention): VirtualStops를 활성화하면, 테스트 속도가 크게 감소합니다. 주의 (Attention): 가상 SL/TP/TS는 제한과 서버 금지가 없습니다. 따라서, 현재 가격에서 설정할 수 있어 즉시 종료될 수 있습니다. |
| SetMinStops |
전문가 어드바이저의 모든 매개변수를 최소 허용 스톱 레벨로 자동 정규화 (Automatically Normalize All Parameters of the Expert Advisor to the Minimum Acceptable Stop Levels). 가상 스톱을 사용할 경우 – 이 매개변수는 영향을 미치지 않습니다. AutoSetMinLevel을 사용하면, 스톱 레벨이 서버에서 허용하는 가장 낮은 레벨로 조정됩니다; Stop Loss 또는 Take Profit 레벨이 서버의 최소 스톱 레벨보다 작으면, Stop Loss/Take Profit 레벨 = 서버의 최소 스톱 레벨 (스프레드 * 2 또는 고정 레벨) + 스프레드가 됩니다. ManualSet을 사용할 경우, 사용자는 EA의 스톱 레벨이 최소값보다 낮다는 메시지를 받게 되며, EA는 서버로부터 오류를 받게 됩니다. 서버의 스톱 레벨이 부동인 경우, 최소 스톱 레벨은 자동으로 스프레드 * 2로 계산됩니다. |
| StopLoss | 포지션당 스톱 로스 (StopLoss), 각 포지션 (position) (딜 (Deal))을 여는 데 사용되는 핍 (Pips). |
| TakeProfit | 포지션당 테이크 프로핏 (TakeProfit), 각 열려 있는 포지션 (position) (딜 (Deal))에 대한 핍 (Pips). |
| ForcedModifySLTP |
포지션의 강제 수정: 스톱 로스 및 테이크 프로핏 설정 (Forced Modification of Positions: Set Stop Loss and Take Profit). 전문가 어드바이저 (Expert Advisor)는 모든 자신의 포지션에 대해 StopLoss 및 TakeProfit을 강제로 수정합니다. 예시: 브로커의 서버가 딜 (Deal)을 열었지만 티켓을 반환하지 않은 경우, 전문가는 모든 자신의 포지션을 강제로 확인합니다. EA가 포지션의 StopLoss 또는 TakeProfit이 0인 것을 발견하면, 전문가 어드바이저 (Expert Advisor)는 StopLoss 및 TakeProfit의 수정을 강제합니다. |
| TimeToCheckAverageSpread | 이 기능의 알고리즘은 자동화된 TickSniper 스켈퍼 판매 어드바이저에서 가져왔습니다 (The Algorithm for This Function is Taken from Our Automated TickSniper Scalper Sales Advisor). 스톱 옵션 (Stops (SL TP TS) Options) 블록에 매개변수가 추가되었습니다: – TimeToCheckAverageSpread: 평균 스프레드를 결정하기 위한 수 (밀리초, 20,000 = 20초) – AutoCheckLowSpread: 낮은 스프레드를 자동으로 결정. 자동으로 스프레드가 너무 낮은지 (1 포인트 (Pip) 미만) 확인하고 모든 시스템 설정을 가능한 가장 낮은 스프레드로 설정합니다. 이는 브로커의 스프레드 감소로부터 시스템을 보호합니다. 사용 방법: 평균 스프레드를 기준으로 핍 (Pips)으로 계산된 매개변수에 “-” 기호를 사용하여 설정을 지정합니다. 예시: StopLoss = 2000은 각 포지션의 StopLoss가 2000 포인트 (Pips)임을 의미합니다! StopLoss = -100은 각 포지션의 StopLoss가 TimeToCheckAverageSpread 밀리초 동안 전문가 어드바이저 (Expert Advisor)에 의해 계산된 평균 스프레드 * 100과 같음을 의미합니다. 스프레드가 20 포인트 (Pips)인 경우, 개시 시 StopLoss는 2000 포인트 (Pips)가 됩니다. 부동 스프레드에서는 이 값이 항상 변경됩니다. 스프레드 모드에서 설정 가능한 매개변수: Distance, DistanceAdditionalOpening, StopOrderDeltaifUSE, StopLoss, TakeProfit, TrailingStop, TakeProfitALL, StopLossALL, LevelWLoss, LevelProfit. 평균 및 현재 스프레드, 그리고 자동 스프레드 낮은 스프레드 수준은 우리 패널의 전략 정보 섹션에 표시됩니다 (The average and current spread, as well as the level of the Auto Spread Low spread, will be displayed in our panel in the section Strategy Info).. |
랏 옵션 (Lots Options) | |
| Lots | 고정 랏 (Volume)을 사용하여 포지션 (Deal) 또는 주문을 엽니다 (A Fixed Lot (Volume) is Used to Open a Position (Deal) or Order). |
|
AdditionalLots – 새로운 신호에 기반하여 각 새로운 딜에 추가될 추가 랏 (Volume). CoefficientLots – 새로운 신호에 따른 각 딜에 랏을 곱할 계수. Work Only (어드바이저가 각 신호에 대해 여러 개의 포지션을 열 수 있을 때 OnlyOnePosbySignal = false / OnePosPerDirection = false). | |
| DynamicLot |
열린 포지션을 위한 동적 랏, AutoLot (A Dynamic Lot, AutoLot, for an Open Position). 여유 마진 비율 및 기타 요소를 기반으로 동적 랏 계산을 활성화할 수 있습니다. 우리의 AutoLot 계산 (Calculation of Our AutoLot). AutoLot 계산 유형: BALANCE – AutoLot은 현재 잔액에서 계산됩니다. 계좌 잔액을 기반으로 랏 계산! 계좌에 열린 포지션이 있는 경우, 잔액이 현재 열린 포지션의 수에서 감소하지 않으므로 다음 랏은 대략 동일하게 유지됩니다! FREEMARGIN – 현재 여유 마진에서의 표준 랏 계산은 계좌에 열린 포지션이 많을수록 다음 포지션에 대해 계산된 랏이 작아집니다. 포지션을 열 때마다 여유 마진이 감소하므로, AutoLot을 계산할 때 각 새 포지션은 더 작은 랏을 가집니다. |
| DynamicLotStopLoss | SL로 인한 위험 (Risk from SL) – Stop Loss를 고려하여 자동 랏을 계산합니다 (Calculates the automatic lot, taking into account Stop Loss). 포지션을 StopLoss에서 마감할 때 최대 손실 비율 (The maximum loss in percentage of the balance when closing a Deal at StopLoss). 랏을 계산할 때, 우리 전문가 어드바이저 (Expert Advisor)는 Stop Loss (딜 (Deal)을 여는 순간)에 이를 고려합니다. 딜 (Deal)이 Stop Loss에서 마감되면, 이 딜 (Deal)의 손실은 잔액의 %와 같아집니다 (딜을 여는 순간의 잔액 기준). 중요 (Important): 딜 (Deal)이 열린 후에 Stop Loss가 변경된 경우, 딜 (Deal)의 랏을 변경할 수 없습니다. 딜 (Deal)을 마감할 때 손실이 더 많거나 적을 수 있습니다. 중요 (Important): 트레일링 스톱을 사용하는 경우, Stop Loss가 각 틱마다 변경되지만 랏은 변경할 수 없습니다. 수식 및 코드: https://expforex.com/ko/my-autolot-secrets-dynamiclot-autolot/#eb-table-content-5 |
| LotBalancePercent | AutoLot을 위한 비율 (Percent for AutoLot). |
| RiskRate |
달러(또는 계좌 통화)에 대한 통화의 환율 (The Rate of Your Currency Against the Dollar (Or Your Account Currency)). 기본값으로, RiskRate = 0은 전문가 어드바이저 (Expert Advisor)가 Market Watch에서 올바른 환율을 찾으려고 시도함을 의미합니다. 모든 통화쌍과 잘 작동하도록 AutoLot을 사용하려면, Market Watch에서 “모든 통화쌍 표시 (Show All Currency Pairs)”를 활성화해야 합니다. 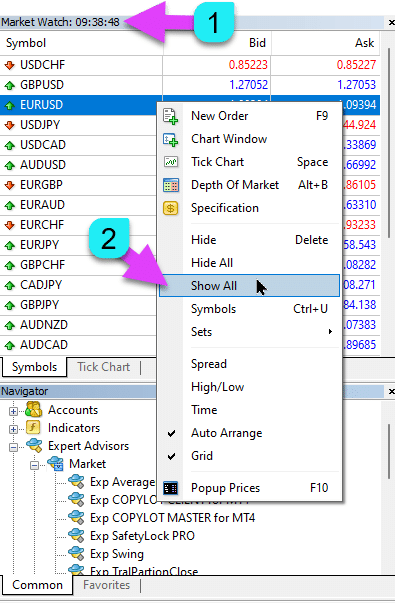
|
| MaxLot | 어드바이저가 AutoLot과 첫 번째 주요 포지션에 대해 Martingale을 계산할 때 열 수 있는 최대 랏 (The Maximum Lot That an Expert Advisor Can Open When Calculating an AutoLot and Martingale for the First Main Position). |
| Martin |
마팅게일 (Martingale). 손실 시 마지막으로 닫힌 포지션의 랏을 표준으로 곱하는 방식 (Martingale. The Standard Multiplication of the Lot of the Last Closed Position at a Loss). Martin = 1인 경우, 마팅게일이 활성화되지 않습니다 (고정 랏 Volumes). Martin = 0인 경우, 전문가 어드바이저 (Expert Advisor)는 다음 포지션을 열 수 없습니다. Martin = 2인 경우, 첫 번째 랏 = 0.1, 두 번째 랏 = 0.2, 그 다음 랏 = 0.4, 0.8, 1.6, 3.2, 6.4… Martin = 0.5인 경우, 첫 번째 랏 = 1, 두 번째 랏 = 0.5, 그 다음 랏 = 0.25, 0.125. |
평균화 옵션 (Averager Options): 포지션 평균화, 추세에 반대하는 포지션 개시를 위한 기능 블록더 알아보기: Exp – Averager. 포지션 평균화. 추세에 반대하거나 추세에 따라 딜 개시! | |
| UseAverAdditionalOpeningOrderinOne | 추가 딜 및 평균화 딜 모두에 대해 공통으로 고려되는 포지션 (position) (딜 (Deal)) 수. 주의! MT4 버전 전용! |
| AverageUSE | 평균화 기능 활성화 (Enable the Averaging Function). 만약 메인 포지션 (position)이 일정 포인트 (Pips)의 손실을 입으면, 우리의 전문가 어드바이저 (Expert Advisor)는 동일한 유형의 포지션 (position)을 엽니다 (추세에 반대). 따라서, 첫 번째 포지션을 평균화합니다. 모든 전문가 어드바이저 (Expert Advisor) 기능들 (트레일링 스톱 (Trailing Stop), 브레이크이븐 (Stop Loss at the Breakeven Point))은 동일 유형의 모든 포지션 (position) (딜 (Deal))에서 계산된 평균 (중간) 라인에서 작동합니다. 예시: 매수 (BUY) 포지션 (position)을 1.600 가격에서 엽니다; 가격이 1.500으로 내려가고 현재 손실이 -100 포인트 (Pips)입니다; 브레이크이븐 포인트 (평균 가격) = 1.600; 브레이크이븐 레벨로 Stop Loss를 수정하려면, 100 포인트 상승해야 합니다; 매수 (BUY) 포지션 (position)을 1.500 가격에서 열면, 우리의 포지션이 평균화되고, 브레이크이븐은 1.550으로 설정될 수 있습니다; 두 개의 딜을 종료하려면, 가격이 50 포인트 상승해야 합니다, 100 포인트가 아니라. 전문가 어드바이저 (EA)는 트레일링 스톱 (Trailing Stop)을 활성화하며, 두 개의 포지션 (position)이 이익을 내면서 이를 증가시킵니다. 주의 (Attention): 서로 다른 랏 크기 (Volumes)의 포지션 (position)에 대해, 평균 가격은 수학적 공식을 사용하여 계산됩니다. |
| TakeProfitALL |
모든 포지션에 대한 총 테이크 프로핏 (Total Take-Profit for All Positions). TakeProfit, 이는 열린 포지션 (position)의 평균 가격에서 TakeProfitALL 포인트 거리로 설정됩니다. TakeProfitALL = 5 포인트로 설정하면, 이는 테이크 프로핏이 중간 라인에서 5 포인트 거리로 설정됨을 의미합니다. |
| Distance |
평균화 그리드의 개시 포지션 거리 (The Distance of the Open Positions of the Averaging Grid). 추세에 반대하여 다음 평균화 포지션 (position) (딜 (Deal))을 마지막 열린 포지션 (position)에서 몇 포인트 반대 방향으로 열지 설정할 수 있습니다. 100 포인트 (Pips)를 설정할 수 있습니다. 그러면, 각 새로운 평균화 포지션 (position)은 마지막 열린 포지션 (position)에서 100 포인트 손실 후에 열립니다. 50 포인트 (Pips)를 설정할 수 있습니다. 그러면, 각 새로운 추가 포지션 (position) (딜 (Deal))은 마지막 열린 포지션 (position)에서 100 + 50 손실 포인트 후에 열립니다 (100, 150, 200, 250, 300). |
| DistanceMartin |
각 딜에 대한 평균으로부터의 거리 증가 계수 (The Increase Factor for the Distance from the Average for Each Deal). 1.5로 설정할 수 있습니다. 그러면, 각 새로운 평균화 포지션 (position)은 마지막 열린 포지션 (position)에서 100 + 50 (100*1.5) 손실 포인트 (Pips) 후에 열립니다 (100, 150, 225, 337, 506). |
| LotsMartin | 계수: 그리드 포지션의 랏 (Volume) 증가 (Coefficient: Increase the Lot (Volume) for the Grid Positions). 다음 추가 평균화 포지션 (position)을 위해 랏을 곱할 계수. 예시: 메인 포지션 (position)의 시작 랏 (Volume) = 0.1 LotsMartin = 2이면, 다음 추가 평균화 포지션 (position)의 랏 (Volume)은 0.2, 0.4, 0.8, 등이 됩니다. 주의 (Attention): 중간 라인은 랏을 기반으로 한 공식을 사용하여 계산됩니다. 이는 브레이크이븐 레벨 (중간 라인)을 현재 가격에 더 가깝게 가져올 수 있게 합니다. 그러나 마팅게일은 계좌에 위험할 수 있습니다. 이러한 부하를 견딜 수 있도록 이 매개변수를 계산하세요. |
| LotAdditional |
다음 평균화 포지션을 위한 추가 랏 (Volume) (Additional Lot (Volume) for the Next Averaging Position). 예시: 메인 포지션 (position)의 시작 랏 (Volume) = 0.1; LotAdditional = 0.05, 그러면 다음 열리는 추가 평균화 포지션 (position)의 랏 (Volume)은 0.15, 0.2, 0.25, 등이 됩니다. |
| MaxOrdersOpen |
한 방향으로 이 통화쌍의 최대 포지션 수 (Separately for BUY and SELL) (Maximum Number of Positions for This Currency Pair in One Direction (Separately for BUY and SELL)). 포지션 그리드가 MaxOrdersOpen에 도달하면, 이후의 평균화 딜 (Deals)는 무시됩니다. |
추가 개시 (Additional Opening): 추세에 따른 포지션 개시를 위한 추가 개시 기능 블록 (Block of Functions for Additional Opening of Positions on a Trend)더 알아보기: Exp – Averager. 포지션 평균화. 추세에 반대하거나 추세에 따라 딜 개시! | |
| AdditionalOpening | 추가 딜 개시 활성화 (Enable the Opening of Additional Deals). 메인 포지션 (position)이 일정 수의 딜 (Deals)로 수익이 날 경우, 우리의 어드바이저는 동일한 유형의 포지션 (position)을 엽니다. 따라서, 첫 번째 포지션을 평균화합니다. 이는 수익성 있는 신호를 활용하는 데 도움이 됩니다. 모든 전문가 어드바이저 (Expert Advisor) 기능들 (트레일링 스톱 (Trailing Stop), 브레이크이븐 (Breakeven) …)은 동일 유형의 모든 포지션 (position) (딜 (Deal))에서 계산된 중간 라인에서 작동합니다. 예시: 매수 (BUY) 포지션 (position)을 1.600 가격에서 엽니다; 가격이 1.700으로 올라가고 현재 이익이 +100 포인트 (Pips)입니다; 브레이크이븐 포인트 (평균 가격) = 1.600; 매수 (BUY) 포지션 (position)을 1.700 가격에서 열면, 우리의 포지션이 평균화되고, 브레이크이븐은 1.650으로 설정될 수 있습니다; 전문가 어드바이저 (Expert Advisor)는 추가로 3개의 포지션 (position) (딜 (Deal))을 엽니다. 가격이 다시 내려갑니다. 전문가 어드바이저 (EA)는 트레일링 스톱 (Trailing Stop)을 활성화하며, 5개의 포지션 (position)이 이익을 내면서 이를 증가시킵니다. 주의 (Attention): 서로 다른 랏 크기 (Volumes)의 포지션 (position)에 대해, 평균 가격은 수학적 공식을 사용하여 계산됩니다. |
| StopLossALL |
모든 포지션에 대한 총 스톱 로스 (Total Stop-Loss for All Positions). StopLoss, 이는 열린 포지션 (position)의 평균 가격에서 StopLossALL 포인트 거리로 설정됩니다. StopLossALL = 5 포인트로 설정하면, 이는 스톱 로스가 중간 라인에서 5 포인트 거리로 설정됨을 의미합니다. |
| DistanceAdditionalOpening |
추가 그리드 포지션 개시 거리 (The Distance for Opening Additional Grid Positions). 추세에 따라 다음 추가 포지션 (position) (딜 (Deal))을 몇 포인트마다 열지 설정할 수 있습니다. 50 포인트 (Pips)를 설정할 수 있습니다. 그러면, 각 새로운 추가 포지션 (position) (딜 (Deal))은 마지막 열린 포지션 (position)에서 100 + 50 손실 포인트 후에 열립니다 (100, 150, 200, 250, 300). |
| LotsMartinAdditionalOpening | 계수: 그리드 포지션의 랏 (Volume) 증가 (Coefficient: Increase the Lot (Volume) for the Grid Positions). 다음 추가 포지션 (position)을 위해 랏을 곱할 계수. 예시: 메인 포지션 (position)의 시작 랏 (Volume) = 0.1 LotsMartinAdditionalOpening = 2이면, 다음 추가 포지션 (position)의 랏 (Volume)은 0.2, 0.4, 0.8, 등이 됩니다. 주의 (Attention): 중간 라인은 랏을 기반으로 한 공식을 사용하여 계산됩니다. 이는 브레이크이븐 레벨 (중간 라인)을 현재 가격에 더 가깝게 가져올 수 있게 합니다. 그러나 마팅게일은 계좌에 위험할 수 있습니다. 이러한 부하를 견딜 수 있도록 이 매개변수를 계산하세요. |
| LotAdditionalOpening |
다음 추가 포지션을 위한 추가 랏 (Volume) (Additional Lot (Volume) for the Next Additional Position). 예시: 메인 포지션 (position)의 시작 랏 (Volume) = 0.1; LotAdditionalOpening = 0.05, 그러면 다음 열리는 추가 포지션 (position)의 랏 (Volume)은 0.15, 0.2, 0.25, 등이 됩니다. |
| MaxOrdersOpenAdditionalOpening |
한 방향으로 이 통화쌍의 추가 개시 포지션 수 (Separately for BUY and SELL) (Maximum Number of Positions for This Currency Pair in One Direction (Separately for BUY and SELL)). 그리드 포지션이 MaxOrdersOpenAdditionalOpening에 도달하면, 이후의 추가 포지션 (position)은 무시됩니다. |
거래 시간 옵션 (Time Trade Options): 거래 시간 관리 및 시간 제한을 위한 기능 블록 (The Block for Managing Trade Time and Time Limits) | |
| TradeStartStopbyTime |
TradeStartStopbyTime은 EA가 지정된 시간 제한 내에서 작동하도록 활성화하는 기능입니다. TradeStartStopbyTime = false인 경우, 전문가 어드바이저 (Expert Advisor)는 연중무휴로 거래합니다. TradeStartStopbyTime = true인 경우, 거래 시간 제한이 활성화됩니다: |
| SeveralTimeWork |
SeveralTimeWork 매개변수에서 거래할 여러 시간대를 지정할 수 있습니다 (You Can Also Specify Several Time Slots for Trading in the SeveralTimeWork Parameter). 기록 형식: HH:MM-HH:MM; where: 거래 시작 시간: 거래 시작 분 – 거래 종료 시간: 거래 종료 분. 예시, SeveralTimeWork = 3:00-5:00;7:30-8:50;12:00-15:00; 그러면 전문가 어드바이저 (Expert Advisor)는 다음 시간대에 거래합니다: 3:00부터 5:00까지; 7:30부터 8:50까지; 그리고 12:00부터 15:00까지. 어드바이저는 다른 시간에는 새로운 딜을 열지 않습니다. |
| OpenHour OpenMinute |
전문가 어드바이저 (Expert Advisor)는 다음 매개변수에 따라 거래 시간을 확인합니다 (The Expert Advisor Checks the Trading Time According to the Parameters): OpenHour: OpenMinute – 거래 시작; CloseHour: CloseMinute – 하루의 거래 종료. 예시: OpenHour = 5 및 OpenMinute = 0, 그리고 CloseHour = 18 및 CloseMinute = 59, 그러면, EA는 매일 오전 5:00부터 오후 6:59까지 거래합니다. |
| ClosePeriod_Minute |
거래 시작 시간으로부터 거래 기간을 지정하려면, ClosePeriod_Minute 매개변수를 설정할 수 있으며, 이는 분 단위의 기간입니다. 예시: OpenHour = 6, OpenMinute = 0, 그리고 ClosePeriod_Minute = 180. 그러면, 어드바이저는 오전 6:00부터 오전 9:00까지 거래 시간을 설정합니다 (6 + 180 분 = 9:00). |
| CloseAllTradesByOutOfTime |
비즈니스 시간이 아닐 때 모든 열린 거래 및 대기 주문 종료 (Close All Open Trades and Pending Orders During Non-Business Hours if CloseAllTradesByOutOfTime = true). 이 경우, 전문가 어드바이저 (Expert Advisor)는 지정된 시간 동안 거래하고, 거래 시간이 끝나면 어드바이저는 모든 열린 포지션 (position) 및 주문 (orders)을 종료합니다. – 사용 안 함 (Not Use) = 기능 사용 안 함; – 포지션 및 주문 (Positions and Orders) = 포지션 (positions) 및 대기 주문 (orders) 종료; – 포지션만 (Only Positions) = 포지션 (positions)만 종료; – 주문만 (Only Orders) = 대기 주문 (orders)만 종료. |
| TradeByDays |
이 블록에서는 거래할 요일 (Trading Days)을 지정할 수 있습니다: TradeByDays. 예시, TradeByDays = true 및 Days = 1,2,3 – 이 경우, 전문가 어드바이저 (Expert Advisor)는 월요일 (Monday), 화요일 (Tuesday), 그리고 수요일 (Wednesday)에만 거래합니다. 또는 거래 시간이 설정되지 않은 경우, 이 3일 동안 연중무휴로 거래합니다. Days = 1,2,3,4,5을 설정하지만 TradeStartStopbyTimeFriday = false인 경우, 전문가 어드바이저 (Expert Advisor)는 금요일 (Friday)에 거래하지 않습니다. |
| DayForOptimization |
최적화를 위한 하루 설정 (Set One Day for Optimization in the DayForOptimization Parameter). 이 옵션은 최적화 중에 어느 요일이 가장 수익성이 있었는지 결정하는 데 유용합니다. 예시, DayForOptimization = 3, 그러면 EA는 수요일 (Wednesday)에만 거래합니다. |
| TradeStartbyTimeMonday |
전문가 어드바이저 (Expert Advisor)는 TradeStartbyTimeMonday = true로 설정되고 OpenHourMonday: OpenMinuteMonday 시간에 월요일에 작동을 시작합니다. 예시, OpenHourMonday = 3 및 OpenMinuteMonday = 40, 그러면 EA는 월요일 (Monday)에 서버 시간 기준으로 오전 3:40에 거래를 시작합니다. (마켓 워치에 표시된 브로커의 시간). |
| TradeStartStopbyTimeFriday |
TradeStartStopbyTimeFriday – 금요일의 거래 시간. 우리의 전문가 어드바이저 (Expert Advisor)에서는 금요일의 거래 시간을 설정할 수 있습니다. 금요일의 시간 옵션: OpenHourFriday: OpenMinuteFriday – CloseHourFriday: CloseMinuteFriday 예시, 금요일에 18:00 이후에 새로운 딜을 열지 않도록 하려면, 다음을 설정하세요: OpenHourFriday = 0: OpenMinuteFriday = 0 – CloseHourFriday = 18: CloseMinuteFriday = 0 이 경우, 어드바이저는 18:00 이후에 새로운 딜을 열지 않습니다. |
| CloseFriday | CloseFriday를 true로 설정하면, 금요일에 모든 열린 거래 및 대기 주문을 18:00에 종료할 수 있습니다. |
브레이크이븐 없이 손실 옵션 (BreakEven Without LOSS Options): 특정 순간에 브레이크이븐 설정을 위한 기능 블록 (Block of Functions for Breakeven (Set Stop Loss to Break-Even at a Specific Moment)) | |
| MovingInWLUSE | 브레이크이븐 기능 활성화 (Enable the Break-Even Function). 이 기능은 포지션이 LevelProfit 포인트의 이익을 달성했을 때 Stop Loss를 LevelWLoss 포인트로 수정합니다. www.expforex.com의 전문가 기능 (Functional Features of Experts from www.expforex.com) 예시: LevelWLoss = 50, LevelProfit = 200 포지션이 200 포인트의 이익을 축적하자마자, 포지션의 Stop Loss가 포지션의 개시 가격 (+ 스프레드) + 50 포인트로 수정됩니다. 예시: LevelWLoss = 0, LevelProfit = 100 포지션이 100 포인트의 이익을 축적하자마자, 포지션의 Stop Loss가 포지션의 개시 가격 (+ 스프레드)으로 수정됩니다. 주의 (Attention): 평균화 또는 추가 기능이 활성화된 경우 (true): 포지션을 2개 이상 열면, 어드바이저는 중간 라인에서 브레이크이븐 기능을 활성화하며, 포지션의 개시 가격에서가 아닙니다. |
| LevelWLoss |
포지션이 이익을 낸 포인트 수준 (LevelWLoss), 이 수준에 도달하면 Stop Loss가 설정됩니다. 1 = 1 포인트 이익; 0 = 자동 최소 이익 모드. 0일 경우, 브레이크이븐 (Stop Loss at the Breakeven Point)의 이익 포인트 수 = 현재 통화쌍의 스프레드. |
| LevelProfit | 포지션이 Stop Loss에서 LevelWLoss 포인트 (Pips)의 이익을 달성할 때 Stop Loss를 설정하는 이익 포인트 수 (LevelProfit). LevelProfit은 LevelWLoss보다 커야 합니다 (LevelProfit must be greater than LevelWLoss). |
표준 트레일링 옵션 (Standard Trailing Options)(트레일링 스톱을 통해 포지션을 수익으로 변경하기) | |
| TrailingStopUSE | 표준 트레일링 스톱 기능 활성화 (Enable the Standard Trailing Stop Function). 참고 (Note): 평균화 또는 추가 기능이 활성화되어 있고, 2개 이상의 포지션 (position)을 열면, 전문가 어드바이저 (Expert Advisor)는 개시 포지션 가격이 아닌 중간 라인에서 트레일링 스톱 기능을 활성화합니다. 평균 가격이 차트에 표시됩니다. 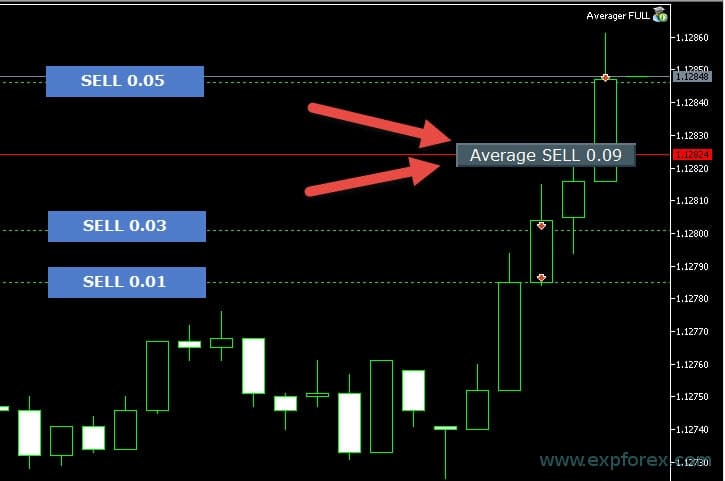
|
| IfProfTrail |
“true”인 경우 – 전문가 어드바이저 (Expert Advisor)는 포지션이 브레이크이븐 (Stop Loss at Breakeven Point) + TrailingStop 포인트 (Pips)의 이익을 달성했을 때만 수정하기 시작합니다. “false”인 경우, Trailing Stop은 포지션이 열리자마자 작동하며, 포지션이 설정되어 가격이 움직일 때마다 이익을 내고 끌어당깁니다. |
| TrailingStop |
현재 가격에서의 스톱 로스까지의 거리 (Distance in Points from the Current Price to the Stop-Loss). 현재 이익이 200 포인트 (Pips)이고, TrailingStop = 100인 경우, Stop Loss는 +100 포인트에 설정됩니다. 따라서, 가격은 최대 100 포인트 (Pips)의 롤백 가능성이 있습니다. 그렇지 않으면, StopLoss가 활성화되어 포지션이 +100 포인트 (Pips)에서 종료됩니다. |
| TrailingStep | 트레일링 스톱 기능이 활성화된 경우 StopLoss의 단계 (The Step of StopLoss When the Trailing Stop Function is Enabled). |
| SaveTPafterTrailingStop |
활성화 시, 수정된 포지션의 Take Profit은 Trailing Stop이 활성화된 후 변경되지 않습니다. 예시: SaveTPafterTrailingStop = false: Trailing Stop을 실행할 때, 수정된 포지션의 TakeProfit은 삭제됩니다 (0으로 설정); SaveTPafterTrailingStop = true: Trailing Stop이 활성화되면, 수정된 포지션의 TakeProfit이 보존됩니다. |
Parabolic SAR을 이용한 트레일링 스톱 (TrailingStop by SAR): Parabolic SAR(Parabolic SAR 지표를 통해 Stop Loss 설정 및 수정) | |
| TrailingStopSAR |
Parabolic SAR 지표를 기반으로 한 트레일링 스톱 (Trailing Stop) 기능을 활성화할 수 있습니다 (You can enable the Trailing Stop function based on the Parabolic SAR indicator). 주의 (Attention): 지표가 포지션에 손실을 주는 경우, 전문가 어드바이저 (Expert Advisor)는 포지션에 이익이 되는 파라볼릭 포인트까지 기다립니다. 평균화 포지션 (position)이 있는 경우, 전문가 어드바이저 (EA)는 포지션의 평균 가격에서 브레이크이븐 (Stop Loss at Breakeven Point)을 고려합니다. |
| TrailingStopSAR_TimeFrame | Parabolic SAR 지표의 시간대 (Timeframe for the Parabolic SAR Indicator). |
| maximum | Parabolic SAR 지표 설정 (Parabolic SAR Indicator Settings). |
총 이익 또는 손실 시 전체 종료 옵션 (CloseALL When Profit or LOSS Options)총 이익/손실에 도달 시 메타트레이더에서 포지션 종료 (Closing Positions in MetaTrader Upon Reaching Total Profit/Loss with the Profit Trailing Function).이 기능은 CloseIfProfitorLoss with Trailing의 일부입니다. 총 이익 또는 손실을 이익 트레일링으로 제어합니다. | |
| TypeofClose |
총 이익 또는 손실 시 종료 유형 (Type of Closing on Total Profit or Loss), 달러 (예금 통화), 포인트 (Pips), 잔액의 퍼센트, 또는 자본의 퍼센트. 이 블록은 모든 포지션 (position)을 닫을 수 있도록 허용하며, 총 이익 또는 손실이 설정된 값에 도달하면 해당 통화쌍에 대한 모든 포지션 (position)을 닫습니다. |
| SeparateBuySell |
두 개의 다른 방향: 매수 및 매도에 대한 포지션의 별도 계산 및 종료 (Separate Calculation and Closing of Positions in Two Different Directions: BUY and SELL). SeparateBuySell = true인 경우, 전문가 어드바이저 (Expert Advisor)는 총 이익 또는 손실을 위해 매수 (BUY) 및 매도 (SELL) 방향을 별도로 종료합니다. SeparateBuySell = false인 경우, 전문가 어드바이저 (Expert Advisor)는 총 이익 또는 손실을 위해 매수 (BUY) 및 매도 (SELL) 방향을 함께 종료합니다. 전문가 어드바이저 (Expert Advisor)가 두 가지 유형의 포지션 (position) (딜 (Deals), 매수 (BUY) 및 매도 (SELL))을 종료하려면, 이 두 포지션의 총 이익이 설정된 값을 초과해야 합니다. 참고 (Note): OnlyOnePosbySignal = false 및 OnePosPerDirection = false인 경우, 또는 여러 방향과 각 방향에 여러 포지션 (position)을 열 수 있는 설정이 있는 경우. |
| CloseProfit |
총 이익으로 포지션 종료 (Close Positions with Total Profit). True – 활성화, False – 비활성화. |
| prifitessss |
종료를 위한 단위 수 (The Number of Units for Closing) (달러(또는 예금 통화), 포인트 (Pips), 퍼센트). 이 통화쌍의 포지션 (position)에 대한 총 이익이 prifitessss 값보다 크거나 같으면, 모든 포지션 (position)이 종료됩니다. |
| CloseLoss |
총 손실 시 포지션 종료 (Close Positions at a Total Loss). True – 활성화, False – 비활성화. |
| lossss |
종료를 위한 단위 수 (The Number of Units for Closing) (달러(또는 예금 통화), 포인트 (Pips), 퍼센트). 이 통화쌍의 포지션 (position)에 대한 총 손실이 lossss 값보다 크거나 같으면, 모든 포지션 (position)이 종료됩니다. |
| TrailOptions |
prifitessss 단위를 초과할 때 총 이익을 트레일링하는 기능 활성화 (Enable Trailing the Total Profit When Exceeding prifitessss Units). 이 옵션은 prifitessss 매개변수로부터의 거리 정의입니다, 이익 트레일링을 활성화하기 위해. 예시, prifitessss = $100 (예금 통화), TrailOptions = $10. 그러면, 포지션 (position)이 $100의 이익을 얻으면, 전문가 어드바이저 (Expert Advisor)는 이러한 포지션 (position)을 종료하지 않고, 이익 수준을 $90으로 설정합니다. 더 나아가, 이익이 $1 증가하여 $101이 되면, 이익 수준은 $91로 고정됩니다. 이익이 감소하여 $91에 도달하면, 모든 포지션 (position)은 이 수준에서 종료됩니다. |
| TrailOptionsStep | 고정 이익 수준을 증가시키는 단계 (The Step of Increasing the Fixed Profit Level). |
| BalanceStart |
시작 잔액 (The Starting Balance), 이로부터 잔액의 퍼센트를 계산합니다. 0으로 설정하면, 현재 계좌 잔액이 사용됩니다. |
| ForcedClose | 총 이익 또는 손실에 도달한 후 모든 포지션을 강제 종료 (Forced Closure of All Positions after the Price Reaches a Total Profit or Loss). |
| MailSend | 총 이익 또는 손실로 인해 포지션 종료 시 이메일 전송 (Send Email when closing positions due to Total Profit or Loss). |
| Orderdelete | 총 이익 또는 손실로 인해 포지션 종료 시 대기 주문 삭제 (Delete Pending Orders when closing positions due to Total Profit or Loss). |
| OFFAfterClosePROF |
총 이익으로 종료 후 전문가 어드바이저 (EA) 비활성화 (Disable the Expert Advisor (EA) After Closing on Total Profit). 전문가 어드바이저 (Expert Advisor)는 작동을 중지하고 새로운 포지션 (position) (딜 (Deal))과 주문을 열지 않습니다! |
| OFFAfterCloseLOSS |
총 손실로 종료 후 전문가 어드바이저 (EA) 비활성화 (Disable the Expert Advisor (EA) After Closing for Total Loss). 전문가 어드바이저 (Expert Advisor)는 작동을 중지하고 새로운 포지션 (position) (딜 (Deal))과 주문을 열지 않습니다! |
| CloseTerminalAfterClosePROF | 총 이익으로 종료 후 터미널 종료 (Close the Terminal After Closing on Total Profit). |
| CloseTerminalAfterCloseLOSS | 총 손실로 종료 후 터미널 종료 (Close the Terminal After Closing for Total Loss). |
손실 및 이익 제한 (Limiting Losses and Profits)특정 기간 동안 손실 및 이익 제한. 하루/주/월 단위로 손실과 이익 제한. 손실 및 이익 제한 LimitFor – 제한 유형 (day/week/month); LimitForLosses – 손실 제한; LimitForProfits – 이익 제한; LimitType – 달러, 포인트, 예금 이자 기준 제한 유형; ClosebyLIMITING – 제한 초과 시 어드바이저의 딜 (Deals) 종료; UseCurrentProfit – 제한 계산 시 현재 플로팅 이익/손실 고려; 이 기능은 전문가 어드바이저 (Expert Advisor)가 예금 통화로 특정 이익/손실을 달성하면 작동을 종료할 수 있게 합니다, 하루/월/주 단위로. 다음 운영은 다음 날, 주 또는 월이 됩니다. 예시, LimitFor = DAY, LimitForProfits = 10 달러; 계산을 위한 LimitType을 선택할 수 있습니다 (달러, 포인트, 계좌 잔액의 퍼센트). 제한이 초과되면 모든 딜 (Deals)을 종료하고 삭제하려면, ClosebyLIMITING = true로 설정하세요. UseCurrentProfit은 이 제한을 계산할 때 이 전문가 어드바이저 (Expert Advisor)의 현재 플로팅 이익/손실을 고려할지 여부를 활성화/비활성화합니다. | |
드로우다운 옵션 (Drawdown Options)드로우다운 시 포지션 개시를 제어하는 기능 블록. DrawDown_Level – 드로우다운 제어 블록 활성화; Type_DrawDownHR – 거래 이력과 현재 거래를 기반으로 한 드로우다운 계산 유형; DrawDown_Level_One – 첫 번째 드로우다운 수준 (퍼센트 단위); Type_Deal_Level_One – 첫 번째 드로우다운 수준 초과 시 조치 (새로운 딜 금지, 딜 평균화 또는 추가 개시 비활성화, 모든 딜 종료); DrawDown_Level_Two – 두 번째 드로우다운 수준 (퍼센트 단위); Type_Deal_Level_Two – 두 번째 드로우다운 수준 초과 시 조치 (모든 수익 포지션 종료, 모든 손실 포지션 종료, 모두 종료). 예시: DrawDown_Level = true, DrawDown_Level_One = 50, Type_Deal_Level_One = No_NewDeal, DrawDown_Level_Two = 90, Type_Deal_Level_Two = Close_All. 이 설정으로, 현재 예금의 딜 (Deals)의 드로우다운이 50%를 초과하면, EA는 새로운 신호에 대해 새로운 딜 (Deals)을 열지 못합니다. 동시에, 평균화 기능은 작동합니다. 드로우다운이 90%를 초과하면, EA는 즉시 모든 딜 (Deals)을 종료합니다. | |
가상 출금 (Virtual Withdrawal)전략 테스트에서 예금 작업(예금 추가, 예금 인출)을 시뮬레이션하는 데 사용되는 가상 출금 도구. 전략 테스터에서 가상 자금 출금을 추가했습니다: Withdrawal – 전략 테스터에서 테스트할 때 가상 자금 출금 활성화; Withdrawal_mode – 출금 모드, 예금 통화 기준 또는 잔액의 퍼센트 기준; Withdrawal_amount – 출금 횟수; Withdrawal_periodicity_days – 출금 빈도 (일 단위); Withdrawal_Max – 최대 출금 금액; Withdrawal_EndOfTest – 테스트 종료 후 출금; | |
OnTester_Custom테스터 블록에서, OnTester_Custom_max 변수가 추가되었으며, 여기에서 유전자 최적화를 위한 기준을 정의할 수 있습니다. 테스트 결과에 대한 자세한 내용: Statistics 공식 형태로 기록됩니다. 예시: OnTester_Custom_max = “STAT_PROFIT * STAT_TRADES / STAT_EQUITY_DD” 참조 문서와 같이 변수 이름을 반드시 지정해야 합니다! 유전자 열거 중에 최적화가 결과를 고려할 최소 값을 설정할 수 있습니다! 다시 말해, 조건을 설정할 수 있습니다: “최소 딜 수” (또는 다른 매개변수), 이 경우 이 실행은 결과로 간주됩니다. 설정에서 지정된 값보다 적은 딜 (Deals)을 열면, 이 최적화 실행은 결과로 간주되지 않습니다! —주의 (Attention)! 고급 사용자 전용. OnTester_Min_Trades = 0; // 최적화를 위한 최소 딜 OnTester_Min_Profit = 0; // 최적화를 위한 최소 이익 OnTester_Min_ProfitFactor = 0; // 최적화를 위한 최소 ProfitFactor OnTester_Min_Balance = 0; // 최적화를 위한 최소 잔액 OnTester_Min_Equity = 0; // 최적화를 위한 최소 자본 OnTester_Max_Balance_DD = 0; // 최적화를 위한 최대 잔액 드로우다운 % OnTester_Max_Equity_DD = 0; // 최적화를 위한 최대 자본 드로우다운 % 이것에 대한 자세한 사용자 가이드 (Detailed USER GUIDE for This) | |
빌더 xCustomEA에 대한 자주 묻는 질문

일반 FAQ
FAQ 가장 인기 있는 질문에 대한 답변
어떤 지표를 사용해야 하나요?
어떤 필터가 내 지표와 맞을까요?
좋은 지표는 어디서 찾을 수 있나요?
전략을 만들어 주실 수 있나요?
맞춤형 프로그래밍 서비스를 제공하시나요?
안녕하세요.
귀하의 댓글에 대해 더 자세히 답변드리겠습니다:
15년 전, 저는 맞춤형 프로그래밍을 시작했습니다. 고객들이 사양을 보내주면, 그들의 요구에 맞는 Expert Advisor를 개발했습니다.
수많은 프로그래밍 프로젝트를 완료했습니다.
많은 프로젝트들이 서로 유사했습니다.
동일한 기능 요구 사항을 가지고 있었습니다.
결국, 각 작업이 이전 작업과 유사해서 프로그래밍에 지치게 되었습니다.
그래서 사용자가 직접 커스터마이즈할 수 있도록 xCustomEA Expert Advisor를 만들었습니다.
가장 중요한 점은 EA에 거래 전략이 없다는 것입니다. 순수하게 도구일 뿐입니다.
주요 기능은 사용자의 지표를 기반으로 거래하는 것입니다. 사용자의 전략을 실행합니다.
저는 “시장에 있는 모든 지표”를 포괄하는 특정 지표 필터를 가지고 있지 않습니다.
왜 “모든”이라고 하나요?
왜냐하면 이것은 내장된 전략이 없는 범용 Expert Advisor이기 때문입니다. 사용자의 지표 신호를 기반으로 거래하며, 설정에서 이를 구성하게 됩니다.
저는 더 이상 맞춤형 프로젝트를 수주할 능력이 없어 맞춤형 프로그래밍을 중단했습니다.
현재는 오직 저만의 도구와 거래 프로그램만 개발하고 있습니다.
신호를 제공하는 귀하의 지표가 충분히 수익성이 없나요?
그렇다면 수익성이 있고 만족스러운 수익을 창출하는 지표를 찾아야 합니다.
저는 그런 지표를 제공하지 않습니다.
이 어드바이저는 사용자의 지표를 기반으로 작동하는 범용 거래 도구입니다.
이것은 거래 로봇을 위한 템플릿입니다.
영상에서 가장 중요한 점을 설명했습니다: 왜 이 프로그램을 만들었는지.
질문에 답변하고 지표 프로그래밍을 도와드리겠습니다.
하지만 신호에 어떤 필터 지표를 사용해야 하는지 묻지 말아 주세요.
특정 신호에 어떤 필터를 사용해야 하는지 결정할 수 없습니다.
이것들은 귀하의 신호입니다.
저는 제 Expert Advisor의 기능을 설명할 수 있습니다.
귀하의 전략을 프로그래밍하는 데 도움을 드릴 수 있습니다.
하지만 제 신호를 사용하고 싶다면, TickSniper – 완전 자동 거래 로봇을 활용하는 것이 좋습니다.
매개변수의 값은 포인트 또는 핍으로 무엇을 나타내나요?
포인트입니다! 값은 Point 변수에서 가져옵니다.
- 5자리 또는 3자리 브로커인 경우, 1 포인트 = 0.00001 또는 0.001
- 4자리 또는 2자리 브로커인 경우, 1 포인트 = 0.0001 또는 0.01
귀하의 특정 브로커에 해당하는 값을 (필드에) 입력하세요.
포인트와 핍의 차이에 대해 많은 논쟁이 있습니다.
저는 보편적인 값 (Point = Pip)을 사용합니다.
이 값들은 귀하의 브로커와 일치합니다.
이 Expert Advisor의 키트와 설정이 있나요?
아니요, 저는 Expert Advisor를 Builder로 개발했습니다.
이 EA는 귀하의 자체 최적화가 필요합니다.
우리의 기능을 사용하여 귀하의 전략과 역량에 따라 커스터마이즈하세요.
The X Advisor 최적화 및 테스트에 대해 더 알아보기
최적화를 원하지 않나요? 저의 초보자용 어드바이저를 다운로드하세요: Tick Hamster 또는 TickSniper.
MT4와 MT5 터미널 간에 테스트 결과가 다른 이유는 무엇인가요?
각각 다른 터미널로서 고유한 시세 기록과 전략 테스터의 원칙이 다르기 때문입니다.
신호에 어떤 설정을 사용하시나요?
기본 설정입니다.
저는 이 어드바이저의 수익성을 테스트하지 않고 기능만 테스트합니다.
왜요?
이 어드바이저는 Builder로 만들어졌기 때문에, 각 사용자가 자신의 전략을 개발해야 합니다.
저의 전략을 원하신다면, TickSniper는 이미 자동 거래 로봇을 설정합니다.
가상 스톱로스와 실제 스톱로스의 결과가 매우 다른 이유는 무엇인가요?
가상 스톱로스는 스프레드 증가, 스톱 레벨 증가 또는 가격 변동으로 인한 주문 수정 오류를 겪을 수 없습니다.
어떤 상황에서도 필요한 수준으로 항상 조정됩니다.
모든 어드바이저 진입은 글로벌 변수에 기록됩니다.
실제 스톱로스는 스프레드 증가, 최소 스톱 레벨 증가 및 가격 변동으로 인한 수정 오류를 겪을 수 있습니다. 따라서 서버에서 허용하는 수준으로만 조정할 수 있습니다.
이러한 시프트로 인해, 이러한 포지션을 종료할 때 가상 종료는 전혀 다른 시간 간격을 가질 수 있습니다. 실제 스톱로스는 다른 시간에 종료될 수 있어 포지션의 개시 및 종료 논리를 방해합니다.
예를 들어, 하나의 포지션이 열려 있는 동안 두 번째 포지션이 열리지 않습니다!
새 버전의 결과가 이전 버전과 다른 이유는 무엇인가요?
프로그램의 사소한 오류를 수정하고 기능을 개선하기 위해 업데이트하고 있습니다.
단일 기능을 변경하고 오류를 수정하면 이전 버전과 새 버전 간의 결과가 달라질 수 있습니다.
그러나 업데이트의 목적은 버그를 수정하고 기능을 향상시키는 것입니다.
이전 버전의 결과가 새 버전과 다를 수 있음에 유감이지만, 계속해서 프로그램을 업데이트할 것입니다.
EA에 여러 가지 변경을 원합니다.
저는 새로운 기능이 시스템 사용자 다수에게 이익이 될 때만 신중하게 고려합니다.
안타깝게도, 모든 사용자에게 각각의 기능을 별도로 프로그래밍할 수는 없습니다.
가치가 있다고 판단되는 몇 가지 기능만 추가할 수 있습니다. 죄송합니다.
더 많은 지표를 언제 추가하시나요?
저는 필요하다고 생각되는 지표만 추가합니다.
안타깝게도,
모든 지표를 Expert Advisor에 추가할 수는 없습니다.
어드바이저는 이미 외부 매개변수로 과부하 상태입니다.
이 기능이 저에게는 작동하지 않아요!
저는 완전한 오류 보고서를 제공해주시면 도와드릴 수 있습니다.
MT4와 MT5 터미널 간에 어드바이저 설정 파일(SET 파일)을 사용할 수 있나요? 왜 MT5의 설정이 MT4에서는 작동하지 않나요?
네, 두 터미널 간에 설정 파일(SET 파일)을 사용할 수 있습니다. 모든 변수는 동일합니다.
하지만 한 가지 문제가 있습니다:
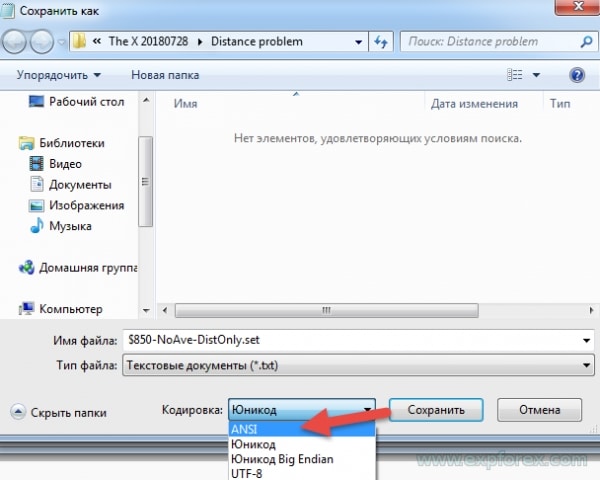
MT5 터미널은 모든 인코딩을 지원하는 반면, MT4는 ANSI 텍스트만 지원합니다.
따라서 MetaTrader 5 터미널에서 저장된 설정 파일은 MetaTrader 4 터미널에서 올바르게 열리지 않습니다.
MT5 터미널의 설정 파일을 MT4에서 사용하려면 SET 파일을 열고 ANSI 인코딩으로 저장해야 합니다.
xCustomEA란 무엇인가요?
xCustomEA는 맞춤형 지표와 함께 작동하도록 설계된 범용 거래 어드바이저입니다. 이는 거래자들이 MT4 및 MT5 터미널에서 맞춤형 지표를 사용하여 거래 전략을 프로그래밍하고 자동화할 수 있게 해줍니다.
xCustomEA는 The X와 어떻게 다른가요?
xCustomEA는 The X 어드바이저의 모든 매개변수를 복제하지만 iCustom을 통해 맞춤형 지표를 사용할 수 있는 기능을 추가합니다. 이는 거래 전략을 만들고 테스트하는 데 있어 더 큰 유연성을 제공합니다.
xCustomEA는 어떤 거래 플랫폼을 지원하나요?
xCustomEA는 MetaTrader 4 (MT4)와 MetaTrader 5 (MT5) 터미널 모두와 호환되며, 거래자들이 다양한 플랫폼에서 이를 사용할 수 있게 해줍니다.
xCustomEA는 모든 맞춤형 지표와 함께 사용할 수 있나요?
네, xCustomEA는 MetaTrader 플랫폼과 호환되는 모든 맞춤형 지표와 통합할 수 있습니다. 인터넷이나 mql5 시장에서 지표를 다운로드하여 xCustomEA와 함께 사용할 수 있습니다.
xCustomEA에 맞춤형 지표를 설치하려면 어떻게 하나요?
맞춤형 지표를 설치하려면, xCustomEA 설정에서 지표의 이름과 버퍼 번호를 지정하세요. 지표가 MetaTrader 터미널의 올바른 Indicators 폴더에 배치되어 있는지 확인하세요.
xCustomEA를 사용함으로써 얻는 이점은 무엇인가요?
xCustomEA는 새로운 지표에 대한 어드바이저를 추가 비용 없이 프로그래밍하고 수정할 수 있는 유연성을 제공합니다. 표준 및 맞춤형 전략을 모두 지원하여 거래자들의 시간과 비용을 절약해 줍니다.
xCustomEA를 사용하여 거래 전략을 프로그래밍하려면 어떻게 하나요?
사용자 정의 지표를 xCustomEA와 통합하여 자신의 전략을 프로그래밍할 수 있습니다. MT4 또는 MT5용 제공된 프로그래밍 단계를 따라 신호, 필터 및 거래 논리를 정의하세요.
xCustomEA를 사용하려면 프로그래밍이 필요한가요?
xCustomEA의 기본 사용은 프로그래밍을 필요로 하지 않으며, 미리 구축된 전략을 포함하고 있습니다. 그러나 맞춤형 지표를 완전히 활용하고 개인화된 전략을 만들려면 약간의 프로그래밍 지식이 유리합니다.
xCustomEA를 MetaTrader 4와 5에서 모두 사용할 수 있나요?
네, xCustomEA는 MetaTrader 4 (MT4)와 MetaTrader 5 (MT5) 플랫폼 모두와 완벽하게 호환되어 원활한 통합 및 전략 구현이 가능합니다.
xCustomEA는 자금 관리를 어떻게 처리하나요?
xCustomEA는 Autolot Calculation 및 Fixed Lot Options와 같은 기능을 포함하여 잔액에 따라 자동으로 로트 크기를 계산하고 일관된 포지션 크기를 보장합니다.
xCustomEA는 어떤 내장된 전략을 제공하나요?
xCustomEA는 이동 평균(Moving Averages), MACD, RSI, Bollinger Bands와 같은 표준 지표를 기반으로 약 20개의 내장 거래 전략을 포함하고 있습니다.
xCustomEA는 최적화 및 테스트를 어떻게 수행하나요?
xCustomEA는 MetaTrader 전략 테스터에서 역사적 데이터를 사용하여 전략 성능을 향상시키고 라이브 거래 전에 신뢰성을 보장하기 위한 포괄적인 백테스팅 및 최적화를 지원합니다.
xCustomEA에서 신호와 필터의 차이는 무엇인가요?
신호는 지표 조건에 따라 거래 행동을 트리거하고, 필터는 추가 기준을 적용하여 이러한 신호를 정제함으로써 거래 정확성을 향상시킵니다.
xCustomEA에서 버퍼 번호를 어떻게 지정하나요?
버퍼 번호를 지정하려면, xCustomEA 설정에서 BUY 및 SELL 신호에 해당하는 적절한 indicator buffers를 식별하세요. 이를 통해 정확한 신호 인식이 가능합니다.
xCustomEA를 반자동 모드로 사용할 수 있나요?
네, xCustomEA는 거래 기회에 대한 알림을 받고 거래 진입을 수동으로 확인할 수 있는 반자동 모드를 제공합니다. 이를 통해 거래에 대한 더 큰 제어권을 가질 수 있습니다.
xCustomEA에서 Autolot 계산이란 무엇인가요?
Autolot Calculation은 현재 계정 잔액을 기반으로 적절한 로트 크기를 자동으로 결정하여 각 거래의 위험 관리를 최적화합니다.
xCustomEA에서 Martingale 전략은 어떻게 작동하나요?
Martingale 전략은 손실 거래 후 로트 크기를 증가시켜 손실을 회복하며, 위험을 관리하고 잠재적 수익성을 향상시키기 위해 매개변수를 사용자 정의할 수 있습니다.
xCustomEA는 트레일링 스톱을 어떻게 관리하나요?
xCustomEA는 Standard Trailing Stop 및 Parabolic SAR Trailing Stop을 포함한 다양한 Trailing Stop 기능을 제공하여 가격 움직임에 따라 동적으로 거래를 관리합니다.
실제 계정에서 xCustomEA의 오류를 어떻게 처리하나요?
xCustomEA는 일반적인 거래 오류 및 문제에서 자동으로 복구하여 라이브 계정에서 원활한 작동을 보장하는 Error Handling 메커니즘을 포함하고 있습니다.
The X에서 xCustomEA로 전략을 가져올 수 있나요?
네, The X에서 xCustomEA로 전략을 가져올 수 있어 검증된 전략을 적용하면서 더 큰 유연성을 위해 맞춤형 수정을 추가할 수 있습니다.
MT4에서 xCustomEA로 전략을 프로그래밍하는 단계는 무엇인가요?
MT4에서 xCustomEA로 전략을 프로그래밍하려면 지표를 리소스에 로드하고, 전략과 신호를 생성하며, 필터를 지정하고, 제공된 프로그래밍 단계를 통해 거래 논리를 정의해야 합니다.
MT5에서 xCustomEA로 지표 핸들을 생성하려면 어떻게 하나요?
MT5에서는 지표 핸들을 선언하고 iCustom 함수를 사용하여 초기화함으로써 핸들을 생성하세요. 이를 통해 xCustomEA는 전략 실행 중에 맞춤형 지표와 상호 작용할 수 있습니다.
xCustomEA에 미리 설정된 거래 전략이 있나요?
네, xCustomEA는 표준 지표를 기반으로 약 20개의 미리 설정된 거래 전략을 포함하고 있으며, 이를 즉시 사용하거나 거래자 취향에 맞게 추가로 커스터마이즈할 수 있습니다.
xCustomEA로 전략을 백테스트하려면 어떻게 하나요?
xCustomEA는 MetaTrader 전략 테스터에서 역사적 데이터를 사용하여 거래 전략을 실행함으로써 백테스팅을 지원하며, 라이브 거래 전에 성능을 평가하고 최적화할 수 있게 도와줍니다.
xCustomEA 사용자에게 어떤 지원 리소스가 제공되나요?
xCustomEA 사용자들은 공식 포럼에서 포괄적인 문서, 프로그래밍 가이드, 전략 예제에 접근할 수 있으며, 문제 해결 및 지원을 위한 고객 지원도 받을 수 있습니다.
위험 경고:
과거 거래 성과는 미래 결과를 보장하지 않습니다.
외환 거래는 높은 위험을 수반하며 모든 투자자에게 적합하지 않을 수 있습니다.
거래 로봇을 사용하는 것은 상당한 위험을 수반하며, 초기 투자금 이상을 잃을 수 있습니다.
신중하게 진행하고, 재정 상황을 신중히 평가하며, 자격을 갖춘 전문가의 조언을 고려하시기 바랍니다.
변경 기록 xCustomEA
-The panel is now fully usable again on MetaQuotes VPS environments.
-Verified actions are back in service: Stop Trading, Modify Only, Telegram alerts, Push notifications.
🎨 MT5 — Visual Layer Refinements
-Improved how interface elements are rendered in MetaTrader 5, making the UI more stable.
-Introduced low-level adjustments to stay ready for the upcoming MT5 graphics engine update.
🔤 Font Update for Consistent Output
-Reworked typography by moving from Roboto to Tahoma for cleaner, uniform text.
-Tahoma is broadly supported on Windows, ensuring the same appearance across different setups.
📏 Strategy Tester — Dynamic Panel Sizing
-The panel can now resize automatically inside the Strategy Tester.
-This makes backtesting with the panel noticeably easier.
🐞 Polishing & Performance Work
-Removed a set of minor bugs and UI edge-case issues.
-Optimized internal routines for higher reliability and faster performance.
-Updated compilation to the latest terminal build for maximum compatibility.
WHAT’S NEW — CUSTOM OPTIMIZATION CRITERION (USER GUIDE)
This feature is for Strategy Tester optimization in MetaTrader 5. It does not change live trading behavior. It helps the Tester pick the best parameters by a number YOU define.
WHAT IT IS & WHY IT MATTERS
During optimization, the Tester ranks results by a single number (criterion). Usually that’s profit, drawdown, etc.
Now you can provide your own number with a simple formula, so you decide what “best” means (e.g., maximize profit while penalizing drawdown, reward more trades, prefer higher Profit Factor, etc.).
Example idea:
STAT_PROFIT / (STAT_EQUITY_DD + 1)
WHAT’S NEW
-
String input “OnTester_Custom_max” to define a custom ranking formula.
-
Full expression support:
-
Operators: + - * /
-
Precedence: * and / before + and -
-
Parentheses: ( )
-
Unary minus: -X
-
Numeric constants: 1, 0.5, 10.0
-
-
No limits on formula length or number of metrics used.
-
All TesterStatistics variables supported (incl. STAT_COMPLEX_CRITERION).
-
Formula normalization: spaces/tabs and case handled automatically.
-
Optional pre-filters before calculation (min trades, min profit, max drawdown, min Profit Factor, etc.) to discard invalid runs early.
-
Improved logs: original formula, normalized expression, final score.
-
Safe division policy by default (division by zero returns 0.0; can be changed in code if desired).
Note: OnTester() affects only optimization ranking. It does not change the EA’s live trading logic.
WHERE TO FIND IT IN METATRADER 5
-
Open Strategy Tester (Ctrl+R).
-
Select the EA, symbol, timeframe, dates, deposit.
-
Enable Optimization.
-
Set Optimization Criterion:
-
Custom max (to maximize your formula), or
-
Custom min (to minimize it).
-
-
In Inputs, find the string parameter: OnTester_Custom_max — enter your formula here.
-
(Optional) Set filters in Inputs to prune junk runs:
-
OnTester_Min_Trades
-
OnTester_Min_Profit
-
OnTester_Min_Balance / OnTester_Min_Equity
-
OnTester_Max_Balance_DD / OnTester_Max_Equity_DD (percent)
-
OnTester_Min_ProfitFactor
-
After runs finish, the “Custom” column equals your returned value (STAT_CUSTOM_ONTESTER).
HOW TO WRITE A FORMULA (SYNTAX)
-
Allowed operators: + - * /
-
Precedence: * and / before + and -
-
Parentheses supported: ( )
-
Unary minus supported: -STAT_PROFIT
-
Spaces and case are ignored
-
Use numeric constants freely: 0.5, 10, 1000
Common variables:
-
STAT_PROFIT Net profit
-
STAT_TRADES Number of trades
-
STAT_EQUITY_DD Max equity drawdown (money)
-
STAT_EQUITYDD_PERCENT Max equity drawdown (%)
-
STAT_BALANCE_DD Max balance drawdown (money)
-
STAT_PROFIT_FACTOR Profit Factor
-
STAT_EXPECTED_PAYOFF Expected payoff per trade
-
STAT_RECOVERY_FACTOR Profit / balance drawdown
Tip: Protect denominators to avoid division by zero, e.g. /(X + 1) or /(X + 0.0001).
READY-TO-PASTE PRESETS (EXAMPLES)
-
Balanced profit vs. drawdown (money):
STAT_PROFIT / (STAT_EQUITY_DD + 1) -
Reward activity while controlling risk:
STAT_PROFIT * STAT_TRADES / (STAT_EQUITY_DD + 1) -
Quality-focused (expected payoff and PF), normalized by % risk:
STAT_EXPECTED_PAYOFF * STAT_PROFIT_FACTOR / (1 + STAT_EQUITYDD_PERCENT) -
Strong penalty for large risk (quadratic):
STAT_PROFIT - 0.1 * (STAT_EQUITY_DD * STAT_EQUITY_DD) -
Classic:
STAT_RECOVERY_FACTOR
Choose “Custom max” in Optimization Criterion for all examples above (unless you specifically need to minimize your metric).
HOW TO ENABLE & USE (STEP-BY-STEP)
-
Set reasonable filters first (e.g., OnTester_Min_Trades, OnTester_Max_Equity_DD) to discard poor runs.
-
Enter your formula in OnTester_Custom_max.
-
Select Optimization Criterion = Custom max (or Custom min if you really want to minimize the metric).
-
Run optimization (Genetic recommended).
-
Sort results by “Custom” — this is your score.
-
Open top 5–10 runs and check secondary stats (drawdown, PF, number of trades).
-
Run Forward testing on finalists to verify robustness and avoid overfitting.
BEST PRACTICES
-
Scale your metric sensibly (avoid extremely large/small values).
-
Keep units consistent when mixing money and percentages (normalize when needed).
-
Use penalties for risk (e.g., quadratic in drawdown) to discourage extreme settings.
-
If many scores are zero, loosen filters or check variable names and denominators.
-
Division by zero policy can be customized in code (0.0 by default; change to DBL_MAX or a large constant if preferred).
FAQ
Q: Does this affect live trading?
A: No. It only changes how the Tester ranks optimization runs.
Q: “Custom” is always zero. Why?
A: Usually too-strict filters, division by zero, or a typo in a variable name. Simplify filters and double-check the formula.
Q: Custom max or Custom min?
A: Typically Custom max. Use Custom min only if your formula is an error/risk/cost you want to minimize.
Q: Can I use numbers in formulas?
A: Yes (e.g., 0.5, 10, 1000). Example: STAT_PROFIT - 0.05 * STAT_EQUITY_DD
SUMMARY
Define your goal as a single number, let the Tester search for parameters that optimize your own definition of “best,” and verify the winners with forward testing for stability.
A built-in technical support chat is now available in the terminal for urgent program-related questions.???? How does it work?
The chat connects to the main module on our website. For a more detailed response from Expforex AI, please visit our website.⚠ Attention! Beta version! Some functionality may be temporarily limited.⚠ Attention! It takes about 5 seconds to connect to the server and receive a response (depending on the quality of your internet connection). If the connection fails, please try again later.⚠ Attention! In Beta Testing, there are limits on the use of the Expforex AI assistant
???? How to set it up?
To ensure the chat works correctly, you need to allow WebRequest for the following URL in the terminal settings:
Open terminal settings → go to the Expert Advisors tab
Enable the option Allow WebRequest for listed URL:
Add the following URL
FULL GUIDE: https://expforex.com/eapadpro/#Documentation/expforex-ai-chatbot
???? See the image above for a setup example.
???? Language Updates
Several translations have been corrected.
Arabic language: text and symbol direction are now displayed correctly.
If you find any issues, please let us know!
EAPADPRO v61
We are excited to introduce new languages to our functionality. Users can now enjoy an even wider range of language options for their convenience and comfort. Here’s the list of newly added languages:
THAI=12 — Thai
INDI=13 — Hindi
MALAY=14 — Malay
INDONEZIA=15 — Indonesian
ARAB=16 — Arabic
VETNAM=17 — Vietnamese
BALKAN=20 — Balkan
POLAND=21 — Polish
CHEZH=22 — Czech
Update your application and enjoy working in your native language! ????
-Fixed the error excessive use of disk space when optimizing Expert in MQL5 CLOUD NETWORK
-Performance improvements and fixes based on crash logs.
--EAPADPRO v60
--Added Language for links;
--Recompiled in last build of MetaTrader;
Added Language for links;
Recompiled in last build of MetaTrader;
Version 24.934 2024.10.04
Fixed a bug in the parameters:
input double AdditionalLots=0; //AdditionalLots –> Additional lot for each new Signal
input double CoeficienteLots=1; //CoeficienteLots –> Coeficiente lot for each new Signal
At the first launch and in the absence of open transactions – Expert Advisor set the minimum lot. – Fixed.
Version 24.918 2024.09.18
EAPADPRO v59
–Enhanced Graphical Interface Translation
We have completely revamped and updated the translations across all elements of the graphical interface. This ensures a more accurate and natural localization, allowing the interface to better reflect the linguistic and cultural nuances of our diverse user base. As a result, interacting with the application is now even more seamless and intuitive, providing a more personalized and comfortable user experience.
–Introduced Informative Tooltips for Panel Elements
To elevate user convenience, we’ve added descriptive tooltips to various panel components. When you hover over buttons and icons, informative explanations about each element’s functionality will appear instantly. This enhancement significantly simplifies navigation and interaction within the application, making it easier for both new and experienced users to utilize all features effectively.
–Resolved Minor Bugs and Boosted Stability
In this update, we’ve addressed and fixed several minor bugs that were affecting the application’s performance. These corrections enhance the overall stability and reliability of the program, ensuring a smoother and more consistent user experience. By eliminating these small issues, we’ve laid the groundwork for a more robust and efficient application.
Version 24.805 2024.08.05
Last build compilation MetaTrader
Fixed error in profit/price/time of closed position in notifications.
Fixed INFOBOX error when deleting the EAPADPRO window.
EAPADPRO v58
Version 24.728 2024.07.29
EAPADPRO v57
Compiled in the last version of MT4
Version 24.404 2024.04.04
Global Update EAPADPRO v55
Attention! Support of visual Graph Elements (Buttons, input line, Edit Box, CheckBox) is no longer supported by VPS server from MetaQuotes!!!!
–Added: information about profit from closed positions to the chart.
The information is displayed for each bar of the current timeframe.
You can change the timeframe to see the result of trading on a certain bar of the current timeframe.
If several positions/deals are closed on one bar of the current timeframe, the trading result is summarized, and the total information for a certain bar is displayed.
The information is updated when the next position/deal is closed.
You can turn off showing history in the panel settings.
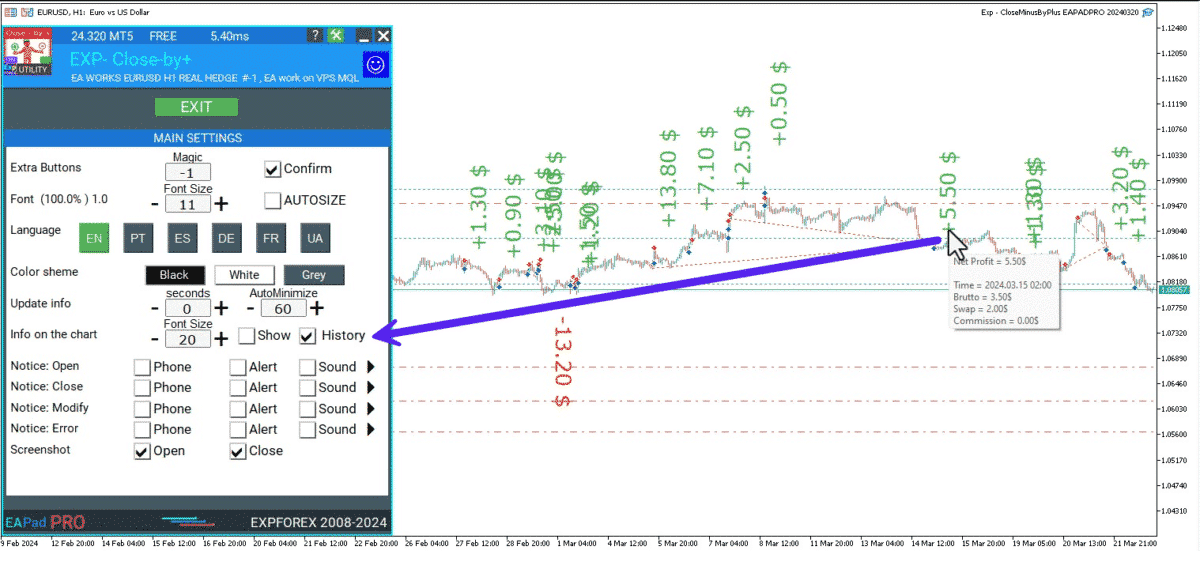
===========================================================================================
–Added: The status of the Expert Advisor operation if it was launched on the server from “VPS MQL MetaQuotes”.
When Expert Advisor is running on the server from MetaQuotes, a message will be created on the home computer that Expert Advisors are running on the server “VPS MQL MetaQuotes”. The smiley face is blue.
Attention: If an Expert Advisor is launched on both the server and the home computer, it can trade in parallel on 2 terminals (server “VPS MQL MetaQuotes” + home computer); there may be conflicts.
Attention: If the Expert Advisor is launched on the server “VPS MQL MetaQuotes”, do not Turn it on work on the home computer to avoid conflicts.
Frequency of polling the status of work on the server = 1 day.
After deinitialization of the Expert Advisor on the server – It will get the status – stopped.
To test the work on the server from “VPS MQL MetaQuotes”, pending orders are created!

===========================================================================================
–Added: The error status of the Expert Advisor operation can now be read on the EAPADPRO panel.
You can click on the Smile or the Expert Advisor operation status bar and you will be shown a message about current errors of Expert Advisor operation.
If you click on the Smile button on the panel, you will be shown the causes and errors and their solutions with pictures.
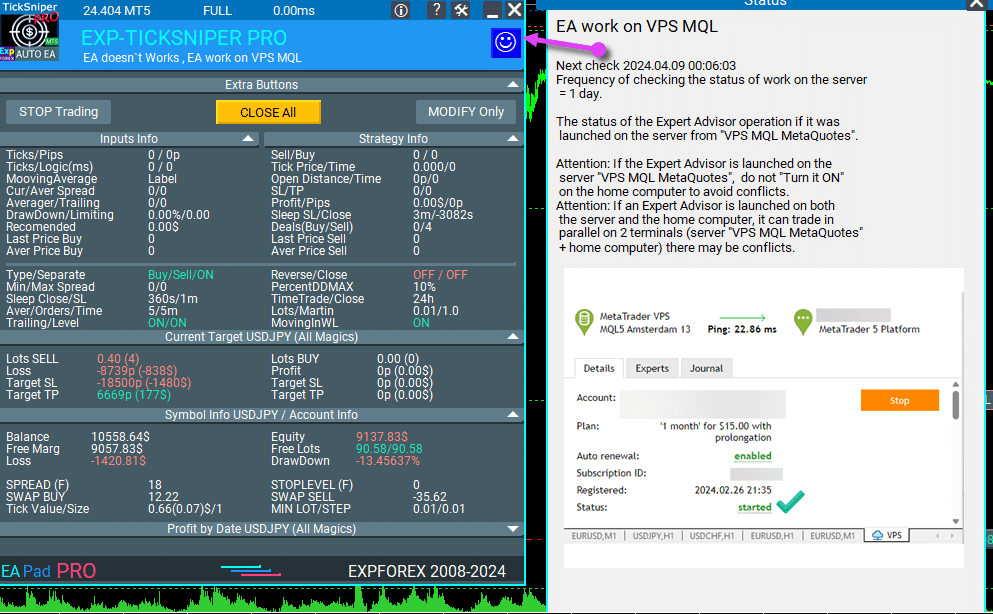
===========================================================================================
–Added: Notification of errors and opening/closing of trades to the chart in the form of InfoBox.
Notification is shown for 4 types:
—Opening a new trade;
—Closing a deal;
—Modification of a trade;
—Error received by Expert Advisor from the server;
In the EAPADPRO panel settings, you can turn on or off the notification type you need.
Notifications can be viewed as they arrive in the notification queue.
Notifications are accumulated in a data array each time you install/reinstall/change Expert Advisor settings.
In the EAPADPRO header you can also enable disable INFOBOX.
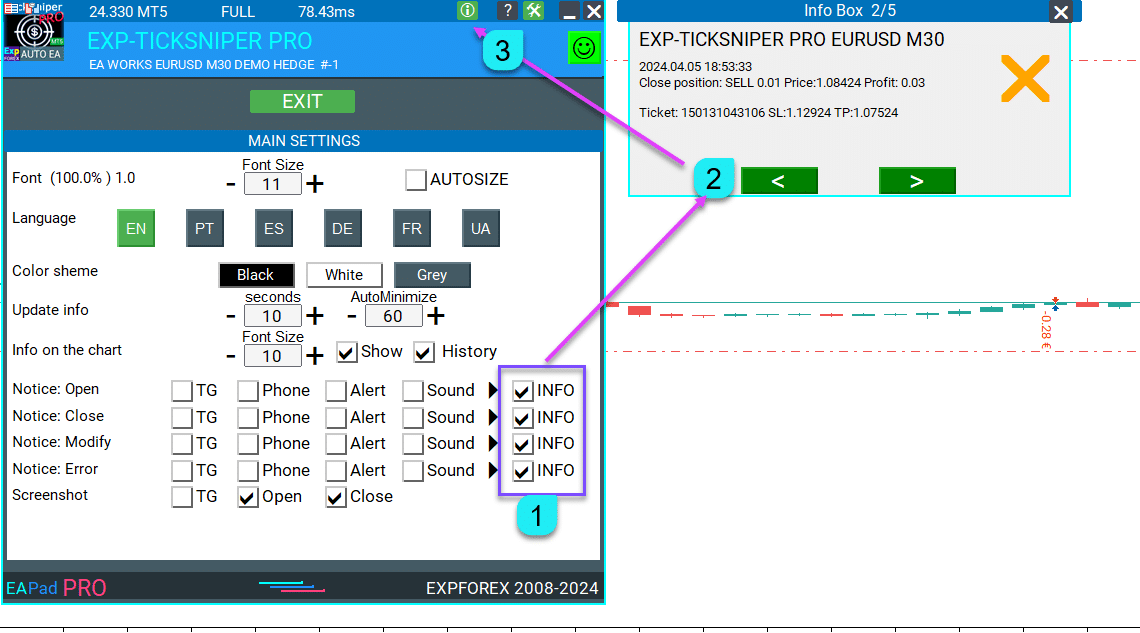
===========================================================================================
–Added: Working with Telegram (Beta version)
For Expert Advisor to work with the Telegram bot, you need to set up the bot on your phone and create a “public” or “private” channel.
To receive notifications from your account, you need to assign your bot as an administrator of your “public” or “private” channel.
Attention! Sending notifications and working with commands takes computer resources! Use the Telegram bot only for your own needs.
New settings for working with Telegram:
EAPadPRO2=” =============== Telegram bot “;
==input ENUM_UPDATE_MODE TG_UpdateMode=UPDATE_SLOW –> Update Mode. Timer speed, to receive commands from Telegram bot. The faster the timer runs, the more computer resources will be used! Please do not change it unnecessarily. 2sec,3sec,10sec
==TG_PRIORITY=TG_HOME_VPS –> Priority of work. This is the priority mode when the Telegram bot works on the MetaQuotes VPS server and your home computer.
TG_HOME_ONLY=1, // Only the HOME bot. The Telegram bot works only on the home computer.
TG_VPS_ONLY=2, // Only the VPS bot. The Telegram bot works only on the MetaQuotes VPS server.
TG_VPS_HOME=3, // First VPS bot, second HOME bot. The Telegram bot works on the MetaQuotes VPS server if you upload it to the server. If not, it will work on your home terminal. Check the work on the VPS server every 10 minutes.
TG_HOME_VPS=4, // First HOME bot, second VPS bot. The Telegram bot works on a home computer, but if the home computer/terminal is turned off, it will work on the VPS server from MetaQuotes. Check the VPS server’s work every 10 minutes.
Attention! Screenshots are not available on the VPS server from MetaQuotes!
==TG_Token=”” –> Token bot. Token (unique code) of the bot that will send notifications and receive commands
==TG_ChannelName=”” –> –> Public Channel Name @. Or “private” ID starts -100 of the private channel. That will send notifications about opening/closing/modification/errors and screenshots from the terminal.
==TG_UserNameFilter=”” –> Whitelist Usernames. List of users, starting with @, who can use the bot.
Attention! Sending notifications and working with commands takes computer resources! Use the Telegram bot only for your own needs.
==TG_UseBotTimer=false;//TG_UseBotTimer –> Working with the bot from the phone
New notification type added to EAPADPRO panel settings:
==Notice Open TG – Send a notification to the Telegram channel if a trade is open;
==Notice Close TG – Send a notification to the Telegram channel if a trade is closed;
==Notice Modify TG – Send a notification to the Telegram channel if a trade is modified;
==Notice Error TG – Send a notification to the Telegram channel if an error is received;
==ScreenShot TG – Send a screenshot to the Telegram channel if a trade is opened or closed;
Attention! This is a beta version of working with the Telegram bot. We are working on improving and adding new features.
If you have any suggestions, please write in the “Comments” section.

===========================================================================================
–Improvement: Code optimization to increase speed.
–Improvement: The speed of the panel update in the strategy tester is now calculated automatically depending on the speed of quotes arrival.
This is done to increase the speed of the program in the strategy tester.
Information update is now equal to 1 real second.
–Improvement: The speed of the program running EAPADPRO in the strategy tester.
Attention! Events in the strategy tester are processed only when a new tick is created.
If a new tick (minimum price movement) is not created, then the panel waits for the next tick.
With Visualization:
Version 48: 390sec (TickSniper 2024-2024)
Version 55: 244sec >>159% (TickSniper 2024-2024)
w/o Visualization:
Version 48: 363sec (TickSniper 2020-2024)
Version 55: 220sec >>165% (TickSniper 2020-2024)
with Visualization:
Version 48: 15750sec (TickSniper 2020-2024)
Version 55: 6220sec >>253% (TickSniper 2020-2024)
–Improvement: The color of the button to close a position on the chart changes depending on the current profit of this position.
–Improvement: Graphic improvements to optimize the Expert Advisor’s performance
–Improvement: The account deposit Symbol is cent ¢, USD $, or eur €. All others are the first letter of the deposit currency name.
–Improvement: When visual testing is completed, objects are not removed from the graph.
–Improvement: When creating screenshots after opening/closing positions, the EAPAPDPRO Control Panel will be expanded to show full information.
This is done in order to study the trading history of Expert Advisor on the visualization graph after testing is completed.
–Fixed: Managing positions and orders from the chart when the panel is minimized.
–Fixed: Corrected the error of clearing the chart from unused order labels.
–Fixed: AutoSize when switching charts.
–Fixed: Drawing errors to Print when the Expert Advisor runs on “VPS MQL MetaQuotes”
Version 24.126 2024.01.26
EAPADPRO v47
DynamicLot for Non-Currency Symbols fixed
New inputs:
Commission_Coefficient –> Commission coefficient (default 2)
DynamicLotStopLoss –> The calculation lot from StopLoss and free margin
Version 23.913 2023.09.19
-EAPADPRO v44
——————————
-Last Build Compilation
Version 23.101 2023.01.08
-EAPADPRO v43 (Added new languages)
-Last Build Compilation
Version 22.130 2022.01.30
Обновление индикатора ZigZag
Version 22.110 2022.01.12
Fixed a bug with drawing objects for new versions of MT5 terminal
Version 21.971 2021.11.10
Update EAPADPRO
Version 21.958 2021.10.28
-EAPADPRO v42 (Added new languages, Added Auto-pause when opening a new bar in the Strategy Tester)
-MT5:
Added the type of indicator signals (xColorArrow with 1 Buffer and 2 colors), for which the signal arrows have 2 different colors (DRAW_COLOR_ARROW)
When using the xColorArrow signal type, you need to set the following values:
SignalBuferforBUY = Buffer number for arrows (Check with the author) or by empirically calculating this buffer number.
SignalBuferforSELL = The number of the color buffer for these arrows (Check with the author), usually following the arrow buffer.
Attention! This type supports 2 colors, where:
0 (the first color of the arrow) is a signal to open a BUY;
1 (the first color of the arrow) is a signal to open SELL;
If your indicator has these colors reversed, then you can additionally use the Signal_Reverse parameter
For more information, we have made an example of using such an indicator with a DRAW_COLOR_ARROW buffer!
An example of using: https://www.mql5.com/ru/market/product/32116#!tab=comments&page=13&comment=25503972
Version 21.953 2021.10.23
-Модернизация сигнала от xArrow для некоторых индикаторов.
Version 21.923 2021.09.24
Recompiling in the latest version of the terminal
Version 21.904 2021.09.04
Recompiled in the latest version of the MetaTrader terminal
Version 21.813 2021.08.13
–Global update of The xCustomEA!
In the block for selecting the type of signal / filter SignalTypeIndicator / FilterTypeIndicator:
Added signals and filters for standard indicators from our Expert Advisor The X!
$$$ THE X MT4: https://www.mql5.com/en/market/product/11536
$$$ THE X MT5: https://www.mql5.com/en/market/product/1230
All 20 standard signals and filters have been added as the main signal / Filter / Signal to close positions!
You can use the standard indicator signals and filters from our The X along with your custom indicator signals.
This means that you can filter custom indicator signals from the market or the Internet using our standard filters.
And also use our standard strategies from The X as the main signal and apply a custom indicator as a filter!
A description of each signal and filter can be found in the user manual for The X: https://www.mql5.com/en/blogs/post/680043
Attention: when you select Standard Indicators, the SignalNameIndicator / SIGNALStrategyInputs / SignalBuferforBUY / SignalBuferforSELL fields do not work!
Attention: when you select Standard Indicators, the FilterNameIndicator / FilterStrategyInputs / FilterBuferforBUY / FilterBuferforSELL fields do not work!
– Added the TrailingStart = Starting point for the start of the Trailing function to the Trailingstop block.
The Expert Advisor will turn on the TrailingStop function when the position gains TrailingStart profit points.
If TrailingStart = 0 then TrailingStart = TrailingStop !!!
Version 21.724 2021.07.24
Added handling of SIGNALStrategyInputs settings for .wav and .bmp files
Version 21.616 2021.06.16
Update for Update
Version 21.612 2021.06.12
EAPADPRO v40 update, according to the new rules for using the MQL5 Market
Version 21.527 2021.05.27
Исправлена работа ClosePositionifChangeOWNSignal = OnlyIfProfit при работе с TypeTradeBUYSELL = Only Sell
Version 21.520 2021.05.21
A new parameter has been added to the “Averaging” block:
— CloseFirstAfterMaxAverage – Close the first averaging deal (the very first of the currently open averaging deals),
when the advisor has opened the maximum number of deals with the MaxOrdersOpen parameter.
If you want to keep a fixed number of Averager grid items (e.g. 5 grid items),
the smallest element must be closed with a loss when the 6th element is opened.
For example:
CloseFirstAfterMaxAverage = false MaxOrdersOpen = 5:
If the EA opens the maximum number of averaging deals, which is set by MaxOrdersOpen = 5,
then the next averaging deal cannot be opened.
CloseFirstAfterMaxAverage = true MaxOrdersOpen = 5:
If the EA opens the maximum number of averaging deals, which is set by MaxOrdersOpen = 5,
then the first averaging trade is closed and the next trade is opened.
================================================== ================================================== ======================
– A new parameter has been added to the “Additional opening” block:
— CloseFirstAfterMaxAdd – Close the first additional opening deal along the trend (the very first of the current open deals),
when the EA opened the maximum number of deals with the MaxOrdersOpenAdditionalOpening parameter.
Same as CloseFirstAfterMaxAverage Paramter.
Version 21.517 2021.05.17
— EAPADPRO v39
— Added custom optimization criteria in genetic mode when choosing the Custom Max optimization mode.
You can set the minimum values ??at which the optimization will take into account the result during genetic enumeration!
In other words: You can set a condition: “the minimum number of deals” (or other parameters),
upon which this run will be counted as a result.
If during selection the advisor opens fewer deals than specified in the settings, then this run of the optimizer will not be counted as a result!
–Attention! For advanced users only.
OnTester_Min_Trades = 0; // Min Deals for optimization
OnTester_Min_Profit = 0; // Min Profit for optimization
OnTester_Min_ProfitFactor = 0; // Min ProfitFactor for optimization
OnTester_Min_Balance = 0; // Min Balance for optimization
OnTester_Min_Equity = 0; // Min Equity for optimization
OnTester_Max_Balance_DD = 0; // Max Balance DD% for optimization
OnTester_Max_Equity_DD = 0; // Max Equity DD% for optimization
– You can find a detailed description of this block of settings in the user manual!
Version 21.425 2021.04.25
Work with the StopTrading button has been modernized. Fixed a bug with random permission of signals to open positions when minimizing the panel.
Version 21.313 2021.03.13
EAPADPRO v38
–Fixed the main signal reversal error when using the Signal_Reverse (true) and ClosePositionifChangeOWNSignal (OnyProfit) functions.
Version 21.216 2021.02.16
Added new parameters of Lots when opening a position by signals:
AdditionalLots – An additional lot that will be added to each new deal based on a new signal
CoeficienteLots – Lot coefficient, by which the lot will be multiplied for each new deal on a new signal
(When the advisor is allowed to open more than one position for each signal ONlyOnePosbySignal = false / OnePosPerDirection = false)
Version 20.731 2020.07.31
MT5: Fixed the conflict of the Additional Opening when using a common stop loss (StopLossALL) and a common trailing stop.
Version 20.608 2020.06.08
Компиляция 2485
Version 20.220 2020.02.19
Dear friends!
We made a very important and difficult decision regarding The X/The xCustomEA for MetaTrader 5 and the use of the multi-currency mode (PAIR1-PAIR12)
Due to the fact that the use of different methods of multi-currency operation does not bring 100% accuracy in obtaining quotes,
we were forced to turn off this mode.
We explored many topics on the forum about the problem of using multi-currency mode in MetaTrader!
Each method of implementing a multi-currency trading mode has its pros and cons!
But in each of these methods there are Cons: Reward resources on computers, skipping ticks, looping the main trade flow.
We made the decision: Remove the multi-currency trading algorithm in The X/The xCustomEA to eliminate trading problems on real charts!
We apologize for any inconvenience caused.
IMPORTANT: As soon as we find the ideal solution for working in multi-currency mode (PAIR1-PAIR12) we will turn on these parameters again, for the convenience of taming and optimization.
IMPORTANT: On a real chart, I recommend installing an adviser on each chart of a currency pair separately from each other (do not use PAIR1-PAIR12)
Version 20.216 2020.02.16
Forced modifying comment length CommentToOrder up to 12 characters!
If the comment is longer than 12 characters, then the advisor will trim the extra characters.
Attention! For the EA to work correctly, set a comment no longer than 12 characters.
eg:
Right: ExpforexTheX
Not Right: Expforex The X Set # 12345
Version 20.212 2020.02.12
– EAPADPRO v35
– Fixed the Work on time error if the advisor TF is greater than the Minutes of the time function.
(For example, closing at 22:49 and TF = H1)
Version 19.994 2019.12.05
Added parameter Send_Push_without_opening_positions:
Sending PUSH notifications to the phone instead of opening positions!
When this parameter is enabled, the adviser will not open a new position on a signal, but only notify the user that
that a new signal has appeared. At the same time, all other functions will work as usual.
Allows the user to open a position on their own if the EA gives a signal.
But the adviser does not make this transaction and does not open a position, but only notifies the user about the signal.
Version 19.905 2019.09.05
Исправлена ошибка алертов при открытии и закрытии позиций.
Version 19.903 2019.09.03
IfProfTrail:
– if true, the Advisor starts the modification only when the position is gaining profit to Breakeven (setting stop loss on the break-even point) + TrailingStop profit points.
– if false – TrailingStop starts working immediately after opening a position and making a profit of 0 points and leaving a position as a profit.
In other words: IfProfTrail = false, then the trailing stop starts working immediately after the position is in profit.
Version 19.820 2019.08.20
-. Alert has been added if the specified indicator is not found!
The adviser will check the existence of the indicator and give a message stating that the indicator was not found with a request to check the correctness of the name!
1. Function ControlNewBarforSIGNAL Changed:
Added values:
ControlNewBarforSIGNALType = 1 = True smallest TF of the settings: New mode!
The EA selects the smallest TimeFrame, which was set by the parameters TF_IndSigToTrade1, FILTER_TF_IndSigToTrade1, FILTER_TF_IndSigToTrade2 ….
In this mode, the EA does not check the signal on the currently set TimeFrame, but on the TimeFrame for receiving a signal from indicators!
This mode is useful for those who use TF_IndSigToTrade1, FILTER_TF_IndSigToTrade1, FILTER_TF_IndSigToTrade2, other than Current.
ControlNewBarforSIGNALType = 2 = True current bar of the current TF: Old mode!
In this mode, the EA checks signals every new bar of the current TimeFrame!
If you use TF_IndSigToTrade1, FILTER_TF_IndSigToTrade1, FILTER_TF_IndSigToTrade2 other than Current, the results on each TimeFrame may be different.
We advise you to install the adviser on the TimeFrame M1!
ControlNewBarforSIGNALType = 1 = False: Do not use the control of the new bar to determine the signal!
Attention: When off, the EA checks signals every new tick! There may be delays in tapping and optimization!
2. Added variable ControlNewBarforOpenbySignal:
ControlNewBarforOpenbySignal = true: Old mode! Open positions on a signal only every new current bar of the current TimeFrame!
The EA opens positions, if there is a signal, only when a new bar of the current TimeFrame arrives!
ControlNewBarforOpenbySignal = false: New mode! Open positions on a signal every new bar from the signal Timeframe!
The EA opens positions, if there is a signal, immediately upon detection of a signal.
This mode is useful for those who use TF_IndSigToTrade1, FILTER_TF_IndSigToTrade1, FILTER_TF_IndSigToTrade2, other than Current.
Version 19.816 2019.08.17
Fixed bug:
When two different directions BUY and SELL are in operation and averaging works, then BUY does not allow to modify the take profit for SELL positions!
Version 19.814 2019.08.14
Update Update
Version 19.808 2019.08.07
Added DistanceMartinAdditional – Coefficient of distance for additional order opening.
Added MinTimebeforenextAverage – Minimum time to the next averaging in minutes.
Code optimization, increased testing speed and optimization.
Starting the calculation of the average spread only when the user uses at least one parameter for the average spread.
EAPADPRO v31.
Version 19.525 2019.05.25
Added function to check different take profit for the averaging function.
If the positions have a different take profit, then the expert sets a single total take profit.
Version 19.517 2019.05.17
Forced modification only when stop loss = 0 or take profit = 0
Version 19.514 2019.05.16
Fixed double opening of averaging deals on accounts with MARKET execution.
Version 19.123 2019.01.23
Indicator example file updated! + StrategyShift removed from indicator file !!!
Added operation mode for the current zero bar(Shift=0)!
Attention! The current bar only forms a signal, so we do not recommend using Bar # 0(Shift=0) to receive signals!
Attention! Some indicators forcibly do not draw a signal at 0 bar! – It is right. Therefore, the adviser will not open positions using Shift = 0.
Version 19.111 2019.01.10
The SaveTPafterTrailingStop function has been updated to work in virtual stop loss / take profit mode with VirtualStops = true
Version 19.110 2019.01.10
ReloadReload
Version 19.107 2019.01.07
– The ClosePositionifChangeOWNSignal parameter is divided into 3 values: False (disabled), True (enabled), OnlyifProfit (Only if the positions are in profit);
– EAPADPRO v25 update
– Additional languages added to the panel: Spanish, Portuguese (Brazil), German, Chinese, Japanese;
The translation was made using the GOOGLE Translator + MQL + Terminal site!
If you find an error in your language, please report it in messages. Thank!
– Increase the speed of the panel;
Version 19.0 2018.12.29
Fix Fix Fix
Version 18.999 2018.12.28
– Optimization of the code, increasing the speed of testing.
– When you first start the advisor, an indicator template file is created for programming your strategy.
A file is created in your terminal Files folder with name “Ind – The xCustomEA TEMPLATE.mq*”
You can open this file and follow the programming instructions of your custom strategy.
Version 18.998 2018.12.28
– Optimization of the code, increasing the speed of testing.
Version 18.992 2018.12.23
– The ability to specify and fill in external variables (which can be configured from the advisor) has been added to the xCustom signal type
SIGNALStrategyInputs, CloseStrategyInputs, FILTERStrategyInputs can now be used with indicators written in our example (xCustomEA)
– In connection with the update of the sample files and our custom indicator Ind – The xCustomEA TEMPLATE, we updated all the variables of the adviser and added an additional type: to the SLTPTypeIndicator type xCustomEA, to call from our example indicator.
Also added is the variable SLTP_IndSigToSlTp to specify the strategy number in the Ind file – The xCustomEA TEMPLATE
Version 18.988 2018.12.10
– Fixed bugs according to user messages
– Reworked system for receiving signals
– Modified indicator indicator files for receiving signals for the operation of new functions and blocks! Be attentive!
================================================= ===============================
– Update EAPADPRO to version 23:
Added controls for speed testing and pause in the strategy tester;
Added a table of current open positions in the strategy tester;
================================================= ===============================
– Added block control signal closure for custom indicator.
This block allows you to close open positions by signals of a custom indicator.
It is used if a custom indicator provides signals for closing positions (separately from the signals for opening a new position).
If you need to tell the adviser signals to close positions, then you need to specify: the indicator name (may be identical with the indicator name for closing positions), a set of parameters (If they differ from the default indicator parameters), TimeFrame, Bar Shift, and number buffers to receive signals for closing. Separately for BUY and SELL positions.
Attention: If you want to close a position when receiving the opposite signals, then you do not need to use this block.
– External parameters Signal for Close options:
CloseNameIndicator = “”; // CloseNameIndicator -> Indicator name to get the signal to close pos
CloseTypeIndicator = xArrow; // CloseTypeIndicator -> Type of indicator signal to close
CloseTimeFrame = PERIOD_CURRENT; // CloseTimeFrame -> TimeFrame of signal to close
Close_shift = 1; // Close_shift -> Bar number to receive signal to close
CloseStrategyInputs = “”; // CloseStrategyInputs -> Inputs Of Ind, separated by commas
CloseBuferforBUY = 4; // CloseBuferforBUY -> Buffer number for close BUY
CloseBuferforSELL = 5; // CloseBuferforSELL -> Buffer number for close SELL
Close_IndSigToClose = 0; // Close_IndSigToClose -> Indicator number to get Close signal
================================================= ===============================
– Added Stop Loss and Take Profit control unit based on custom indicator signals.
This block allows you to set a stop loss or take profit when opening positions on the signal, which can be taken from the values of the custom indicator buffers.
If the Custom Indicator has separate buffers for getting Stop Loss or Take Profit, you can use these values when opening a new position.
Attention: Stoploss or take profit is set only when a new position is opened using a new signal. The functions of averaging, additional opening use the parameters of stop loss and take profit from past variables. Stoploss and take profit obtained from the custom indicator in Averaging and additional opening are not accepted.
Stop loss and take profit from a custom indicator is also set when using the ForcedModifySLTP function.
If you need to tell the adviser the stop loss and take profit values from the custom indicator, then you need to specify: the indicator name
(may be identical with the name of the indicator for opening / closing positions), a set of parameters (If they differ from the parameters of the indicator by
default), TimeFrame, Shift bar, and the number of buffers to get values. Separately for BUY and SELL positions and separately for StopLoss and TakeProfit.
– External parameters Custom StopLoss and TakeProfit from Indicators options:
SLTPNameIndicator = “”; // SLTPNameIndicator -> Indicator name to get the signal of SL / TP
SLTPTypeIndicator = xPrice; // SLTPTypeIndicator -> Type of indicator signal of SL / TP
SLTPTimeFrame = PERIOD_CURRENT; // SLTPTimeFrame -> TimeFrame of signal of SL / TP
SLTP_shift = 1; // SLTP_shift -> Bar number to receive signal of SL / TP
SLTPStrategyInputs = “”; // SLTPStrategyInputs -> Inputs of the ind, separated by commas
SLTPBuferforBUY_StopLoss = -1; // SLTPBuferforBUY_StopLoss -> Buffer number of SL for BUY
SLTPBuferforSELL_StopLoss = -1; // SLTPBuferforSELL_StopLoss -> Buffer number of SL for SELL
SLTPBuferforBUY_TakeProfit = -1; // SLTPBuferforBUY_TakeProfit -> Buffer number of TP for BUY
SLTPBuferforSELL_TakeProfit = -1; // SLTPBuferforSELL_TakeProfit -> Buffer number of TP for SELL
================================================= ===============================
Version 18.970 2018.11.10
– Global update and improvement of the working code.
-Add EAPADPRO v21 panel
-Add short hints to external variables
-Add parameters for calling indicators SIGNALStrategyInputs, for indicators with the type SignalTypeIndicator = xArrow
Read more in our blog.
빌더 xCustomEA에 대한 리뷰
피드백을 주셔서 감사합니다!

Atila R Akdeniz
⭐⭐⭐⭐⭐
Atila R Akdeniz
I just bought the EA. I have been using The X Universal for a long time now, with great results. This EA does everything TheX Universal does and much more, including integration of other EA's and signals and independent strategies etc. I guess there will be a little bit of a learning curve to understand its full functionality and use it to its full power. 5 stars for such an innovative product from a great designer.

Deniz90
⭐⭐⭐⭐⭐
Deniz90
Excellent EA, providing endless opportunities. The author is very helpful and responsive, definitely recommended.

Manuel Sanchez
⭐⭐⭐⭐⭐
Manuel Sanchez
Great EA. Just do your homework and you will find a good strategy. I love the interface panel. 5 start. Thanks to the programmer.

leachimk
⭐⭐⭐⭐⭐
leachimk
Присоединяюсь к словам предыдущего автора. Советник обладает всеми необходимыми инструментами для успешной торговли. Ключевое слово - оптимизация. Особая благодарность разработчику за то, что он постоянно продолжает усовершенствовать советник. Респект и так держать!

ROBERT URBANSKI
⭐⭐⭐⭐⭐
ROBERT URBANSKI
I rent this EA for one month for testing. I give 5 stars in begin for Suport. After month I will update info about EA but now I can tell. It have many interesting settings. I tried work with many custom indicator (not build). Works very impresive.

DadeSubandryo
⭐⭐⭐⭐⭐
DadeSubandryo
Great support for consumers. still learning stage & EA started to work as i want. I will update the stars & comments if necessary. Thank you


189114nickynomates
⭐⭐⭐⭐⭐
189114nickynomates
This has opened up a whole new world to my trading. The concept is pure brilliant. The forums very informative and you always get help to questions detailed in the correct way. The biggest gain I have received is widening my understanding of the scope that can be achieved in cleaver trading with this ea. Keep up the good work.

Sammy Boy
⭐⭐⭐⭐⭐
Sammy Boy
Excellent EA. Vladislav has put in great effort to come up with such sophisticated EA

Pia Basson
⭐
Pia Basson 2022.08.23 18:17
I bought this EA hoping to convert my indicators into trading EAs. No luck, it does not work, and the instructions are incomplete and half translated from Russian , and when I requested support, I followed their instructions to provide full descriptions of problem together with screen shots, they then replied and wrote that they don't support this product - they don't support users to even get started or learn to make their software work - how useless. I strongly do not recommend this product. It shows promise but does not deliver. I am sure that just a proper user manual would solve this problem - I checked all their links, blogs, etc. I am now $129 out of pocket a week of time wasted trying to make it work.2022.08.23 20:20
I don't have the technical ability to help. before buying, you can use the product for free. until we have peace, I cannot work. sorry.


Stanimir Stanchev
⭐⭐⭐⭐⭐
Stanimir Stanchev
I am using xCustomEA for two months and i am extreamly happy with it and the support i'd received from Vladislav. His Exp4 Tester PAD for Strategy Tester is also very useful when it comes to test a strategy in visual mode. My favorite developer as of now!

Valter Oliveira
⭐⭐⭐⭐⭐
Valter Oliveira
Excellent product for implementing Expert Advisors (EA) using existing indicators in the MQL5 market. I thank the developer for making this tool available to us.

Hanxyork
⭐⭐⭐⭐⭐
Hanxyork
I purchased the xCustomEA few days ago, Vladislav answered all my questions quickly, he is very professional, responsible, knowledgeable, honest and dedicated, he helped me to start up my xCustomEA in a VPS. I am buying more of his products, definitely. Thank you very much Vladislav.

Vasil lupanov
⭐⭐⭐⭐⭐
Vasil lupanov 2020.01.16 19:45
Friends, don't bother looking for experts and utilities. Look for Vladislav !!!! He has everything! Five gold stars for his products and 10 stars for him !!!


Mohamed Irushad Rasheed
⭐⭐⭐⭐⭐
Mohamed Irushad Rasheed 2019.10.14 22:54
looks promising . i will update the review after a month.

Al Bundy
Al Bundy 2021.08.14 09:26 ==================================================================================================================== ***** Very best EA on market. With new update, you are topping yourself :-)) ! Congratulations! I am very ambitious, but it's so rich with features for grid, averaging, ... I can only be satisfied. Technically I just have one wish: one (or a few) of parameters for custom indicators in separate fields, for iterations of strategy tester. (1. Field for custom indicator, 2. Replaces {with comma separated} custom parameter x) If I will be unsuccessful in trading, it is certainly not due to this advisor! Al Bundy
Update 3.4.2022 Zero stars Complete useless EA... Meanwhile I programmed my own EA and so I know, how easy my suggestions could have been implemented. The indicators are worthless, because no good parameters to set. Some are buggy. Even a single moving average trend filter is not possible to set. Update 18.11.2021 Issue 7 solved. Stars upgraded. My wish for hedging same pair in direction of trend is also obsolete. I studied the mathematical theory and it can gain nothing. (+1 -1 = 0) (+1 -1.1 = -0.1) == (+0 -0.1 = -0.1) but additional spread,slip,commission, lower equity, margin. This understanding has burst my illusion... ======================================================================= Update 17.11.2021 *---- Not one single issue is solved so long - very bad support. Mainly Gold for 10.000 sells - I'm so proud of you - this should only given for 10.000 succesful traders or solutions... Meanwhile my real account is 25% in draw down, because this expert has only very risky averaging martingale against the trend. EA can nothing do to solve this big issue! I have to solve it with another EA or manually. Shame it! Till there is no function for opening a position with the trend when reaching stop loss (instead of closing position), this EA is NOT to recommend. For instance ADX is not usable for me without two additional fields: 1. Time frame (I want to filter with W1) 2. ADX minimum level. The standard (25) is not good. Many thanks for your advise to use strategy tester with cloud network (in your manuals and web page of your expert advisor). There is no negative balance protection and this is not communicated. So my test run 45 minutes and I'm billed with $812,- I would like this advisor, but all these issues reduces my score again. Maybe eventually I get support or this EA will be better, than I think of better rating again. I'm tired to read always why something doesn't work. Best regards ========================================================================================================== Update 14. Oct 2021 ***-- Next star is gone, because an EA without a good indicator is useless... It seems, that many functions are not possible to function if one uses a custom indicator with this EA. See following issue number 7. Since it is not possible to optimize parameters (see 16) and others are too complex, it lacks of at least four major functions. So it seems better to use an EA with integrated indicator signals. ========================================================== 14.10.2021 Addition to issue 6. Sometimes the calculated values of my indicator are changed or not used. My indicator delivers stop loss. I check stop level but nonetheless xCustom uses SL=0 !!!!! This is a NO GO! Journal: 2021.10.14 22:01:12.612 2021.09.20 21:24:03 OPEN DEAL sy=EURUSD op=1 ll=0.16 sl=-1 tp=-1 But I have set an Indicator and a buffer number for stop loss! Issue 18. In strategy tester virtual stop loss doesn't work! ==================================================================================================================== 7.10.2021 BUMP - When are you willing to answer all my questions? Seems as there is no support... ==================================================================================================================== 2021-09-27 ****- Meanwhile there are several inconsistencies, which I recognized. It is possible, that the causes are elsewhere, but so long I can't find out. 5. I have written an indicator with arrow buffers, but not all arrows are caught - what can be wrong? (Some can bet got with OWNSIGNAL_shift=0!) 6. I deliver SL and TP, but they are sometimes not set. I have included spread and corrected the values against stoplevel. In journal there is no error. 7. With another indicator I use iCustom with a second indicator to convert non-arrow buffers to arrow buffers. My indicator receives the signal at bar 1. The bar number to receive the signal in xCustomEA can't be lower than 2 to get the signals - is this a fact? If so, double indis are not usable. 8. Some times there are errors related to the parameter without error number and metatrader freezes. They are gone if SignalStrategyInputs="". 9. in Strategy Tester visual mode it trades normal, in non visual I get a flat line. How comes? 10. If I set OnTester_custom_max = STAT_PROFIT_TRADES_PERCENT I always get 0. 11. I want to filter trades with FilterTypeIndicator = "Moving Average". If SMA200 goes up it should allow buy, if it goes down it should allow sell. Other should be prohibited. How can I do this? 12. I want the simplest setup: Indicator with up/down arrows, SL=50, TP=50, no other confounding factors. I couldn't find out since 3 months! Is this not possible? That just can't be true! 13. Documentation lacks at a few places - TrailingStart, standard indicators. 14. I can't find out how to set parameters so, that trailing starts at 0. It is too complex for me to understand MovingInWLUse + LevelWLoss + LevelProfit + TrailingStart + TrailingStep. There should be a few examples in documentation for different usage. I need 3 cases: Trailing starts at SL, Trailing starts at 0, Trailing starts at 50. Rest is ballasted. 15. I need a solution for stopping multiple consecutive stop losses like written before (2021-09-20)! 16. It is awfully well to make fields for parameters and to optimize them. I have written an EA with 60 int, 60 double and 60 bool parameters, which are compound to 60 and delivered to iCustom. They can be optimized. After 3 months 12 hours per day 7 times the week learning trading, learning MQL5, coding, testing, trying, I have no satisfying combination from bought or self made indicators with xCustomEA. Either no/poor profits or large draw downs. Maybe this is forex... ================================================== 2021.09.20 00:10 #237 DE - copy from comments ***-- Hi, after heavy strategy testing I have a few wishes: 1. Your EA has "Open Opposite Position After Stop Loss" - I'm missing "Open Opposite Position After Close Pos If Change". 2. I can't get rid of cascades of Stop Loss losses (eg.: March 2020, Feb 2021, July 2021 , which egalize all previous profits. So I wish "Minutes Pause from Trading After (multiple/heavy) Stop Loss", to wait till the time of worst trading is over. 3. Withdrawal in tester: starting balance 1000. If balance greater than 1100 withdraw to 1000. I think this is how many trader are doing. 4. Don't trade during important news. I hope you can see the importance of these enhancements. Many thanks in advance BUMP, because of long time no response!2021.11.18 15:38
Hello, thank you. Unfortunately this is not possible. Optimization of indicator parameters in the Expert Advisor is not available. Because the advisor does not initially know the number and type of parameters. Parameters are filled in as a string and passed as variables to the indicator. there are many nuances here. You're lying! I answer every question you have. First, you gave me 5, then you started to lower the grade for not answering you, but this is not true! I answer every question you have! https://www.mql5.com/en/market/product/32116#!tab=comments&page=13&comment=25238753 next Answer: https://www.mql5.com/ru/market/product/32116#!tab=comments&page=14&comment=25950119 next answer: https://www.mql5.com/en/market/product/32116#!tab=comments&page=13&comment=25822275

jewboy
jewboy 2019.07.22 17:50
i bought this EA yesterday and with the help of Vladislav, it is working smoothly. I will make it work on different fx pairs. Thanks again for your time Vladislav

talha8877
⭐⭐⭐⭐⭐
talha8877 2018.12.16 18:49
I was using The X Universal EA and it was great, but it was missing the ability to add custom indicators. Now the Author created this expert and it's possible to add those custom indicators or other Experts for signal triggers. It requires a bit more effort to learn how to integrate those additional functions but thankfully the author has very detailed documentation about the EA.

빌더 xCustomEA댓글
질문이 있으신가요?
Extra
탭을 통한 탐색
관련 게시물
X와 xCustomEA: 테스트 및 최적화
설명 The X과 The xCustomEA는 지난 5년 동안 Forex(포렉스) 거래 커뮤니티에서 두드러진 Expert Advisors (EAs)입니다. 이러한 도구들은 customize(커스터마이즈)하고자 하는 트레이더들을 위해…
EAPADPRO 라이브러리 – 우리 패널을 귀하의 EA에 추가하기
EAPADPRO 라이브러리 – 정보 패널로 귀하의 전문가 고문(EA) 향상시키기 EAPADPRO 라이브러리는 MetaTrader 플랫폼에서 전문가 고문(EA)의 기능을 향상시키려는 트레이더들에게 강력한 솔루션을 제공합니다….
Close Minus by Plus, 수익성 있는 포지션을 검색하고 종료하여 손실
수익성 있는 포지션을 식별하고 종료하여 손실 포지션을 종료합니다. 전문가 고문(EA)은 수익성 있는 포지션을 식별하고 종료하여 손실 포지션을 종료하도록 설계되었습니다….
Extra Report Pad – 트레이더의 일기. 귀하의 거래 계정을 전문적으로
Extra Report Pad – 거래 계정 분석을 위한 전문 솔루션 오늘날 여러 통화쌍을 동시에 거래하는 것이 필수적입니다. 하지만 거래가 많을수록 계정의…
Partial Close and Trailing. 롤백 시 부분 청산
Partial Close and Trailing은 롤백 중에 포지션의 일부(즉, 로트의 일부)를 청산하는 EA 어시스턴트입니다. 가격이 먼저 이익 방향으로 움직였다가 되돌아갈 때, EA는…
Assistant – 실제/가상 스탑로스 / 테이크프로핏 / 트레일링 스탑을 지원하는
스탑로스, 테이크프로핏, 트레일링 스탑, 브레이크이븐 레벨 자동 설정, 가상 스탑 활성화. Exp Assistant는 포지션 유지 관리를 조직하는 데 도움을 줍니다. 이 전문가…
MetaTrader용 InfoPad, 온라인 정보 패널
InfoPad는 MetaTrader 터미널에서 선택한 특정 통화 쌍에 대한 중요한 정보를 제공하도록 설계된 매우 유용한 정보 패널입니다. 이 패널은 현재 매수 및…
The X – 표준 지표를 사용하는 Forex용 유니버설 전문가 어드바이저
MetaTrader용 광범위한 기능을 갖춘 유니버설 전문가 어드바이저 (EA) 전문가 어드바이저 The X는 MetaTrader용 다목적 트레이딩 도구로, 다양한 기능과 사용자…
VirtualTradePad(VTP) 트레이딩 패널. 차트와 키보드에서 원클릭 트레이딩을 위한 트레이드 패드
VirtualTradePad 또는 VTP – MetaTrader 터미널에서 원클릭으로 거래하기 위한 제어판. 외환에서 스캘핑과 수동 거래를 위한 프로그램입니다.. 차트와 키보드에서 원클릭 트레이딩을…
Copylot – MetaTrader용 외환 거래 복사기. 터미널 간 복사기
MetaTrader용 트레이드 복사기. 모든 계정에서 외환 거래, 포지션, 주문을 복사합니다. COPYLOT MT4 버전에서 MT4-MT4, MT5-MT4 간 최고의 트레이드 복사기 중 하나입니다 (또는…
Duplicator – MetaTrader 터미널에서 거래/포지션 복제
Exp-Duplicator는 MetaTrader 계정에서 거래 및 포지션을 미리 설정된 횟수만큼 복제하도록 설계된 자동 전문가 고문(Expert Advisor)입니다. 수동으로 열리든 다른 EA에 의해 열리든…
SafetyLOCK PRO 반대의 보류 주문을 열어 포지션을 잠금으로써 보호합니다. 헤지
SAFETYLOCK: 급격한 시장 반전에 대비하여 거래를 보호하세요 금융 시장에서의 거래는 특히 급격한 시장 반전 시에 높은 위험을 수반합니다. SAFETYLOCK은 기존 포지션에…
Tester Pad은(는) 전략 테스터용 Forex 거래 시뮬레이터입니다. 지표를 사용한 거래.
전략 테스터 차트에서 원클릭 거래. 유틸리티를 사용하여 전략 테스터에서 전략을 수동으로 테스트할 수 있습니다. 시각화 차트에서 원클릭 거래. 거래 기술을 테스트하기…
Market Time Pad. 거래 세션이 포함된 MetaTrader용 지표
타임 인디케이터는 주요 글로벌 시장의 현재 시간을 표시하고 활성 거래 세션을 강조합니다. 사용이 간편하며 차트에서 공간을 최소화하여 Expert Advisors…
이 게시물은 다음 언어로도 제공됩니다: English Portuguese Español Deutsch Українська Chinese Русский Français Italiano Türkçe 日本語 한국어 العربية Indonesian ไทย Tiếng Việt


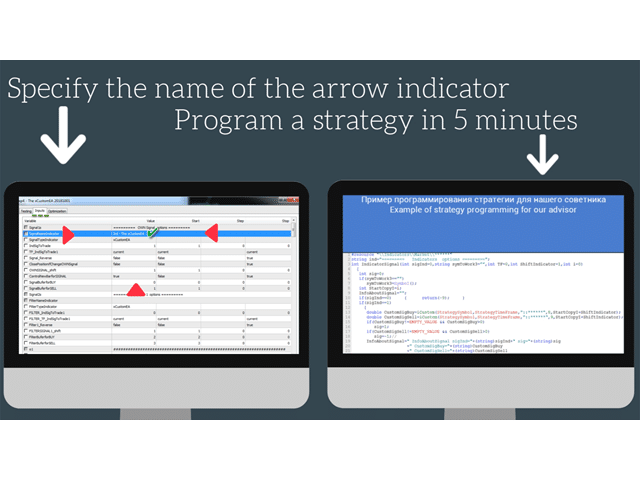
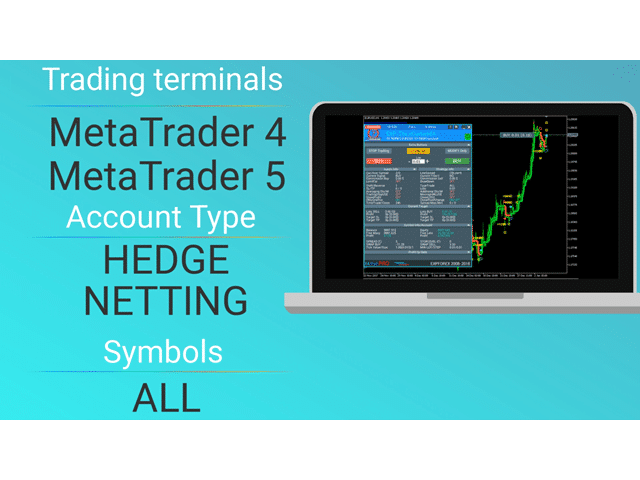
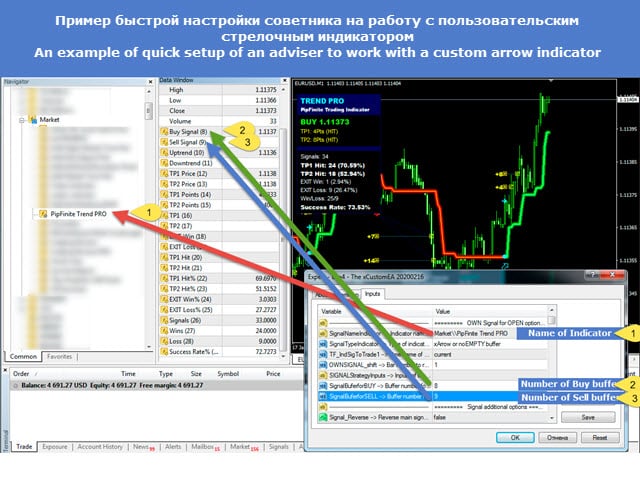



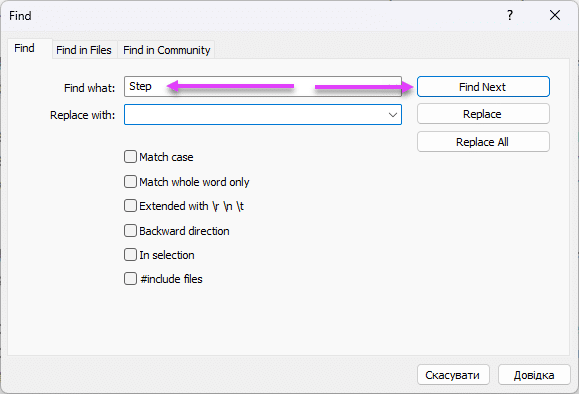




Leave a Reply