


MetaTrader friert ein? Universeller Fix: Terminal-Freezes und Abstürze

EXPFOREX Web Simulator — browserbasierter Trading-Simulator
Hauptbereich
Dokumentation
Einstellungen
FAQ
Changelog
Bewertungen
Kommentare
Extra
Professionelle MetaTrader-Handelssteuerung — aus einem verbundenen Arbeitsbereich.
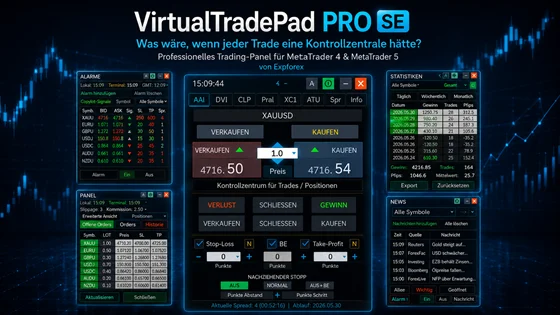
VirtualTradePad PRO SE ist ein professioneller Trading-Arbeitsbereich für MetaTrader 4 and MetaTrader 5. Er hilft Tradern, Trades schneller, übersichtlicher und komfortabler direkt aus dem Chart zu verwalten — ohne ständig zwischen MetaTrader-Fenstern, Skripten, Terminal-Tabs und manuellen Berechnungen zu wechseln.
Bewegen Sie den Mauszeiger über ein Modul und sehen Sie den echten PRO-SE-Panel-Tab
Bevor Sie die vollständige Dokumentation lesen, können Sie die Kernmodule visuell erkunden.
Gehen Sie durch POS, ORD, CLP, PART, AVG, ATM, SIG und INFO, um zu sehen, wie das Produkt aufgebaut ist.
Manueller Handel, Pending Orders, Positionsverwaltung, Teilausstiege, Basket-Profit/Loss-Kontrolle, Averaging-Level, ATM-Regeln, Signale, Live-Informationen, Strategy-Tester-Tools und VPS-fähiger Workflow — alles in einer verbundenen Chart-Oberfläche.
Wie funktioniert VirtualTradePad PRO SE?
Was Trader über VirtualTradePad sagen
Feedback und Bewertungen von Tradern helfen neuen Nutzern zu verstehen, wie das Panel in der Praxis eingesetzt wird. In der ersten Veröffentlichungsphase kann vorhandenes VirtualTradePad-Feedback als Produkthistorie angezeigt und später durch neue Bewertungen zu VirtualTradePad PRO SE ersetzt oder erweitert werden.

Rudolf Strahm
Ein Hilfreiches Tool mit einfachen Handhabungen von Pendenten HandelI've been using the MT4/MT5 versions for years now. I could not trade without this tool, its amazing. Otherwise it is a perfect app. Ok it also has a few formatting issues with previews and numbers on the chart, but cmon its an amazing EA and worth your money! One problem I'm having right now though is as follows: If I have my Stop loss set at 100, and my Take profit at 200, when I go to click the "Buy" button, and I show on the chart where my Take profit and Stop loss would be, they are reversed. So for a buy in this case, my Stop loss would show 200, and my Take profit 100, even though that is the opposit for what I have them set at. This goes for clicking the "Sell" button. Basically, the Take profit and Stop loss previews are backwards, which is very frustrating. -Edit: The issue is being worked on, and I'm sure will be fixed soon. Perfect product and great support from the developer 🙂

P_Morgan
It's a very good tool. The seller answers questions and solves problems clearly.wilsonvivas32
I have been tradings since 2019 manually! and was looking for a tool to help me with my manual trades and must said , I am so greatful for this awesome tool! Is not for a beginner but if you have some experience you will greatly appreciate all the posibilities and freedom to place orders fast that left me speechless!Mohamedshah
I have just purchased VirtualTradePad. I can see that the developer has put a huge effort and commitment to make the Virtual Tradepad perfect in all its parameters and functions available. I have checked many similar EA's in MQL5 and this the only EA I can recommend. Thank You! Vladislav Andruschenko for providing this robust EA at an affordable price.aph.andy
Very good! Have been using it for 3 days, it increases my profits! Thank you very muchERIC ANTHONY HAHN
Amazing product with lots of options. The best trading tools all in one product.Alexander Men
Very useful too for manual scalping. Thank youmarlowyip
This is really awesome. The stop loss control was effected by the magic number. Very frustrating to figure that out.kpt247
Hi, It's really good EA for manual trading. It's very helpful. Can you add the following functions: 1- Non-stop Auto trading: Buy / Sell / Buy and Sell (also has option to turn ON/OFF filters of some most popular indicators) 2- Auto averaging with: Distance Addition / Distance Martin / Lot Addition / Lot Martin / Max Lot / Max Orders Thank you !COPYTRADER777
Купил панель, реверс и безубыток одной кнопкой определенно экономят время, авто процент тоже думаю вещь удобная( но если честно высчитываю уже на глазок). Что хочу сказать, спасибо что есть такой сайт и спасибо что есть люди у которых руки из нужного места. Собственно говоря не такие большие деньги чтобы сэкономить на нервах и удобно работать на быстром рынке.)Rogerio Costa
Hello, The program is a beast best tool to work that i have proved. I would like to know if it is possible to have one activation, in to the MT4 beacause instead of buying it for MT4 i bought for the MT5, is there any solution?Jo nathan
A must have tool. Works great.Dave W
This is the best trading pad on the market. So many features, the value is ridiculously good. If you're a manual trader you need this tool.Atila R Akdeniz
Excellent Tool, definitely the best on the market. All of Vladislav's products are of excellent quality, and he provides very good support. With the current prices it's a good time to buy all his products.




Testen Sie VirtualTradePad PRO SE, bevor Sie es auf einem Echtgeldkonto verwenden
Starten Sie KOSTENLOS!
Sie können unser Programm kostenlos herunterladen und installieren!
Und Sie können es ohne Zeitlimit auf Ihrem DEMO-Konto testen!
Außerdem können Sie unser Programm kostenlos auf einem ECHTKONTO mit dem Symbol USDJPY testen!
Installieren Sie die richtige MT4- oder MT5-Version, hängen Sie das Panel an einen Demo-Chart an und testen Sie den Hauptworkflow Schritt für Schritt.
Vollversion von VirtualTradePad PRO SE kaufen
VirtualTradePad PRO SE ist als professionelles Produkt für Trader vorbereitet, die ein vollständiges chartbasiertes Kontrollzentrum für MetaTrader benötigen. Wählen Sie die Version, die zu Ihrem Terminal passt: MetaTrader 4 oder MetaTrader 5.
 | MT5VollversionFor MetaTrader 5125 $ | MT5Miete für 3 MonateFor MetaTrader 530 $ | MT4VollversionFor MetaTrader 4125 $ | MT4Miete für 3 MonateFor MetaTrader 430 $ |
|---|---|---|---|---|
| MetaTrader | MT5 | MT5 | MT4 | MT4 |
| Nutzungsdauer | Lebenslang | 3 Monate | Lebenslang | 3 Monate |
| Handelskonten | Unbegrenzt | Unbegrenzt | Unbegrenzt | Unbegrenzt |
| Computer / Aktivierungen | 10 | 10 | 10 | 10 |
| Funktionen | Voll | Voll | Voll | Voll |
| Support | 24/7 | 24/7 | 24/7 | 24/7 |
| Aktion | Für MT5 kaufen | Für MT5 mieten | Für MT4 kaufen | Für MT4 mieten |
Die MT4- und MT5-Versionen sind separate Produkte, weil MetaTrader 4 und MetaTrader 5 unterschiedliche Plattformlogik verwenden. Wählen Sie die Version, die zu dem Terminal passt, in dem Sie das Panel nutzen werden.
Vor dem Kauf empfehlen wir dringend, unsere Anleitung und FAQ-Bereich zu lesen, damit die Nutzung reibungslos verläuft.
Inhaltsverzeichnis (zum Anzeigen klicken)
List
- Was VirtualTradePad PRO SE macht
- POS-Tab — Kontrollpanel für manuelles Trading
- ORD-Tab — Pending Orders und Planung von Preislevels
- CLP-Tab — Schließen nach Gewinn, Verlust und Trailing Profit
- PART-Tab — Manager für Teilschließungen
- AVG-Tab — Averaging- und Trend-Add-Manager
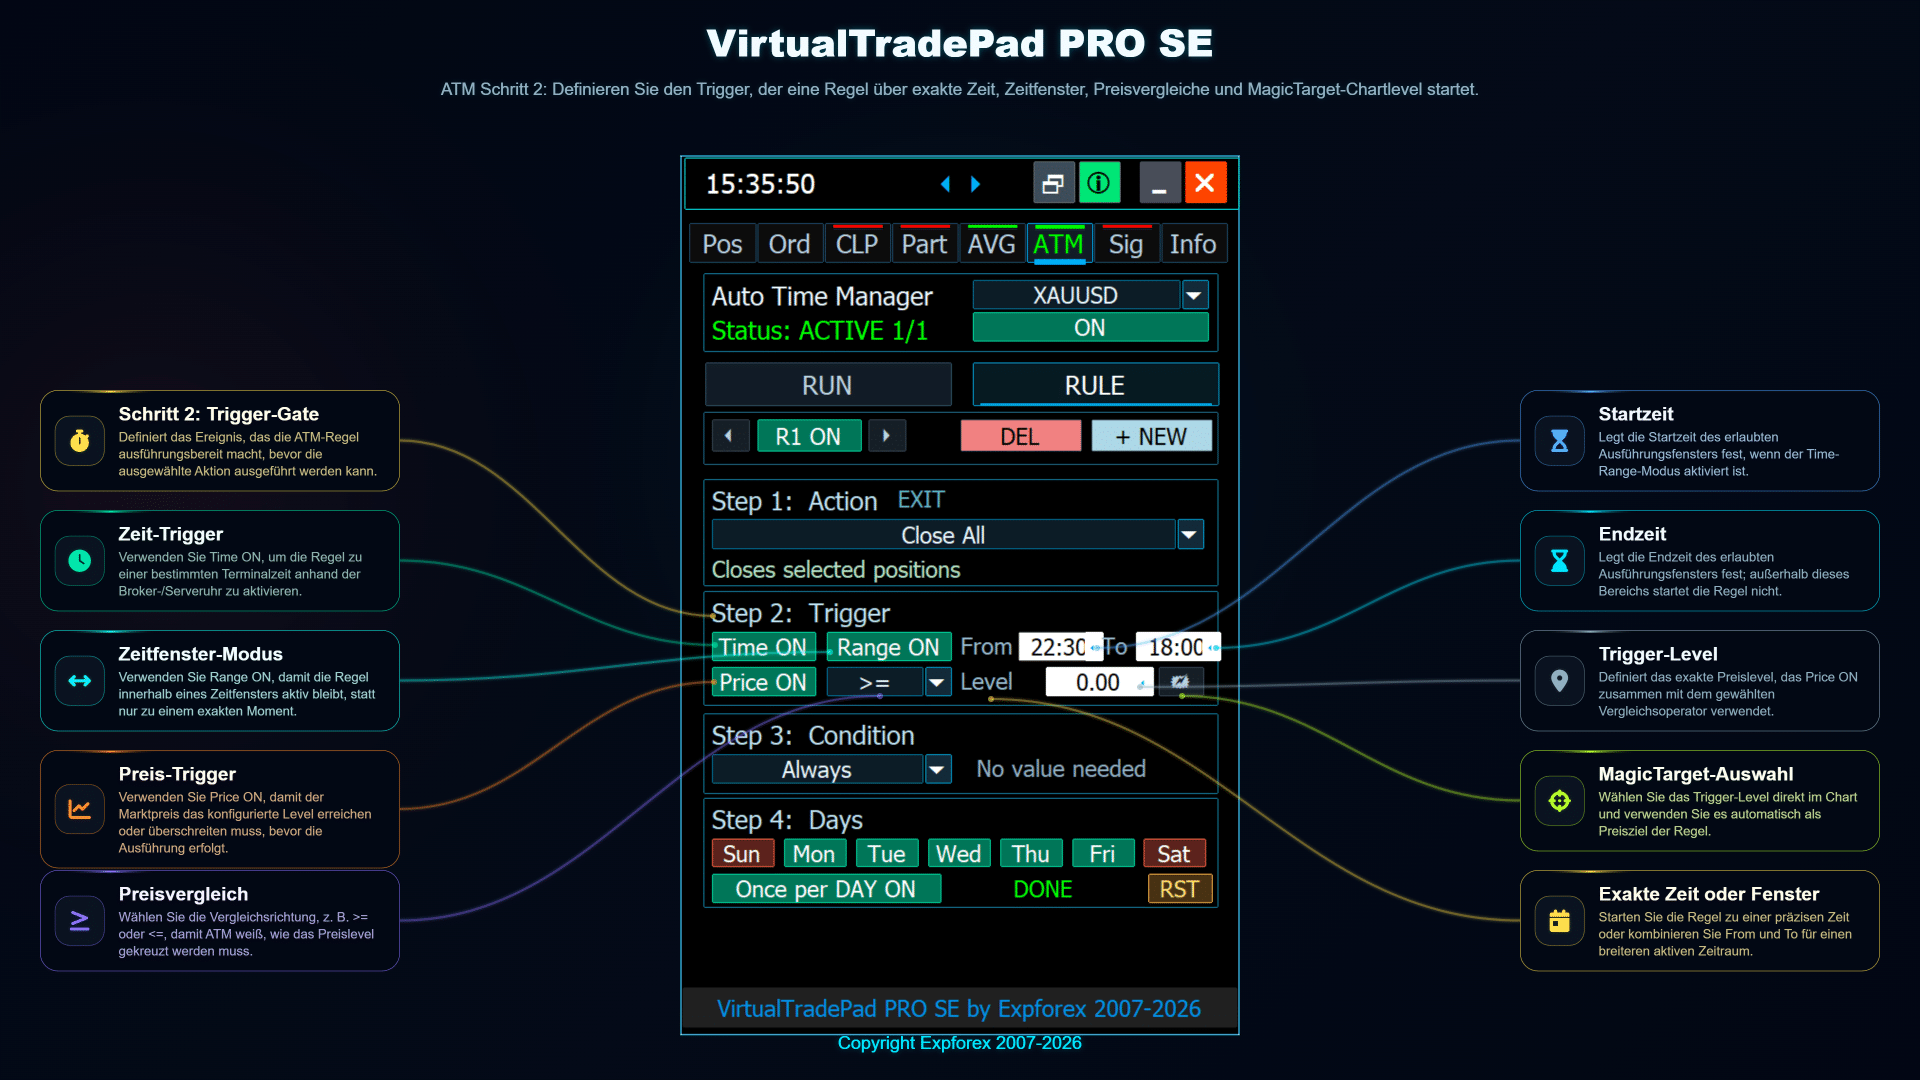
- ATM-Tab — Erweiterte Regeln für das Trade Management
- SIG-Tab — Signal Trade Manager
- INFO-Tab — Live-Markt, Exposure und Risikoübersicht
- Strategy Tester Control — visueller Testarbeitsbereich
- MQL5-VPS-Umgebung — stabiler Panel-Workflow
- Installation und erster Start
- Praktische Workflows und Anwendungsfälle
Was VirtualTradePad PRO SE macht
Das Panel ist auf den echten täglichen Arbeitsablauf eines Traders ausgerichtet: einen Trade eröffnen, ihn absichern, die Exposure überwachen, Levels anpassen, einen Teil der Position schließen, das Basket-Ergebnis kontrollieren, die Idee testen und wichtige Informationen sichtbar halten.
| Bereich | Was es dem Trader bietet |
| Manuelles Trading | Schnelles BUY, SELL, Close, Reverse, Lock, Lot-Kontrolle und Trade-Kommentare direkt aus dem Chart. |
| Schutzwerkzeuge | Stop Loss, Take Profit, Trailing Stop, Breakeven sowie reale und virtuelle Schutzmodi. |
| Positionskontrolle | Live-Positionsdetails, Werkzeuge für Teilschließungen, Chart-Levels und schnelle Aktionen zur Positionsverwaltung. |
| Pending Orders | Platzierung von Pending Orders, Order-Grid-Logik und Magic-Target-Workflow direkt aus dem Chart. |
| Basket-Management | Close Profit, Close Loss, Profit Trailing sowie separate BUY/SELL- oder ausgewählte Symbolsteuerung. |
| Erweiterte Module | PART-, AVG-, ATM-, SIG- und INFO-Module für strukturiertere Trade-Management-Workflows. |
Warum es sich von einem einfachen Trade Panel unterscheidet
Ein Standard-Trading-Panel konzentriert sich normalerweise auf eine schnellere Orderausführung. VirtualTradePad PRO SE geht weiter: Es verbindet Ausführung, Überwachung, Trade Management, Chart-Levels, Tester-Workflow und erweiterte Module in einer einzigen Umgebung.
| Einfaches Trade Panel | VirtualTradePad PRO SE |
| Konzentriert sich meist auf BUY-, SELL- und Close-Schaltflächen. | Bietet einen vollständigen Trade-Management-Arbeitsbereich mit mehreren Modulen. |
| Zeigt oft nur begrenzte Positionsinformationen. | Zeigt Live-Details, Exposure, virtuelle SL/TP, Floating-Ergebnis und Statistiken. |
| Unterstützt komplexe Chart-Level-Workflows möglicherweise nicht. | Unterstützt Chart-Levels für Positionen, Pending Orders, Teilausstiege, AVG- und ATM-Logik. |
| Hat normalerweise nur ein grundlegendes Testverhalten. | Enthält visuelle Strategy-Tester-Werkzeuge und Auto-Pause-Ereignissteuerungen. |
| Risikohinweis: VirtualTradePad PRO SE ist ein professionelles Werkzeug für das Trade Management. Es kann den Arbeitsablauf und die Übersicht verbessern, aber es kann Trading-Risiken nicht entfernen. Testen Sie Einstellungen immer zuerst auf einem Demokonto und verwenden Sie verantwortungsvolles Risikomanagement. |
Schnelle Modulnavigation
| Modul | Hauptzweck | Was Sie lernen werden |
| POS | Manuelles Trading und Positionskontrolle. | BUY/SELL-Ausführung, Lot-Modus, Kommentare, Reverse, Lock, Close, Stop Loss, Take Profit, Trailing Stop und BreakEven. |
| ORD | Pending Orders und chartbasierte Orderplatzierung. | Buy Stop, Sell Stop, Buy Limit, Sell Limit, Order-Grids, Abstand, Laufzeit, Koeffizienten-Lot und Magic-Target-Workflow. |
| CLP | Schließen nach Gewinn, Trailing Profit und Schließen nach Verlust. | Basket-Bereich, ausgewählte Deals, separate BUY/SELL-Logik, einzelne Deals, Gewinnziele, Trailing-Ziele und Verlustlimits. |
| Part | Teilschließung nach TP- und SL-Levels. | TP/SL-Teilschließungslevels, Smart SL, Chart-Leitern, Bearbeitung pro Level, benutzerdefinierte Überschreibungen und gestaffelte Positionsausstiege. |
| AVG | Averaging- und Trend-Add-Levelverwaltung. | Against-Modus, Trend-Modus, Level-Abstände, Lot-Multiplikatoren, AddLot, Basket-SL/TP/TS und Chart-Level-Vorschau. |
| ATM | Regelbasierte Automatisierung innerhalb des Panels. | Gespeicherte Regeln, Aktionen, Trigger, Bedingungen, Tagesfilter, Once-per-Day-Logik, Trade-Einstellungen und Sicherheitsbarrieren für die Automatisierung. |
| Sig | Signalmatrix und Indikator-/Timeframe-Logik. | BUY/SELL-Signalstärke, Timeframe-Spalten, Indikatorzeilen, benutzerdefinierte Matrixzellen, Alerts, Push-Benachrichtigungen und Auto-Trading-Kontrolle. |
| Info | Live-Symbolstatus und Trading-Statistiken. | Marktbedingungen, Exposure, Prop-Firm-Kontrolle, SL/TP-Zielübersicht und geschlossene P/L-Historie. |
| Strategy Tester | Visuelles Testen und Workflow-Prüfung. | Tester-Terminal, Wiedergabesteuerung, Geschwindigkeitssteuerung, Auto-Pause-Ereignisse, Chart-Levels und Simulation des manuellen Tradings. |
| MQL5 VPS | Stabile MetaTrader-VPS-Umgebung. | Wie Sie das Panel für die VPS-Migration vorbereiten und warum gespeicherte Zustände/Einstellungen vor Live-Automatisierung geprüft werden müssen. |
| ⚠️ | Vor der Verwendung erweiterter Module Module wie AVG, ATM, Sig, CLP und Part können Trade-Management-Aktionen gemäß Ihren Einstellungen ausführen oder vorbereiten. Prüfen Sie vor der Aktivierung auf einem Echtgeldkonto alle Parameter, testen Sie das Verhalten nach Möglichkeit im Strategy Tester und beginnen Sie mit einem Demokonto oder einer konservativen Lotgröße. Falsche Einstellungen können das Trading-Risiko erhöhen. Das Panel stellt Kontrollwerkzeuge bereit, aber die Trading-Entscheidung und das Risikomanagement bleiben in der Verantwortung des Traders. |
POS-Tab — Kontrollpanel für manuelles Trading
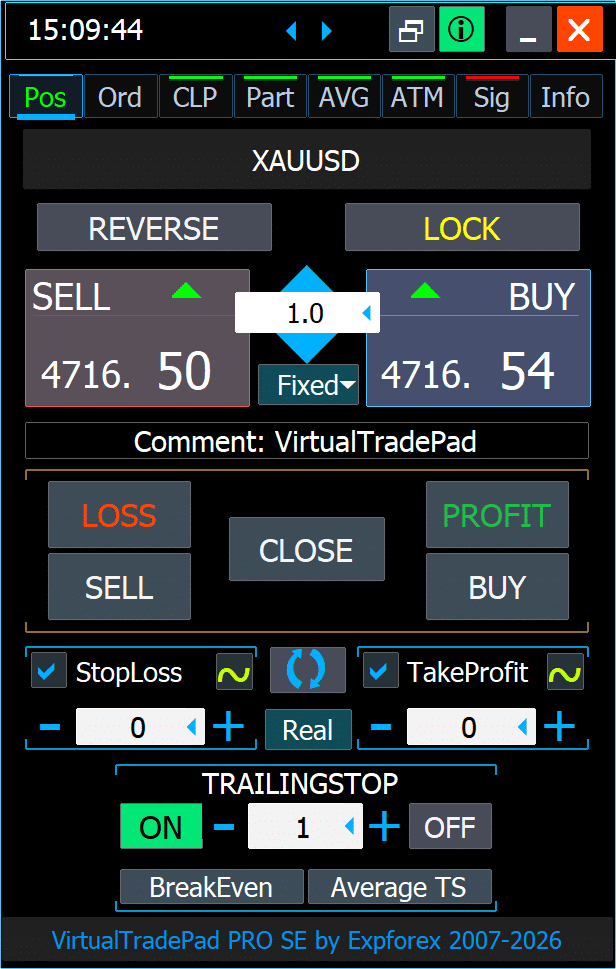
Der POS-Tab ist der zentrale Arbeitsbereich für manuelles Trading in VirtualTradePad PRO SE. Er ist für schnelle Orderausführung, Positionsschutz, schnelle Schließaktionen, Reverse-/Lock-Management, Stop-Loss- und Take-Profit-Kontrolle, Trailing Stop, Breakeven und durchschnittsbasierte Trailing-Logik direkt aus dem Chart konzipiert.
Dieser Tab ist der beste Startpunkt für neue Benutzer, weil er die Kernidee des Produkts erklärt: ein professionelles MetaTrader-Kontrollzentrum, in dem Trading-Aktionen, Schutzeinstellungen und Werkzeuge zur Positionsverwaltung in einem kompakten Panel verfügbar sind.
| Empfohlene Verwendung: Verwenden Sie den POS-Tab, wenn Sie BUY/SELL-Trades manuell eröffnen, die Lotgröße festlegen, einen Kommentar hinzufügen, SL/TP-Schutz vor dem Einstieg aktivieren, Positionen nach Richtung oder Ergebnis schließen, Exposure umkehren, Positionen locken oder Trailing und Breakeven direkt aus dem Chart verwalten möchten. |
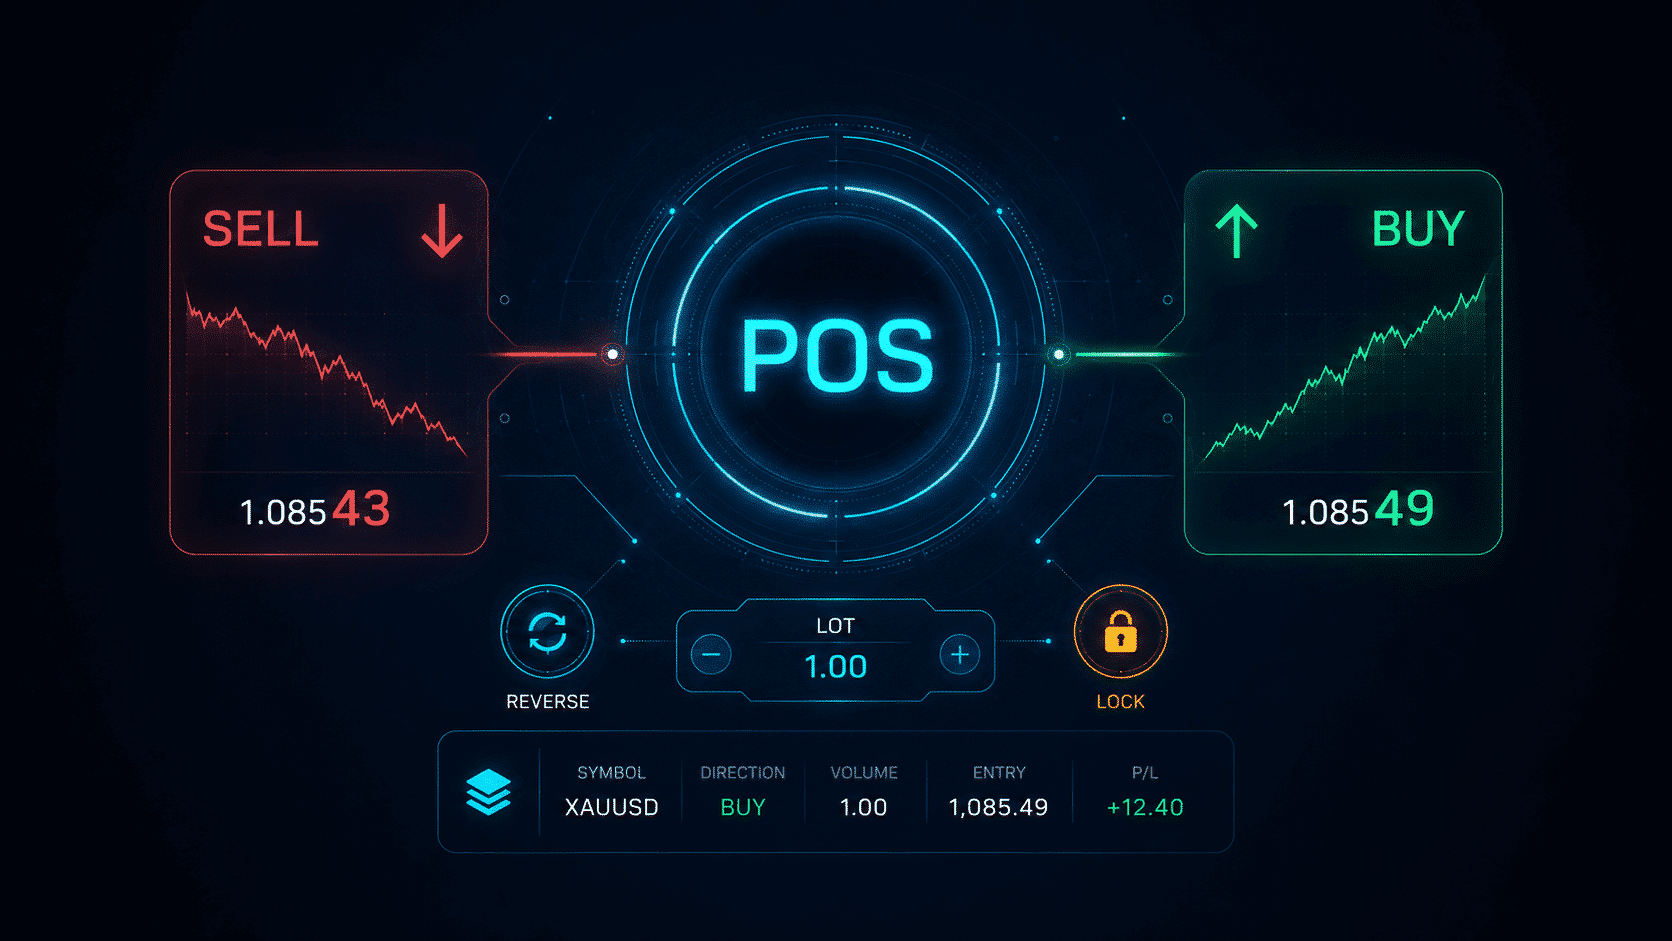
POS-Tab-Übersicht
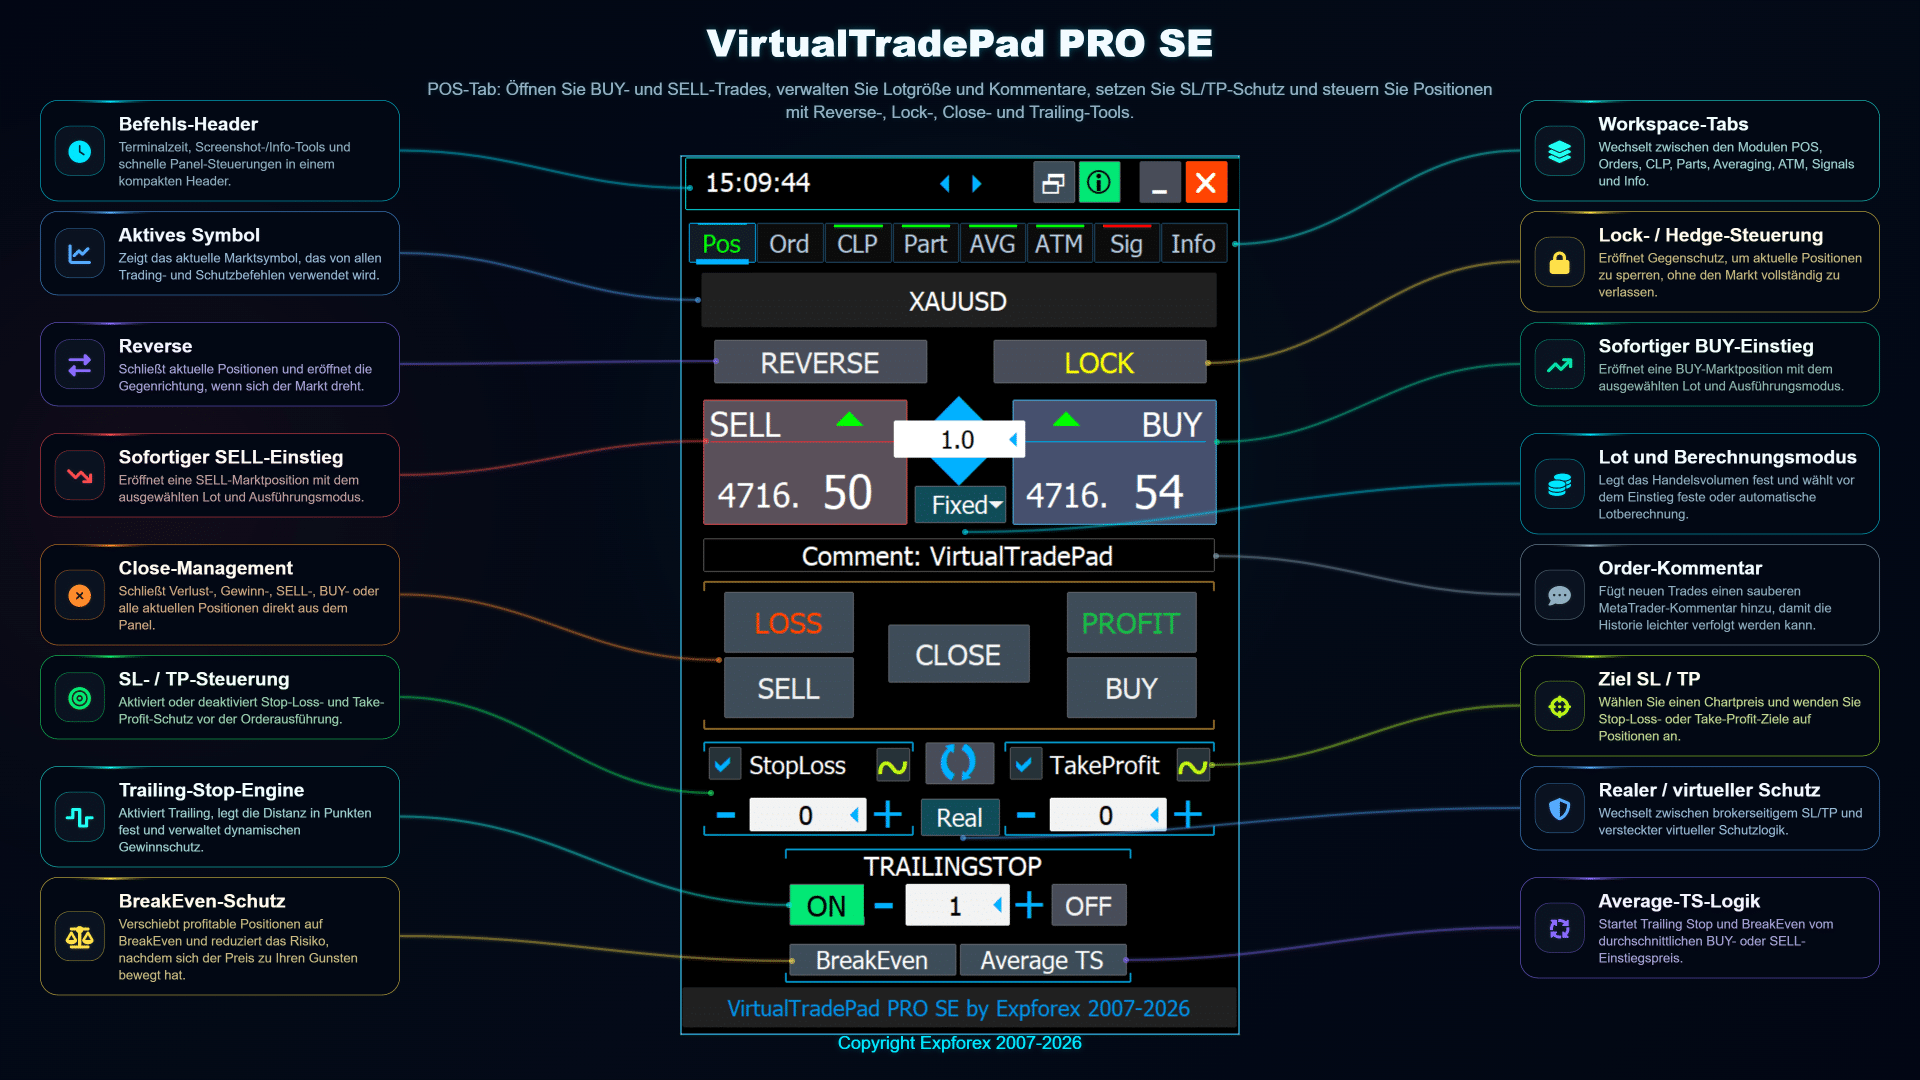
Das POS-Panel kombiniert die am häufigsten verwendeten Trading-Steuerungen: Symbolkontext, Lot-Auswahl, Markteinstiegs-Schaltflächen, Schließen-Schaltflächen, SL/TP-Aktivierung, realer oder virtueller Schutz, Trailing Stop, Breakeven und durchschnittsbasierter Trailing Stop. Das Panel ist kompakt, aber jeder Block hat einen klaren Zweck.
Hauptsteuerungen erklärt
| Steuerung | Zweck | Praktische Verwendung |
| BUY / SELL | Eröffnet Marktpositionen mit dem ausgewählten Lot und Ausführungsmodus. | Schnelle manuelle Einstiege direkt aus dem Chart, ohne das Standard-Orderfenster von MetaTrader zu öffnen. |
| Lot-Feld | Legt das Handelsvolumen vor dem Einstieg fest. | Verwenden Sie je nach konfigurierten Einstellungen ein fixes Lot oder den automatischen Berechnungsmodus. |
| Kommentar | Fügt neuen Trades einen sauberen MetaTrader-Kommentar hinzu. | Nützlich für die Historienauswertung, Strategietrennung und Support-Analyse. |
| REVERSE | Schließt die aktuelle Exposure und eröffnet die Gegenrichtung. | Nützlich, wenn sich die Marktrichtung ändert und der Trader die Position schnell drehen möchte. |
| LOCK | Eröffnet einen entgegengesetzten Schutz zur Absicherung der aktuellen Exposure. | Kann verwendet werden, um das Marktergebnis vorübergehend zu sperren, statt Positionen vollständig zu schließen. |
| LOSS / PROFIT / SELL / BUY / CLOSE | Schließt Positionen nach Ergebnis, Richtung oder alle aktuellen Positionen. | Ermöglicht schnelles Bereinigen von Verlustpositionen, Gewinnpositionen, BUY-Positionen, SELL-Positionen oder des gesamten Baskets. |
| StopLoss / TakeProfit | Aktiviert und setzt Schutzlevels vor dem Öffnen von Trades. | Hilft, einen disziplinierten Einstiegsworkflow zu erstellen, bei dem der Schutz vor der Ausführung vorbereitet wird. |
| Real / Virtual | Wechselt zwischen brokerseitigem SL/TP und versteckter virtueller Schutzlogik. | Realer Schutz wird auf dem Broker-Server platziert. Virtueller Schutz wird von der Panel-Logik verwaltet, solange das Terminal läuft. |
| TRAILINGSTOP | Verschiebt den Schutz dynamisch, wenn sich der Preis zugunsten des Traders bewegt. | Nützlich, um Floating-Gewinn zu schützen, ohne den Trade sofort zu schließen. |
| BreakEven | Verschiebt profitable Positionen auf Breakeven, wenn die Bedingungen es erlauben. | Reduziert das Risiko, nachdem sich der Markt in die gewünschte Richtung bewegt hat. |
| Average TS | Startet Trailing-Logik ab dem durchschnittlichen BUY- oder SELL-Einstiegspreis. | Nützlich, wenn mehrere Positionen als ein Basket verwaltet werden. |
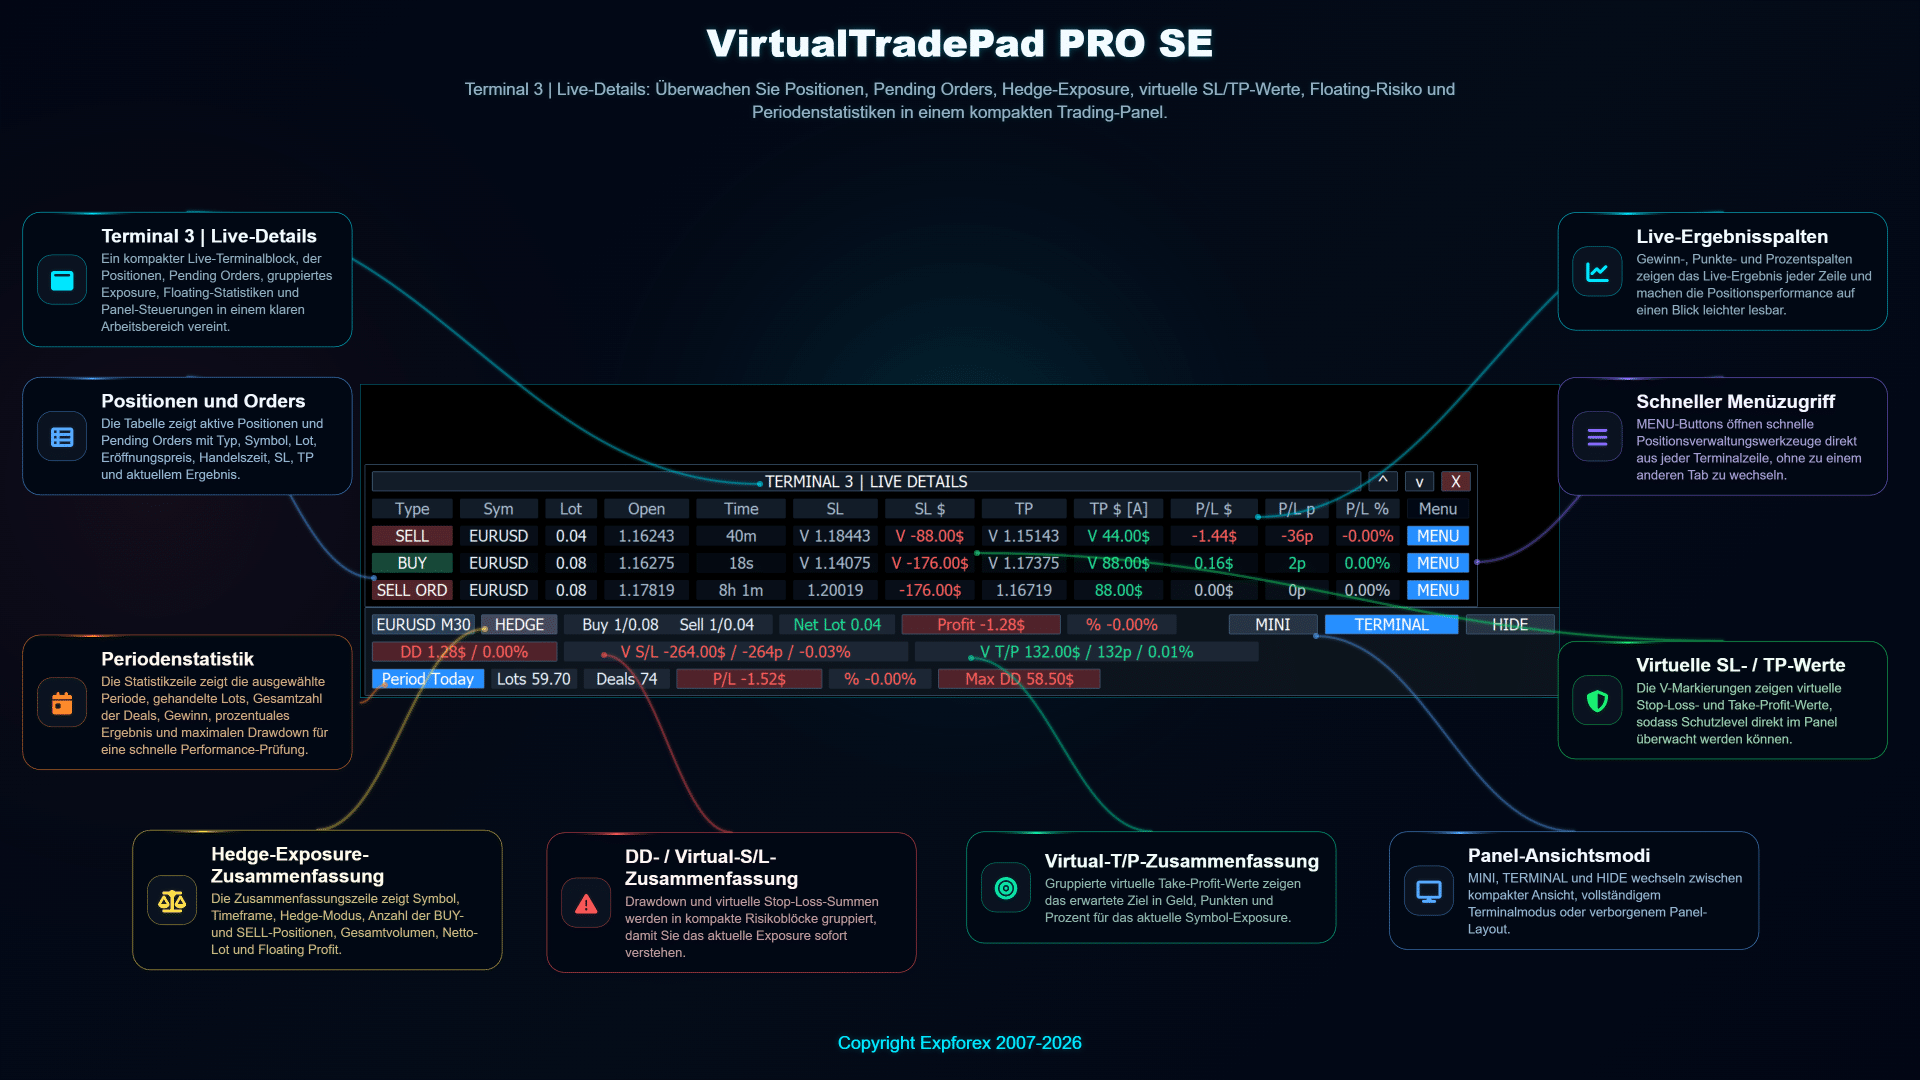
Terminal / Live-Details-Panel
Der POS-Workflow kann mit dem Terminal / Live Details-Panel kombiniert werden. Dieses Panel zeigt Positionen, Pending Orders, Hedge-Exposure, virtuelle SL/TP-Werte, Floating-Risiko, Periodenstatistiken und schnellen Menüzugriff in einem kompakten Trading-Block.
| Tipp: Das Live-Details-Panel ist besonders nützlich, wenn mehrere Trades gleichzeitig geöffnet sind. Statt das Standard-MetaTrader-Terminal zu prüfen, kann der Trader Symbol-Exposure, Netto-Lot, Floating-Ergebnis, virtuelle SL/TP-Gesamtdaten und Periodenperformance direkt aus dem Chart überwachen. |
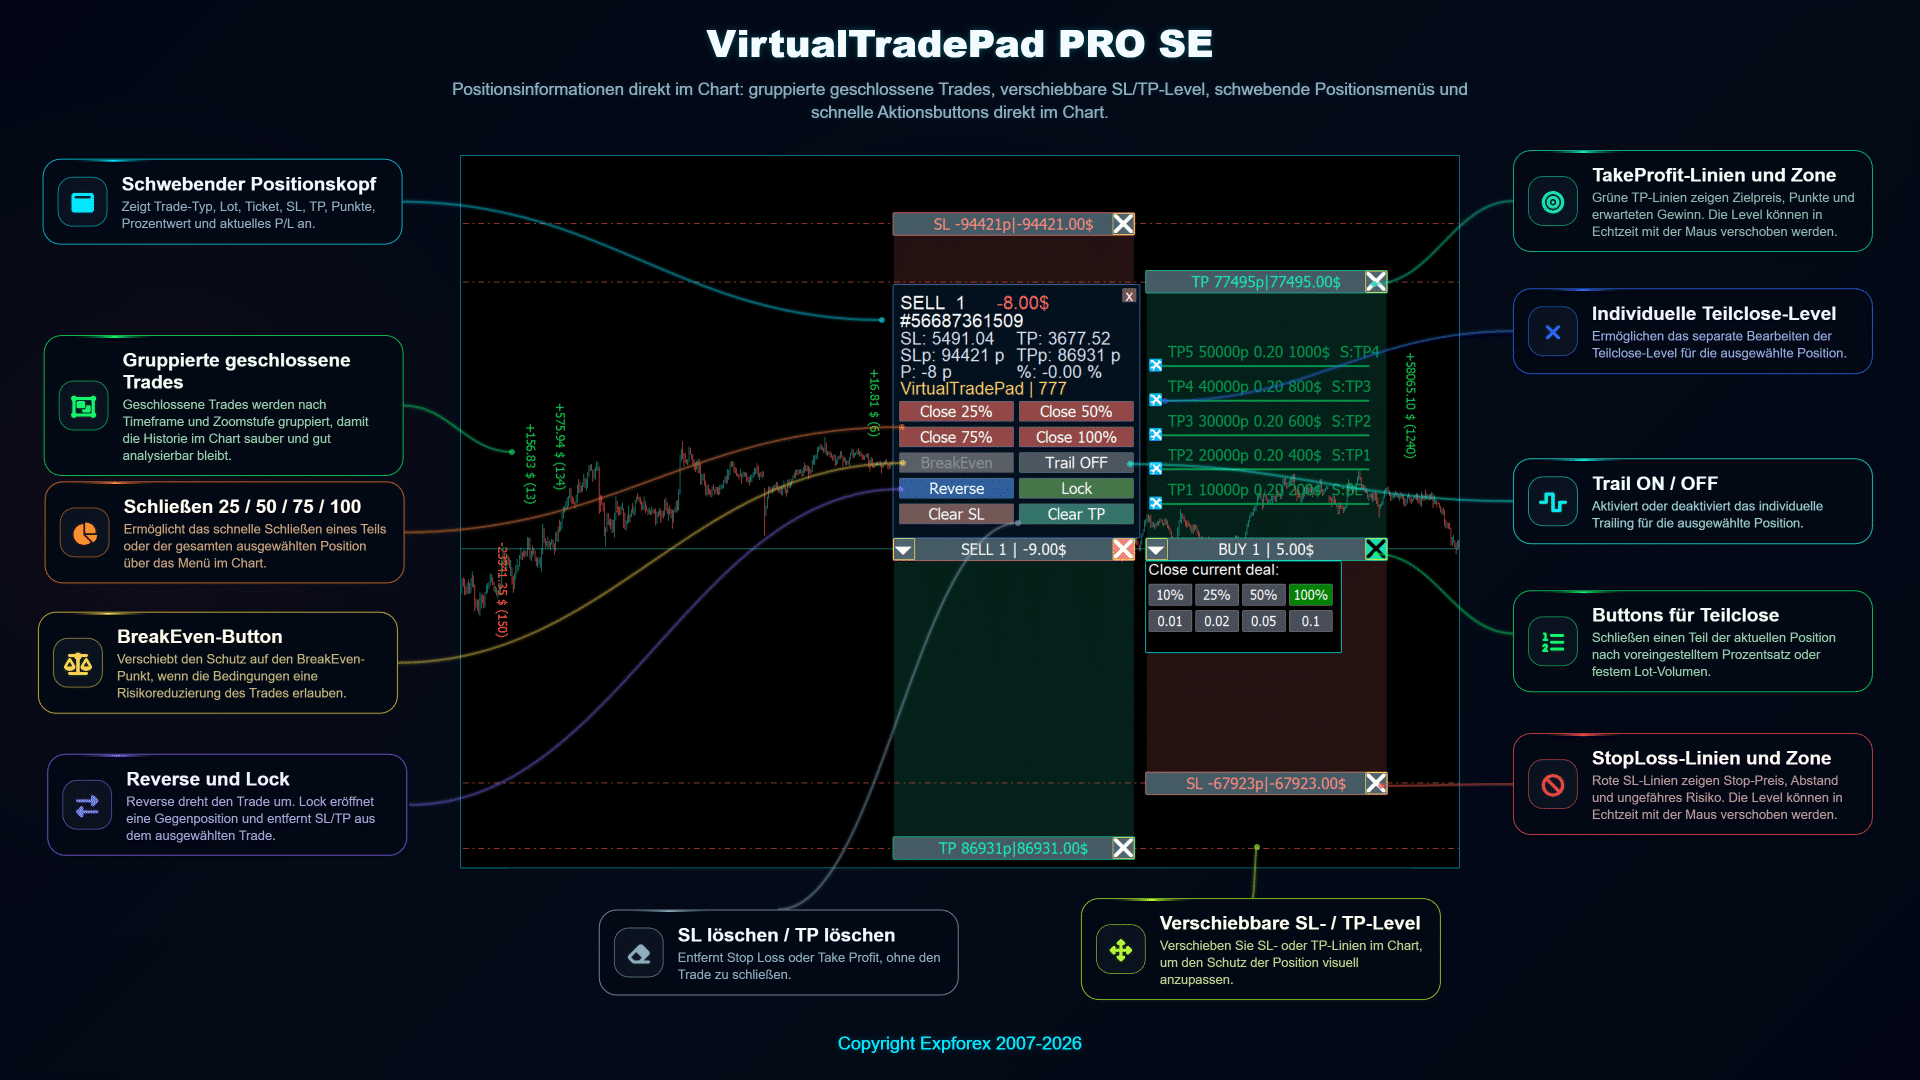
Positionsverwaltung im Chart
VirtualTradePad PRO SE kann Positionsinformationen und Aktionsmenüs auch direkt im Chart anzeigen. Das hilft dem Trader, einzelne Positionen visuell zu verwalten: Teilschließung, Reverse, Lock, SL/TP löschen, Levels verschieben, Trailing-Kontrolle und individuelle TP/SL-Zonen können geprüft werden, ohne den Chart zu verlassen.
Praktischer POS-Workflow
| Schritt | Aktion | Grund |
| 1 | Wählen Sie das Symbol und bestätigen Sie den Chart-Kontext. | Die Panel-Aktionen sind mit dem aktuellen Chart-Symbol und der konfigurierten Trading-Logik verbunden. |
| 2 | Legen Sie die Lotgröße fest und wählen Sie den Berechnungsmodus. | Dadurch wird das Handelsvolumen vor dem Öffnen einer Marktorder definiert. |
| 3 | Aktivieren Sie Stop Loss und Take Profit, wenn Schutz erforderlich ist. | Der Schutz kann vor der Orderausführung vorbereitet werden. |
| 4 | Eröffnen Sie BUY oder SELL über das Panel. | Die Position wird direkt aus dem Chart mit den ausgewählten Werten eröffnet. |
| 5 | Verwalten Sie die Position mit Close-, Reverse-, Lock-, Trailing- oder Breakeven-Werkzeugen. | Der Trader kann schnell reagieren, ohne zwischen mehreren MetaTrader-Fenstern zu wechseln. |
Wichtige Hinweise
- Virtueller Schutz erfordert, dass das Terminal oder die VPS-Umgebung weiterläuft. Wenn Sie virtuelle SL/TP oder virtuelle Trailing-Logik verwenden, testen Sie das Verhalten sorgfältig vor dem Live-Trading.
- Lock- und Reverse-Aktionen ändern die Markt-Exposure schnell. Verwenden Sie sie nur, wenn Sie verstehen, wie Hedging und Gegenpositionen auf Ihrem Kontotyp funktionieren.
- Average TS ist basketorientiert. Es ist nützlich, wenn mehrere Positionen vom durchschnittlichen Einstiegspreis aus verwaltet werden, sollte aber zuerst auf einem Demokonto getestet werden.
- Prüfen Sie immer die Handelsbedingungen des Brokers. Stop-Levels, Freeze-Levels, Spread, Ausführungsmodus und Marktstatus können das Öffnen und Ändern von Orders beeinflussen.
| Risikohinweis: VirtualTradePad PRO SE ist ein professionelles Trading-Management-Panel. Es garantiert keinen Gewinn und entfernt kein Marktrisiko. Testen Sie Einstellungen immer auf einem Demokonto und verwenden Sie Risikolimits, die zu Ihrer Trading-Strategie passen. |
ORD-Tab — Pending Orders und Planung von Preislevels
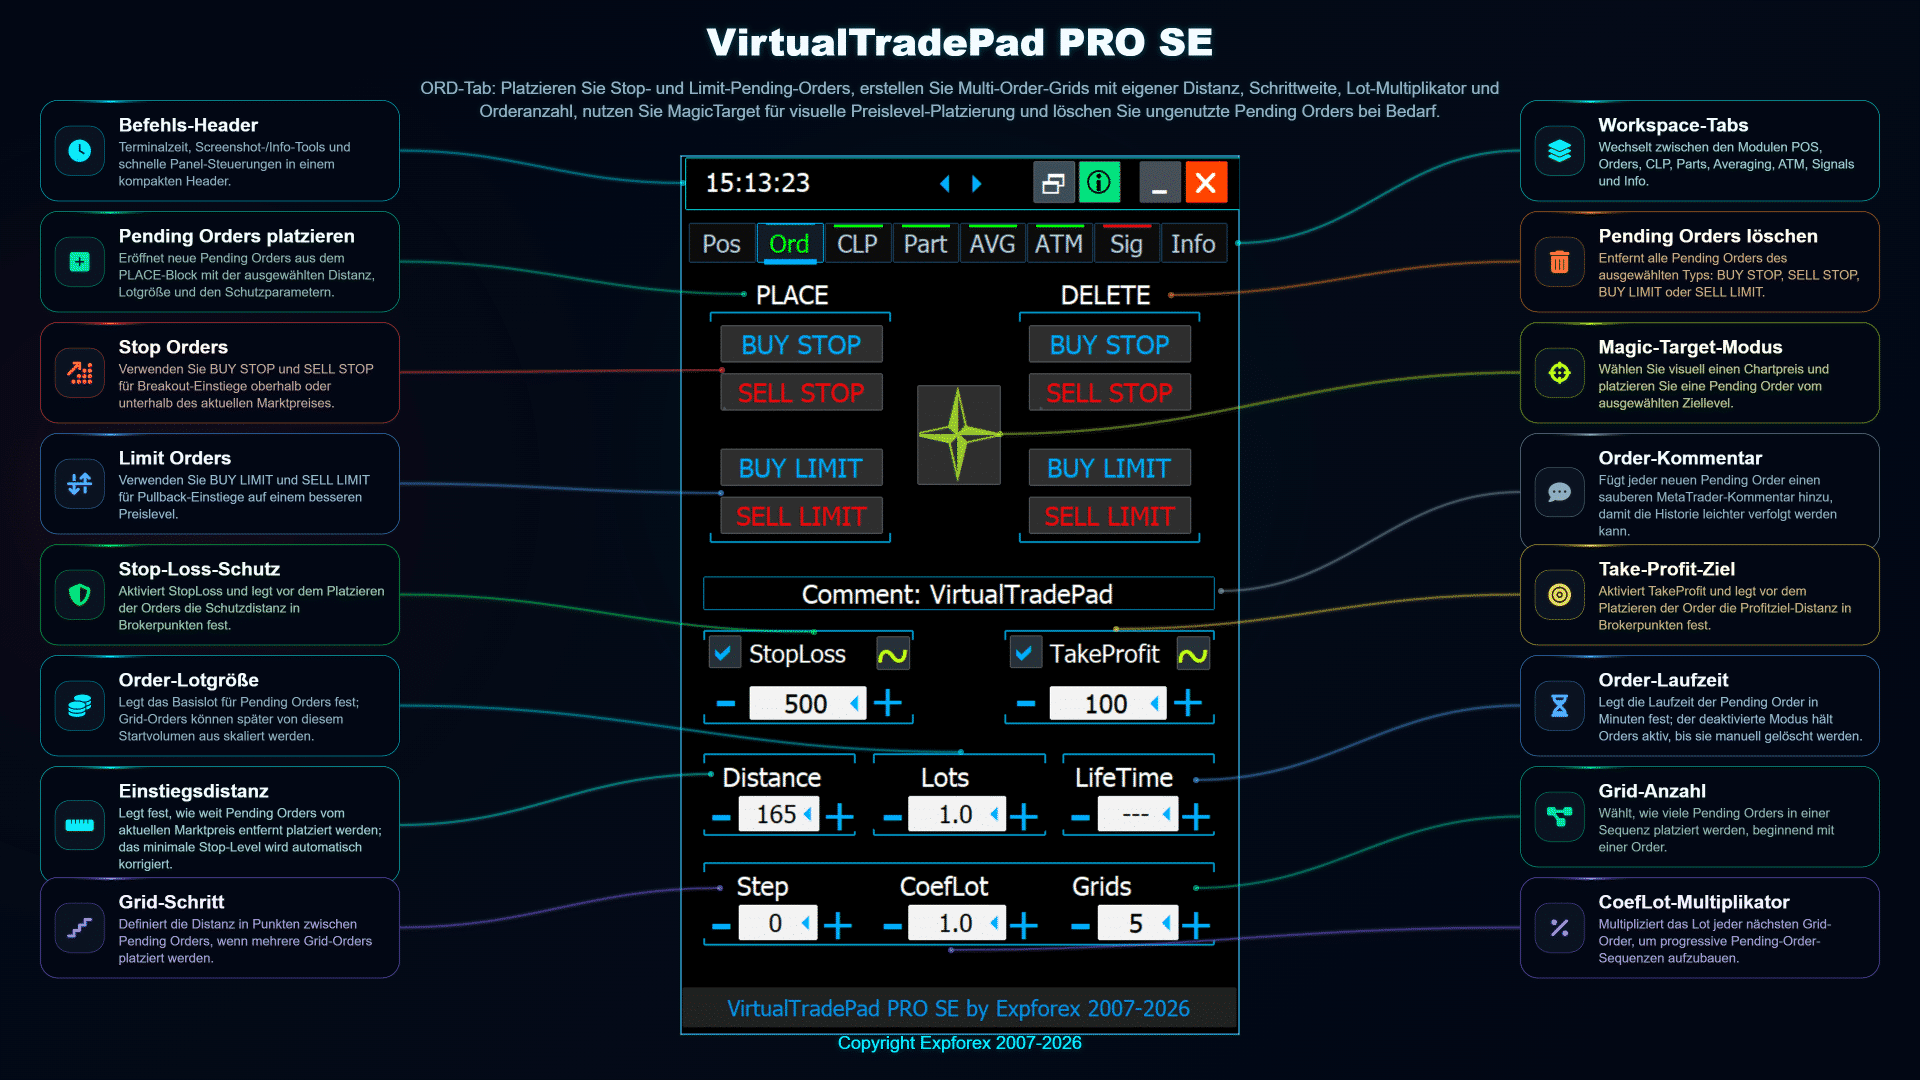
Der ORD-Tab in VirtualTradePad PRO SE ist für die Arbeit mit Pending Orders direkt aus dem Chart konzipiert. Er hilft dem Trader, Buy Stop-, Sell Stop-, Buy Limit- und Sell Limit-Orders vorzubereiten, Order-Abstände zu definieren, Order-Grids zu erstellen, Schutzlevels zu setzen und den Magic-Target-Workflow für die visuelle Preislevel-Planung zu nutzen.
Dieses Modul ist nützlich, wenn der Trader nicht sofort in den Markt einsteigen möchte, sondern einen strukturierten Einstiegsplan rund um den aktuellen Preis, Breakout-Zonen, Pullback-Bereiche oder manuell gewählte Chart-Levels vorbereiten will.
| Empfohlene Verwendung: Verwenden Sie den ORD-Tab, wenn Sie Pending Orders platzieren, Order-Grids aufbauen, zukünftige Einstiege nach Abstand oder Preislevel planen oder Orders visuell vorbereiten möchten, ohne das Standard-Orderfenster von MetaTrader zu öffnen. |
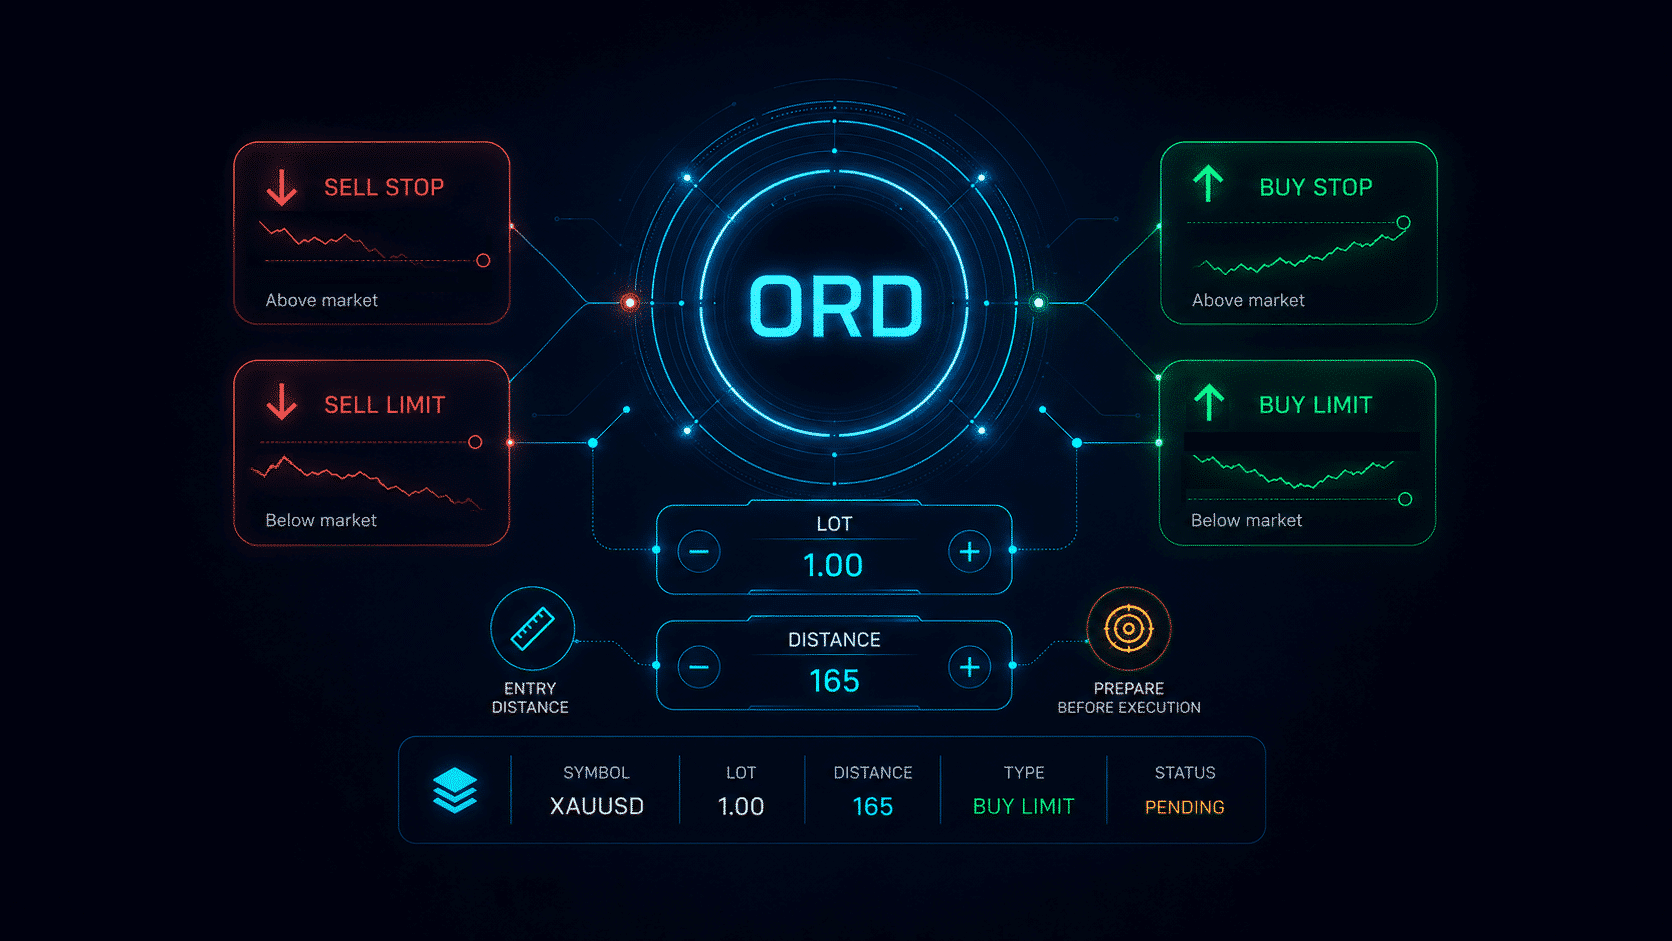
ORD-Tab-Übersicht
Das ORD-Panel bündelt die Steuerungen für Pending Orders in einem kompakten Arbeitsbereich. Der Trader kann den Ordertyp auswählen, die Lotgröße definieren, Abstands- oder Preislogik wählen, Stop Loss und Take Profit aktivieren, Order-Grids vorbereiten und Pending Orders aus demselben Panel verwalten.
Hauptsteuerungen des ORD-Tabs erklärt
| Steuerung | Zweck | Praktische Verwendung |
| Buy Stop / Sell Stop | Platziert Breakout-orientierte Pending Orders über oder unter dem aktuellen Marktpreis. | Nützlich, wenn der Trader eine Fortsetzung nach dem Bruch eines gewählten Levels erwartet. |
| Buy Limit / Sell Limit | Platziert Pullback-orientierte Pending Orders unter oder über dem aktuellen Marktpreis. | Nützlich, wenn der Trader erwartet, dass der Preis zu einem besseren Einstiegsbereich zurückkehrt, bevor er sich in die geplante Richtung bewegt. |
| Lot-Feld | Definiert das Volumen der Pending Order vor der Platzierung. | Verwenden Sie je nach Trading-Plan ein fixes Lot oder die konfigurierte Lot-Berechnungslogik. |
| Distance / Step | Steuert, wie weit die Pending Order oder das Grid-Level vom aktuellen Preis oder ausgewählten Basislevel entfernt platziert wird. | Hilft, konsistente Orderplatzierung zu erstellen, ohne jedes Level manuell zu berechnen. |
| SL / TP | Fügt Pending Orders Stop-Loss- und Take-Profit-Schutz hinzu. | Nützlich, wenn Orders unmittelbar nach der Aktivierung geschützt sein müssen. |
| Order Grid | Erstellt mehrere Pending Orders entsprechend dem konfigurierten Step, der Anzahl und der Volumenlogik. | Nützlich für strukturierte Breakout-, Pullback- oder levelbasierte Einstiegsplanung. |
| Delete / Modify tools | Verwaltet bestehende Pending Orders aus dem Panel oder aus dem Chart. | Ermöglicht schnelle Anpassung oder Bereinigung, wenn sich der Marktplan ändert. |
| Magic Target | Ermöglicht visuelle Orderplanung durch Auswahl von Chart-Levels mit dem Cursor. | Nützlich, wenn der Trader Einstieg, SL und TP direkt aus dem Chart definieren möchte, statt Preise manuell einzugeben. |
Chartbasiertes Pending-Order-Grid
VirtualTradePad PRO SE kann geplante Pending-Order-Levels direkt im Chart anzeigen. Dadurch lässt sich die Orderstruktur leichter verstehen, bevor die Orders platziert oder aktiviert werden. Der Trader kann den Abstand zwischen Levels, Orderrichtung, Lotgröße und die Beziehung zur aktuellen Preisbewegung visuell prüfen.
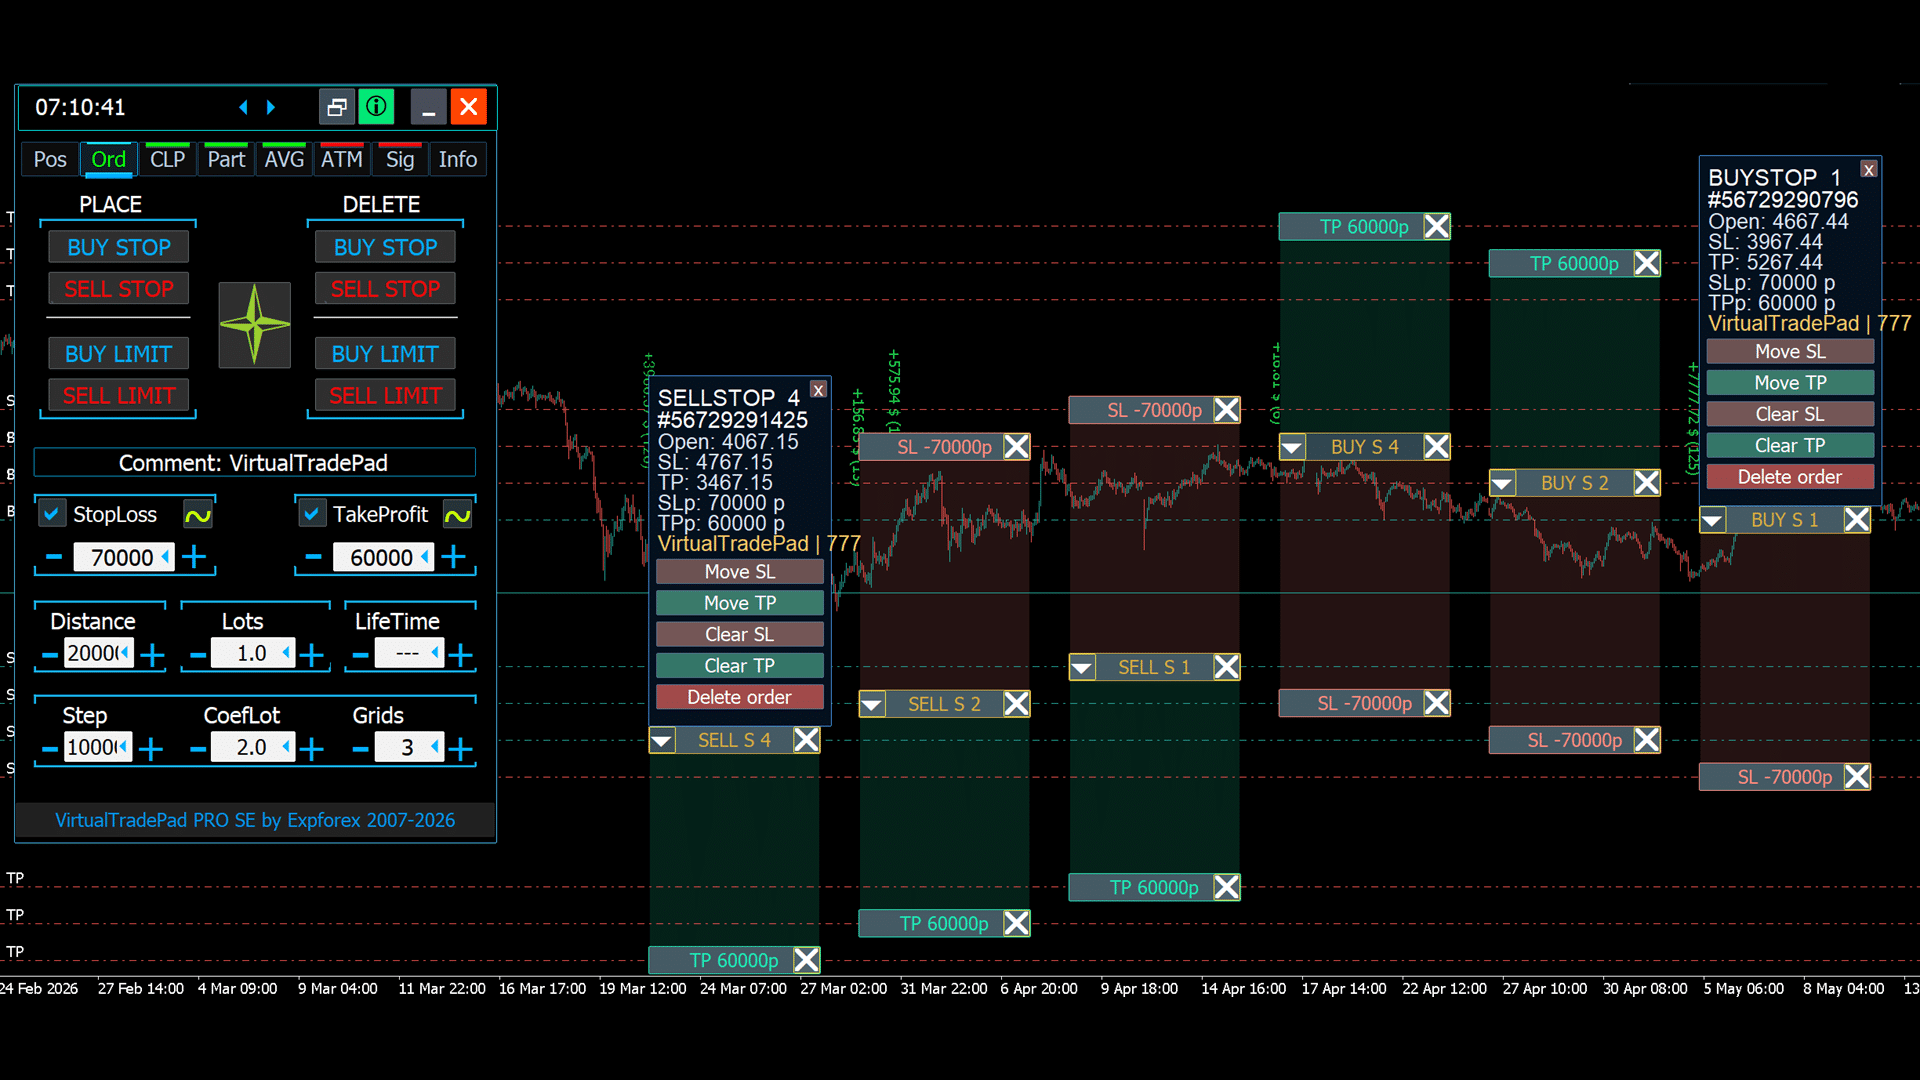
| Tipp: Chartbasierte Orderplanung ist besonders nützlich für Breakout- und Pullback-Strategien. Statt jedes Level manuell zu berechnen, kann der Trader mit dem Panel eine konsistente Orderstruktur vorbereiten und sie im Chart visuell bestätigen. |
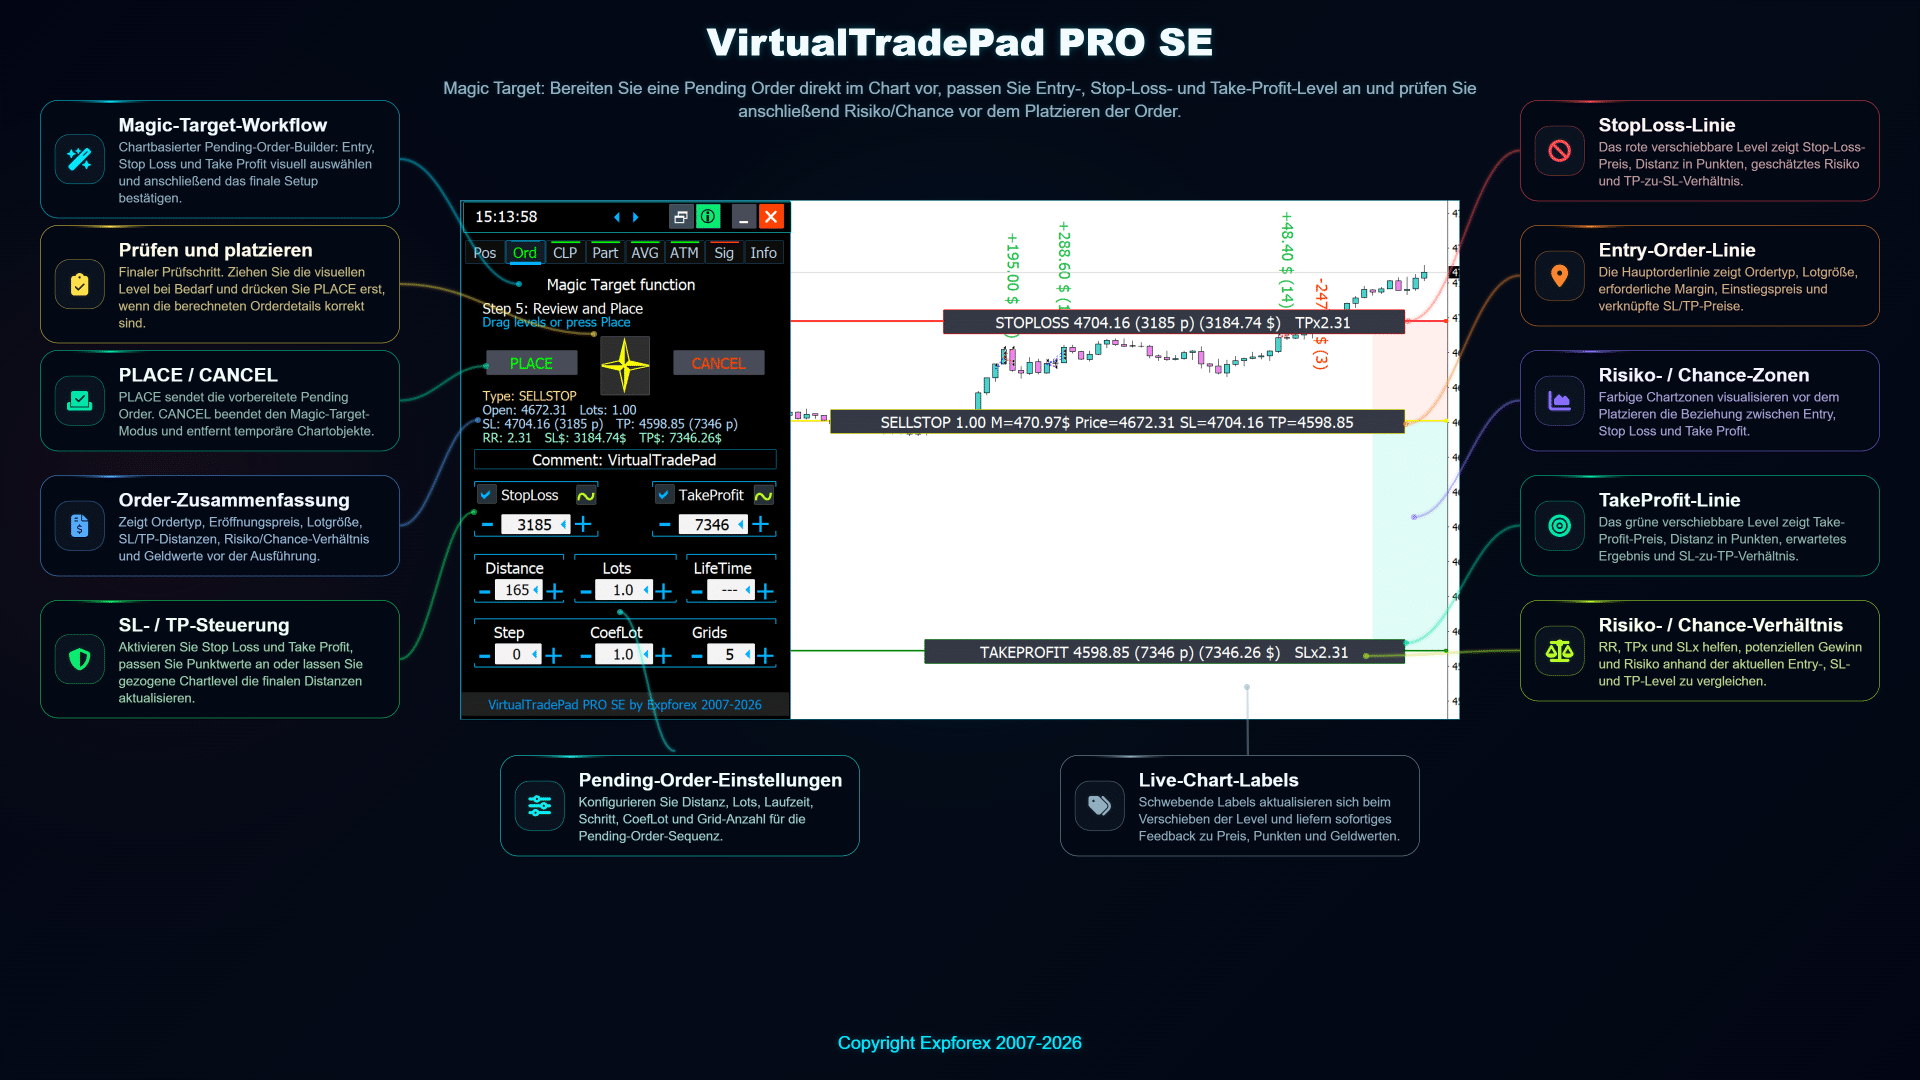
Magic-Target-Workflow
Magic Target ist ein visueller Workflow zum Platzieren oder Vorbereiten von Trade-Levels direkt aus dem Chart. Statt jeden Preis manuell einzugeben, kann der Trader mit dem Chart-Cursor wichtige Levels wie Einstieg, Stop Loss und Take Profit definieren. Das macht die Ordervorbereitung intuitiver und reduziert die Menge manueller Preiseingaben.
Praktischer ORD-Workflow
| Schritt | Aktion | Grund |
| 1 | Wählen Sie den Pending-Order-Typ. | Unterschiedliche Ordertypen werden für Breakout- oder Pullback-Logik verwendet. |
| 2 | Legen Sie die Lotgröße und den Orderabstand fest oder wählen Sie Chart-Levels aus. | Dadurch wird definiert, wo die zukünftige Order platziert wird und wie groß sie ist. |
| 3 | Aktivieren Sie Stop Loss und Take Profit, wenn Schutz erforderlich ist. | Der Schutz kann an die Pending Order angehängt werden, bevor sie zur Marktposition wird. |
| 4 | Platzieren Sie eine einzelne Order oder erstellen Sie ein Grid. | Der Trader kann einen einzelnen geplanten Einstieg oder einen strukturierten Ordersatz vorbereiten. |
| 5 | Überwachen, ändern oder löschen Sie Pending Orders aus dem Panel oder Chart. | Der Plan kann schnell angepasst werden, wenn sich die Marktbedingungen ändern. |
Wichtige Hinweise
- Pending Orders sind noch keine Marktpositionen. Sie werden erst dann zu aktiven Positionen, wenn der Markt den Orderpreis erreicht und der Broker die Ausführung akzeptiert.
- Prüfen Sie immer die Broker-Regeln. Mindestabstand, Freeze Level, Spread und Ausführungsbeschränkungen können die Platzierung oder Änderung von Pending Orders beeinflussen.
- Testen Sie zuerst auf Demo. Bevor Sie Order-Grids oder Magic Target auf einem Live-Konto verwenden, testen Sie den Workflow auf einem Demokonto oder im Strategy Tester.
- Das Risiko steigt mit mehreren Pending Orders. Ein Grid kann mehrere Marktpositionen erzeugen, wenn der Preis mehrere Levels aktiviert. Verwenden Sie angemessene Lotgrößen und Schutzeinstellungen.
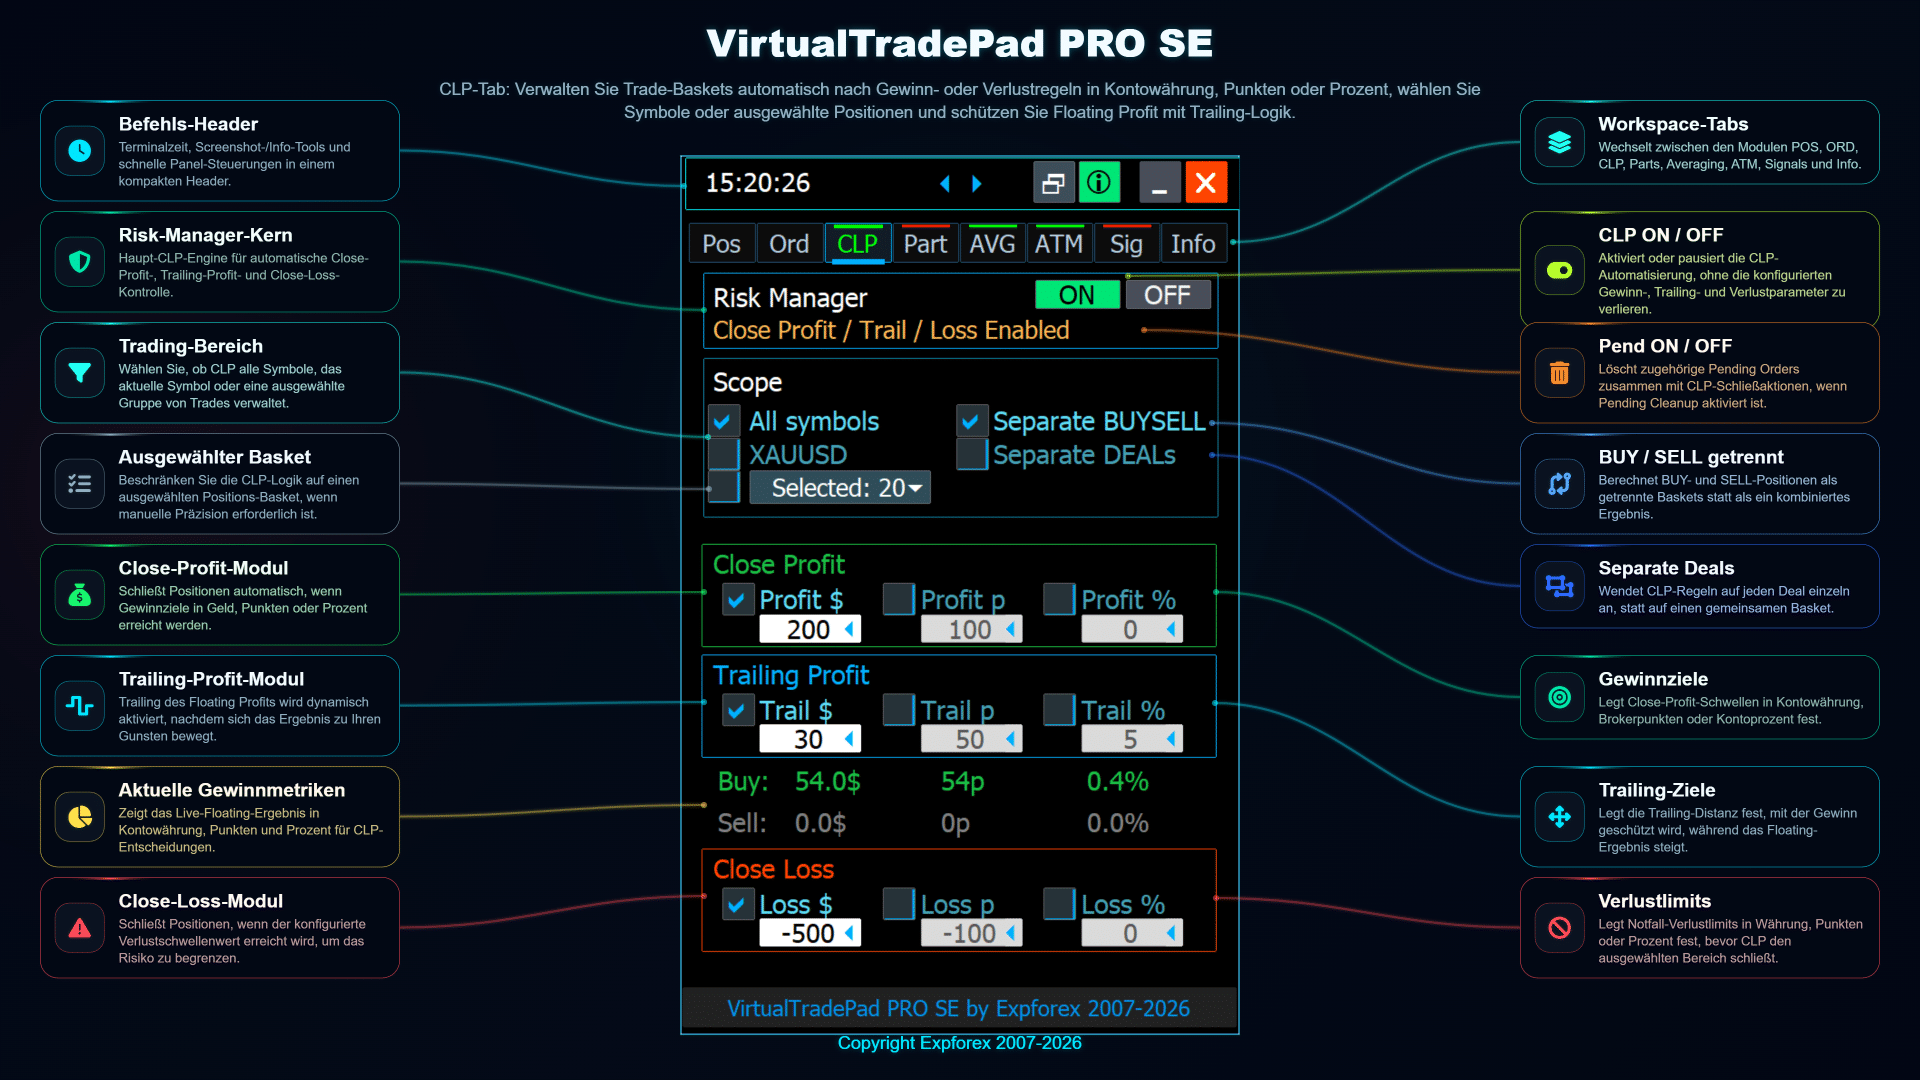
CLP-Tab — Schließen nach Gewinn, Verlust und Trailing Profit
CLP ist das Basket-Kontrollmodul innerhalb von VirtualTradePad PRO SE. Es hilft dem Trader, Positionen nach Gesamtgewinn, Gesamtverlust, Trailing Profit, ausgewählten Symbolen oder getrennten BUY/SELL-Exposures zu überwachen und zu schließen.
Dieser Tab ist besonders nützlich, wenn Sie mehrere Positionen gleichzeitig verwalten und eine klare regelbasierte Möglichkeit benötigen, das Konto zu schützen, Gewinn zu sichern, Floating-Verlust zu begrenzen oder nur eine bestimmte Gruppe von Trades zu schließen.
| Modul | CLP — Close Profit / Close Loss / Profit Trailing |
| Hauptzweck | Schließt einen Basket von Positionen, wenn Gewinn-, Verlust- oder Trailing-Profit-Bedingungen erreicht werden. |
| Am besten geeignet für | Manuelles Trading, Basket-Management, Kontrolle mehrerer Positionen, Recovery-Strategien und Gewinnschutz. |
| Wichtig | CLP ist ein Managementwerkzeug. Es garantiert keinen Gewinn und muss vor Live-Einsatz auf einem Demokonto getestet werden. |
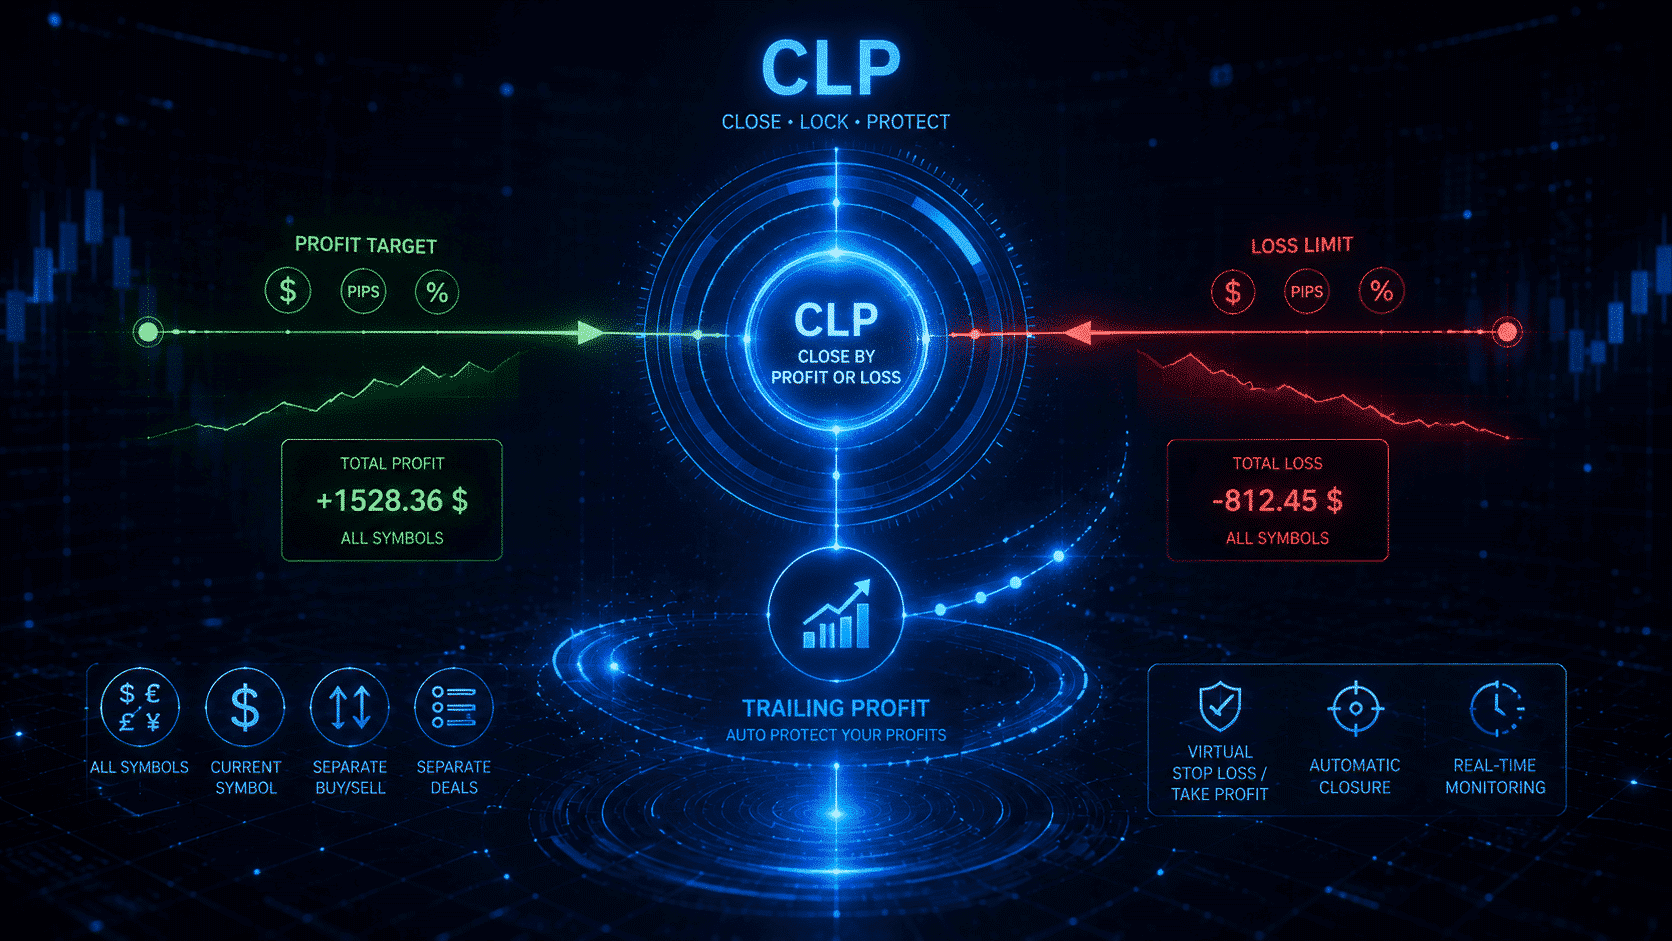
CLP-Panel-Übersicht
Der CLP-Tab bündelt die wichtigsten Basket-Schließwerkzeuge in einem kompakten Panel. Sie können Gewinnziele, Verlustlimits, Trailing-Profit-Verhalten, Symbolbereich und separate BUY/SELL-Logik konfigurieren.
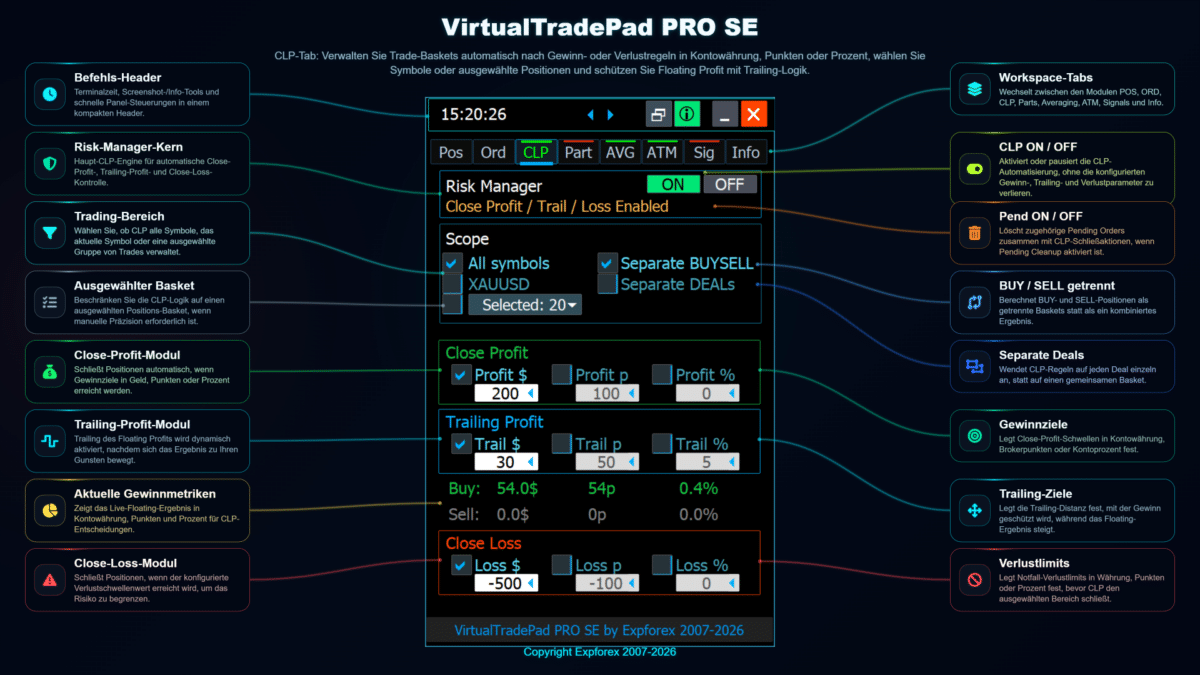
Hauptfunktionen von CLP
| Funktion | Was sie macht | Typische Verwendung |
| Close Profit | Schließt ausgewählte Positionen, wenn das konfigurierte Gewinnziel erreicht ist. | Basket-Gewinn sichern, ohne jeden Trade manuell zu prüfen. |
| Close Loss | Schließt ausgewählte Positionen, wenn das konfigurierte Verlustlimit erreicht ist. | Floating-Verlust begrenzen und das Konto vor unkontrollierter Exposure schützen. |
| Profit Trailing | Verfolgt den Basket-Gewinn und schließt Positionen, wenn der Gewinn um den konfigurierten Trailing-Schritt zurückläuft. | Floating-Gewinn schützen und dem Basket trotzdem Raum zum Wachsen lassen. |
| Selected Symbols | Wendet die CLP-Logik nur auf ausgewählte Symbole oder Symbolgruppen an. | Ein Symbol verwalten, ohne andere Charts oder Strategien zu beeinflussen. |
| Separate BUY / SELL | Trennt Long- und Short-Baskets, damit BUY- und SELL-Positionen unabhängig kontrolliert werden können. | Nützlich für Hedge-Konten, Grid-Systeme oder Trading mit gemischten Richtungen. |
Selected-Symbols-Modus
Der Selected-Symbols-Modus hilft Ihnen, CLP-Regeln nur auf die Instrumente anzuwenden, die Sie verwalten möchten. Das ist wichtig, wenn auf demselben Konto mehrere Charts, verschiedene Strategien oder mehrere Symbole gleichzeitig laufen.
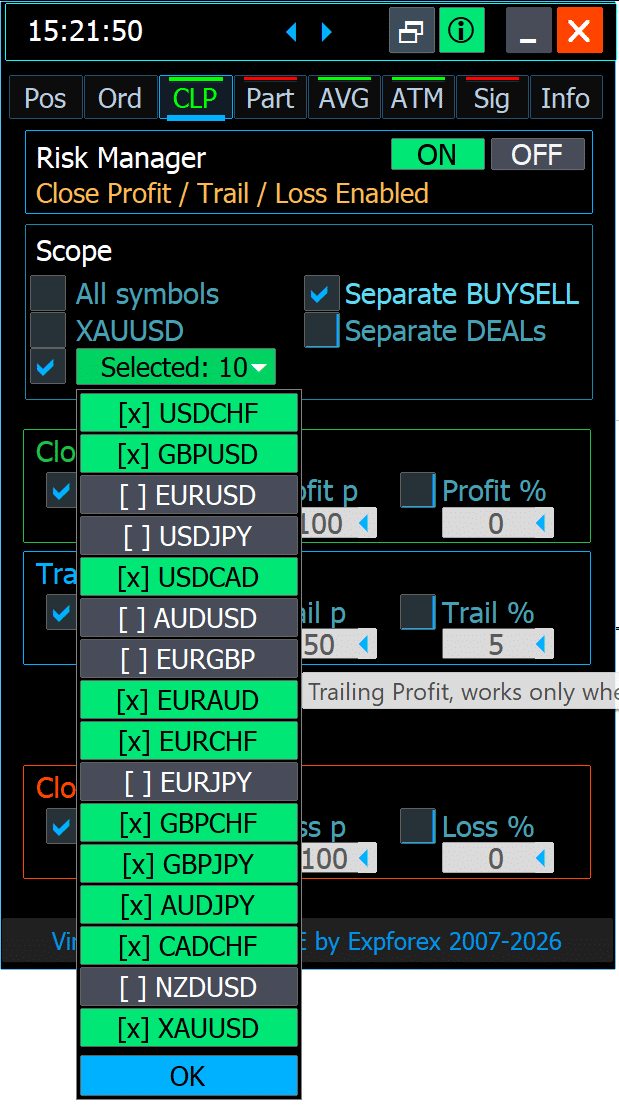
Beispiel: Wenn Sie EURUSD, XAUUSD und GBPUSD auf demselben Konto handeln, können Sie CLP so konfigurieren, dass nur ein Symbol oder eine ausgewählte Gruppe kontrolliert wird, statt alles auf dem Konto zu schließen.
Separate BUY- und SELL-Baskets
Wenn das Konto Positionen in beide Richtungen enthält, reicht es oft nicht aus, nur das Gesamtergebnis zu kontrollieren. Die Separate-BUY/SELL-Logik ermöglicht es dem Trader, BUY- und SELL-Baskets unabhängig zu verwalten.
Das ist nützlich für Hedging, Recovery-Systeme, manuelles Trading mit gemischten Richtungen und Situationen, in denen eine Marktseite geschützt werden muss, während die Gegenrichtung aktiv bleibt.
Praktischer CLP-Workflow
- Öffnen Sie den CLP-Tab in VirtualTradePad PRO SE.
- Wählen Sie den Bereich: aktuelles Symbol, ausgewählte Symbole, alle Positionen oder getrennte BUY/SELL-Baskets.
- Legen Sie das Gewinnziel, Verlustlimit oder die Trailing-Profit-Bedingung fest.
- Prüfen Sie das aktuelle Floating-Ergebnis und die Exposure, bevor Sie die Regel aktivieren.
- Aktivieren Sie die benötigte CLP-Logik und überwachen Sie den Basket über das Panel.
- Testen Sie das Verhalten im Strategy Tester oder auf einem Demokonto, bevor Sie es im Live-Trading einsetzen.
| Wichtiger Risikohinweis: CLP schließt Positionen gemäß den konfigurierten Regeln und dem aktuellen Kontostand. Prüfen Sie immer die ausgewählten Symbole, die Magic-Number-Logik, die BUY/SELL-Trennung und aktive Module, bevor Sie automatisches Basket-Schließen aktivieren. Falsche Bereichseinstellungen können mehr Positionen schließen als erwartet. |
Wann Sie den CLP-Tab verwenden sollten
- Wenn Sie mehrere Positionen als einen Basket verwalten.
- Wenn Sie eine Gruppe von Trades nach Gesamtgewinn oder Gesamtverlust schließen möchten.
- Wenn Sie Trailing Profit für einen Basket benötigen, nicht nur für eine einzelne Position.
- Wenn Sie Hedge-Positionen handeln und separate BUY/SELL-Kontrolle benötigen.
- Wenn Sie einen sichtbaren Gewinn-/Verlust-Managementblock direkt im Chart möchten.
PART-Tab — Manager für Teilschließungen
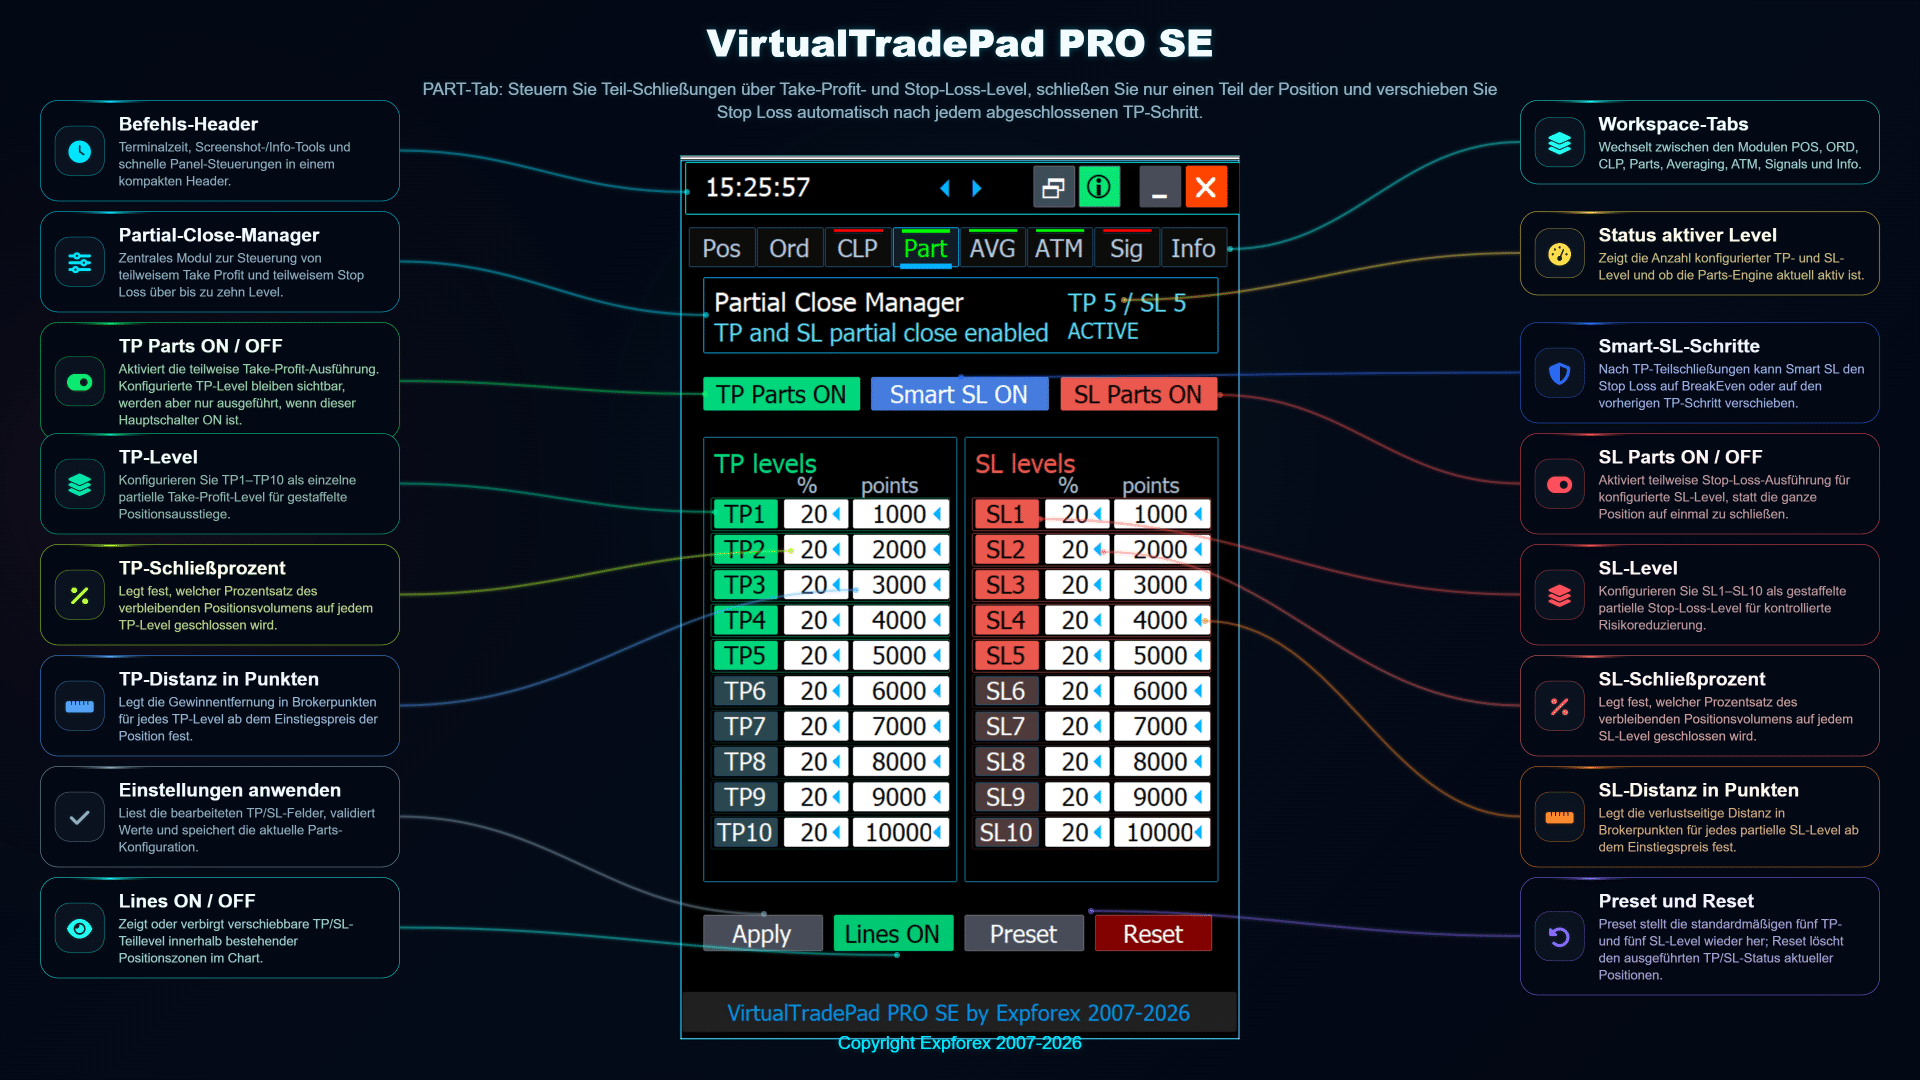
Der PART-Tab in VirtualTradePad PRO SE wurde für die strukturierte Teilschließung von Positionen entwickelt. Statt eine Position vollständig auf einmal zu schließen, kann der Trader mehrere Teil-Ausstiegslevel vorbereiten, den Lot-Anteil für jedes Level festlegen und die Take-Profit-/Stop-Loss-Logik direkt vom Chart aus verwalten.
Dieses Modul ist besonders nützlich für Trader, die Positionen schrittweise reduzieren, Gewinne nach und nach absichern oder vor dem Erreichen der Zielzone einen klaren visuellen Plan für Teil-Ausstiege benötigen.
| Zweck Teilausstiege aus Positionen nach Leveln planen und ausführen. | Am besten geeignet für Scale-out, gestaffelte Gewinnmitnahmen und kontrollierte Positionsreduzierung. | Hauptidee Jedes Level kann nur einen ausgewählten Teil der Position schließen. |
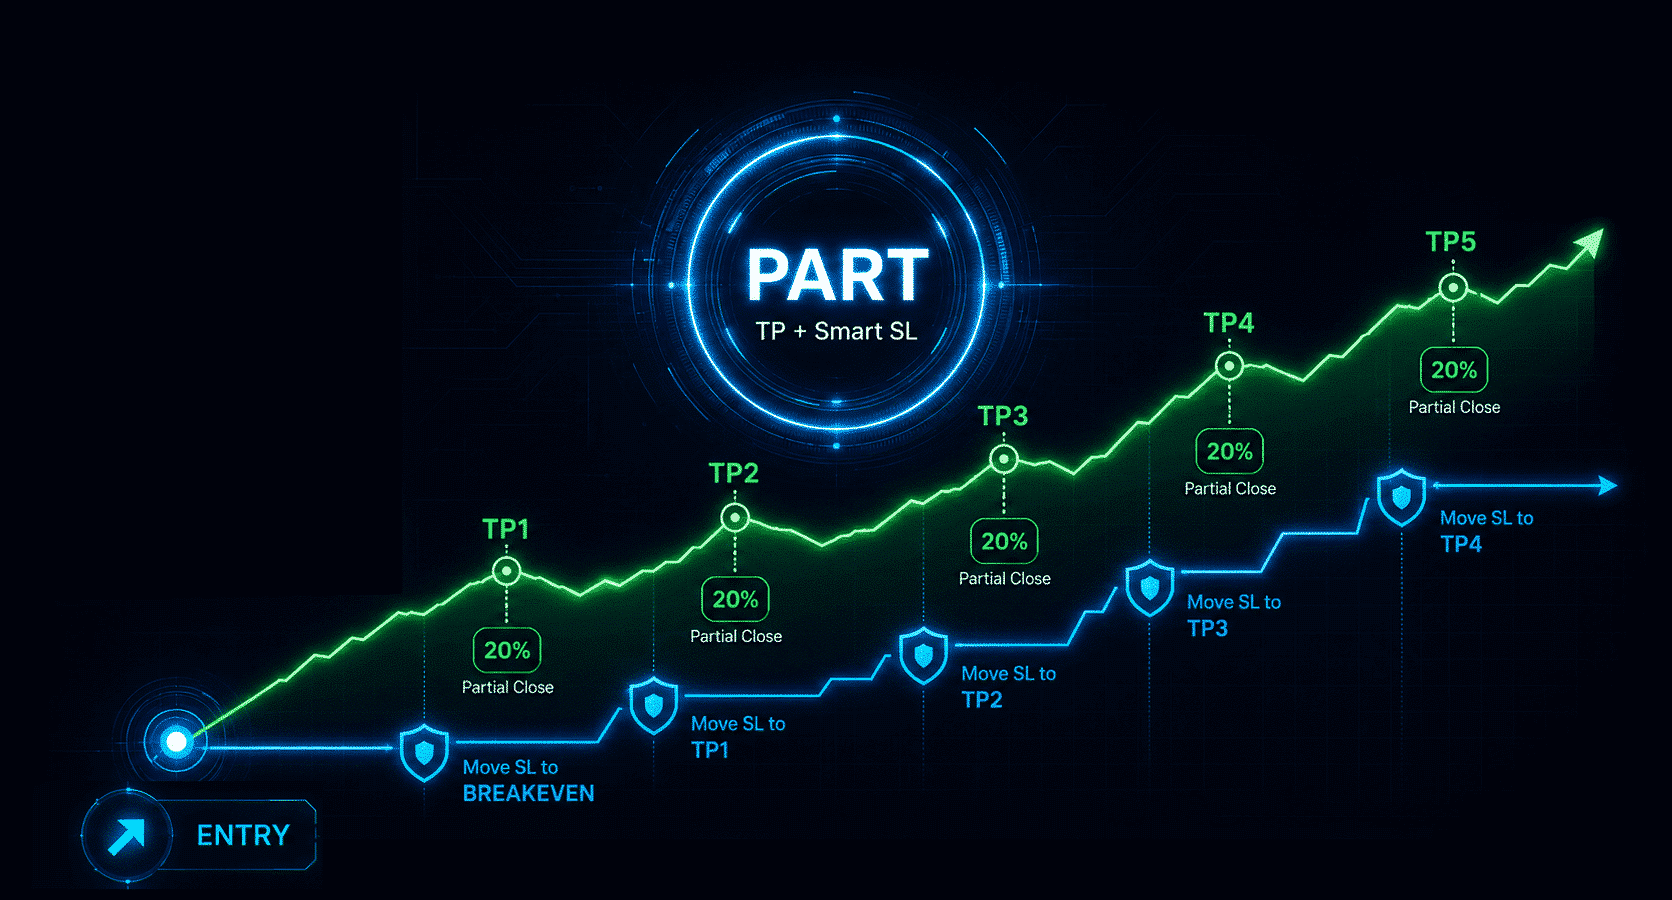
PART-Tab Übersicht
Das PART-Modul bietet eine levelbasierte Struktur, in der jede Regel für eine Teilschließung im Voraus vorbereitet werden kann. Ein Trader kann die Zielentfernung, den zu schließenden Lot-Anteil, das Stop-Loss-Verhalten, das Take-Profit-Verhalten und eine optionale intelligente Schutzlogik definieren.
Jede Zeile in der PART-Tabelle steht für ein zukünftiges Teilausstiegslevel. Das Modul hilft dabei, die Ausstiegslogik visuell zu organisieren und reduziert die Notwendigkeit, jede Teilschließung während des aktiven Tradings manuell zu berechnen.
Wichtige PART-Steuerelemente
| Steuerelement | Was es macht | Praktische Anwendung |
| PART ON / OFF | Aktiviert oder deaktiviert das Modul für Teilschließungen. | Verwenden Sie es nur, wenn die aktuelle Position nach Regeln für Teilausstiege verwaltet werden soll. |
| Level-Zeilen | Definieren mehrere Ziellevel für gestaffelte Ausstiege. | Bereiten Sie TP1, TP2, TP3 und weitere Ausstiegslevel vor, bevor der Preis diese Bereiche erreicht. |
| Lot / Prozent | Legt fest, welcher Teil der Position auf dem ausgewählten Level geschlossen werden soll. | Schließen Sie einen Teil des Trades, während das verbleibende Volumen im Markt bleibt. |
| TP-/SL-Werte | Legen Ziel- und Schutzlogik für jedes Teil-Level fest. | Erstellen Sie einen strukturierten Ausstiegsplan, statt unter Druck manuell reagieren zu müssen. |
| Smart SL | Fügt zusätzliches Schutzverhalten hinzu, nachdem Teil-Level erreicht wurden. | Nützlich, wenn der Trader die verbleibende Position nach einer Teilgewinnmitnahme schützen möchte. |
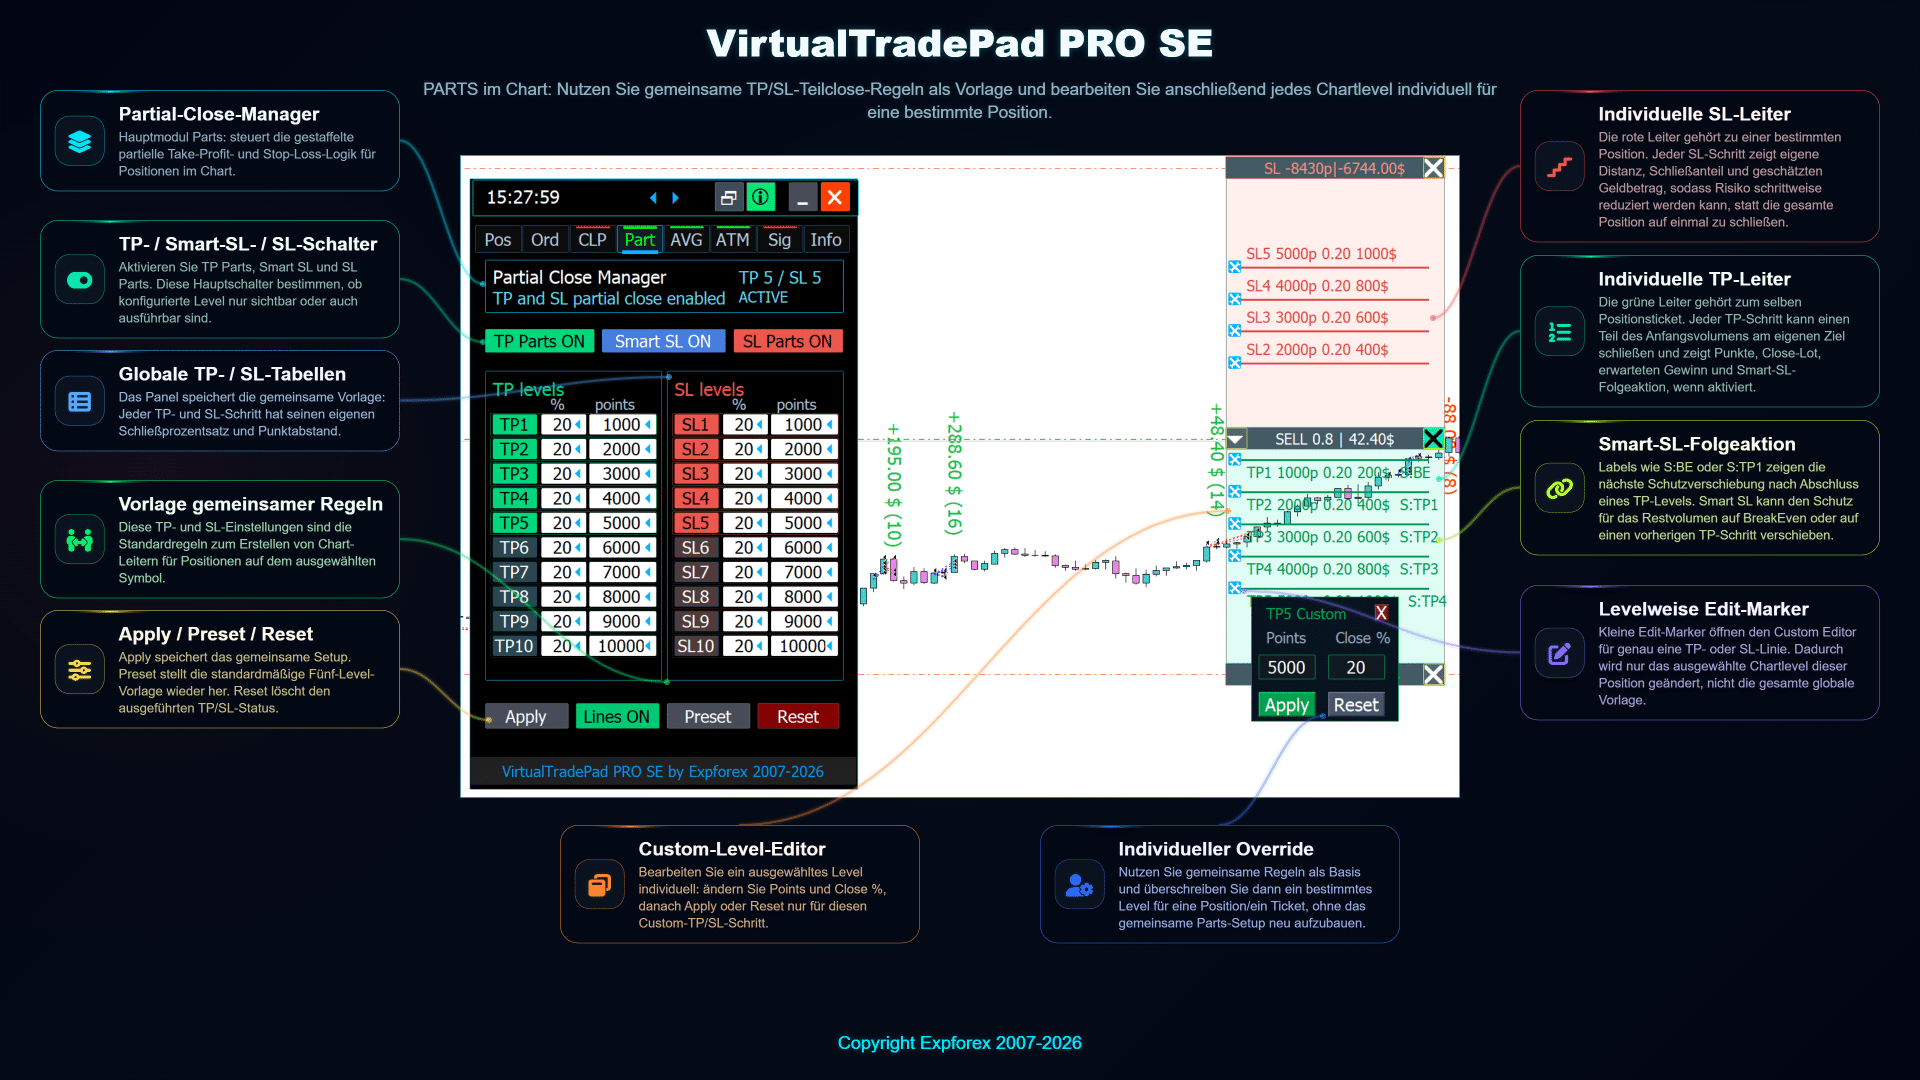
Teilschließungs-Level im Chart
Einer der wichtigsten Vorteile des PART-Moduls ist die visuelle Chart-Kontrolle. Teilschließungs-Level können direkt im Chart angezeigt werden, sodass der Trader bereits vor dem Erreichen des Preisbereichs sieht, wo jeder geplante Ausstieg erfolgen kann.
Chart-Level machen den Ausstiegsplan leichter verständlich. Statt nur Zahlen im Panel zu lesen, sieht der Trader die geplanten Level im Verhältnis zum aktuellen Marktpreis, zum Einstiegspreis der Position und zu bestehenden Stop-Loss-/Take-Profit-Bereichen.
Beispiel-Workflow
- Öffnen oder wählen Sie eine bestehende Position im Chart aus.
- Öffnen Sie den PART-Tab und aktivieren Sie das Modul für Teilschließungen.
- Definieren Sie mehrere Ausstiegslevel, zum Beispiel TP1, TP2 und TP3.
- Legen Sie den Lot-Anteil oder Prozentsatz fest, der auf jedem Level geschlossen werden soll.
- Aktivieren Sie Chart-Level, um den zukünftigen Ausstiegsplan visuell zu prüfen.
- Passen Sie Level direkt im Chart an, wenn sich die Marktstruktur ändert.
- Überwachen Sie die verbleibende Position nach jeder abgeschlossenen Teilschließung.
Dieser Workflow ist besonders nützlich für Trader, die eine profitable Position nicht sofort vollständig schließen möchten, aber auch nicht das gesamte Volumen bis zum finalen Ziel offen lassen wollen.
Praktische Anwendungsfälle
| Scalping und schnelle Ausstiege | Einen kleinen Teil des Trades schnell schließen und eine reduzierte Position für die weitere Bewegung im Markt behalten. |
| Trendfortsetzung | Zwischengewinne auf Teil-Leveln realisieren und den Rest des Trades für ein größeres Ziel laufen lassen. |
| Risikoreduzierung | Das Exposure reduzieren, nachdem sich der Preis in die erwartete Richtung bewegt hat, während ein Teil der Position aktiv bleibt. |
| Strukturierter Ausstiegsplan | Mehrere Ausstiege vorbereiten, bevor der Trade emotional oder manuell schwerer zu verwalten wird. |
Wichtige Hinweise
- Das Verhalten bei Teilschließungen hängt von den Ausführungsregeln des Brokers, der Mindest-Lotgröße und dem Lot-Schritt ab.
- Das verbleibende Positionsvolumen muss für das gehandelte Symbol gültig sein.
- Testen Sie die Teilschließungslogik immer zuerst auf einem Demokonto, bevor Sie sie auf einem Live-Konto verwenden.
- Wenn Sie Chart-Level verwenden, prüfen Sie, ob die Level für die aktuelle Symbol-Genauigkeit und die Brokerbedingungen korrekt platziert sind.
- Eine Teilschließung reduziert die Positionsgröße, entfernt das Handelsrisiko aber nicht vollständig.
| ⚠️ | Risikohinweis: Der PART-Tab hilft bei der Organisation von Teilausstiegen, garantiert aber keinen Gewinn und ersetzt kein Risikomanagement. Verwenden Sie angemessene Lotgrößen, prüfen Sie die Handelsbedingungen Ihres Brokers und testen Sie das Modul sorgfältig, bevor Sie es auf einem Live-Konto einsetzen. |
AVG-Tab — Averaging- und Trend-Add-Manager
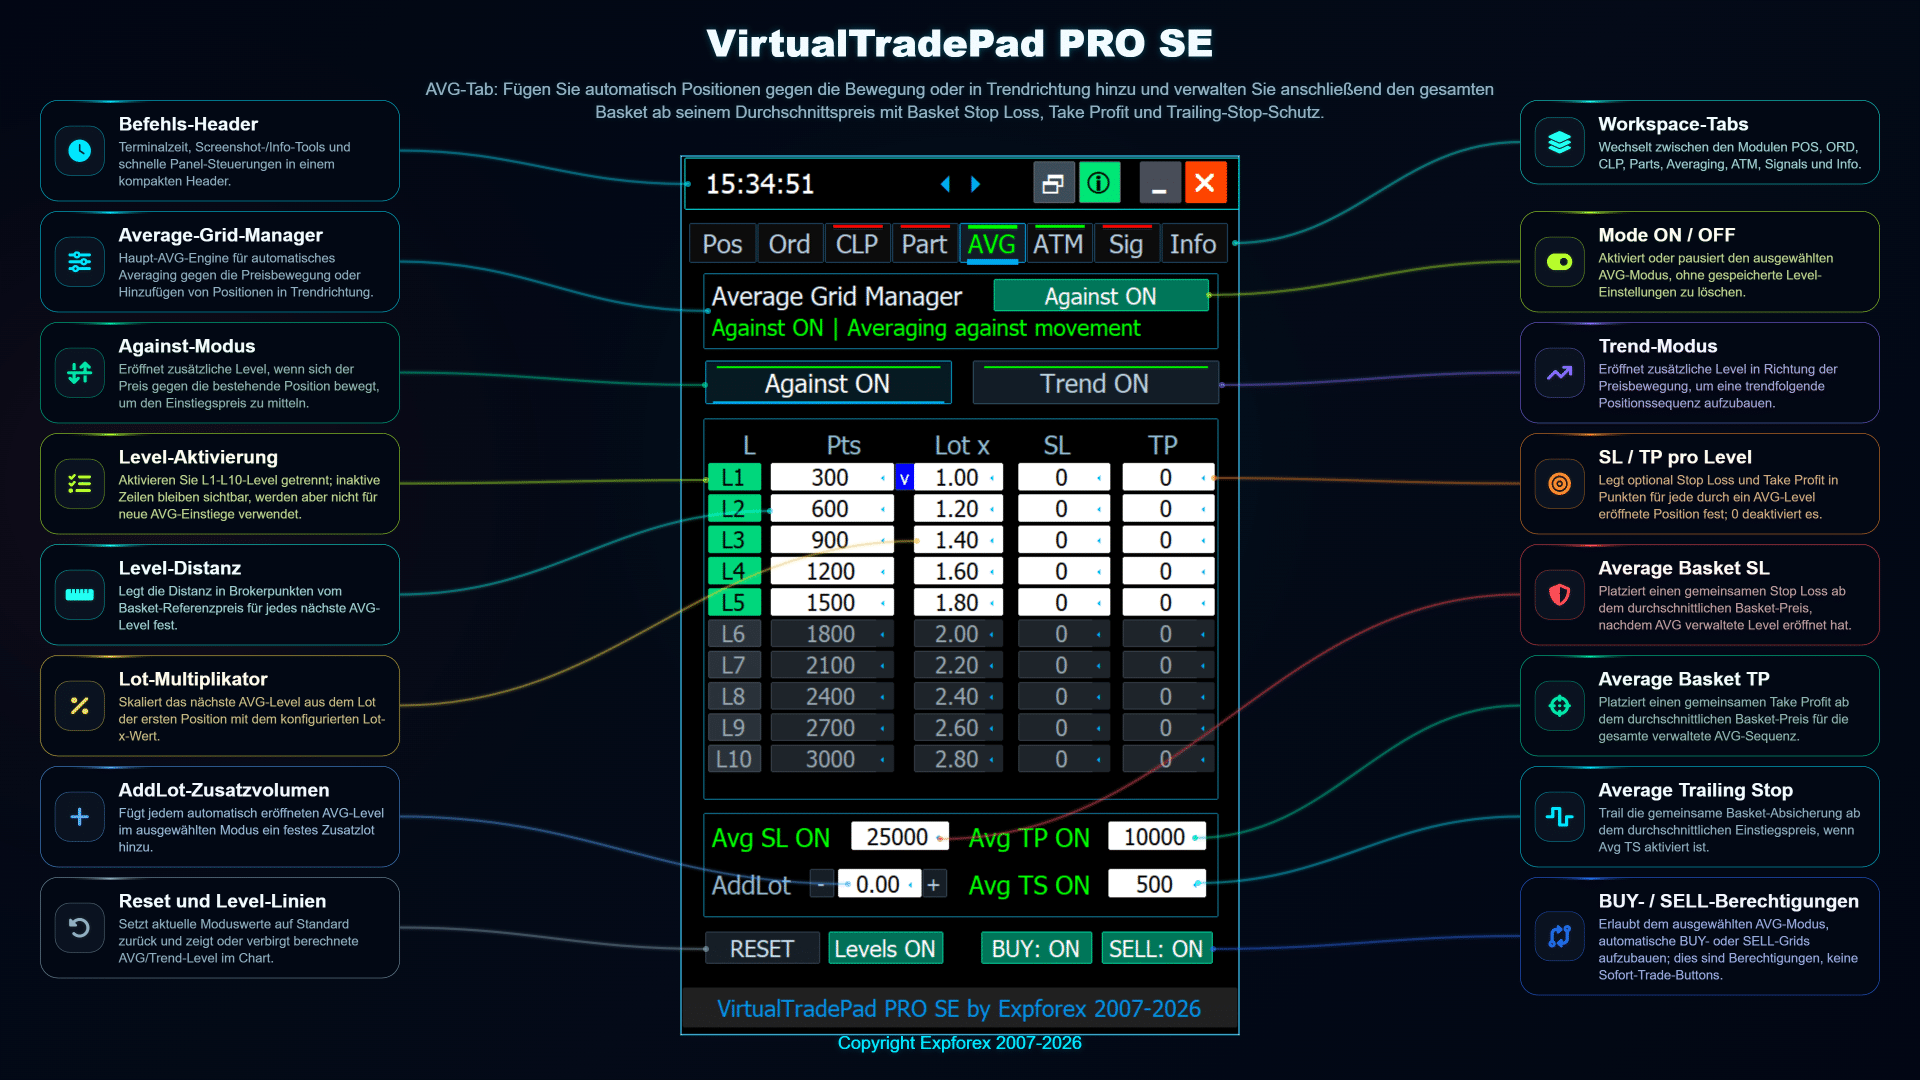
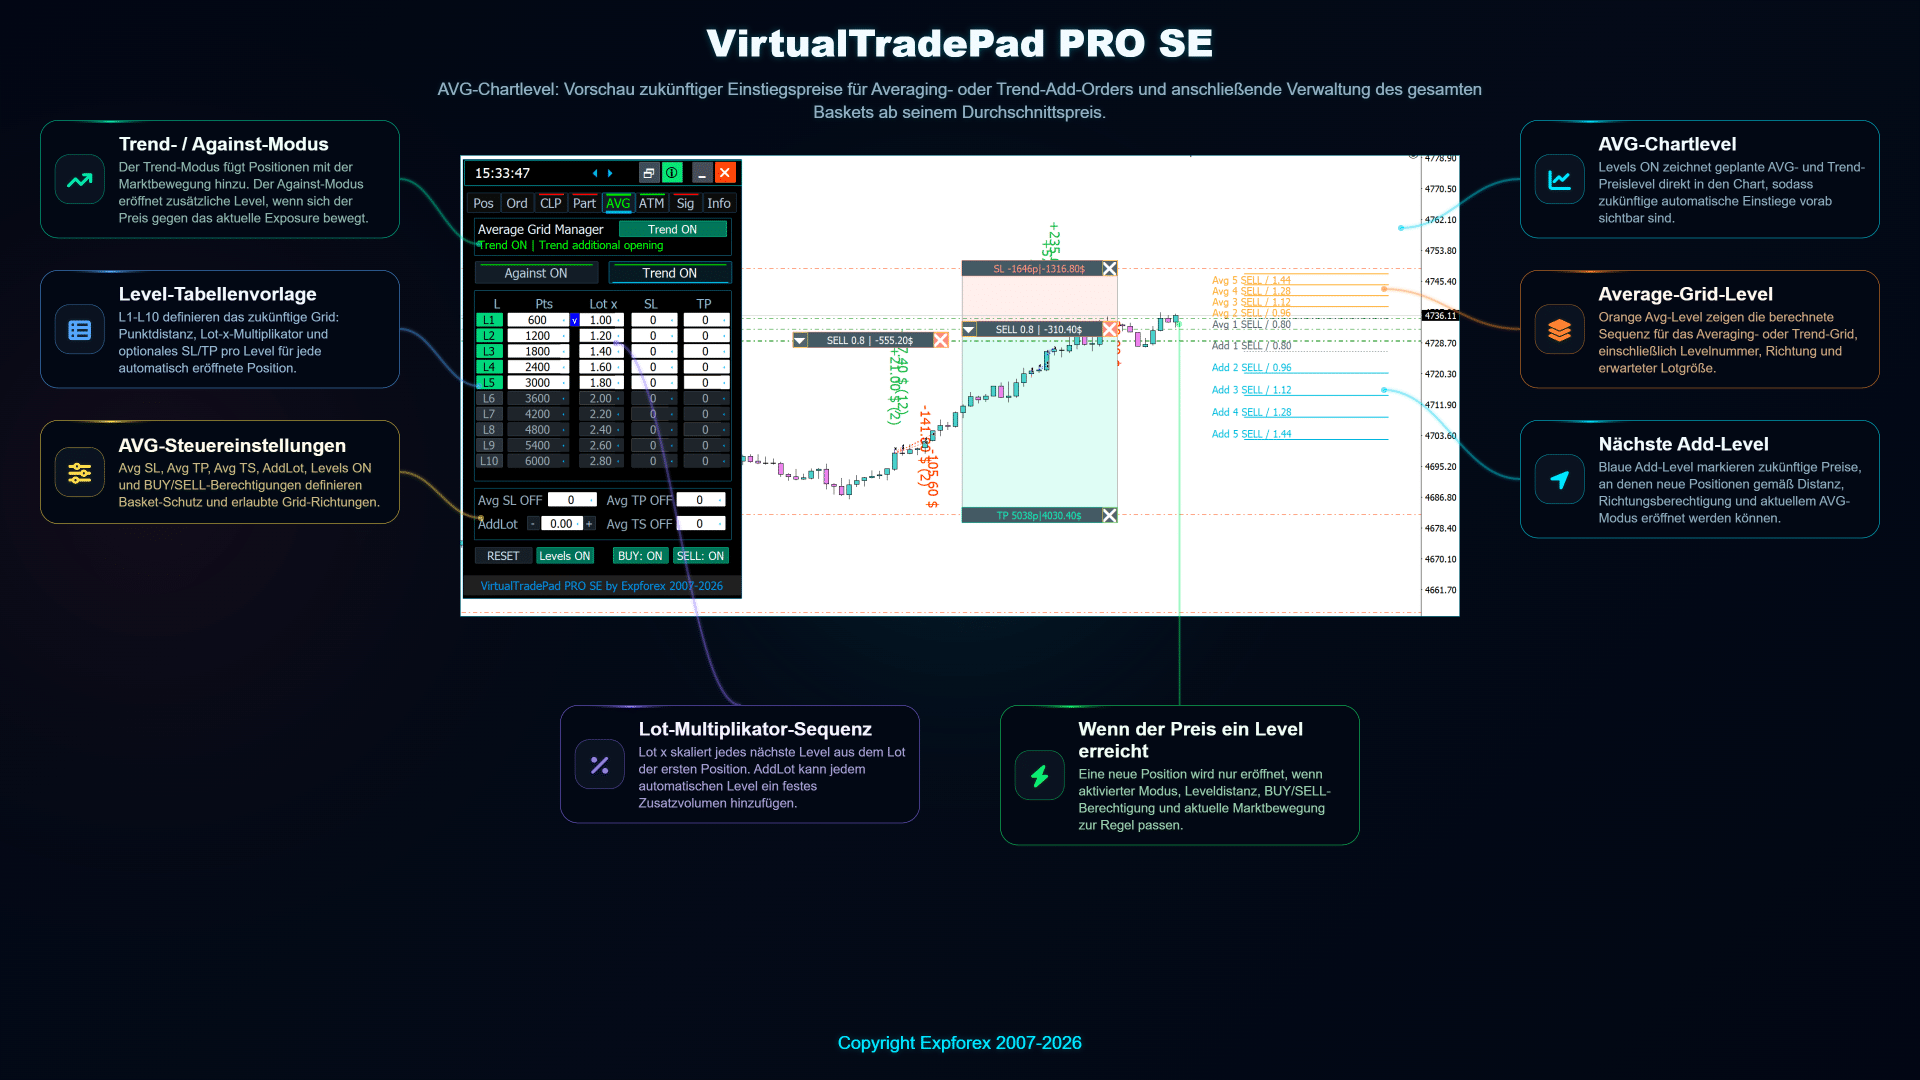
Der AVG-Tab in VirtualTradePad PRO SE wurde entwickelt, um zusätzliche Einstiege aus einer bestehenden Marktposition heraus zu planen und zu kontrollieren. Er kann für Averaging genutzt werden, wenn sich der Preis gegen das aktuelle Exposure bewegt, oder für zusätzliche Positionen in Richtung der Marktbewegung, wenn eine Trend-Add-Logik aktiviert ist.
Dieses Modul ist keine Gewinngarantie und muss mit Vorsicht eingesetzt werden. Averaging kann das Exposure schnell erhöhen. Daher sollte jeder Trader die Logik auf einem Demokonto testen, vernünftige Lotgrößen verwenden und das gesamte Basket-Risiko verstehen, bevor automatische Level aktiviert werden.
| Zweck Zusätzliche Einstiege für Averaging- oder Trend-Add-Szenarien planen. | Am besten geeignet für Trader, die sichtbare zukünftige Level und Schutz auf Basket-Ebene benötigen. | Hauptidee Zukünftige Einstiege werden über Abstand, Lot-Multiplikator und erlaubte Richtung vorbereitet. |
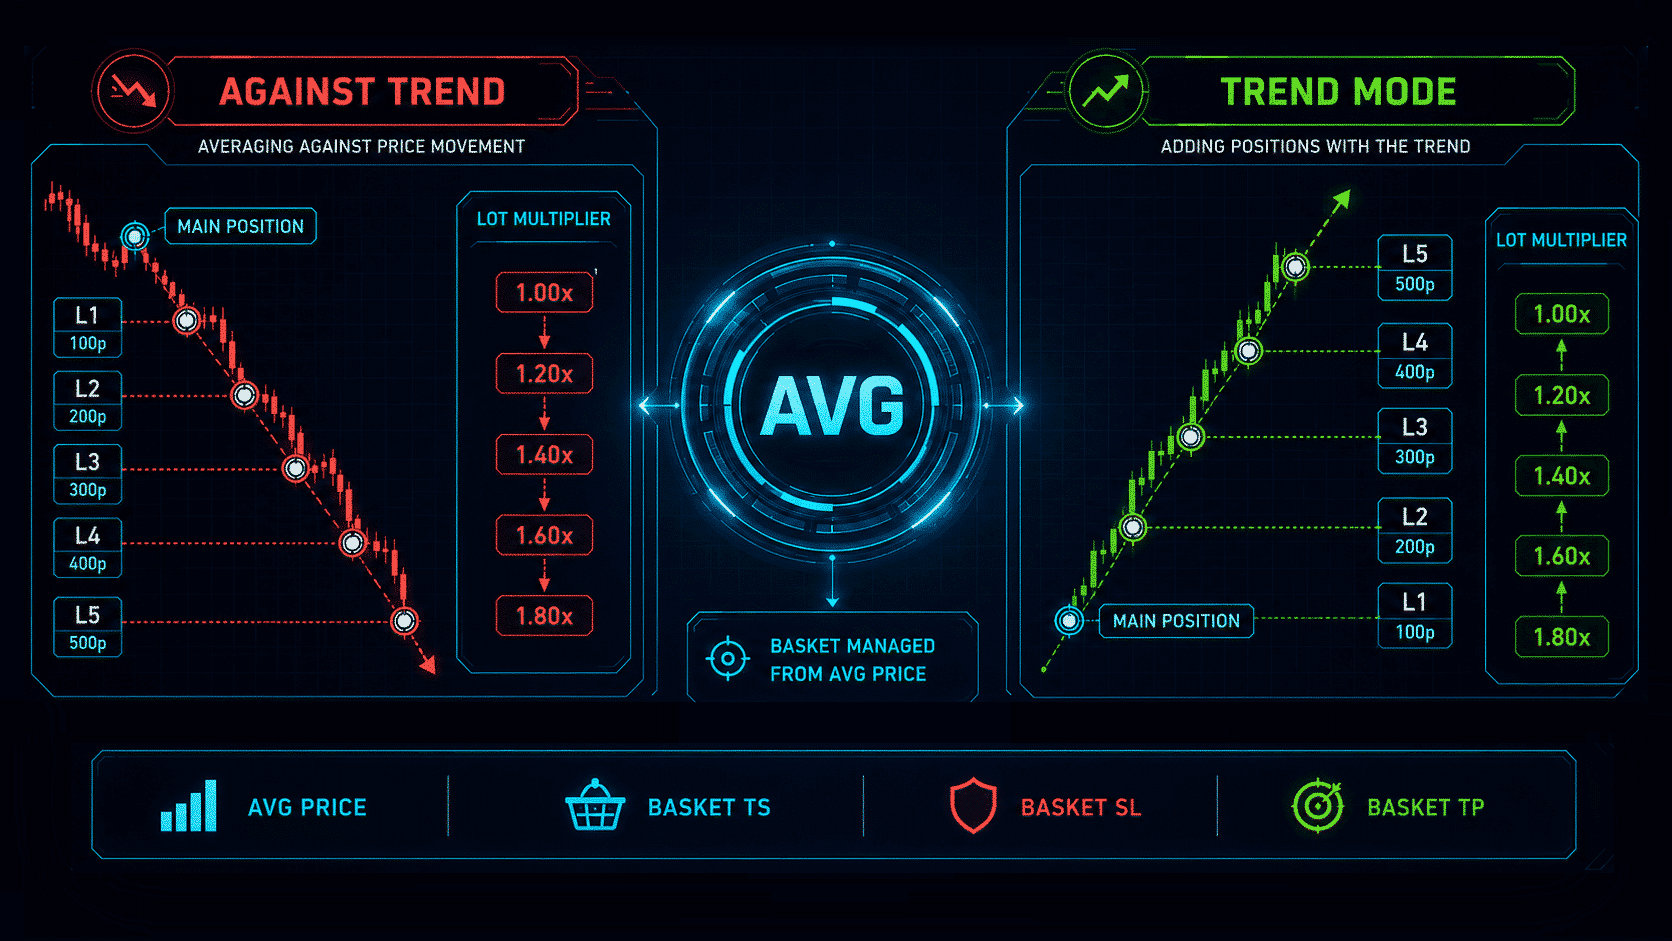
AVG-Tab Übersicht
Das AVG-Modul bietet dem Trader eine strukturierte Tabelle für zukünftige Einstiegslevel. Jedes Level kann einen eigenen Abstand in Punkten, einen Lot-Multiplikator, optionale SL-/TP-Werte und einen Aktivierungsstatus haben. Das Modul hilft, einen komplexen Averaging-Plan in einen sichtbaren und kontrollierbaren Workflow umzuwandeln.
Der Tab basiert auf zwei wichtigen Ideen: Die nächsten Einstiegspreise sollten sichtbar sein, bevor sie erreicht werden, und der gesamte Basket sollte über durchschnittlichen SL, durchschnittlichen TP und durchschnittliche Trailing-Stop-Einstellungen eine klare Schutzlogik haben.
Against-Modus und Trend-Modus
Der AVG-Tab kann in zwei unterschiedlichen Handelskonzepten verwendet werden. Der Against-Modus bereitet zusätzliche Einstiege vor, wenn sich der Preis gegen das aktuelle Exposure bewegt. Der Trend-Modus bereitet zusätzliche Einstiege in Richtung der Marktbewegung vor, wenn der Trader eine Position schrittweise aufbauen möchte.
| Modus | Funktionsweise | Wann mit Vorsicht verwenden |
| Against | Fügt neue Level hinzu, wenn sich der Preis gegen die bestehende Position oder den bestehenden Basket bewegt. | Nur wenn der Trader das erhöhte Exposure akzeptiert und ein klares Risikolimit hat. |
| Trend | Fügt Positionen mit der Marktbewegung hinzu, wenn die ausgewählte Richtung und die Level-Regeln passen. | Nützlich für den schrittweisen Positionsaufbau, erfordert aber weiterhin SL/TP- und Lot-Kontrolle. |
Der gewählte Modus sollte zur Strategie des Traders passen. Das Modul folgt nur den konfigurierten Regeln; es ersetzt keine Marktanalyse, keine Risikoplanung und keine Prüfung der Brokerbedingungen.
Wichtige AVG-Steuerelemente
| Steuerelement | Was es macht | Praktische Anwendung |
| AVG ON / OFF | Aktiviert oder deaktiviert die automatische Verarbeitung von AVG-Leveln. | Lassen Sie es deaktiviert, während Sie Level vorbereiten, und aktivieren Sie es erst nach einer Risikoprüfung. |
| BUY-/SELL-Erlaubnis | Legt fest, welche Richtung für automatische zusätzliche Einstiege erlaubt ist. | Verwenden Sie diese Einstellung, um zu verhindern, dass das Modul unerwünschte Richtungen eröffnet. |
| Distance | Legt fest, wie weit das nächste Level vom Referenzpreis entfernt sein soll. | Erhöhen Sie den Abstand bei volatilen Symbolen und testen Sie ihn vor dem Live-Einsatz. |
| Lot x | Multipliziert den Lot der ersten Position für die nächsten AVG-Level. | Vermeiden Sie aggressive Multiplikatoren, wenn der gesamte Drawdown nicht vollständig verstanden wurde. |
| AddLot | Fügt jedem automatischen Level ein festes Zusatzvolumen hinzu. | Nützlich für eine kontrollierte Volumenerhöhung, ohne die Multiplikatorlogik zu ändern. |
| Avg SL / Avg TP / Avg TS | Steuert Stop Loss, Take Profit und Trailing Stop auf Basket-Ebene vom Durchschnittspreis aus. | Verwenden Sie diese Werte, um Schutz für den gesamten Basket zu definieren, nicht nur für einen einzelnen Einstieg. |
| Levels ON | Zeichnet geplante zukünftige AVG- und Add-Level direkt in den Chart. | Aktivieren Sie diese Funktion, um zukünftige Level visuell zu prüfen, bevor automatische Einstiege erlaubt werden. |
AVG-Chart-Level
Wenn Chart-Level aktiviert sind, zeichnet VirtualTradePad PRO SE geplante AVG- und Add-Level im Chart. Dadurch versteht der Trader, wo der nächste automatische Einstieg erscheinen kann, bevor die Regel ausgelöst wird.
Die Chart-Ansicht ist besonders im Strategy Tester und während der manuellen Vorbereitung nützlich. Sie ermöglicht es dem Trader, Level-Abstände, Richtungserlaubnisse und erwartetes Volumen zu überprüfen, bevor der Markt die nächste Preiszone erreicht.
Praktischer AVG-Workflow
| 1 | Öffnen oder wählen Sie die Startposition, die als Referenz für die AVG-Logik verwendet wird. |
| 2 | Wählen Sie den benötigten AVG-Modus: Against für Averaging oder Trend für zusätzliche Einstiege mit der Marktbewegung. |
| 3 | Konfigurieren Sie Abstände, Lot-Multiplikator, AddLot und optionale SL-/TP-Werte pro Level. |
| 4 | Aktivieren Sie Levels ON und prüfen Sie zukünftige Preise direkt im Chart. |
| 5 | Legen Sie den Basket-Schutz über Avg SL, Avg TP oder Avg TS fest, bevor Sie die automatische Verarbeitung aktivieren. |
| 6 | Aktivieren Sie AVG erst, nachdem Margin, gesamtes Lot-Exposure und maximal akzeptabler Drawdown geprüft wurden. |
Typische Anwendungsfälle
- Kontrolliertes Averaging: mehrere zusätzliche Level vorbereiten, wenn der Trader eine Korrektur oder Erholung erwartet.
- Trend-Skalierung: Positionen schrittweise hinzufügen, wenn sich der Markt weiter in die ausgewählte Richtung bewegt.
- Basket-Planung: ein gemeinsames Durchschnittsziel definieren, statt jeden Einstieg separat zu verwalten.
- Visuelles Testen: zukünftige Level im Strategy Tester prüfen, bevor der Workflow im Live-Trading verwendet wird.
- Risikovisualisierung: verstehen, wie Lot-Multiplikatoren und AddLot-Werte den gesamten Positions-Basket beeinflussen.
Wichtiger Risikohinweis
| Warnung: Averaging und Lot-Multiplikation können Markt-Exposure und Drawdown sehr schnell erhöhen. Bevor Sie AVG auf einem Realkonto aktivieren, testen Sie die exakten Einstellungen im Strategy Tester oder auf einem Demokonto. Prüfen Sie Margin, maximale Lotgröße, gesamtes Basket-Volumen und die Worst-Case-Distanz zwischen den Leveln. |
Der AVG-Tab ist ein professionelles Kontrollmodul. Er gibt dem Trader Sichtbarkeit und Ausführungsstruktur, aber die Handelsentscheidung, Level-Abstände, Lot-Risiko und Kontoschutz bleiben in der Verantwortung des Nutzers.
ATM-Tab — Erweiterte Regeln für das Trade Management
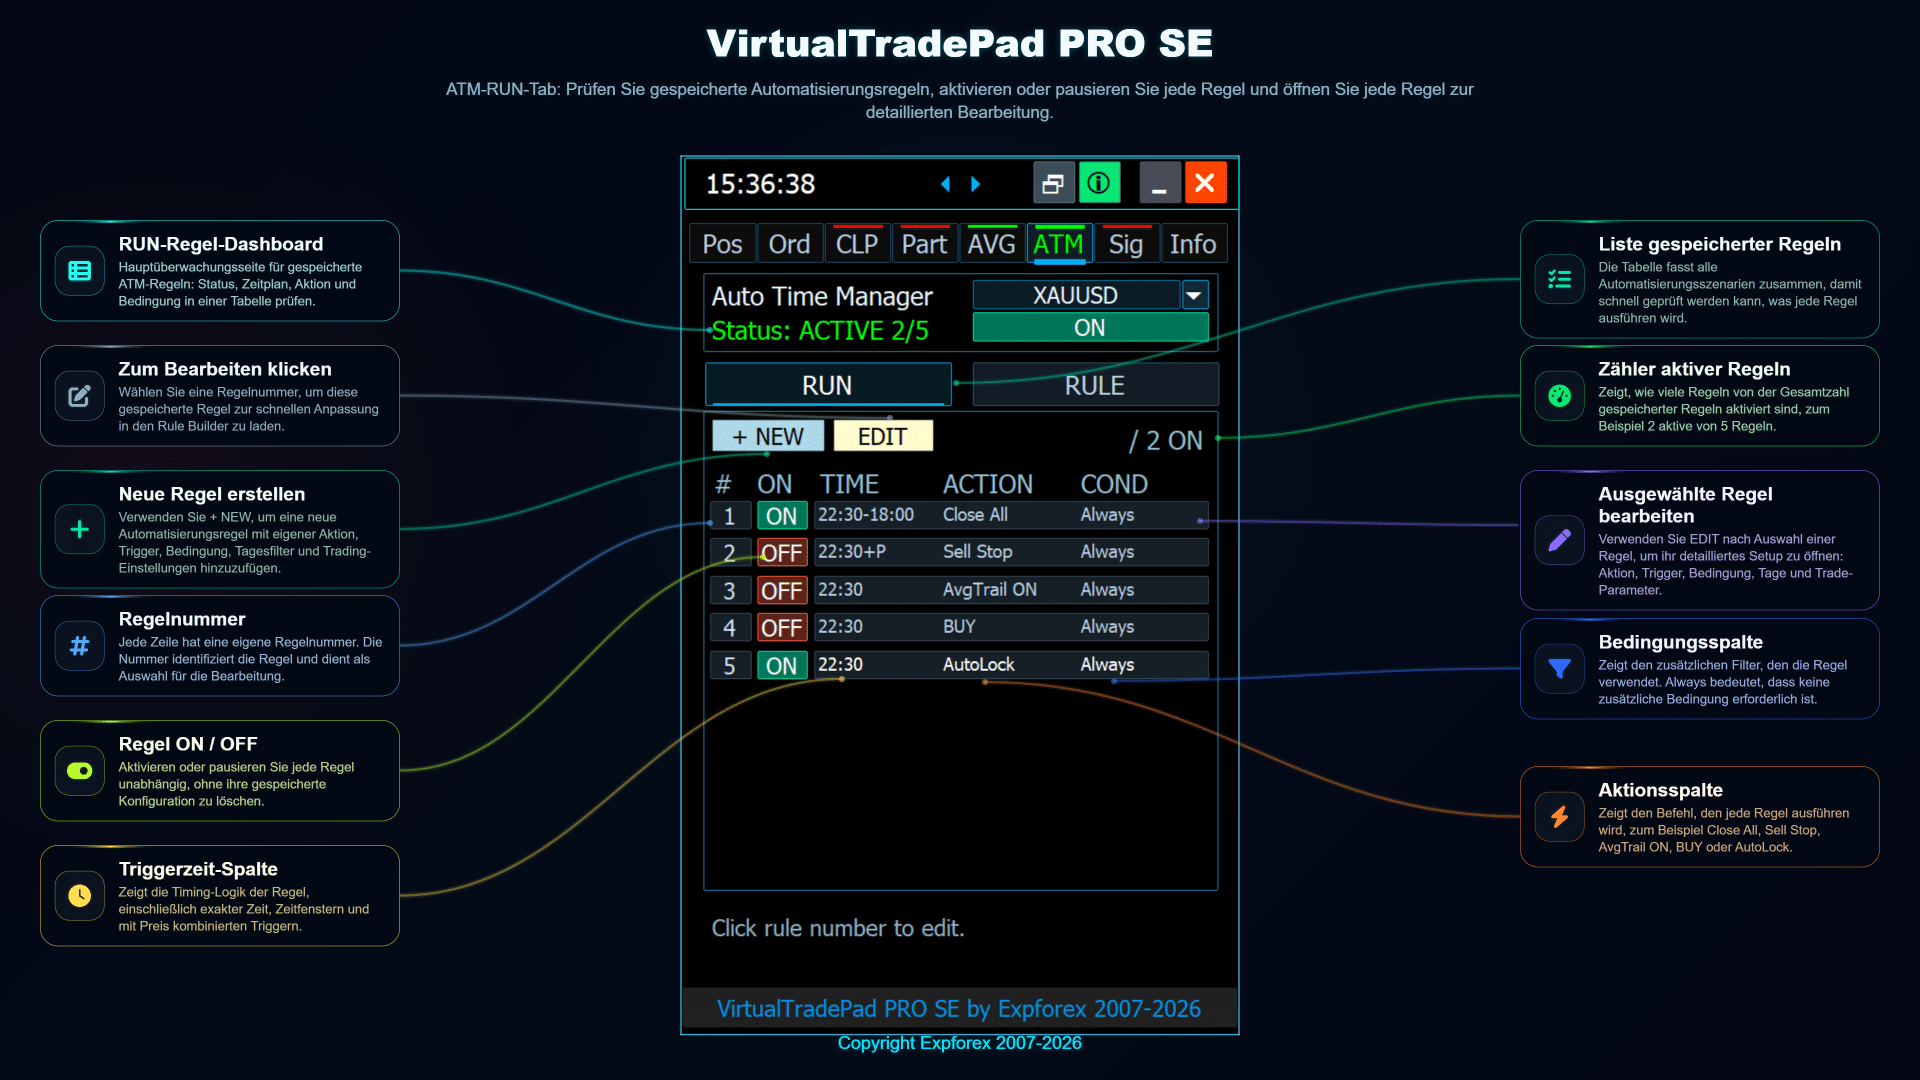
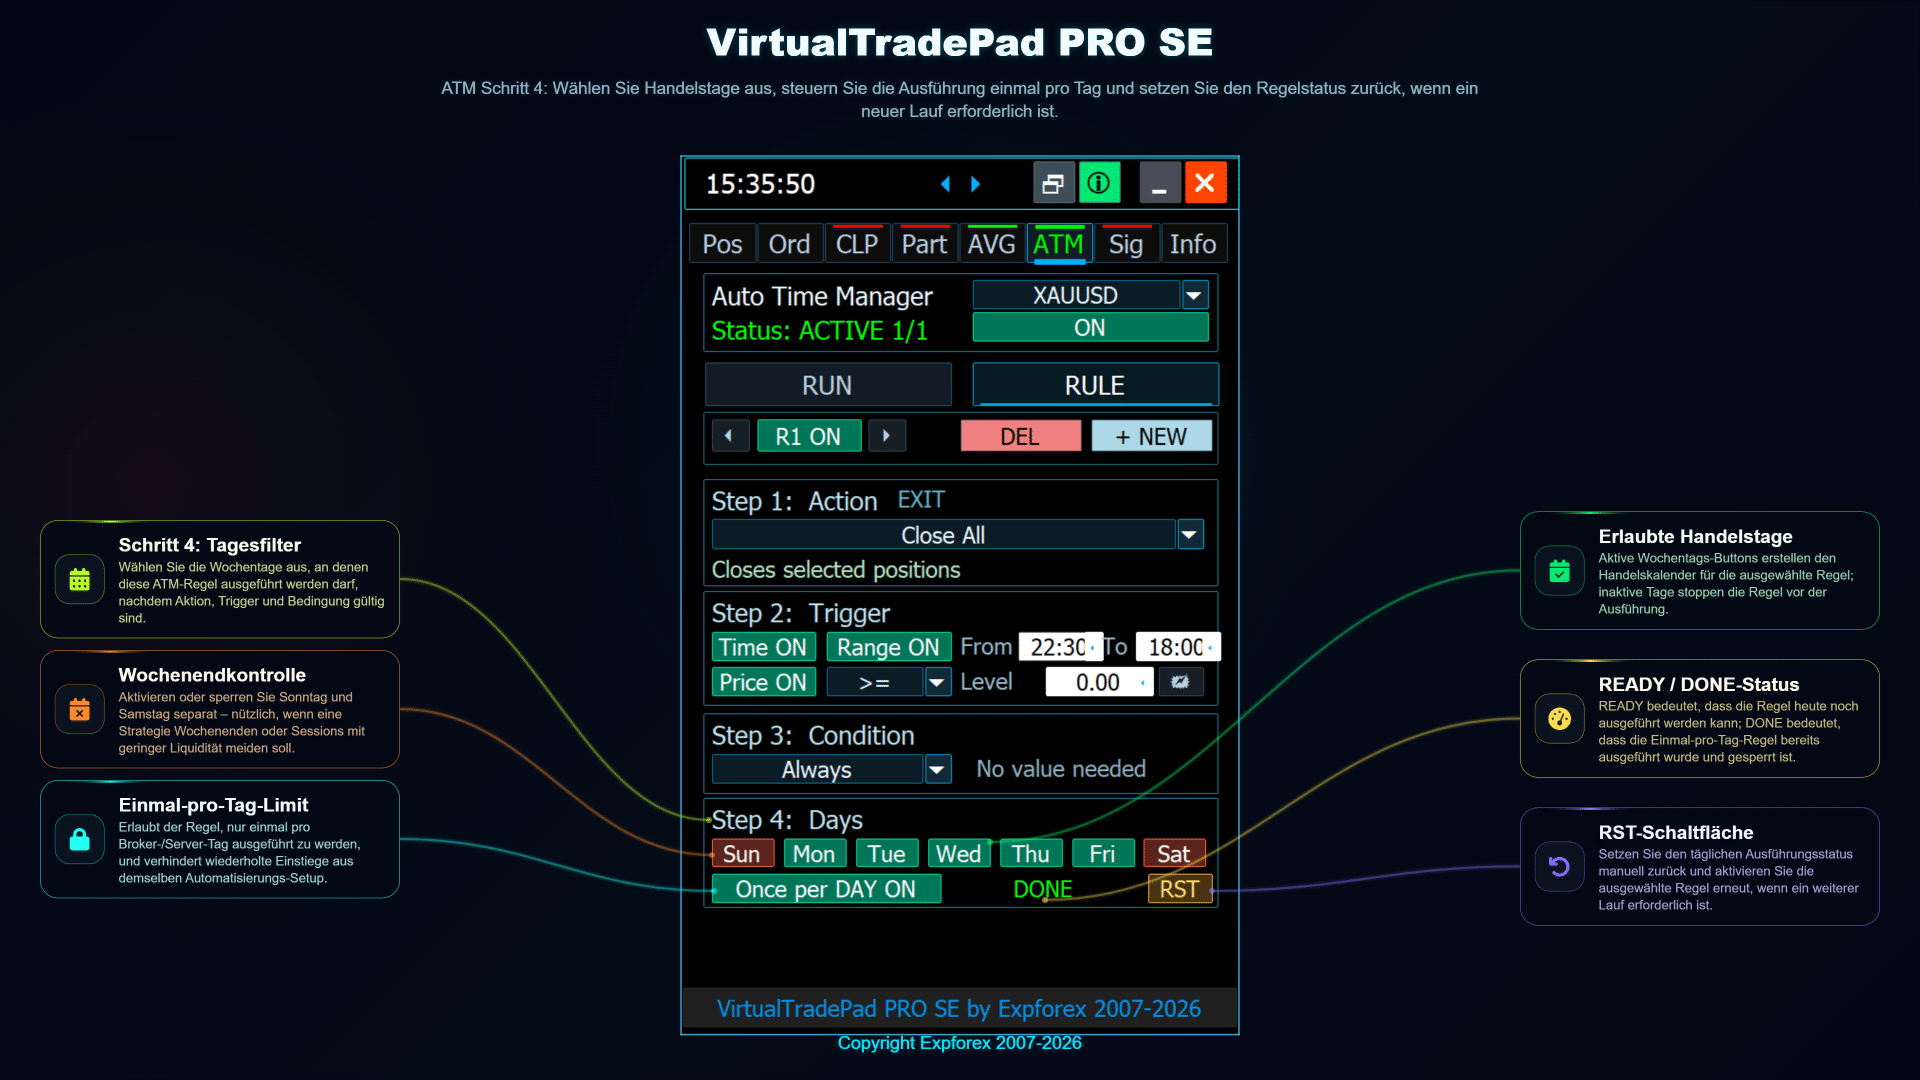
ATM in VirtualTradePad PRO SE ist ein regelbasiertes Trade-Management-Modul, mit dem Trader strukturierte Aktionen vor oder während des Tradings vorbereiten können. Statt auf jede Marktsituation manuell zu reagieren, können Sie Bedingungen, Aktionen und Ausführungslogik in einem organisierten Workflow definieren.
Der ATM-Tab gehört zu den fortgeschrittensten Bereichen von VirtualTradePad PRO SE. Er ist nützlich für Trader, die mehr Kontrolle über wiederkehrende Handelsszenarien, Positionsverwaltungsregeln, zeitgesteuerte Logik, chartbasierte Automatisierung und Experimente im Strategy Tester wünschen.
| Wichtig: ATM-Regeln sind leistungsstarke Werkzeuge zur Verwaltung von Handelslogik, müssen aber sorgfältig auf einem Demokonto und im Strategy Tester getestet werden, bevor sie auf einem Realkonto verwendet werden. Falsche Bedingungen oder Aktionen können zu unerwarteten Handelsoperationen führen. |
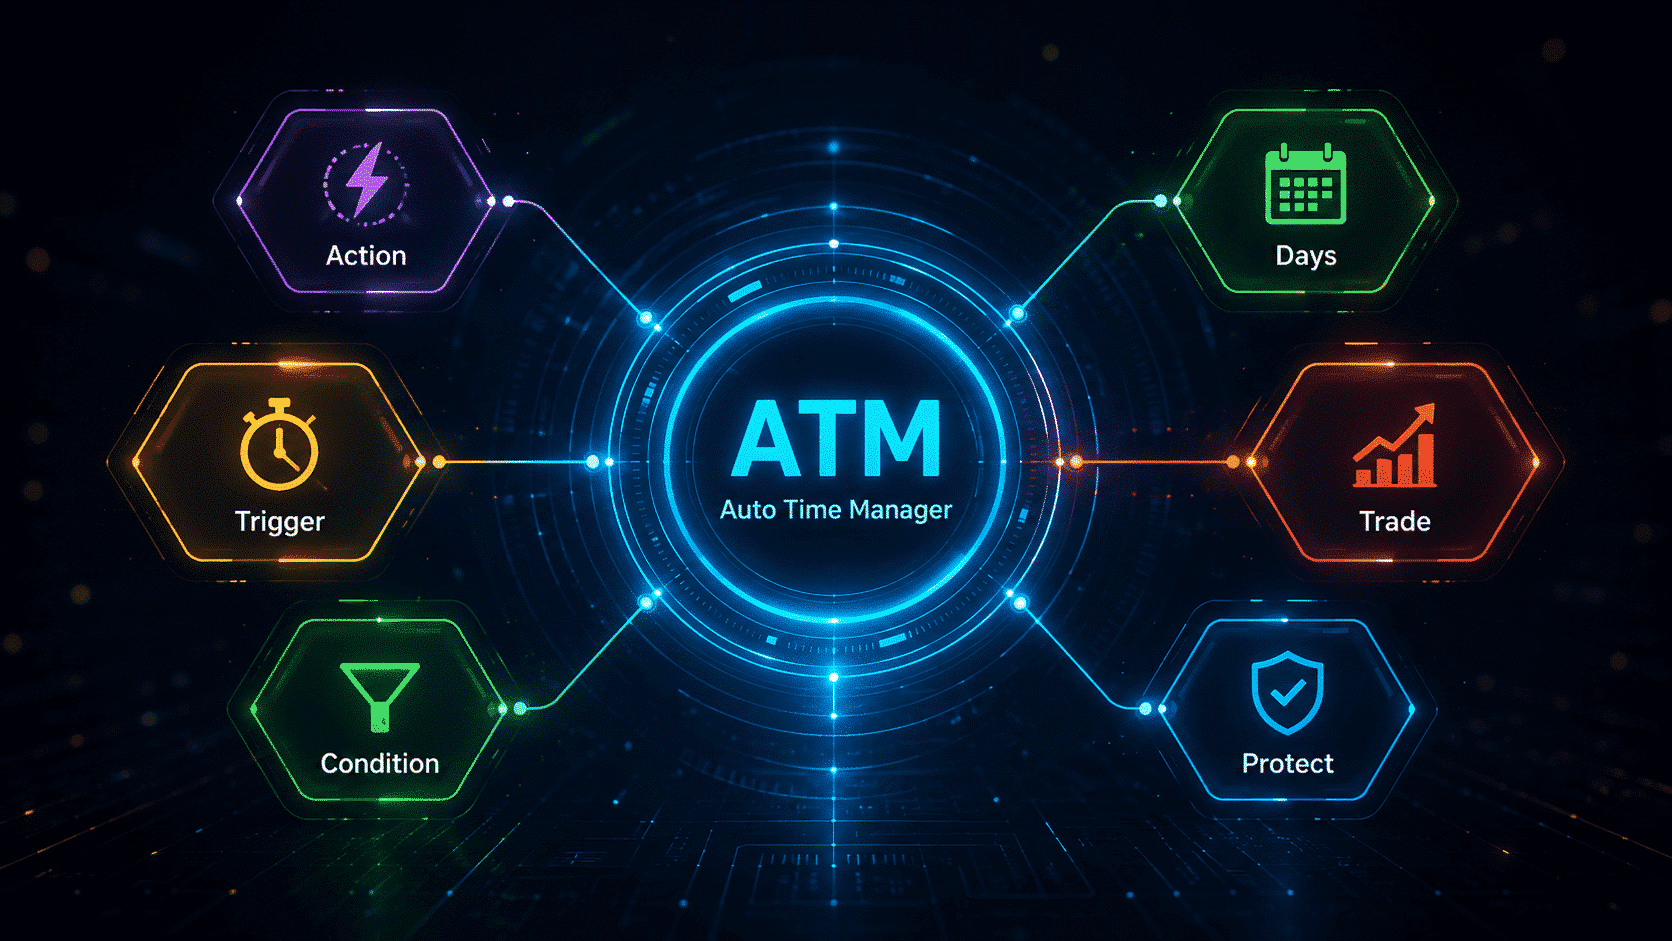
ATM-Hauptbildschirm und Regelliste
Der ATM-Hauptbildschirm zeigt die aktive Regelstruktur und ermöglicht die Verwaltung vorbereiteter Automatisierungsszenarien. Eine Regel kann in der ATM-Oberfläche aktiviert, deaktiviert, bearbeitet oder überprüft werden. Dadurch erhält der Trader einen klaren Überblick darüber, was vor der Ausführung der Regel erwartet wird.
Die Regelliste wurde so gestaltet, dass Automatisierung sichtbar bleibt. Das ist wichtig, weil der Trader immer verstehen sollte, welche Regeln aktiviert sind, welche Marktbedingungen überwacht werden und welche Aktionen ausgeführt werden können.
Wie ATM-Regeln funktionieren
Die ATM-Logik lässt sich als einfache Kette verstehen:
| Schritt | Bedeutung | Zweck |
| 1. Aktion auswählen | Wählen Sie, was die Regel tun soll. | Handelsobjekte gemäß der ausgewählten Logik öffnen, schließen, ändern oder verwalten. |
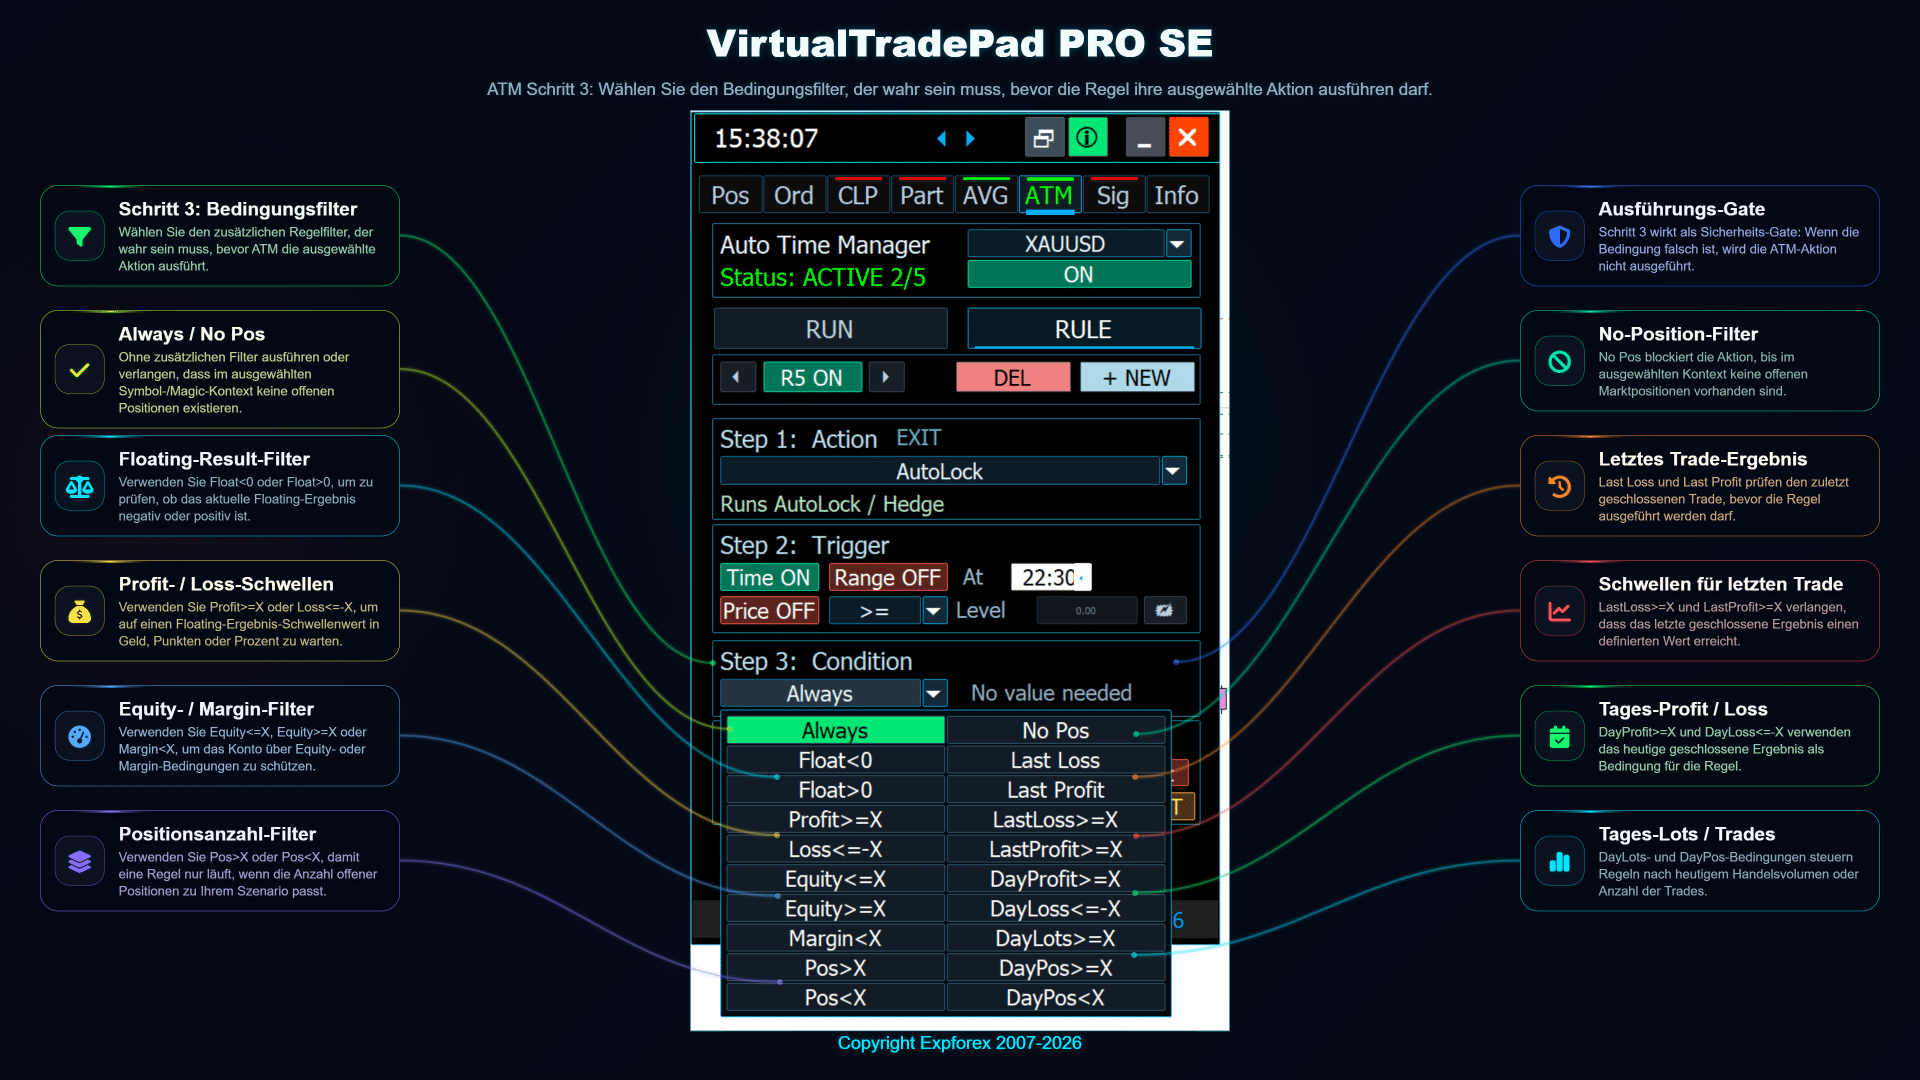
| 2. Bedingung definieren | Legen Sie fest, wann die Regel ausgelöst werden darf. | Zufällige Ausführung vermeiden und die Regel mit Markt- oder Positionskontext verbinden. |
| 3. Details konfigurieren | Passen Sie Symbol, Richtung, Volumen, Preis, Timing oder Management-Parameter an. | Die Regel exakt an Ihr Handelsszenario anpassen. |
| 4. Starten und überwachen | Aktivieren Sie die Regel und überwachen Sie sie im Chart und im Panel. | Automatisierung während Trading oder Testing sichtbar und kontrolliert halten. |
Diese Struktur macht ATM leichter verständlich: Es ist keine versteckte Blackbox. Der Trader definiert, was passieren soll, wann es passieren soll und wie die Aktion ausgeführt werden soll.
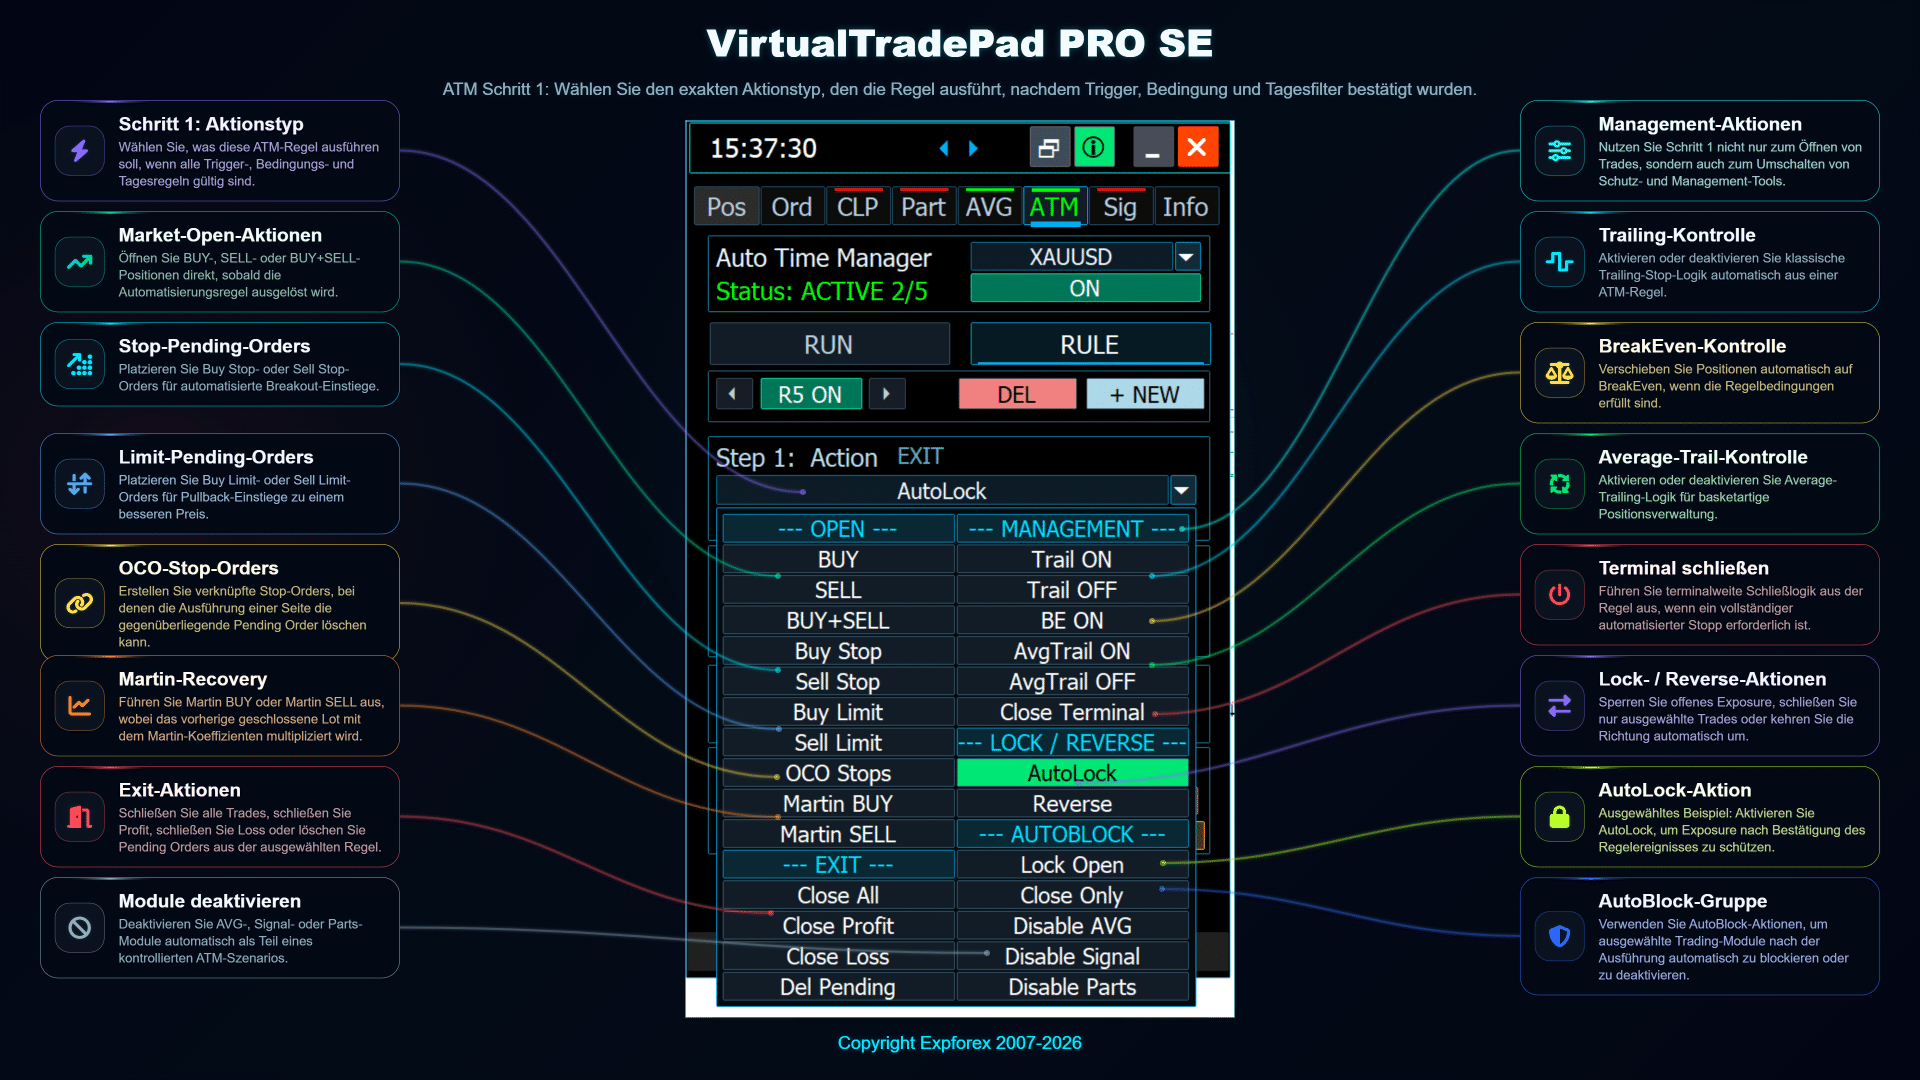
Schritt 1 — Regelaktion auswählen
Im ersten Schritt wird die Aktion ausgewählt, die die ATM-Regel ausführen soll. Je nach gewähltem Modus kann die Aktion mit dem Öffnen von Trades, dem Schließen von Positionen, Änderungen, Schutzlogik oder einer anderen unterstützten Management-Operation verbunden sein.
Eine klare Aktionsauswahl ist wichtig, weil jeder nächste Schritt von dieser Wahl abhängt. Eine Regel, die einen Trade öffnet, benötigt beispielsweise andere Details als eine Regel, die eine bestehende Position schließt oder ändert.
Schritt 2 — Bedingung definieren
Die Bedingung teilt ATM mit, wann die ausgewählte Aktion ausgelöst werden darf. Dies kann mit Marktpreis, Positionsstatus, Zeit, Kerzenlogik oder einem anderen unterstützten Regelkontext verbunden sein.
Bedingungen helfen, unkontrolliertes Verhalten zu verhindern. Eine Regel sollte nicht einfach nur existieren; sie sollte auf eine klare Situation warten, die der Trader vorher definiert hat.
Schritt 3 — Regeldetails konfigurieren
Nach der Auswahl von Aktion und Bedingung muss die Regel konfiguriert werden. Dieser Schritt definiert die praktischen Parameter der Regel, zum Beispiel Symbol-Logik, Order-Richtung, Optionen zur Positionsverwaltung, Abstand, Preislevel, Volumen oder andere Werte, die für die ausgewählte Aktion erforderlich sind.
In diesem Schritt wird die Regel konkret. Je sorgfältiger dieser Teil konfiguriert ist, desto leichter ist zu verstehen, was das Panel tun wird, wenn die Bedingung ausgelöst wird.
Schritt 4 — Regel prüfen und starten
Bevor die Regel aktiviert wird, sollte die vollständige Einrichtung überprüft werden. ATM ist darauf ausgelegt, die Handelslogik sichtbar zu halten, damit der Trader die ausgewählte Aktion, Bedingung und Konfiguration vor dem Start kontrollieren kann.
Dieser finale Prüfschritt hilft, Fehler zu reduzieren. Er ist besonders wichtig, wenn mehrere Regeln vorbereitet wurden oder derselbe Chart für mehrere Handelsszenarien verwendet wird.
ATM Trade Workflow
Der ATM Trade Workflow hilft dabei, regelbasierte Logik mit praktischen Handelsoperationen zu verbinden. Er kann verwendet werden, um strukturierte Aktionen für Trade-Einstieg, Trade Management oder Positionskontrolle vorzubereiten.
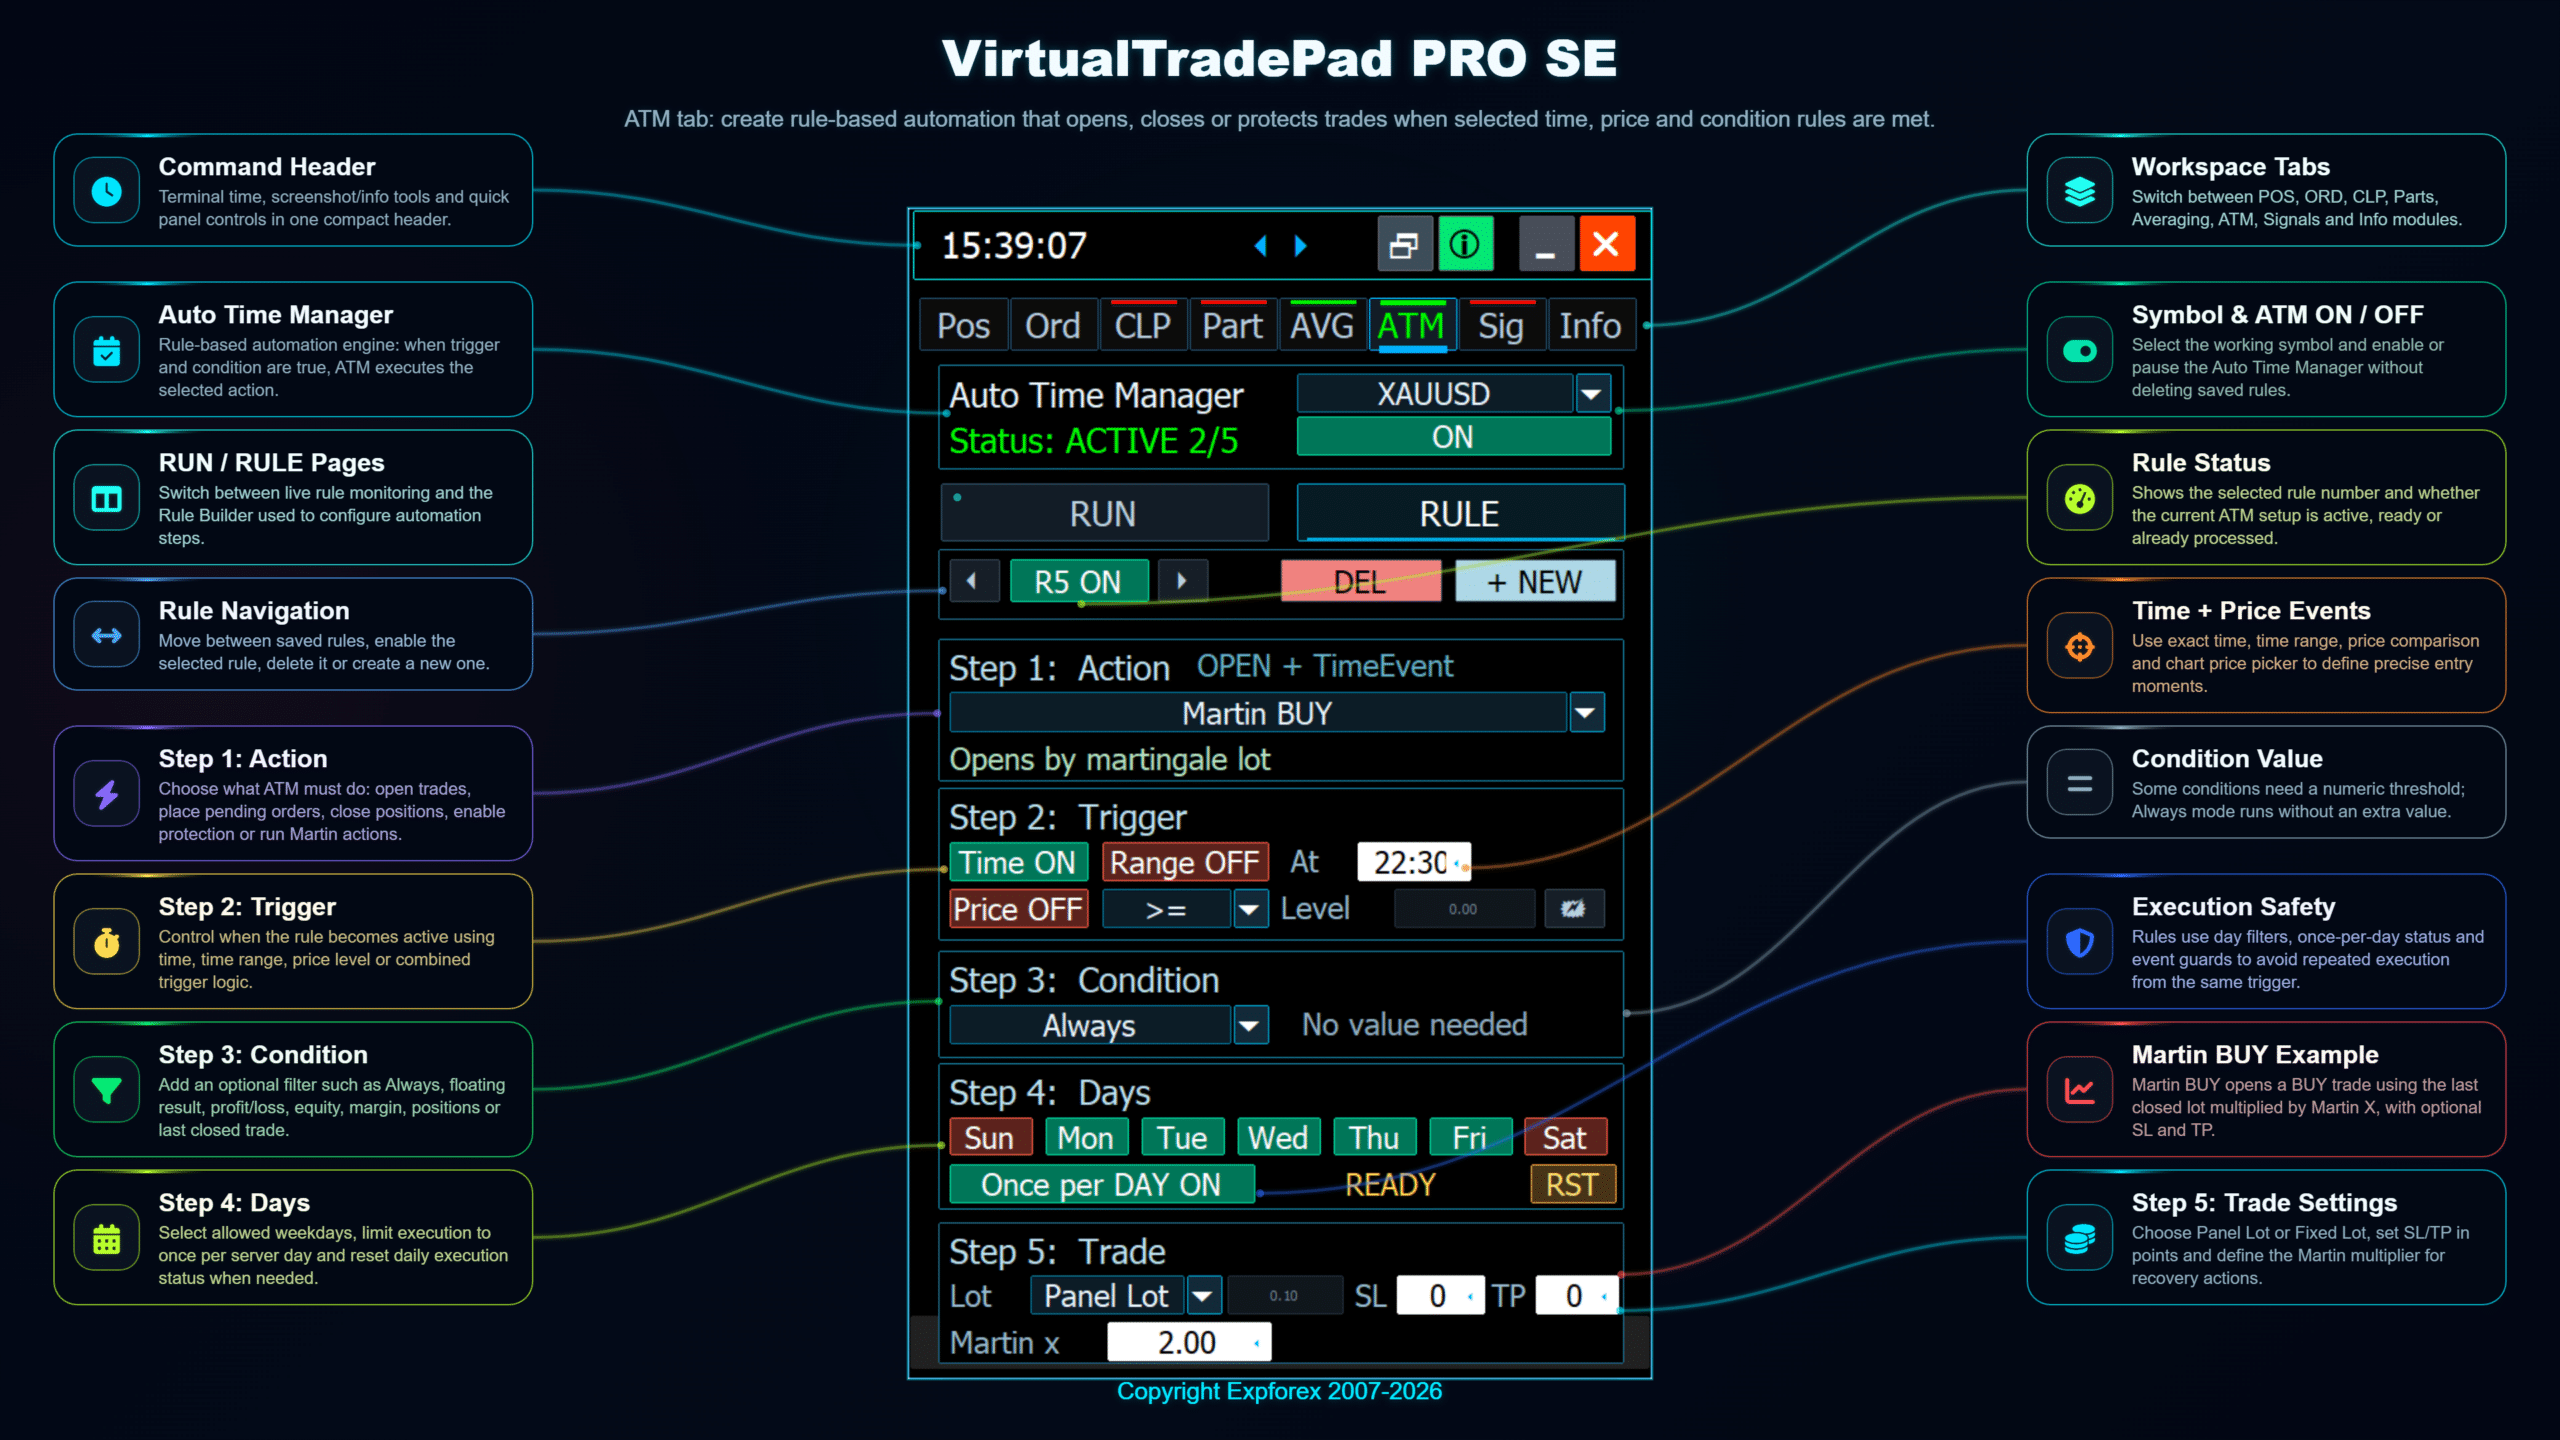
Der größte Vorteil ist die Sichtbarkeit. Statt sich mehrere manuelle Schritte merken zu müssen, kann der Trader ein wiederholbares Szenario erstellen und es über die ATM-Oberfläche überwachen.
Praktische ATM-Anwendungsfälle
| Anwendungsfall | Wie ATM hilft |
| Strukturiertes Handelsszenario vorbereiten | Definieren, welche Aktion passieren soll und unter welcher Bedingung sie erlaubt ist. |
| Wiederholte manuelle Aktionen reduzieren | Vordefinierte Regeln verwenden, statt dieselbe Abfolge jedes Mal manuell zu wiederholen. |
| Regelverhalten visuell testen | Das Panel im Strategy Tester ausführen und beobachten, wie sich die Regellogik unter historischen Marktbedingungen verhält. |
| Automatisierung sichtbar halten | Aktivierte Regeln direkt im Panel überwachen, statt sich auf versteckte Logik zu verlassen. |
Empfohlener ATM-Workflow
- Beginnen Sie mit einer einfachen Regel und testen Sie sie im Strategy Tester.
- Verwenden Sie klare Bedingungen, die im Chart leicht überprüfbar sind.
- Prüfen Sie die ausgewählte Aktion, bevor Sie die Regel aktivieren.
- Führen Sie nicht mehrere komplexe Regeln gleichzeitig aus, bevor jede einzelne separat getestet wurde.
- Verwenden Sie Demokonten, bevor Sie ATM-Logik auf einem Realkonto einsetzen.
- Behalten Sie nur die Regeln, die Sie verstehen und für das aktuelle Handelsszenario benötigen.
| Risikohinweis: ATM-Regeln können Trade-Management-Aktionen automatisieren oder halbautomatisieren. Das reduziert das Handelsrisiko nicht automatisch. Testen Sie das Regelverhalten immer auf einem Demokonto und stellen Sie sicher, dass die Logik zu Ihrer Strategie, den Brokerbedingungen und den Risikolimits Ihres Kontos passt. |
SIG-Tab — Signal Trade Manager
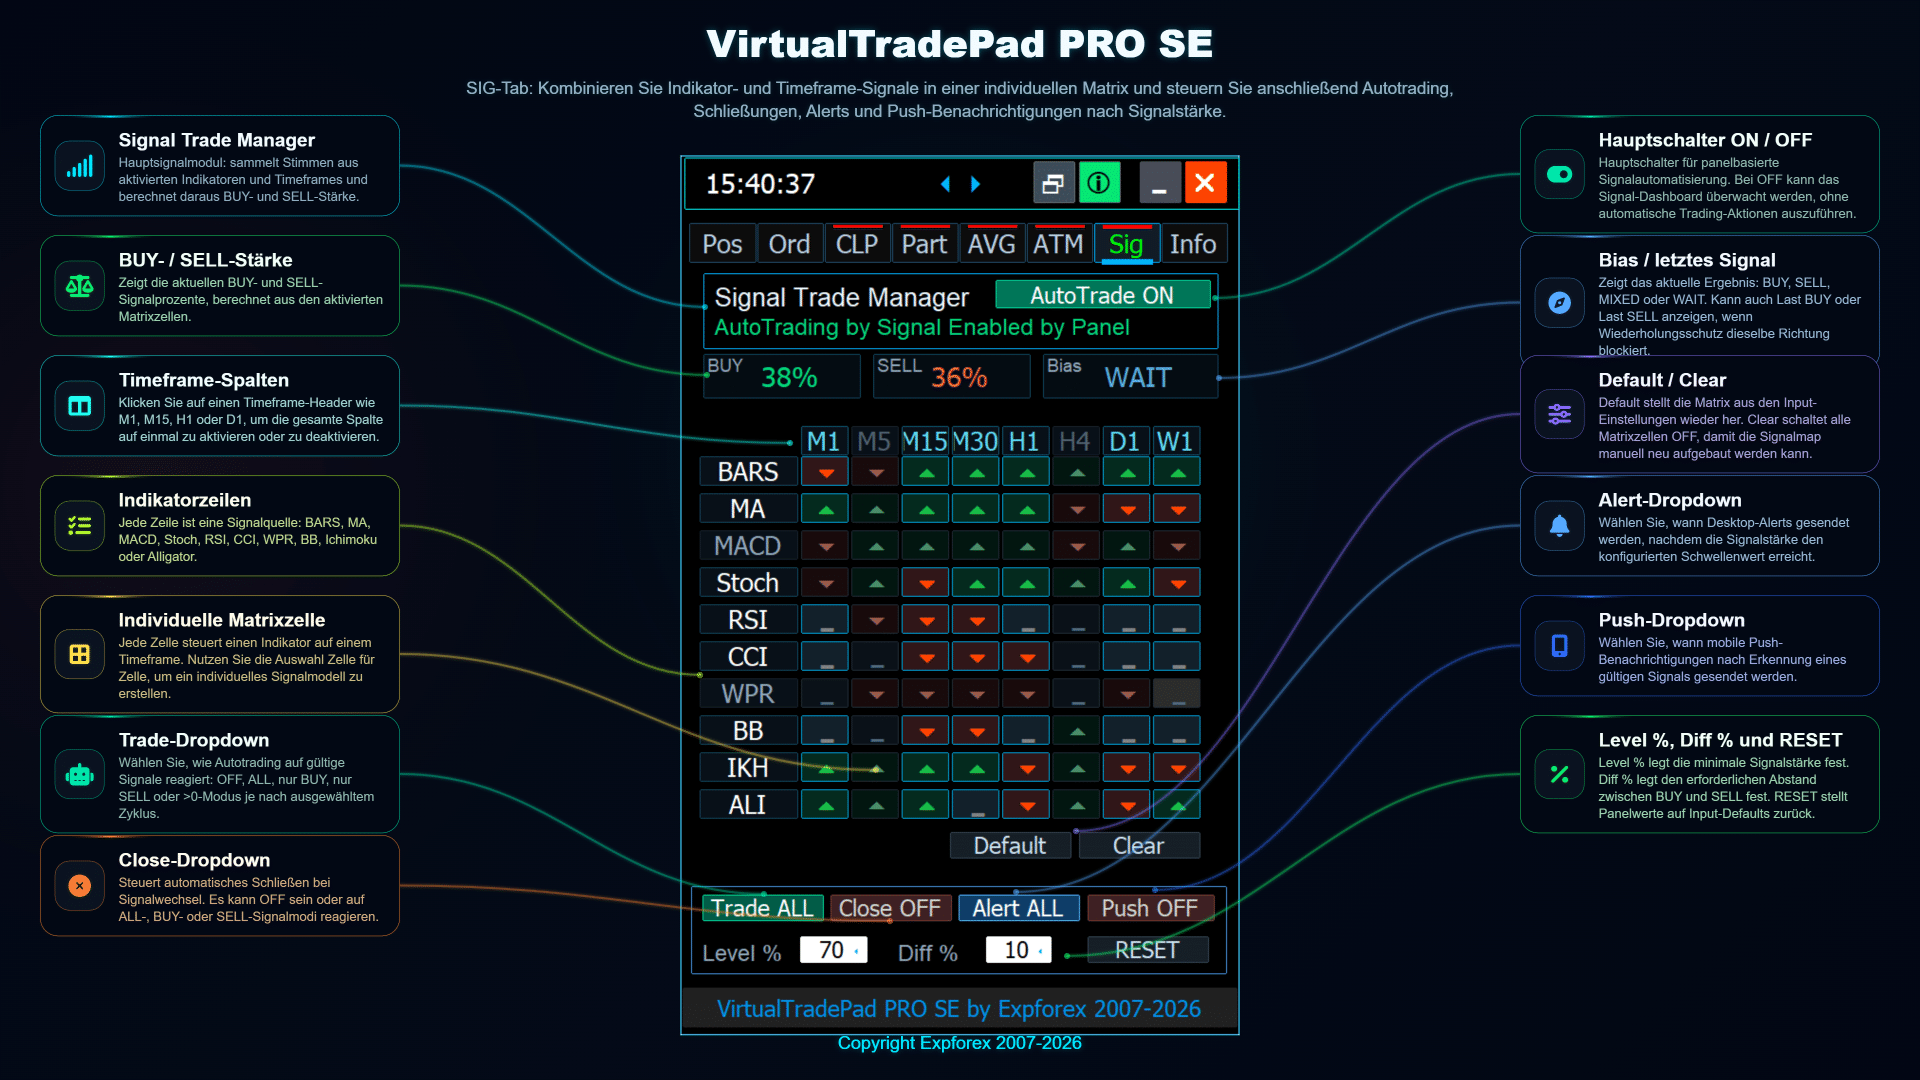
Der SIG-Tab in VirtualTradePad PRO SE hilft Tradern dabei, Signalbedingungen aus mehreren Werkzeugen und Timeframes in einem organisierten Panel zu überwachen. Er bietet eine strukturierte Ansicht von Signalzuständen, Alarmen und Trade-Management-Berechtigungen, ohne dass der Trader ständig zwischen mehreren Charts oder Indikatoren wechseln muss.
Dieses Modul ist besonders nützlich, wenn ein Trader visuelle Chartanalyse mit einer klaren Signalmatrix kombinieren möchte. Statt sich nur auf separate Indikatorfenster zu verlassen, sammelt der SIG-Tab den Signalstatus in einem kompakten Arbeitsbereich direkt innerhalb des Trading-Panels.
| Hauptidee: Der SIG-Tab ist keine Garantie für profitables Trading. Er ist ein Kontroll- und Überwachungsmodul, das hilft, Signalinformationen, Alarme und mögliche Handelsaktionen übersichtlicher zu organisieren. |
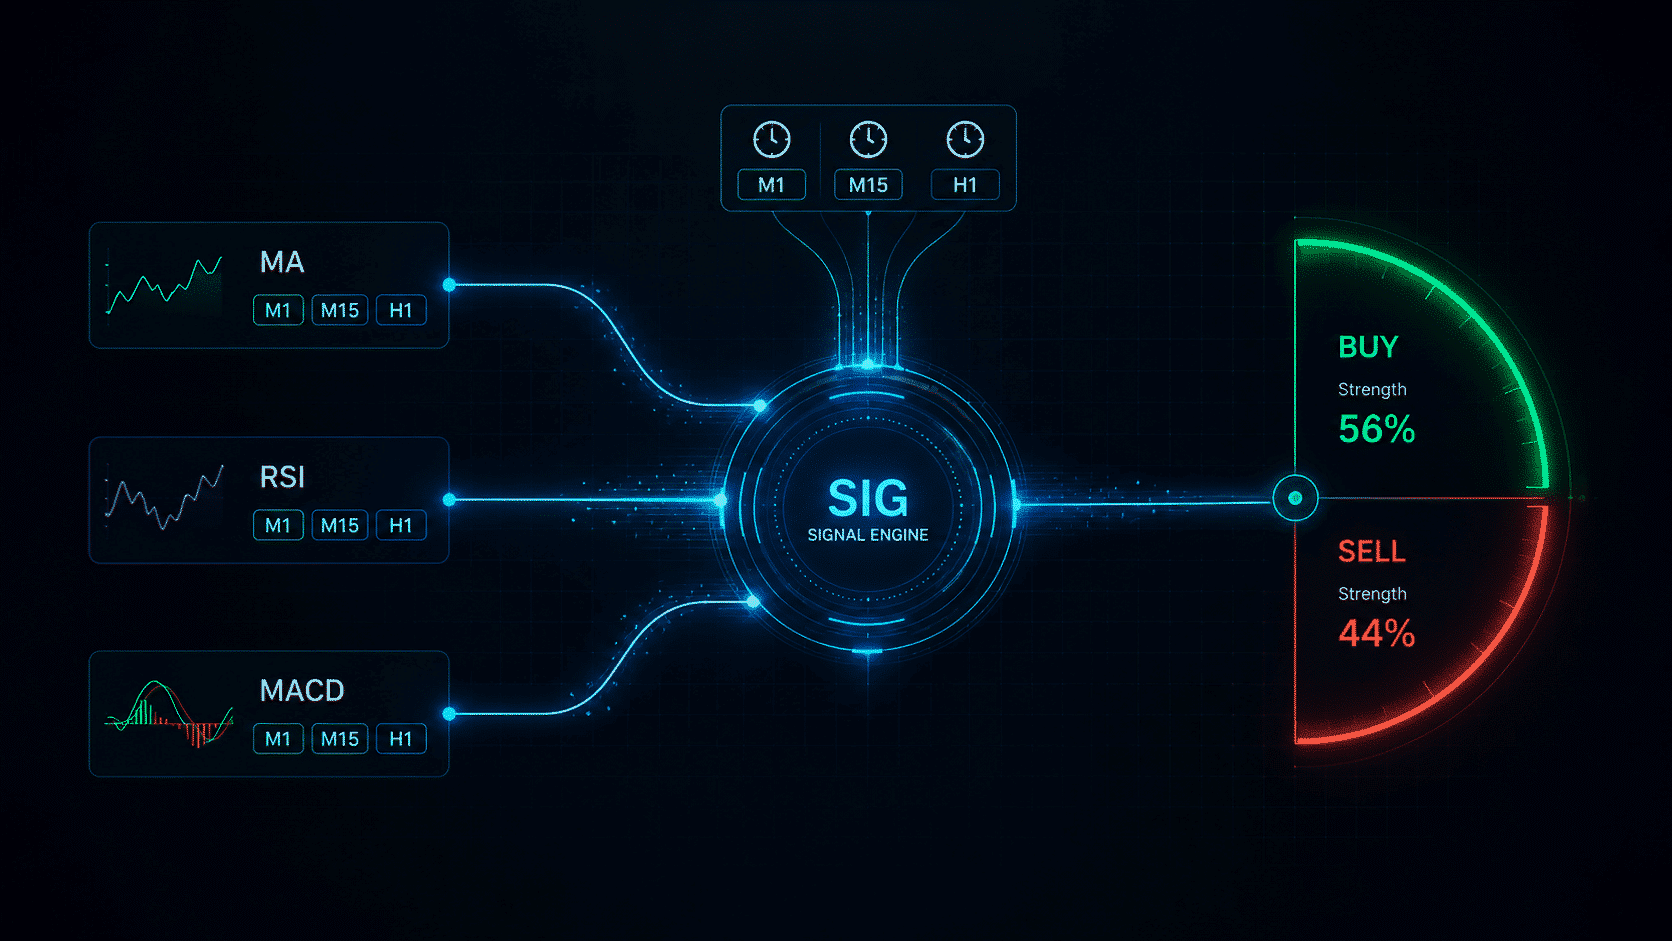
Übersicht der Signalmatrix
Der SIG-Tab stellt Signalinformationen als Matrix dar. Zeilen und Spalten können je nach Konfiguration des Moduls verschiedene Signalgruppen, Timeframes, Indikatoren oder konfigurierte Bedingungen darstellen. So versteht der Trader schneller, welche Signale aktiv, neutral oder beobachtungswürdig sind.
Das Ziel dieses Layouts ist es, Rauschen zu reduzieren. Ein Trader kann den aktuellen Signalzustand an einem Ort sehen und entscheiden, ob die Situation für manuelles Handeln, Alarmüberwachung oder regelbasierte Ausführung geeignet ist.
Hauptfunktionen des SIG-Tabs
| Funktion | Zweck |
| Signalmatrix | Zeigt Signalzustände in einer strukturierten Tabelle an, damit der Trader Marktbedingungen schneller beurteilen kann. |
| Benutzerdefiniertes Signal-Set | Ermöglicht die Anpassung des Signal-Arbeitsbereichs an bevorzugte Werkzeuge und Konfigurationen des Traders. |
| Timeframe-Überwachung | Hilft beim Vergleich von Signalzuständen über verschiedene Marktperioden hinweg, wenn die Konfiguration dies unterstützt. |
| Alarme und Benachrichtigungen | Können verwendet werden, um den Trader zu informieren, wenn ausgewählte Signalbedingungen erkannt werden. |
| Logik für Handelsberechtigungen | Hilft dabei, Signalbeobachtung von möglichen Handelsaktionen zu trennen, abhängig von den ausgewählten Einstellungen. |
So verwenden Sie den SIG-Tab
Ein praktischer Signal-Workflow beginnt normalerweise mit der Beobachtung. Konfigurieren Sie zuerst die Signale, die Sie überwachen möchten. Prüfen Sie anschließend, wie die Matrix unter realen Marktbedingungen oder im Strategy Tester reagiert. Erst danach sollten Sie entscheiden, ob das Signal für Alarme, manuelle Bestätigung oder handelsbezogene Aktionen verwendet werden soll.
- Öffnen Sie den SIG-Tab und prüfen Sie die aktuelle Signalmatrix.
- Überprüfen Sie, welche Signalzeilen oder -spalten aktiv sind.
- Bestätigen Sie das Signal im Chart, bevor Sie es für eine Handelsentscheidung verwenden.
- Verwenden Sie Alarme, wenn Sie Signale überwachen möchten, ohne den Chart ständig zu beobachten.
- Testen Sie die Konfiguration auf Demo, bevor Sie handelsbezogene Aktionen erlauben.
Dieser Ansatz hält das Modul praktisch und kontrolliert. Signale sollten Ihren Handelsprozess unterstützen, nicht Ihr Risikomanagement oder Ihre Marktanalyse ersetzen.
Alarme, Push-Benachrichtigungen und Signalkontrolle
Je nach gewählter Konfiguration kann der SIG-Tab nicht nur zur visuellen Überwachung, sondern auch für Alarme und Benachrichtigungen verwendet werden. Das ist nützlich, wenn der Trader über eine Signalbedingung informiert werden möchte, ohne jeden Chart manuell zu prüfen.
| Best Practice: Verwenden Sie zuerst Signalalarme. Nachdem die Signallogik getestet und verstanden wurde, können Sie entscheiden, ob sie rein informativ bleiben oder mit aktiverem Trade-Management-Verhalten verbunden werden soll. |
Für verantwortungsvolles Trading ist es besser, drei unterschiedliche Phasen zu trennen: Signalerkennung, Signalbestätigung und Trade-Ausführung. Der SIG-Tab hilft, diesen Prozess klarer zu organisieren.
Praktische Anwendungsfälle
| Anwendungsfall | Wie SIG hilft |
| Multi-Timeframe-Überwachung | Signalzustände über konfigurierte Timeframes hinweg aus einem Panel vergleichen. |
| Manuelle Trade-Bestätigung | Die Matrix als zusätzliche Bestätigung verwenden, bevor ein Trade manuell geöffnet oder verwaltet wird. |
| Alarmbasierter Workflow | Eine Signalbenachrichtigung erhalten und anschließend den Chart prüfen, bevor gehandelt wird. |
| Prüfung im Strategy Tester | Beobachten, wie sich die Signallogik während historischer visueller Tests verhält. |
Wichtige Hinweise
- Ein Signal ist kein garantiertes Trading-Ergebnis.
- Bestätigen Sie das Signalverhalten immer im Chart und im Strategy Tester.
- Aktivieren Sie keine handelsbezogenen Aktionen, bevor die Signallogik getestet wurde.
- Verwenden Sie Demokonten, wenn Sie benutzerdefinierte Signal-Sets anpassen.
- Halten Sie die Signalkonfiguration zunächst einfach und erweitern Sie sie Schritt für Schritt.
| Risikohinweis: Signalwerkzeuge sind nur Instrumente zur Entscheidungsunterstützung. Sie entfernen weder Marktrisiko noch Spread-Risiko, Slippage, Ausführungsrisiko oder das Risiko falscher Einstellungen. Testen Sie alle Signalkonfigurationen, bevor Sie sie auf einem Realkonto verwenden. |
Verwandte Abschnitte
Der SIG-Tab ist mit dem vollständigen Workflow von VirtualTradePad PRO SE verbunden. Verwenden Sie den POS-Tab für manuelle Ausführung, den Info-Tab für Markt- und Exposure-Überwachung, den ATM-Tab für regelbasierte Logik und den Abschnitt Strategy Tester, um zu prüfen, wie sich Signale vor dem Live-Trading verhalten.
INFO-Tab — Live-Markt, Exposure und Risikoübersicht
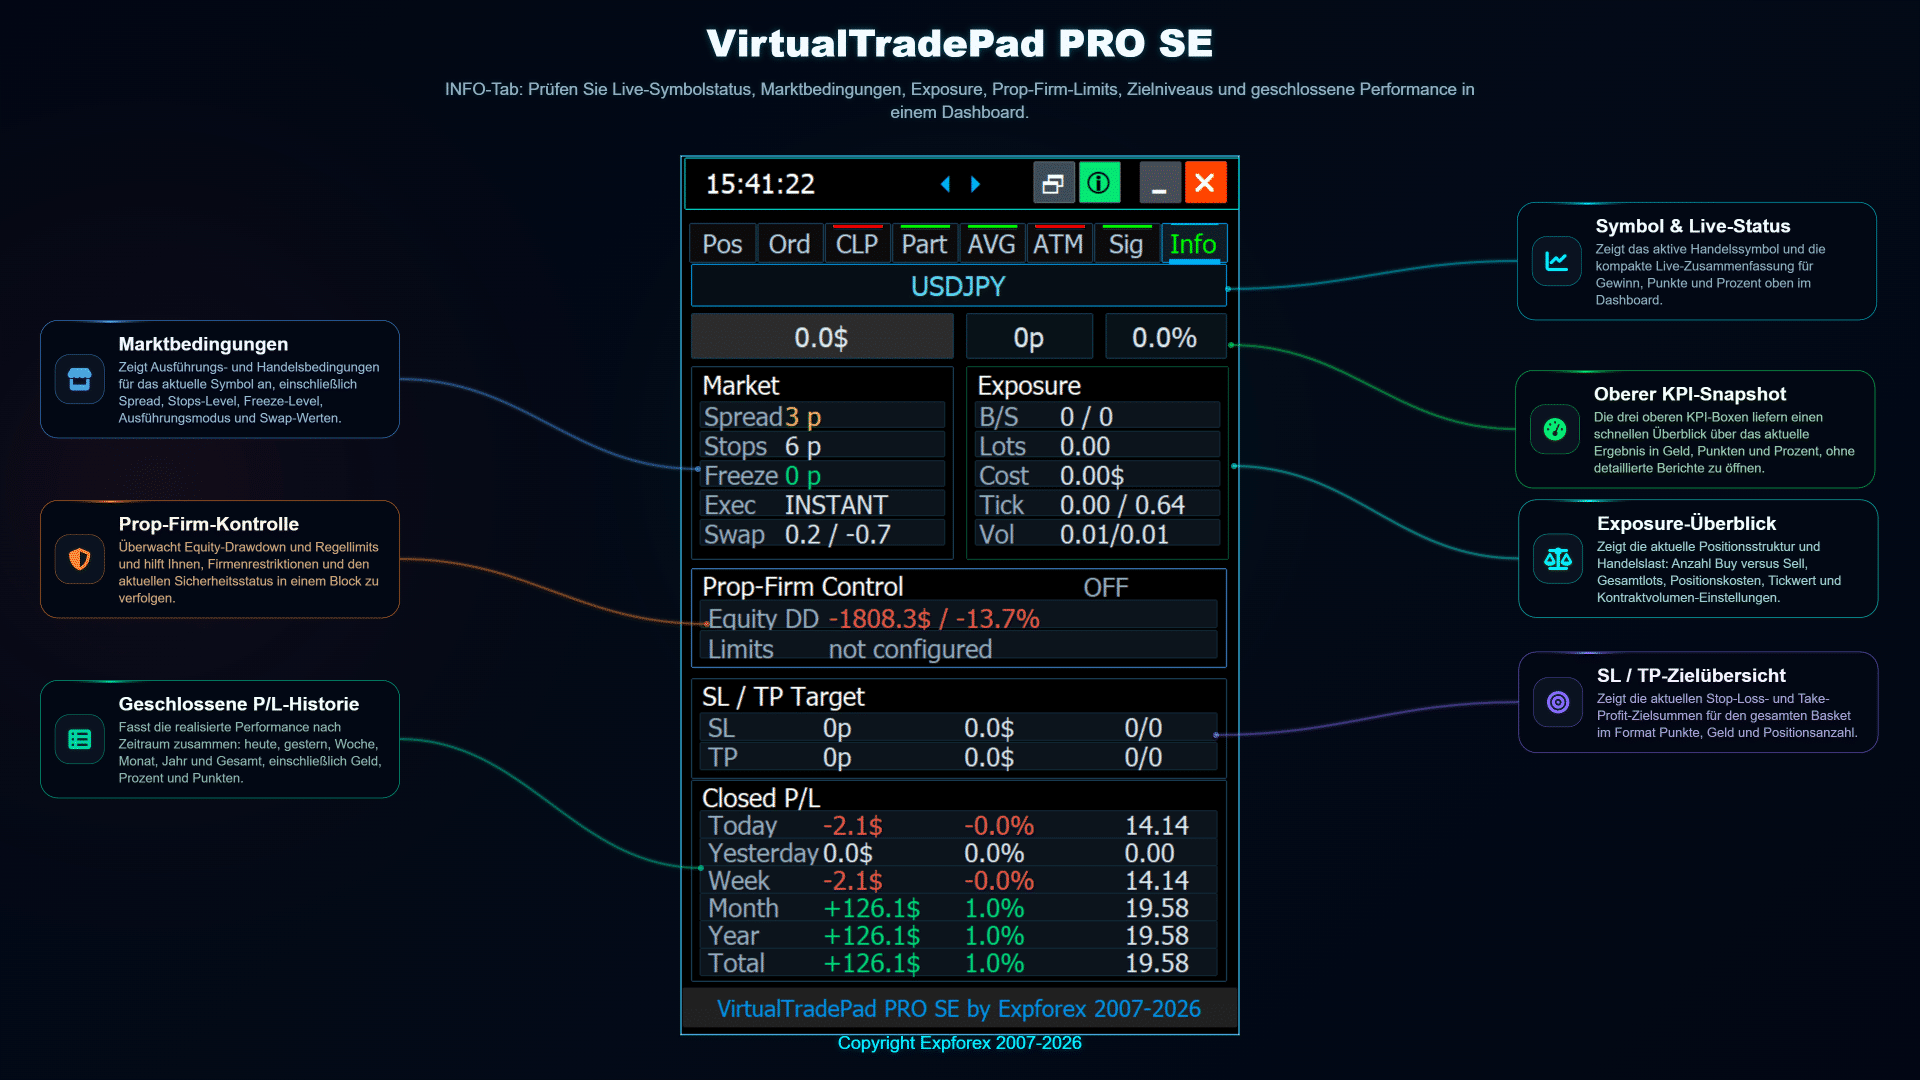
Der INFO-Tab in VirtualTradePad PRO SE ist als kompaktes Monitoring-Zentrum für das aktuelle Symbol, die Konto-Exposure, laufende Ergebnisse, Handelslimits und wichtige Marktbedingungen aufgebaut. Er hilft Tradern, die aktuelle Situation zu verstehen, ohne mehrere separate MetaTrader-Fenster öffnen zu müssen.
Dieser Tab ist nicht nur eine optische Ergänzung. Er liefert praktischen Kontext für manuelles Trading, Positionsverwaltung, Risikokontrolle, Analysen im Strategy Tester und Prop-Firm-orientiertes Monitoring. Das Ziel ist einfach: Der Trader soll die wichtigsten Informationen direkt im Arbeitsbereich sehen, bevor er eine Handelsentscheidung trifft.
| Grundidee: Der INFO-Tab zeigt in einem strukturierten Block einen schnellen Überblick über den Marktstatus, offene Exposure, laufendes Ergebnis, SL/TP-Ziele, Drawdown und zuletzt geschlossene Gewinne/Verluste. |
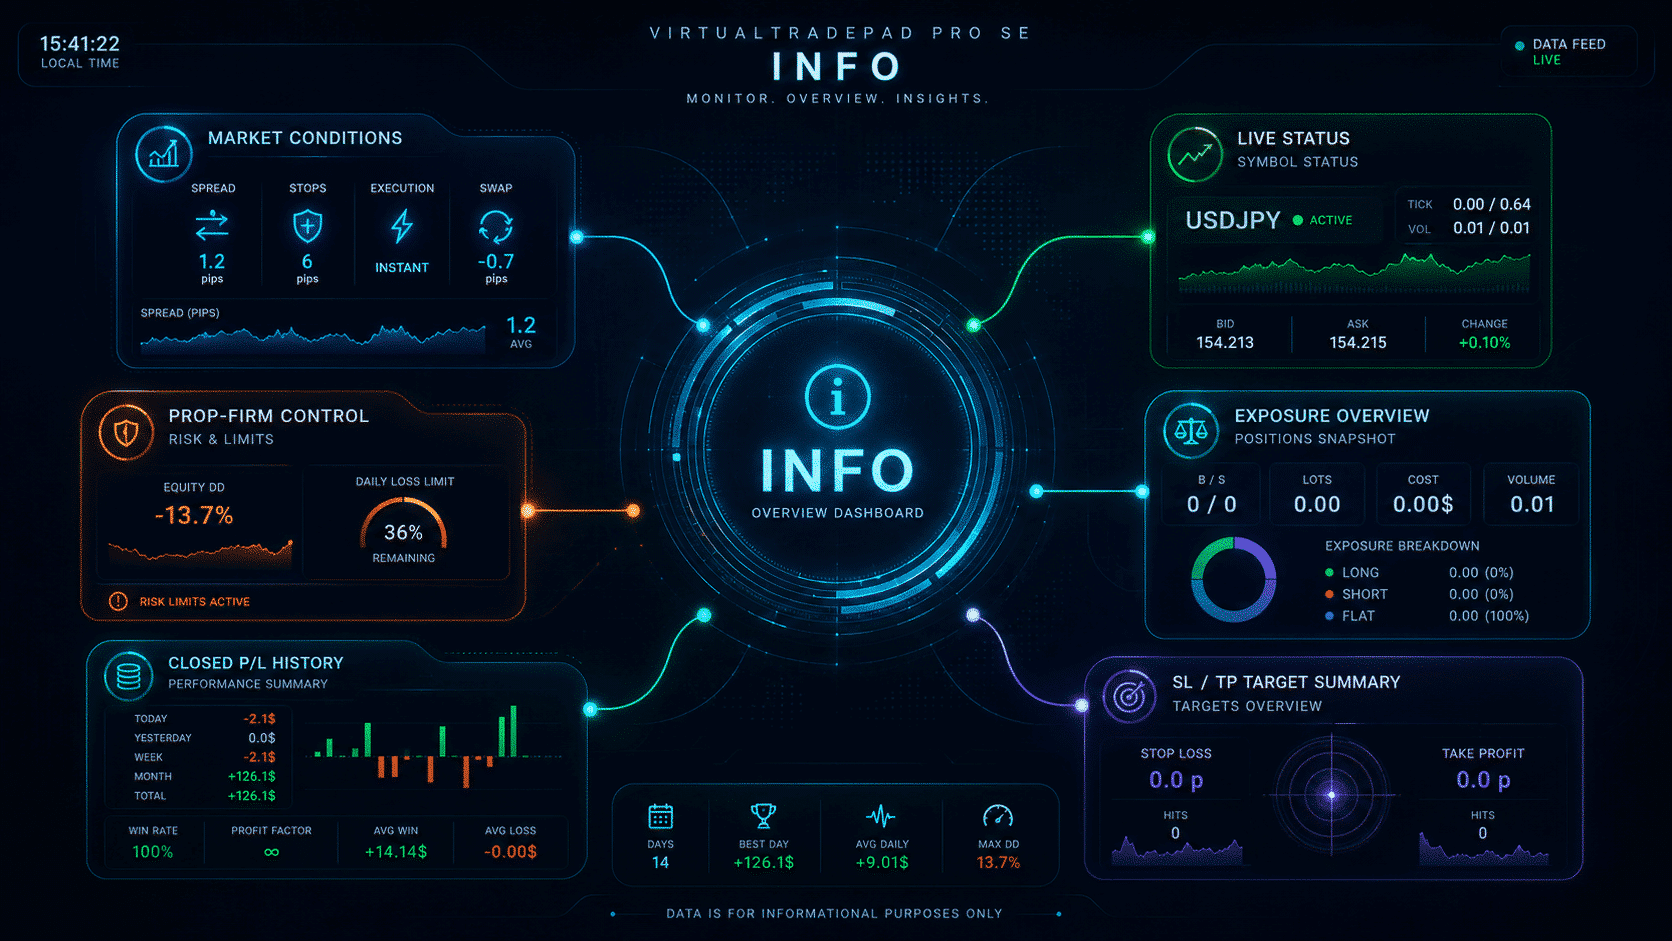
Übersicht über den INFO-Tab
Der INFO-Tab kombiniert mehrere Monitoring-Blöcke: aktuelle Symboldaten, Handelsstatus, Spread, Marktbedingungen, Positions-Exposure, laufenden Gewinn/Verlust, Drawdown, SL/TP-Zielinformationen und Statistiken zu geschlossenen Ergebnissen. So erhält der Trader eine klare Zusammenfassung der aktuellen Handelsumgebung.
Das Panel ist besonders nützlich, wenn der Trader den aktuellen Status schnell prüfen muss: ob Trading erlaubt ist, wie viel Exposure offen ist, wo die aktuellen Ziele liegen und wie sich das Konto im ausgewählten Zeitraum entwickelt.
Wichtige Informationsblöcke
| Block | Was angezeigt wird | Warum es wichtig ist |
| Symbolstatus | Aktuelles Symbol, Timeframe, Preiskontext und grundlegender Marktstatus. | Hilft zu bestätigen, dass das Panel am richtigen Chart und Symbol angebracht ist. |
| Marktbedingungen | Spread, Handelserlaubnis, sitzungsbezogene Informationen und aktueller Ausführungskontext. | Hilft, Aktionen bei ungeeigneten Marktbedingungen oder eingeschränkten Handelszuständen zu vermeiden. |
| Exposure | Offenes BUY/SELL-Volumen, Netto-Lot, Anzahl der Positionen und laufendes Ergebnis. | Zeigt die tatsächliche aktuelle Exposure, ohne dass der Trader jede Order manuell prüfen muss. |
| Prop-Firm-Kontrolle | Monitoring im Stil von Risikolimits für Drawdown und Kontobeschränkungen, wenn es konfiguriert ist. | Hilft, Handelsentscheidungen mit Kontolimits und Risikoregeln abzugleichen. |
| SL-/TP-Zielübersicht | Aktuelle Stop-Loss- und Take-Profit-Zielinformationen für die aktive Exposure. | Macht potenzielles Risiko und Zielzonen leichter einschätzbar, bevor Trades geändert werden. |
| Statistiken zum geschlossenen P/L | Zuletzt geschlossener Gewinn/Verlust, Periodenergebnis und Zusammenfassungswerte. | Hilft dem Trader, die aktuelle Session-Performance zu bewerten, ohne das Panel zu verlassen. |
Monitoring von Exposure und laufendem Ergebnis
Eine der wichtigsten Aufgaben des INFO-Tabs ist das Exposure-Monitoring. Wenn mehrere Positionen offen sind, muss der Trader das gesamte BUY-Volumen, SELL-Volumen, den Netto-Lot und das aktuelle laufende Ergebnis verstehen. Das ist besonders wichtig für Strategien mit mehreren Einstiegen, Teilschließungen, Hedging, Averaging oder Basket-Management.
Statt jede Position einzeln auszuwerten, gruppiert der INFO-Tab die wichtigsten Werte in lesbaren Blöcken. Dadurch lässt sich die aktuelle Exposure besser verstehen, bevor POS-, CLP-, PART-, AVG- oder ATM-Module verwendet werden.
| Empfohlene Vorgehensweise: Prüfen Sie den INFO-Tab, bevor Sie Aktionen auf Basket-Ebene verwenden. Er hilft, aktuelle Exposure, laufendes Ergebnis und Risikokontext zu bestätigen, bevor Positionen geschlossen, geändert, gemittelt oder automatisierte Verwaltungslogik angewendet wird. |
Drawdown, Risiko und Zieltransparenz
Der INFO-Tab hilft Tradern, nicht nur den Gewinn, sondern auch das Risiko zu sehen. Zusammenfassungen zu Drawdown, Stop Loss und Take Profit ermöglichen einzuschätzen, ob aktuelle Positionen noch zum geplanten Trading-Plan passen.
Das ist wichtig, weil ein Trading-Panel nicht nur Ausführungsbuttons bereitstellen sollte. Ein professioneller Trading-Arbeitsbereich sollte auch den Kontext dieser Aktionen zeigen: aktuelles Risiko, mögliches Ziel, laufender Verlust und Kontobelastung.
| Wert | So nutzen Sie ihn |
| Laufender P/L | Prüfen Sie, ob die aktuell offenen Positionen profitabel sind oder unter Druck stehen. |
| Drawdown | Überwachen Sie aktuellen Konto- oder Symboldruck, bevor Sie neue Exposure hinzufügen. |
| SL-Ziel | Bewerten Sie den potenziellen Verlust, wenn Schutzlevel ausgelöst werden. |
| TP-Ziel | Schätzen Sie das mögliche Zielergebnis für die aktuelle Exposure ein. |
Empfohlener Workflow für den INFO-Tab
- Prüfen Sie Symbol und Timeframe, bevor Sie Trades verwalten.
- Prüfen Sie Handelsstatus, Spread und aktuelle Marktbedingungen.
- Prüfen Sie offene BUY/SELL-Exposure und Netto-Lot.
- Prüfen Sie laufendes Ergebnis, Drawdown und SL/TP-Zielinformationen.
- Verwenden Sie die POS-, CLP-, PART-, AVG- oder ATM-Tabs erst, nachdem der aktuelle Risikokontext bestätigt wurde.
- Prüfen Sie Statistiken zum geschlossenen P/L, um das Ergebnis der aktuellen Trading-Session zu verstehen.
Dieser Workflow hilft, blinde Aktionen zu vermeiden. Der Trader prüft zuerst die Situation und entscheidet danach, welches Verwaltungsmodul verwendet werden soll.
Praktische Anwendungsfälle
| Anwendungsfall | Wie der INFO-Tab hilft |
| Manuelles Trading | Prüfen Sie Spread, Exposure und aktuelles laufendes Ergebnis, bevor Sie Trades öffnen oder schließen. |
| Basket-Management | Prüfen Sie die gruppierte Exposure, bevor Sie CLP, AVG oder Teilschließungsfunktionen verwenden. |
| Risikokontrolle | Überwachen Sie Drawdown, SL/TP-Ziele und konfigurierte Informationen im Stil von Risikolimits. |
| Überprüfung im Strategy Tester | Nutzen Sie Live-Statistiken, während Sie Trade-Management-Entscheidungen visuell testen. |
Wichtige Hinweise
- Der INFO-Tab zeigt nützliche Monitoring-Daten, aber der Trader bleibt für alle Handelsentscheidungen verantwortlich.
- Laufender Gewinn und Drawdown können sich bei volatilen Marktbedingungen schnell ändern.
- Spread- und Ausführungsbedingungen hängen vom Broker und der aktuellen Marktsitzung ab.
- Blöcke im Stil von Risikolimits sind Monitoring-Werkzeuge und sollten korrektes Risikomanagement nicht ersetzen.
- Testen Sie das Verhalten des Panels immer auf einem Demokonto, bevor Sie es auf einem echten Konto verwenden.
| Risikowarnung: Monitoring-Informationen helfen, die aktuelle Situation zu verstehen, garantieren aber kein sicheres Trading. Marktrisiko, Broker-Ausführung, Slippage, Spreads und falsche Einstellungen können weiterhin zu Verlusten führen. |
Verwandte Abschnitte
Der INFO-Tab unterstützt den gesamten VirtualTradePad PRO SE Workflow. Verwenden Sie ihn zusammen mit dem POS-Tab für manuelles Trading, CLP für Basket-Gewinn-/Verlustmanagement, Part für Teilausstiege, AVG für Averaging- und Trend-Add-Logik, ATM für regelbasiertes Management und dem Strategy Tester Abschnitt für visuelles Testen.
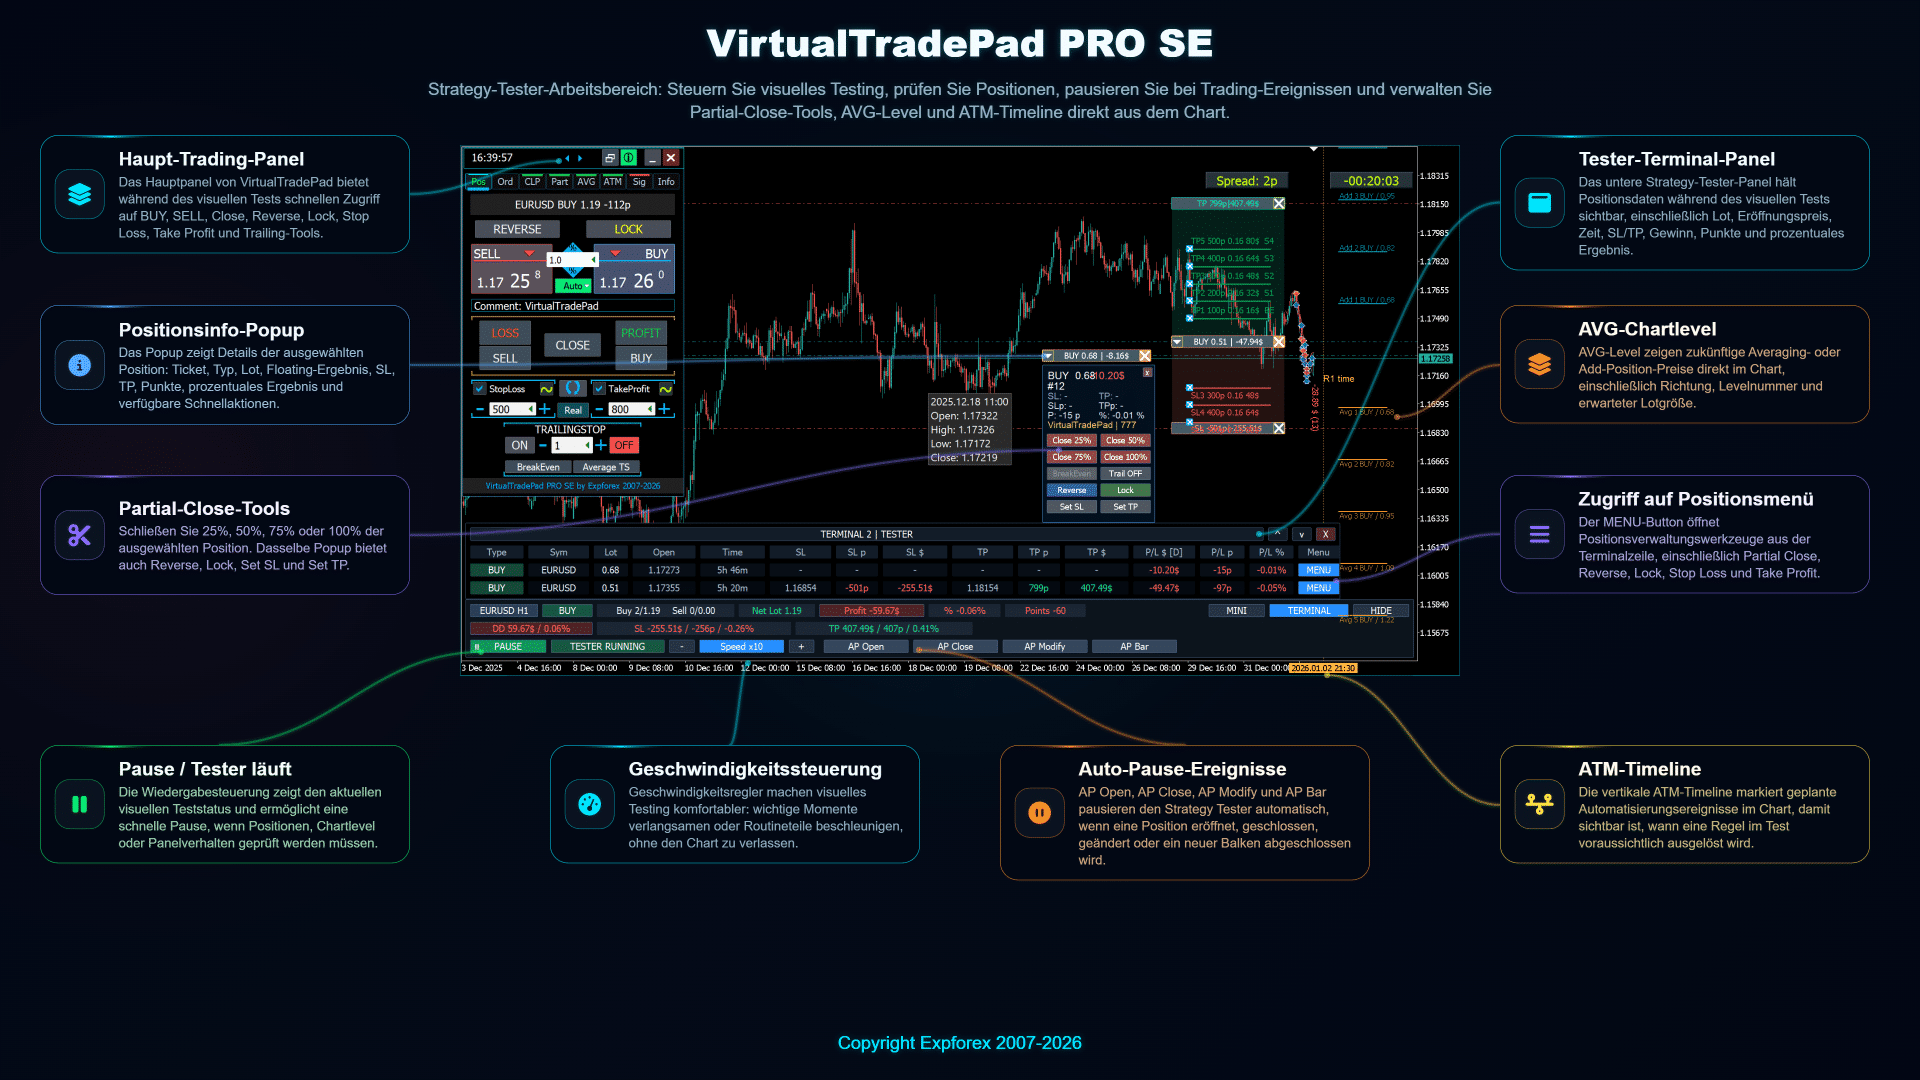
Strategy Tester Control — visueller Testarbeitsbereich
VirtualTradePad PRO SE ist nicht nur für Live-Charts entwickelt, sondern auch für die visuelle Arbeit im MetaTrader Strategy Tester. Dadurch können Trader manuelle Aktionen, Panel-Verhalten, Positionsverwaltungswerkzeuge, Teilausstiege, AVG-Level, ATM-Regeln und Tester-Control-Szenarien prüfen, bevor das Panel auf einem echten Konto eingesetzt wird.
Der Strategy-Tester-Arbeitsbereich ist besonders nützlich, wenn Sie den Markt verlangsamen, den Test an wichtigen Momenten pausieren, die Reaktion des Panels auf Trades prüfen und den gesamten Workflow verstehen möchten, ohne echtes Kapital zu riskieren.
| Grundidee: Die Strategy-Tester-Unterstützung hilft Ihnen, das Panel zu erlernen, Ihren Trade-Management-Workflow zu testen und wichtige Einstellungen in einer visuellen Umgebung zu prüfen, bevor Sie live handeln. |
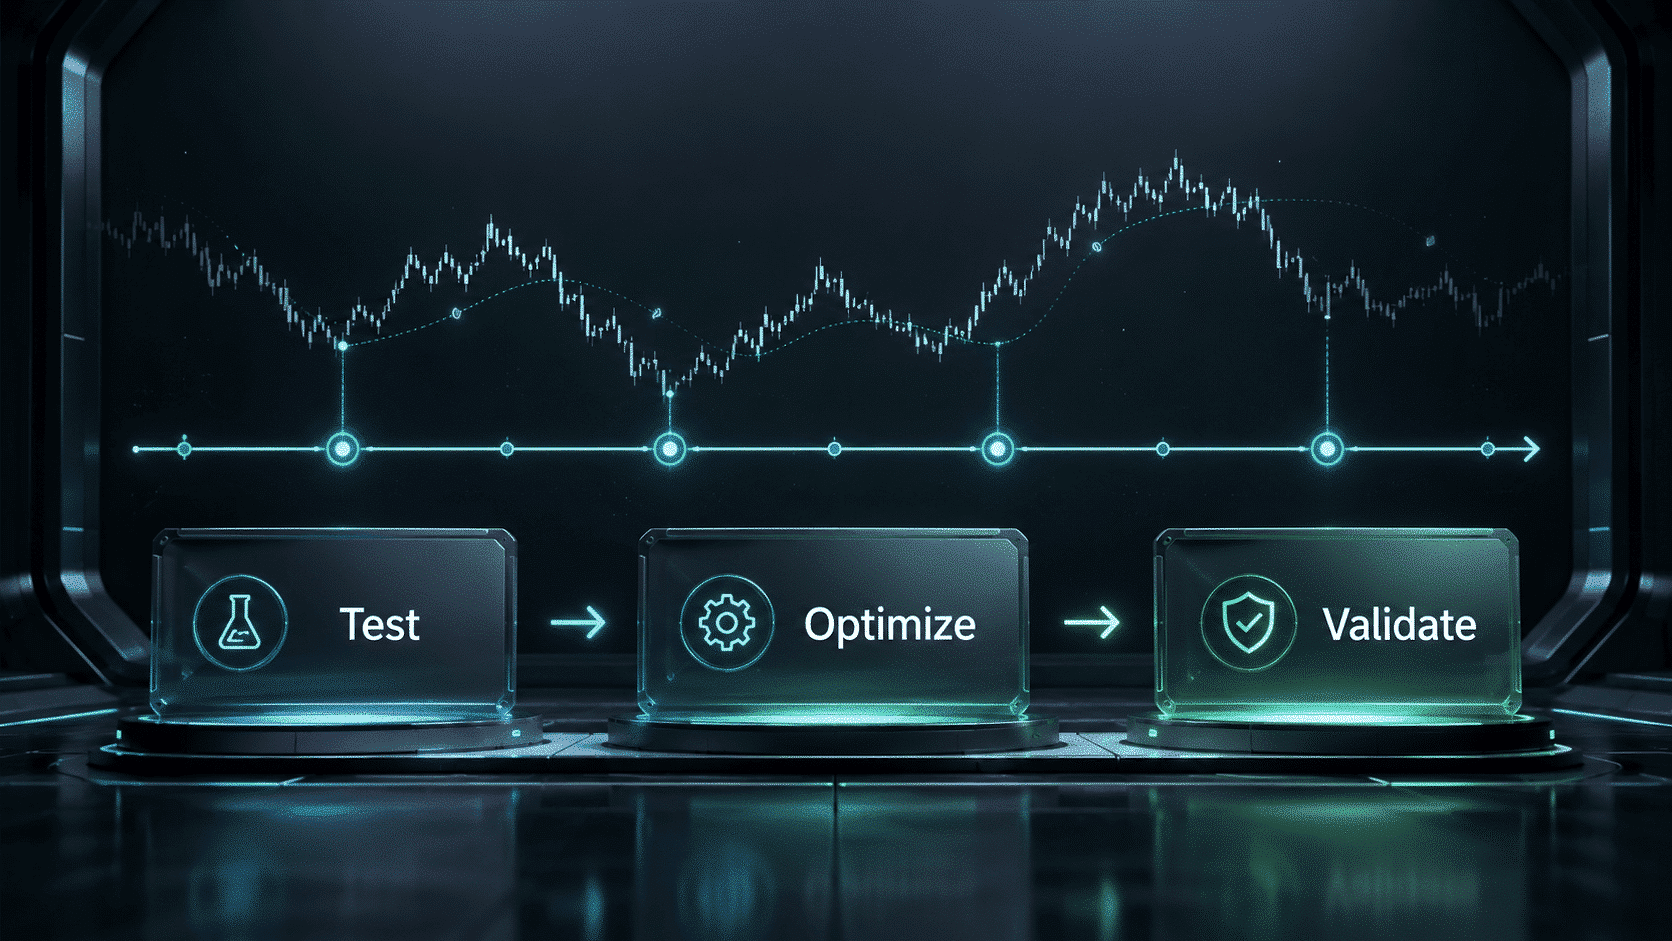
Übersicht über den Tester-Arbeitsbereich
Die Strategy-Tester-Ansicht kombiniert Chart, VirtualTradePad PRO SE Panel, Wiedergabesteuerung des Testers, Informationen zu offenen Positionen und visuelle Chart-Level. Dadurch lässt sich leichter analysieren, wie sich das Panel während historischer Marktbewegungen verhält.
Die Tester-Umgebung ist sowohl für Einsteiger als auch für erfahrene Nutzer hilfreich. Einsteiger können lernen, wie das Panel funktioniert, während erfahrene Trader komplexe Workflows mit Teilschließungslevels, Averaging, ATM-Regeln und Signalverhalten testen können.
Tester-Steuerungsbuttons
VirtualTradePad PRO SE enthält testerorientierte Steuerungen, die visuelles Testen komfortabler machen. Diese Bedienelemente helfen, den Test zu pausieren, die Geschwindigkeit zu ändern, Positionen zu prüfen und auf wichtige Trading-Ereignisse zu reagieren.
| Steuerung | Zweck | Warum es hilft |
| Pause / Run | Stoppt oder setzt den visuellen Test fort. | Ermöglicht die Prüfung von Positionen, Levels und Panel-Status genau in dem Moment, in dem es nötig ist. |
| Geschwindigkeitssteuerung | Ändert die Wiedergabegeschwindigkeit des visuellen Tests. | Macht es möglich, wichtige Bereiche zu verlangsamen und Routinephasen zu beschleunigen. |
| Terminalansicht | Zeigt kompakte oder erweiterte Positionsinformationen. | Hält Trade-Details sichtbar, ohne zum Standard-Terminalfenster wechseln zu müssen. |
| Panel-Modi | Wechselt zwischen kompaktem, Terminal- und ausgeblendetem Anzeigemodus. | Hilft, den Chart übersichtlich zu halten, wenn mehr Arbeitsfläche benötigt wird. |
Auto-Pause-Ereignisse
Auto-Pause-Ereignisse sind für detailliertes Testen gedacht. Sie ermöglichen es dem Strategy Tester, automatisch zu pausieren, wenn ein wichtiges Trading-Ereignis eintritt. Das ist nützlich, wenn Sie den genauen Moment einer Trade-Eröffnung, Schließung, Änderung oder des Abschlusses einer neuen Kerze prüfen möchten.
| Auto-Pause-Button | Wann der Test pausiert |
| AP Open | Wenn eine neue Position oder Order eröffnet wird. |
| AP Close | Wenn eine Position oder Order geschlossen wird. |
| AP Modify | Wenn eine Position, Order, Stop Loss oder Take Profit geändert wird. |
| AP Bar | Wenn eine neue Kerze abgeschlossen ist. |
Diese Steuerungen sind keine Trading-Signale. Es sind Testwerkzeuge. Ihr Zweck ist es, den visuellen Test an sinnvollen Momenten zu stoppen, damit der Trader analysieren kann, was passiert ist und warum.
Positionsinformationen während des Tests
Während des visuellen Tests kann das Panel Positionsinformationen direkt im Chart und im unteren Terminalblock anzeigen. So lassen sich offene Trades, Teilschließungsaktionen, SL/TP-Level, laufendes Ergebnis, Punkte, prozentuales Ergebnis und Menüaktionen überwachen, ohne den Testworkflow zu unterbrechen.
- Prüfen Sie offene Positionen direkt im Tester-Arbeitsbereich.
- Nutzen Sie das Positionsmenü, um verfügbare Verwaltungsaktionen zu prüfen.
- Prüfen Sie Teilschließungswerkzeuge und Chart-Level visuell.
- Überwachen Sie AVG-Level und ATM-Timeline-Verhalten während des Tests.
- Prüfen Sie laufendes Ergebnis und Risikoinformationen, bevor Sie den Test fortsetzen.
Dadurch wird der Strategy-Tester-Abschnitt nicht nur zu einer Testumgebung, sondern auch zu einer Lernumgebung für den vollständigen Panel-Workflow.
Empfohlener Strategy-Tester-Workflow
| Schritt | Aktion | Ziel |
| 1 | Beginnen Sie mit dem POS-Tab und einfachen manuellen Trades. | Lernen Sie das grundlegende Verhalten beim Öffnen, Schließen und Ändern von Trades. |
| 2 | Testen Sie SL/TP, Trailing und Breakeven-Logik. | Verstehen Sie, wie Schutzwerkzeuge während der Preisbewegung arbeiten. |
| 3 | Testen Sie Teilschließung und Chart-Level. | Prüfen Sie, wie Positionsskalierung und Ausstiegslevel reagieren. |
| 4 | Aktivieren Sie AVG-Level und beobachten Sie zukünftige Einstiegszonen. | Prüfen Sie Averaging- oder Trend-Add-Logik vor dem realen Einsatz. |
| 5 | Testen Sie ATM-Regeln einzeln. | Bestätigen Sie die Regel-Logik, bevor Sie komplexere Automatisierung aktivieren. |
| Testwarnung: Ein Ergebnis im Strategy Tester garantiert nicht dasselbe Ergebnis auf einem Live-Konto. Reales Trading kann Spread-Änderungen, Slippage, Requotes, Broker-Ausführungslimits und Marktbedingungen enthalten, die sich vom historischen Test unterscheiden. |
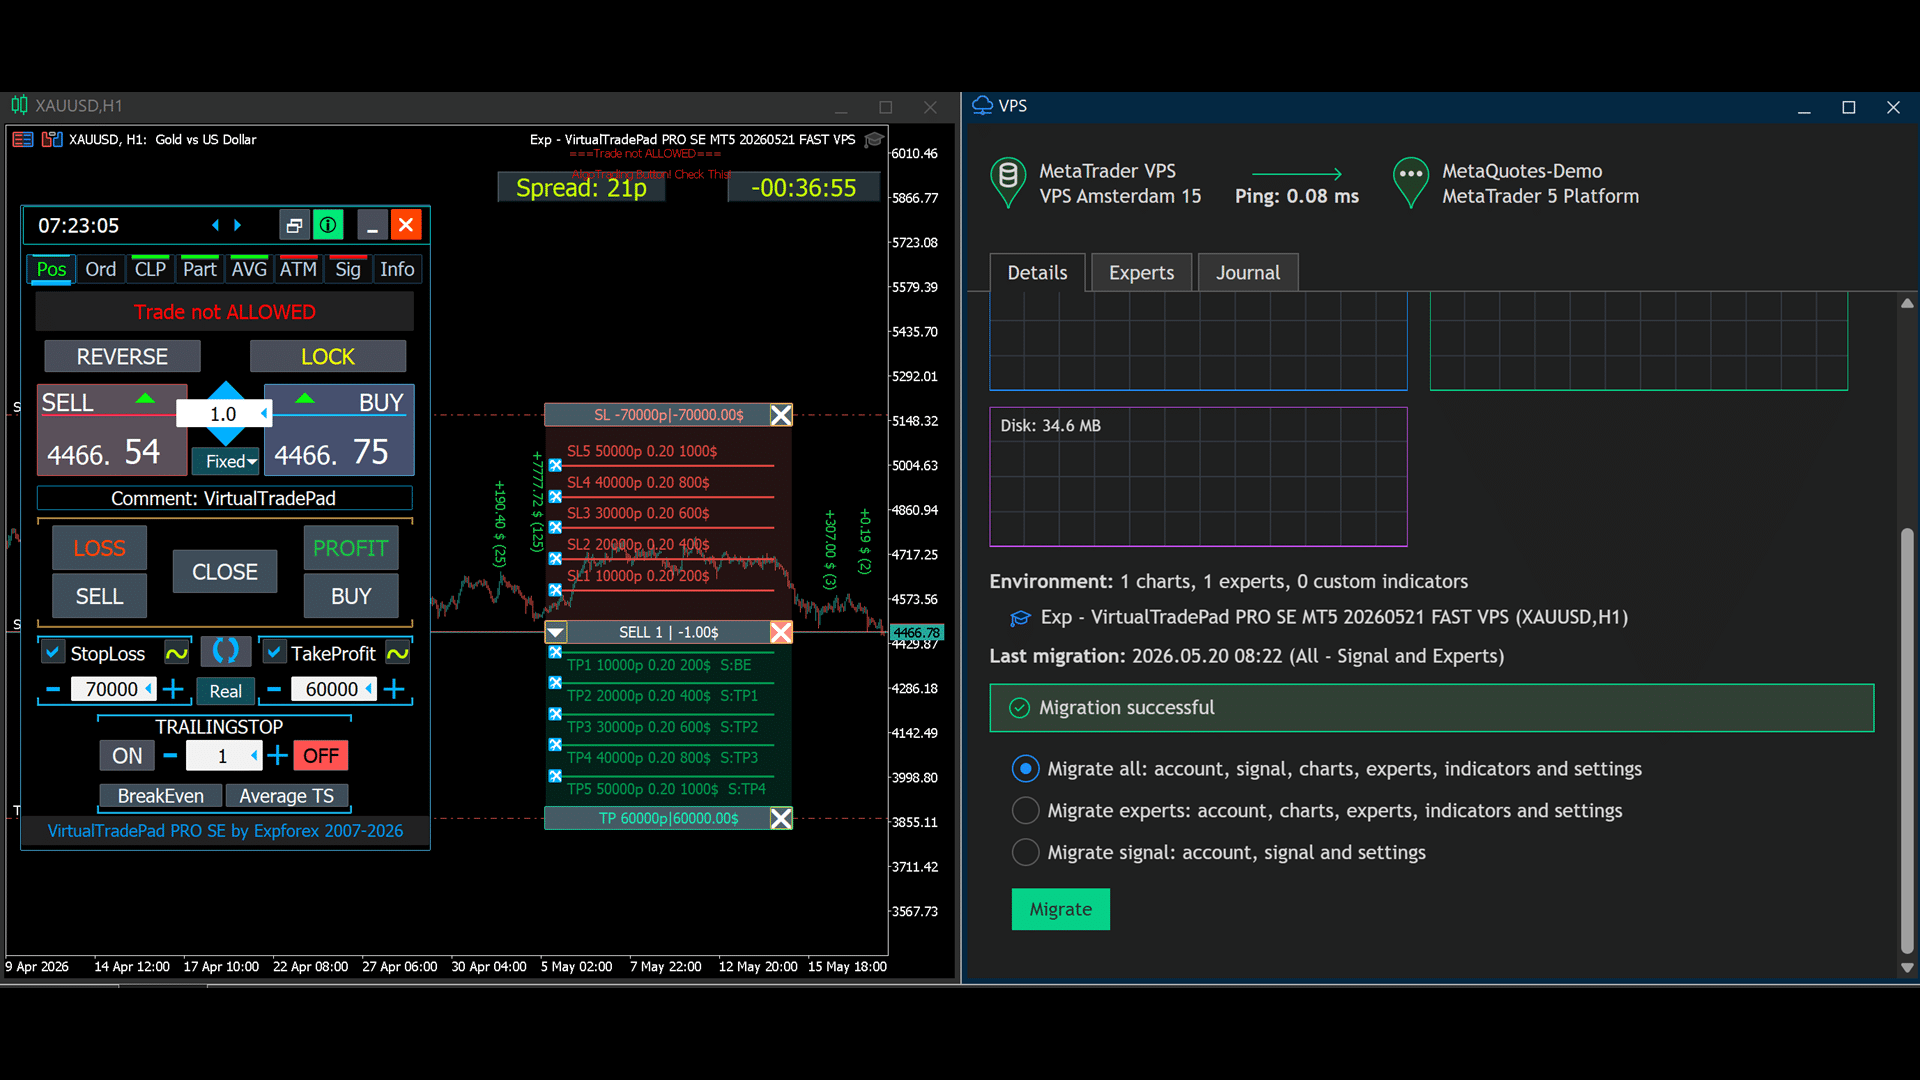
MQL5-VPS-Umgebung — stabiler Panel-Workflow
VirtualTradePad PRO SE wurde mit Blick auf die Nutzung von MQL5 VPS entwickelt. Wenn das Panel vor der Migration korrekt vorbereitet wird, können sein Zustand und wichtige Parameter in der VPS-Umgebung wiederhergestellt werden, damit der Arbeitsbereich nach der Migration stabil bleibt.
Das ist besonders wichtig für Trader, die MetaTrader-Hosting für den kontinuierlichen Betrieb verwenden. Das Panel sollte vor der Migration konfiguriert und getestet werden, und die VPS-Kopie sollte nach der Migration geprüft werden, um sicherzustellen, dass die erforderlichen Einstellungen und der Chartzustand korrekt übertragen wurden.
Empfohlener VPS-Workflow
- Konfigurieren Sie das Panel zuerst im lokalen Terminal.
- Testen Sie die gewählten Einstellungen vor der Migration auf einem Demo-Chart.
- Behalten Sie nur die Charts und Expert Advisors, die für den VPS-Betrieb benötigt werden.
- Speichern oder bestätigen Sie den Panel-Zustand vor der Migration.
- Migrieren Sie die Terminalumgebung zu MQL5 VPS.
- Öffnen Sie nach der Migration die VPS-Logs und prüfen Sie, ob das Panel wie erwartet funktioniert.
- Ändern Sie wichtige Einstellungen nach der Migration nicht blind ohne Test.
Die VPS-Umgebung ist nützlich für Stabilität, ersetzt aber keine korrekte Einrichtung. Prüfen Sie immer, ob Terminal, Chart, Symbol, Kontotyp und Panel-Einstellungen korrekt sind, bevor Sie sich auf eine Remote-Umgebung verlassen.
| Support-Hinweis: Wenn Sie Hilfe zum Verhalten im Strategy Tester oder auf MQL5 VPS benötigen, fügen Sie bitte Screenshots, das Expert-Log, das Journal-Log, Ihre Einstellungsdatei und eine kurze Erklärung der genauen Aktion bei, die nicht wie erwartet funktioniert. |
Installation und erster Start
Dieser Abschnitt erklärt den empfohlenen Workflow für den ersten Start von VirtualTradePad PRO SE. Ziel ist es, die richtige Version zu installieren, sie an den Chart anzuhängen, MetaTrader-Berechtigungen zu prüfen, grundlegende Trading-Aktionen zu testen und erst danach zu erweiterten Modulen zu wechseln.
VirtualTradePad PRO SE ist ein leistungsstarker Trading-Arbeitsbereich. Beginnen Sie nicht damit, jedes Modul zu aktivieren. Starten Sie mit einem sauberen Chart, einem Demokonto und grundlegenden manuellen Aktionen. Danach fahren Sie mit Schutzwerkzeugen, Pending Orders, Basket-Management und erweiterten Modulen fort.
| Empfohlener erster Start: Installieren Sie die richtige MT4- oder MT5-Version, hängen Sie sie an einen Demo-Chart an, prüfen Sie Berechtigungen, testen Sie BUY / SELL / Close, danach SL / TP, Trailing und Breakeven und fahren Sie erst anschließend mit CLP, PART, AVG, ATM und SIG fort. |
Bevor Sie beginnen
Prüfen Sie vor der Nutzung des Panels die grundlegenden Anforderungen. Die meisten Probleme beim ersten Start hängen mit deaktiviertem Algo Trading, fehlenden Berechtigungen, falscher Produktversion, geschlossenem Markt, Symbolbeschränkungen oder Brokerlimits zusammen.
| Anforderung | Was geprüft werden sollte |
| Richtige Plattform | Verwenden Sie das MT4-Produkt in MetaTrader 4 und das MT5-Produkt in MetaTrader 5. |
| Algo Trading / AutoTrading | Stellen Sie sicher, dass automatisiertes Trading im Terminal und in den Eigenschaften des Expert Advisors erlaubt ist. |
| Zuerst Demokonto | Verwenden Sie ein Demokonto, um Buttons, Einstellungen, SL/TP, Teilschließung und erweiterte Module zu testen. |
| Marktstatus | Prüfen Sie, ob der Markt geöffnet ist und ob Trading für das ausgewählte Symbol erlaubt ist. |
| Brokerlimits | Prüfen Sie Mindestlot, Lot-Schritt, Stop Level, Freeze Level und Ausführungsregeln des Symbols. |
Installationsschritte
- Öffnen Sie MetaTrader 4 oder MetaTrader 5.
- Melden Sie sich im richtigen Trading-Konto an.
- Öffnen Sie den Chart des Symbols, auf dem Sie das Panel verwenden möchten.
- Installieren oder starten Sie VirtualTradePad PRO SE aus dem Bereich Market / Navigator.
- Hängen Sie den Expert Advisor an den Chart an.
- Öffnen Sie den Inputs-Tab und prüfen Sie die Grundeinstellungen.
- Erlauben Sie Algo Trading / AutoTrading, wenn das Panel Handelsoperationen ausführen soll.
- Klicken Sie auf OK und warten Sie, bis das Panel im Chart erscheint.
Wenn das Panel nicht erscheint, prüfen Sie die Tabs Experts und Journal in MetaTrader. Die Logs zeigen normalerweise, ob ein Berechtigungsproblem, Ladeproblem, Market-Autorisierungsproblem oder eine Terminalbeschränkung vorliegt.
Erster Test auf einem Demokonto
Nachdem das Panel im Chart erscheint, beginnen Sie mit dem einfachsten Workflow. Testen Sie erweiterte Module nicht sofort. Bestätigen Sie zuerst, dass das Panel eine einfache Testposition korrekt öffnen, schließen und ändern kann.
| Schritt | Aktion | Ziel |
| 1 | Stellen Sie einen sehr kleinen festen Lot ein. | Vermeiden Sie unnötiges Risiko während des Tests. |
| 2 | Öffnen Sie eine BUY- oder SELL-Position. | Bestätigen Sie, dass die Trade-Ausführung funktioniert. |
| 3 | Ändern Sie SL und TP. | Prüfen Sie Brokerlimits und das Änderungsverhalten des Panels. |
| 4 | Schließen Sie die Position über das Panel. | Bestätigen Sie, dass die Schließlogik korrekt funktioniert. |
| 5 | Prüfen Sie Experts- und Journal-Logs. | Stellen Sie sicher, dass keine versteckten Fehler vorhanden sind. |
Nach diesem Basistest fahren Sie mit Reverse, Lock, Trailing Stop, Breakeven und Pending Orders fort. Erweiterte Module sollten erst getestet werden, wenn der Kernworkflow stabil ist.
Empfohlene erste Einstellungen
Verwenden Sie beim ersten Start eine konservative Konfiguration. Ziel ist nicht, sofort die fortschrittlichste Einstellung zu erstellen, sondern zu prüfen, dass jede wichtige Aktion korrekt funktioniert.
- Verwenden Sie zuerst festen Lot statt automatischer Lot-Berechnung.
- Verwenden Sie eine kleine vom Broker erlaubte Lotgröße.
- Verwenden Sie zuerst reale SL/TP, wenn Sie mit virtuellem Schutz noch nicht vertraut sind.
- Deaktivieren Sie erweiterte Module, bis Sie den Kernworkflow von POS und ORD getestet haben.
- Lassen Sie CLP, PART, AVG, ATM und SIG während des ersten Basistests deaktiviert.
- Speichern Sie nach der ersten stabilen Konfiguration ein sauberes Preset.
Das gibt Ihnen eine saubere Basislinie. Nachdem diese stabil ist, können Sie zusätzliche Presets für Strategy Tester, Teilschließung, AVG, ATM oder VPS-Workflows erstellen.
Wann erweiterte Module getestet werden sollten
Erweiterte Module sollten erst getestet werden, nachdem der grundlegende Trading-Workflow bestätigt wurde. Jedes Modul hat seine eigene Logik und kann Positionen unterschiedlich beeinflussen.
| Modul | Testen nach… | Ziel des ersten Tests |
| CLP | Der grundlegende Öffnen-/Schließen-Workflow ist stabil. | Prüfen Sie das Schließen nach Gewinn/Verlust an einem kleinen Basket. |
| PART | Sie verstehen Mindestlot- und Lot-Schritt-Regeln. | Prüfen Sie die Teilschließung einer Position mit kleinem Volumen. |
| AVG | Sie verstehen Lot, Exposure und Drawdown-Risiko. | Zeigen Sie zuerst Levels an und testen Sie automatische Einstiege danach vorsichtig. |
| ATM | Sie können Aktion und Bedingung der Regel klar erklären. | Führen Sie eine einfache Regel aus und bestätigen Sie ihr Verhalten im Strategy Tester. |
| SIG | Sie verstehen Signal-Matrix und Alert-Logik. | Verwenden Sie zuerst Alerts, bevor Sie handelsbezogene Berechtigungen aktivieren. |
Häufige Probleme beim ersten Start
| Problem | Was geprüft werden sollte |
| Panel erscheint nicht | Prüfen Sie Experts-Tab, Journal-Tab, Market-Autorisierung, Terminalberechtigungen und Produktinstallation. |
| Trading-Button reagiert nicht | Prüfen Sie AutoTrading / Algo Trading, EA-Berechtigungen, Marktstatus und Handelsberechtigungen des Symbols. |
| Fehler „Ungültiges Volumen“ | Prüfen Sie Mindestlot, Maximallot und Lot-Schritt für das ausgewählte Brokersymbol. |
| SL/TP kann nicht gesetzt werden | Prüfen Sie Stop Level, Freeze Level, Marktstatus und ob die gewählte Distanz vom Broker erlaubt ist. |
| VPS-Zustand ist anders | Prüfen Sie Migrationslogs, Chart-Einrichtung, Inputs, globale Variablen und ob der richtige Chart migriert wurde. |
| Risikowarnung: Beginnen Sie den Test eines professionellen Trading-Panels niemals mit großen Lotgrößen oder echtem Kapital. Der erste Start sollte immer konservativ, kontrolliert und leicht überprüfbar sein. |
Praktische Workflows und Anwendungsfälle
VirtualTradePad PRO SE ist leichter zu verstehen, wenn man es als Sammlung praktischer Trading-Workflows betrachtet. Jedes Modul hat seine eigene Rolle, aber der eigentliche Wert entsteht, wenn die Module in einer klaren und kontrollierten Reihenfolge zusammen verwendet werden.
Dieser Abschnitt zeigt typische Einsatzmöglichkeiten des Panels: manuelles Trading, Positionsschutz, Planung von Pending Orders, Teilausstiege, Basket-Management, Averaging, ATM-Regeln, Signal-Monitoring und Analysen im Strategy Tester.
| Wichtig: Diese Workflows sind Beispiele dafür, wie das Panel verwendet werden kann. Sie sind keine Trading-Signale und garantieren keinen Gewinn. Passen Sie Einstellungen immer an Ihre eigene Strategie, Brokerbedingungen und Kontorisikolimits an. |
Workflow 1 — schnelles manuelles Trading aus dem Chart
Dies ist der grundlegende Workflow für Trader, die Trades schneller und übersichtlicher direkt aus dem Chart öffnen und verwalten möchten.
| Schritt | Aktion | Modul |
| 1 | Wählen Sie das Symbol und prüfen Sie die Marktbedingungen. | INFO |
| 2 | Stellen Sie Lotgröße, Kommentar, SL und TP ein. | POS |
| 3 | Öffnen Sie BUY oder SELL über das Panel. | POS |
| 4 | Überwachen Sie laufendes Ergebnis, Punkte, Prozent und Exposure. | Live Details / INFO |
| 5 | Schließen, drehen, locken oder schützen Sie die Position bei Bedarf. | POS |
Dieser Workflow ist der beste Einstiegspunkt für neue Nutzer. Er hilft, das Panel zu erlernen, ohne komplexe Automatisierung oder Basket-Logik zu aktivieren.
Workflow 2 — Planung von Pending Orders und Magic Target
Der ORD-Tab ist nützlich, wenn Sie Einstiege im Voraus vorbereiten möchten, statt sofort eine Marktposition zu eröffnen. Sie können Pending Orders, Order-Grid-Logik und den Magic-Target-Workflow nutzen, um Einstiege visuell zu planen.
- Öffnen Sie den ORD-Tab.
- Wählen Sie den Pending-Order-Typ und die Orderparameter.
- Verwenden Sie chartbasierte Platzierung oder Magic Target, wenn es sinnvoll ist.
- Prüfen Sie geplanten Preis, SL, TP und Distanz.
- Platzieren Sie die Order erst, nachdem Sie den Chartkontext bestätigt haben.
Dieser Workflow ist nützlich für Breakout-, Pullback-, Grid-Planung und levelbasiertes Trading. Prüfen Sie immer Brokerbeschränkungen, bevor Sie Pending Orders nahe am aktuellen Marktpreis platzieren.
Workflow 3 — Scaling-out mit Teilschließungslevels
Das PART-Modul ist für Trader gedacht, die nicht die gesamte Position auf einmal schließen möchten. Es hilft, einen strukturierten Ausstiegsplan zu erstellen, bei dem Teile der Position auf verschiedenen Levels geschlossen werden können.
| Praktischer Schritt | Was geprüft werden sollte |
| Levels erstellen | Definieren Sie TP/SL-Teil-Level sowie Lot-Prozent oder Lot-Wert. |
| Levels im Chart anzeigen | Prüfen Sie, ob die geplanten Ausstiegslevels korrekt liegen. |
| Broker-Lotregeln prüfen | Mindestlot und Lot-Schritt müssen das Teilschließungsvolumen erlauben. |
| Zuerst eine Position testen | Beginnen Sie nicht mit mehreren Positionen, bevor das Verhalten mit einer Position bestätigt ist. |
Teilschließung ist besonders nützlich für Scaling-out, das Sichern eines Teils des Gewinns, die schrittweise Reduzierung der Exposure und das aktive Halten eines kleineren Positionsrests.
Workflow 4 — Basket-Gewinn- und Verlustmanagement
Das CLP-Modul wird verwendet, wenn Sie einen Basket aus Positionen verwalten und diese nach Gesamtgewinn, Gesamtverlust oder Profit-Trailing-Bedingungen schließen möchten. Das ist nützlich, wenn mehrere Positionen zu einer Trading-Idee gehören.
- Verwenden Sie Close Profit um einen Basket zu schließen, nachdem ein Zielgewinn erreicht wurde.
- Verwenden Sie Close Loss um den Basket-Verlust nach einem vordefinierten Wert zu begrenzen.
- Verwenden Sie Profit Trailing um angesammelten Basket-Gewinn zu schützen, nachdem er ein konfiguriertes Level erreicht hat.
- Verwenden Sie Selected Symbols wenn nicht alle Symbole einbezogen werden sollen.
- Verwenden Sie Separate BUY/SELL wenn Long- und Short-Exposure unabhängig verwaltet werden sollen.
CLP kann mehrere Positionen schließen und muss deshalb sorgfältig getestet werden. Bestätigen Sie immer den Umfang: alle Positionen, aktuelles Symbol, ausgewählte Symbole oder getrennte BUY/SELL-Baskets.
Workflow 5 — Averaging- oder Trend-Add-Levels
Das AVG-Modul ist für Trader gedacht, die zusätzliche Einstiege verwenden. Es kann zukünftige Averaging- oder Trend-Add-Levels im Chart anzeigen und den Basket-Schutz vom Durchschnittspreis aus verwalten.
| Workflow mit hohem Risiko: AVG kann die Exposure schnell erhöhen. Beginnen Sie nur mit der Chart-Level-Vorschau und testen Sie automatisches Verhalten anschließend mit kleinen Lots auf Demo oder im Strategy Tester. |
- Wählen Sie Against- oder Trend-Modus.
- Konfigurieren Sie Level-Distanzen.
- Stellen Sie konservative Lot-Multiplikatoren und AddLot-Werte ein.
- Aktivieren Sie Chart-Level und prüfen Sie zukünftige Einstiegspreise.
- Prüfen Sie den Schutz durch Avg SL, Avg TP und Avg TS.
- Testen Sie die Sequenz im Strategy Tester, bevor Sie sie live verwenden.
Der Hauptvorteil der AVG-Level ist Transparenz. Der Trader sieht geplante zukünftige Einstiege, bevor sie entstehen, und kann entscheiden, ob die Logik für das aktuelle Konto und die Marktbedingungen akzeptabel ist.
Workflow 6 — regelbasiertes Management mit ATM
ATM ist nützlich, wenn Sie eine strukturierte Regel vorbereiten möchten, statt auf jede Situation manuell zu reagieren. Eine Regel kombiniert normalerweise eine Aktion, eine Bedingung und Konfigurationsdetails.
| ATM-Schritt | Zweck |
| Aktion | Was die Regel tun soll. |
| Bedingung | Wann die Aktion ausgelöst werden darf. |
| Details | Symbol, Richtung, Volumen, Preis, Timing oder andere erforderliche Werte. |
| Überprüfung | Letzte Prüfung vor dem Start der Regel. |
ATM sollte jeweils mit einer Regel getestet werden. Wenn mehrere Regeln gleichzeitig aktiviert sind, wird es schwieriger zu verstehen, welche Regel eine bestimmte Aktion ausgelöst hat.
Workflow 7 — Signal-Monitoring und Alerts
Der SIG-Tab wird am besten zuerst als Monitoring- und Alert-Werkzeug verwendet. Er kann Signalzustände in einer Matrix anzeigen und den Trader benachrichtigen, wenn konfigurierte Bedingungen auftreten.
- Beginnen Sie mit visuellem Signal-Monitoring.
- Aktivieren Sie Terminal-Alerts, wenn Sie benachrichtigt werden möchten.
- Testen Sie Push-Benachrichtigungen erst, nachdem die MetaTrader-Mobile-Einstellungen konfiguriert sind.
- Verbinden Sie Signale nicht mit handelsbezogenem Verhalten, bevor die Logik getestet ist.
- Bestätigen Sie jedes Signal visuell im Chart, bevor Sie es für eine Handelsentscheidung verwenden.
Signale sind Werkzeuge zur Entscheidungsunterstützung. Sie sollten Analyse, Risikokontrolle oder Demotests nicht ersetzen.
Workflow 8 — Analyse im Strategy Tester
Der Strategy Tester ist der sicherste Ort, um komplexes Panel-Verhalten zu untersuchen. Nutzen Sie ihn, um manuelle Aktionen, Teilausstiege, AVG-Level, ATM-Regeln, Signalverhalten und Auto-Pause-Werkzeuge zu testen.
| Auto-Pause-Werkzeug | Verwenden Sie es, wenn Sie den Test stoppen möchten… |
| AP Open | nachdem eine Position oder Order eröffnet wurde. |
| AP Close | nachdem eine Position oder Order geschlossen wurde. |
| AP Modify | nach SL-, TP-, Order- oder Positionsänderung. |
| AP Bar | nachdem eine neue Kerze abgeschlossen wurde. |
Nutzen Sie die Geschwindigkeitssteuerung des Testers, um wichtige Bereiche zu verlangsamen und routinemäßige Marktbewegungen zu beschleunigen. Ein guter Test dreht sich nicht nur um das Endergebnis, sondern auch darum zu verstehen, warum jede Aktion passiert ist.
| Abschließende Workflow-Warnung: Praktische Workflows sind Beispiele und keine Trading-Empfehlung. Testen Sie immer Ihre eigene Konfiguration, verstehen Sie jedes aktive Modul und verwenden Sie konservatives Risiko, bevor Sie live handeln. |
VirtualTradePad PRO SE Einstellungen — vollständige Referenz
Die Registerkarte Settings erklärt die externen Eingabeparameter von VirtualTradePad PRO SE. Die meisten Grundeinstellungen folgen der klassischen VirtualTradePad-Logik, während der PRO-SE-Workflow eine erweiterte Struktur für Live-Informationen, Strategy-Tester-Nutzung, Chartobjekte, Teil-Schließungen, AVG, ATM, Signale und VPS-bezogenes Verhalten ergänzt.
Sie müssen nicht jeden Parameter vor dem Start ändern. Der beste Ansatz ist: zunächst die Standardeinstellungen verwenden, das Panel auf einem Demokonto testen und danach nur die Gruppen anpassen, die für Ihren Trading-Workflow relevant sind.
| Empfohlene Einrichtungslogik: Beginnen Sie mit Panel-Anzeige, Symbolauswahl, Lotgröße, Stop Loss, Take Profit und den grundlegenden Handelsbuttons. Danach testen Sie Tastaturhandel, CLP, Teil-Schließung, AVG, ATM, Signale, Strategy Tester und VPS-bezogenes Verhalten Schritt für Schritt. |
So verwenden Sie diese Einstellungsreferenz
- Fügen Sie VirtualTradePad PRO SE an einen Chart an.
- Öffnen Sie die Eigenschaften des Expert Advisors mit F7 oder über das Kontextmenü des Charts.
- Wechseln Sie zur Registerkarte Inputs.
- Ändern Sie nur die Einstellungen, die Sie verstehen und wirklich benötigen.
- Speichern Sie eine Preset-Datei, nachdem Sie eine stabile Konfiguration erstellt haben.
- Nutzen Sie den Strategy Tester oder ein Demokonto, bevor Sie neue Einstellungen auf einem echten Konto anwenden.
| Wichtig: Die Einstellungen beeinflussen direkt, wie das Panel Trades öffnet, schließt, ändert und verwaltet. Falsche Parameter können zu unerwartetem Verhalten führen. Testen Sie neue Konfigurationen immer zuerst auf einem Demokonto. |
Information options
Anzeige, Sprache, Sounds, Chart-Beschriftungen und Informationsblöcke. Beginnen Sie hier, wenn Sie anpassen möchten, wie das Panel aussieht und welche Informationen es auf dem Chart anzeigt.
| Parameter | Beschreibung und empfohlene Verwendung |
| GeneralSize | Größe des Panels GeneralSize Standard = 12. Vergrößert die Paneldarstellung. Die Schrift-Skalierung in WINDOWS wird dabei berücksichtigt. Minimum GeneralSize=9! |
| SymbolToTradeCustom | Variable Symbolangabe für den Panelbetrieb: SymbolToTradeCustom Damit kann auch auf Offline-Charts gehandelt werden (Ticks, Renko usw.). Achtung: Schreiben Sie den NAMEN sehr sorgfältig. Der Name muss exakt mit dem Namen in der Marktübersicht übereinstimmen! EurUSD – falsch EURUSD – richtig! Wenn dieser Parameter nicht gesetzt ist, arbeitet der Expert Advisor auf dem Symbol, auf dem er installiert wurde (Current Symbol)! |
| Sounds Push | Aktiviert/deaktiviert Soundmeldungen beim Öffnen/Schließen/Ändern von Positionen und Orders Sie können Benachrichtigungen über Öffnen/Schließen/Fehler auf dem Telefon oder Soundbenachrichtigungen im Abschnitt Notifications ein- oder ausschalten. Sie können außerdem den Dateinamen für Sounds im WAV-Format ändern, ohne die Dateiendung anzugeben (nur der Name). Notice_Open_Push = false; Notice_Open_Sound = true; Notice_Close_Push = false; Notice_Close_Sound = true; Notice_Modify_Push = false; Notice_Modify_Sound = true; Notice_Error_Push = false; Notice_Error_Sound = true; Notice_Open_NameSoundFromEa = “ok”; Notice_Close_NameSoundFromEa = “alert2”; Notice_Modify_NameSoundFromEa = “stops”; Notice_Error_NameSoundFromEa = “timeout”; So richten Sie das Terminal für den E-Mail-Versand ein |
| HintShow | Schaltet Tooltips beim Bewegen des Mauszeigers über Buttons ein oder aus |
| Language | Hinweise zur Sprachauswahl Language: Spanisch, Portugiesisch (Brasilien), Deutsch, Chinesisch, Japanisch; Standardmäßig wird die Sprache der Hinweise automatisch anhand der Sprache Ihres Terminals bestimmt. Sie können die Sprache auch manuell auswählen; Die Übersetzung wurde mit GOOGLE Translator + MQL + Terminal-Seite erstellt! Einige Wörter wurden gekürzt, um Platz zu sparen (maximale Zeilenlänge in Tooltips = 255 Zeichen). Wenn Sie einen Übersetzungsfehler finden, schreiben Sie uns bitte: Kontaktieren Sie uns |
| PrintToLog | Option zum Steuern der Nachrichtenausgabe (Print) in die MetaTrader-Logdatei. Schalten Sie diese Option nicht aus, wenn Sie nicht genau wissen, warum. Wenn Sie das Volumen der Terminal-Logs reduzieren möchten, können Sie diese Option deaktivieren (false). Alle Meldungen werden protokolliert, um die Aktionen des Expert Advisors nachzuverfolgen und Fehler zu debuggen. Wenn Sie diese Funktion deaktivieren, können wir einen Fehler in den Programmaktionen nicht finden und Ihnen nicht helfen. Bitte schalten Sie diese Funktion nicht aus. input bool PrintToLog = true; //PrintToLog –> Print to Logs (Don’t turn it false!) |
| ButtonLanguage | Mit dem Parameter ButtonLanguage wählen Sie die Sprache der Buttontexte und die Hauptsprache des Panels (Informationen auf den Tabs) aus! Verfügbare Sprachen: English, Português, Español, Deutsch, Français, Italiano, Türkçe! Achtung: Dieser Parameter beeinflusst nur die Texte der Buttons und Tabs. Die Sprache der Tooltips wird im Parameter Language ausgewählt! |
| Show_Future_Line | Schaltet die Anzeige der virtuellen Linien der zukünftigen Position ein oder aus. Funktioniert nur auf der Position-Registerkarte. Wenn diese Option auf dem Terminalchart aktiviert ist, zeichnet der Expert Advisor die Linien für Eröffnungspreis, Stop Loss und Take Profit. Er zeigt Informationen zu Lot, Stop Loss und Take Profit in der Kontowährung sowie die Preisniveaus für Stop Loss und Take Profit an. 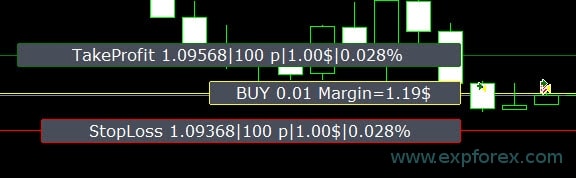 Optionen für die Informationsanzeige: – false – keine Informationen anzeigen; – true — always – immer auf dem Chart anzeigen; – true — cursor is on the panel – nur anzeigen, wenn sich der Cursor auf dem Panel befindet; – true — cursor is outside the panel – nur anzeigen, wenn sich der Cursor außerhalb des Panels befindet. – true — cursor is only on BUY / SELL – nur anzeigen, wenn sich der Cursor auf den BUY- oder SELL-Buttons befindet |
| Show_Future_Line_Orders | Schaltet die Anzeige der virtuellen Linien zukünftiger Orders ein oder aus. Funktioniert nur auf der Orders-Registerkarte. Wenn diese Option auf dem Terminalchart aktiviert ist, zeichnet der Expert Advisor die Linien für Eröffnungspreis, Stop Loss und Take Profit. Er zeigt Informationen zu Lot, Stop Loss und Take Profit in der Kontowährung sowie die Preisniveaus von Stop Loss und Take Profit an. 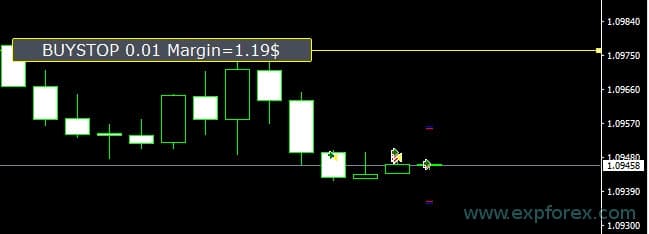 Optionen für die Informationsanzeige: – false – keine Informationen anzeigen; – true — always – immer auf dem Chart anzeigen; – true — cursor is on the panel – nur anzeigen, wenn sich der Cursor auf dem Panel befindet; – true — cursor is outside the panel – nur anzeigen, wenn sich der Cursor außerhalb des Panels befindet. – true — cursor is only on BUY / SELL – nur anzeigen, wenn sich der Cursor auf den BUY- oder SELL-Buttons befindet |
| Show_AveragePrice | Schaltet die virtuellen Durchschnittspreislinien aller BUY- und SELL-Positionen ein/aus und zeigt sie an. Zeigt den Durchschnittspreis (Break-even-Punkt) der BUY- und SELL-Positionen. Optionen für die Informationsanzeige: – false – keine Informationen anzeigen; – true — always – immer auf dem Chart anzeigen; – true — cursor is on the panel – nur anzeigen, wenn sich der Cursor auf dem Panel befindet; – true — cursor is outside the panel – nur anzeigen, wenn sich der Cursor außerhalb des Panels befindet. – true — cursor is only on BUY / SELL – nur anzeigen, wenn sich der Cursor auf den BUY- oder SELL-Buttons befindet 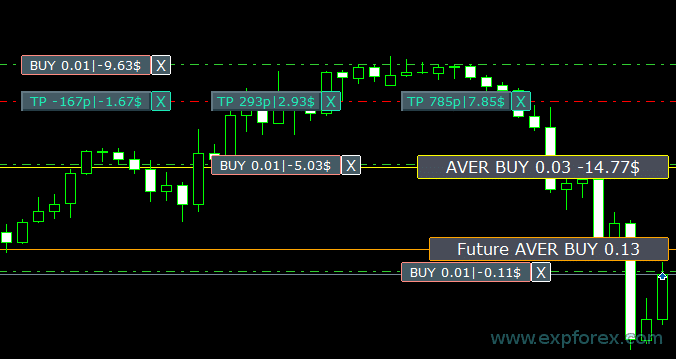 Future BUY / SELL – zeigt die zukünftige Mittellinie (Break-even-Punkt) und das Lot, wenn der Nutzer jetzt eine BUY- oder SELL-Position aus dem Panel mit diesem Lot öffnen würde; Damit können Sie die Break-even-Linie über/unter der aktuellen Mittellinie setzen. |
| ShowInfoPosition | Informationen zu offenen Positionen und deren Stop Loss / Take Profit / Teil-Schließung auf dem Chart anzeigen bzw. damit arbeiten. Die Informationen werden als Textlabels angezeigt. Optionen für die Informationsanzeige: – false – keine Informationen anzeigen; – true — always – immer auf dem Chart anzeigen; – true — cursor is on the panel – nur anzeigen, wenn sich der Cursor auf dem Panel befindet; – true — cursor is outside the panel – nur anzeigen, wenn sich der Cursor außerhalb des Panels befindet. – true — cursor is only on BUY / SELL – nur anzeigen, wenn sich der Cursor auf den BUY- oder SELL-Buttons befindet 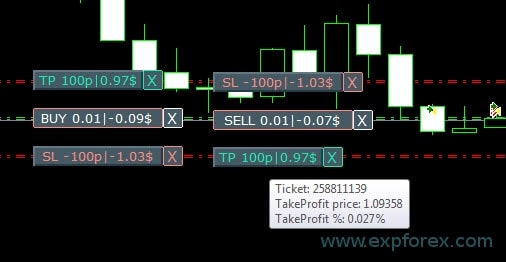 Stop Loss und Take Profit verschieben (das Verschieben der Stop-Loss- und Take-Profit-Linien ist eine Standardfunktion des MetaTrader-Terminals) Stop Loss / Take Profit löschen: Wenn Sie auf “X” neben SL oder TP auf dem Chart klicken, können Sie dieses Level löschen; Position teilweise oder vollständig schließen: Wenn Sie auf “X” neben der Position auf dem Chart klicken, wird ein Fenster zur Auswahl einer teilweisen oder vollständigen Positionsschließung erstellt: in Prozent: 10%, 25%, 50%, 100%; in Lots: Lot step, Lot step * 2, Lot step * 5, Lot step * 10; 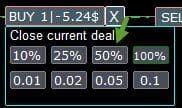 |
| Shift_from_Right | Parameter zum Verschieben von Textlabels Shift_from_Right. Der Parameter wird in Bars angegeben! Standardmäßig ist im VirtualTradePad-Panel der Wert Shift_from_Right = 5 Bars von der rechten Preislinie eingestellt (die Chartverschiebung im Terminal wird ebenfalls berücksichtigt). – Diese Verschiebung wird auf alle Textlabels im Chart angewendet! |
| ShowInfoClosedPositionSize | Fügt Informationen über den Gewinn aus geschlossenen Positionen zum Chart hinzu. Die Information wird für jede Bar des aktuellen Timeframes angezeigt. Sie können den Timeframe ändern, um das Trading-Ergebnis auf einer bestimmten Bar des aktuellen Timeframes zu sehen. Wenn mehrere Positionen/Deals auf einer Bar des aktuellen Timeframes geschlossen werden, wird das Trading-Ergebnis summiert und die Gesamtinformation für diese Bar angezeigt. Die Information wird aktualisiert, wenn die nächste Position geschlossen wird. Einstellungen: ShowInfoClosedPositionSize = Größe der Textlabels; wenn 0, werden Textlabels standardmäßig nicht angezeigt; PLUS_Color = Farbe des positiven Werts; MINUS_Color = Farbe des negativen Werts;  |
| Show_Prices_on_Tab_Position | Zeigt Informationen über Preisänderungen und die Richtung der Änderung auf den BUY- und SELL-Buttons der Positions-Registerkarte an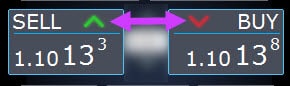 |
| Type_Profit_On_Position_Tab | Der Expert Advisor kann Gewinninformationen auf der Positions-Registerkarte anzeigen. – in Punkten Ihres Brokers. – in der Kontowährung. -“Do not show” – deaktiviert die Gewinnanzeige auf der Positionsseite
|
| Show_Spread | Parameter zur Anzeige des Spreads auf dem Chart. Show_Spread. Show_Spread – zeigt den Spread in Punkten Ihres Brokers auf dem Chart an! Sie können die Position dieser Markierung ändern, indem Sie auf den Spread-Button im Chart klicken. Der Button hat 4 Positionen auf dem Chart.  |
| Show_BuySell_LimitStop MetaTrader 5 | Show_BuySell_LimitStop – in MetaTrader 5. Zusätzliche Buttons zum Öffnen von Buy/Sell Stop Limit Orders. Sie können die Anzeige der Buy/Sell Stop Limit Öffnungsbuttons aktivieren. Standardmäßig ist diese Option deaktiviert!  |
| TypeofOrdersMagicTarget | TypeofOrdersMagicTarget – Auswahl des Ordertyps bei Verwendung von MagicTarget, wenn Stop Loss und Take Profit nicht genutzt werden. BuyStop SellStop – Bei Magic Target ohne Stops werden BuyStop / SellStop gesetzt (standardmäßig wie in früheren Versionen). BuyLimit SellLimit – Bei Magic Target ohne Stops werden BuyLimit / SellLimit gesetzt. |
| Show_EndOfBar | Show_EndOfBar zeigt ein Textlabel auf dem Chart mit der Endzeit der aktuellen Bar! Die Position des Informationslabels zum Bar-Ende kann geändert werden. Wenn Sie auf dieses Label klicken, ändert es seine Position auf dem Chart! Die Zeit wird bei jedem Tick angezeigt! Das bedeutet: Wenn kein Tick kommt, stoppt die Zeit!  |
ReDrawIfNewObjectFoundbool | Steuert das automatische Neuzeichnen des Panels, wenn ein neues Chartobjekt erscheint. Lassen Sie diese Option aktiviert, wenn Sie Chartlevels, Magic Target, Teil-Schließungsobjekte, AVG/ATM-Objekte oder Vorlagen verwenden, in denen Objekte dynamisch erstellt werden können. Deaktivieren Sie sie nur, wenn Sie bewusst die Redraw-Aktivität auf einem sehr schweren Chart reduzieren möchten. Standard: true Typ: bool |
| Show_Info_Close | Zeigt zusätzliche Schließinformationen, wenn sich der Cursor in der Nähe von Close-Steuerelementen oder Chart-Schließbereichen befindet. Das hilft dem Trader, den Kontext vor dem Ausführen einer Schließaktion zu sehen. Wenn der Chart zu visuell überladen wird, kann diese Anzeige deaktiviert werden. Standard: true Typ: bool |
| Create_Arrow_Open_Close | Aktiviert oder deaktiviert MetaTrader-Handelshistorienpfeile/Marker auf dem Chart für Öffnungs- und Schließoperationen. In MT5 schaltet der Code CHART_SHOW_TRADE_HISTORY entsprechend dieser Einstellung. Deaktivieren Sie die Option für einen saubereren Arbeitsbereich; aktivieren Sie sie, wenn Sie visuelle Trade-History-Markierungen auf dem Chart sehen möchten. Standard: false Typ: bool |
| ShowMagicTargetGraphInfoButtons | Zeigt schwebende Magic-Target-Informations-/Aktionsbuttons direkt auf dem Chart. Wenn aktiviert, kann der Chart Magic-Target-Hinweise und Steuerbuttons für den Orderplatzierungs-Workflow anzeigen. Deaktivieren Sie diese Option, wenn Sie nur Panelbuttons oder Hotkeys verwenden möchten. Standard: true Typ: bool |
| Show_Ask_Line | Zeigt die Ask-Linie auf dem MetaTrader-Chart an. Das Panel aktiviert die Plattform-Ask-Linie, wenn diese Option aktiv ist. Das ist nützlich für Spread-Kontrolle, SELL-Schließpreis-Bewusstsein und eine genauere visuelle Orderplanung. Standard: true Typ: bool |

Trade options
Kernverhalten des Tradings: Symbolbereich, Magic Numbers, Slippage, virtuelle Levels, Broker-Ausführung und Orderkommentare.
| Parameter | Beschreibung und empfohlene Verwendung |
| Rounding | Der Expert Advisor kann alle Preise beim Öffnen und Ändern von Orders und Positionen runden. Optionen: Keine Rundung, Rundung auf 1 Stelle, Rundung auf 2 Stellen. Die Funktion wurde für Gold und Silber sowie für Broker erstellt, bei denen eine bestimmte Tick-Genauigkeit erforderlich ist. Beispiel: Eröffnungspreis der Position = 1.12345 Rundung auf 1 Stelle = 1.12340 Rundung auf 2 Stellen = 1.12300 |
| MagicNumber | Die Magic Number für Positionen und Orders wird beim Öffnen gesetzt. Sie wird verwendet, um Positionen und Orders meines Expert Advisors oder fremder Systeme zu unterscheiden. 0 – ohne Magic Number, MultiMagic: Parameter MagicNumber aktualisiert: Die erste Zahl ist für die Magic Number zum Öffnen und Ändern von Positionen vorgesehen. Sie können auch mehrere Magic Numbers zur Begleitung angeben; z. B.: — MagicNumber = 777 UseAllMagicFromAllAccount = true: Der Expert Advisor überwacht alle Positionen auf dem aktuellen Symbol im gesamten Konto; — MagicNumber = 777 UseAllMagicFromAllAccount = false: Der Expert Advisor überwacht Positionen mit der Magic Number 777 für das aktuelle Symbol im gesamten Konto; — MagicNumber = 777,888 UseAllMagicFromAllAccount = false: Der Expert Advisor verfolgt Positionen mit den Magic Numbers 777 und 888 (öffnet Positionen mit Magic Number 777) auf dem aktuellen Symbol im gesamten Konto; — MagicNumber = 777,888,999 UseAllMagicFromAllAccount = false: Der Expert Advisor verfolgt Positionen mit den Magic Numbers 777, 888 und 999 (öffnet Positionen mit Magic Number 777) auf dem aktuellen Symbol im gesamten Konto; |
| UseAllMagicFromAllAccount | Erlaubt, alle im Terminal für dieses Symbol geöffneten Positionen zu berücksichtigen. Beispiel: UseAllMagicFromAllAccount = true Dann werden alle Positionen mit jeder Magic Number beim Öffnen, Schließen, Ändern oder Berechnen von Informationen berücksichtigt. UseAllMagicFromAllAccount = false Der Expert Advisor berücksichtigt nur Positionen, die die angegebene MagicNumber haben. |
| MarketWatch | Für eröffnete Positionen mit Stop Loss / Take Profit auf einem Konto mit MARKET-Ausführung. Zuerst kann der Expert Advisor die Position öffnen, und nach erfolgreicher Eröffnung werden die Stop-Loss- und Take-Profit-Levels in dieser Position geändert. True – für ECN-Broker und Konten, bei denen es verboten ist, Stops gleichzeitig mit dem Öffnen einer Position zu setzen. Wenn Ihr Konto zur ECN- oder NDD-Gruppe gehört, müssen Sie diese Option auf true setzen. |
| Slippage | Der maximal mögliche Preisabweichungswert beim Öffnen und Schließen von Positionen (in Points). Beispiel: Slippage = 1 Maximale Preisabweichung beim Öffnen einer Position = Eröffnungspreis + -1 Point. Slippage = 100 Maximale Preisabweichung beim Öffnen einer Position = Eröffnungspreis + -100 Points. Zum Beispiel: Der Preis beim Senden der Position an den Server = 1.12345 Wenn sich der Preis während des Sendens und Öffnens der Position innerhalb von 100 Points geändert hat (Requote), wird die Position innerhalb des Preisbereichs 1.12245 – 1.12445 eröffnet |
| VirtualSLTPUse | Virtuelle Stop-Loss-/Take-Profit-Levels beim Öffnen von Positionen verwenden. Wenn diese Option aktiviert ist, werden der echte Stop Loss und Take Profit vor dem Broker verborgen. Der Expert Advisor speichert die Stop-Levels im Array und auf dem Chart. Achtung: Virtueller Stop Loss und Take Profit funktionieren nur, wenn das Terminal eingeschaltet ist.  |
| Digitss | Anzahl der Dezimalstellen in der Anzeige auf der Position-Registerkarte auf den BUY- und SELL-Buttons Auswahl: Show_for_4_digits; Show_for_5_digits; |
| CommentOrders | Kommentar, der beim Öffnen zum Positions- oder Orderkommentar hinzugefügt wird. Beispiel: CommentOrders = “Super“, Positionskommentar: Super; Funktion zur Arbeit mit Binary Options BO hinzugefügt: Parameter CommentOrders aktualisiert. Jetzt können Sie die Ablaufzeit der Option festlegen, zum Beispiel 5 (Schließen nach 5 Minuten)! Unterstützung eindeutiger Kommentare für Broker mit BOs, die einen individuellen Kommentar verlangen. Zum Beispiel: CommentOrders = CLOSE31 (Schließen nach 31 Minuten) Geben Sie die Regeln für das Schreiben eines BO-Kommentars bei Ihrem Broker an! |
| TradebyOnTimer | Startet die schwere Trading-/Tick-Engine über einen Timer, statt sich nur auf Marktticks zu verlassen. 0 deaktiviert timerbasierte Trading-Logik. Ein positiver Wert setzt das Timerintervall in Millisekunden; der Code schützt das Intervall davor, zu niedrig zu werden. Nützlich für Symbole mit langsamen Ticks, Tester-Workflows oder Module, die auch bei seltenen Ticks aktualisiert werden müssen. Standard: 0 Typ: int |
| NumberTryClose | Maximale Anzahl von Versuchen beim Senden von Close-Befehlen. Das hilft dem Panel, Schließoperationen zu wiederholen, wenn Broker/Server temporäre Ausführungsprobleme, Requotes oder Verzögerungen im Trade Context zurückgeben. Standard: 10 Typ: int |
| NumberTryOpen | Maximale Anzahl von Versuchen beim Senden von Open-Befehlen. Erhöhen Sie diesen Wert nur, wenn Ihr Broker häufig Trade-Anfragen ablehnt oder verzögert; behalten Sie konservative Werte bei, um wiederholte unbeabsichtigte Einstiege zu vermeiden. Standard: 1 Typ: int |
| Prevent_accidental_double_click | Fügt Schutz gegen versehentliche wiederholte Klicks hinzu. Wenn aktiviert, prüft das Panel das Intervall zum letzten Ereignis und blockiert doppelte Aktionen innerhalb eines kurzen Schutzfensters. Dadurch sinkt das Risiko, versehentlich zweimal zu öffnen, zu schließen, zu reversen oder zu locken. Standard: false Typ: bool |
Notice options
Push- und Soundbenachrichtigungen für Open-, Close-, Modify- und Error-Ereignisse. Diese Einstellungen benötigen die passenden MetaTrader-Sounddateien und/oder eine Push-Benachrichtigungskonfiguration, wenn mobile Benachrichtigungen verwendet werden.
| Parameter | Beschreibung und empfohlene Verwendung |
| Notice_Open_Push | Sendet eine mobile PUSH-Benachrichtigung, wenn eine Position oder Order geöffnet wird, sofern MetaTrader-Benachrichtigungen eingerichtet sind. Standard: false Typ: bool |
| Notice_Open_Sound | Spielt einen Sound ab, wenn eine Position oder Order geöffnet wird. Der Name der Sounddatei wird über Notice_Open_NameSoundFromEa gesteuert. Standard: true Typ: bool |
| Notice_Close_Push | Sendet eine mobile PUSH-Benachrichtigung, wenn eine Position oder Order geschlossen wird, sofern MetaTrader-Benachrichtigungen eingerichtet sind. Standard: false Typ: bool |
| Notice_Close_Sound | Spielt einen Sound ab, wenn eine Position oder Order geschlossen wird. Der Name der Sounddatei wird über Notice_Close_NameSoundFromEa gesteuert. Standard: true Typ: bool |
| Notice_Modify_Push | Sendet eine mobile PUSH-Benachrichtigung, wenn eine Position/Order oder ihre Levels geändert werden. Standard: false Typ: bool |
| Notice_Modify_Sound | Spielt einen Sound ab, wenn eine Position/Order oder ihre Levels geändert werden. Der Name der Sounddatei wird über Notice_Modify_NameSoundFromEa gesteuert. Standard: true Typ: bool |
| Notice_Error_Push | Sendet eine mobile PUSH-Benachrichtigung, wenn das Panel einen Ausführungs- oder Handelsoperationsfehler erhält. Standard: false Typ: bool |
| Notice_Error_Sound | Spielt einen Sound ab, wenn ein Ausführungs- oder Handelsoperationsfehler auftritt. Der Name der Sounddatei wird über Notice_Error_NameSoundFromEa gesteuert. Standard: true Typ: bool |
| Notice_Open_NameSoundFromEa | Sounddateiname für Open-Ereignisse. Geben Sie nur den WAV-Dateinamen ohne Erweiterung an. Standard: “ok” Typ: string |
| Notice_Close_NameSoundFromEa | Sounddateiname für Close-Ereignisse. Geben Sie nur den WAV-Dateinamen ohne Erweiterung an. Standard: “alert2” Typ: string |
| Notice_Modify_NameSoundFromEa | Sounddateiname für Modify-Ereignisse. Geben Sie nur den WAV-Dateinamen ohne Erweiterung an. Standard: “stops” Typ: string |
| Notice_Error_NameSoundFromEa | Sounddateiname für Error-Ereignisse. Geben Sie nur den WAV-Dateinamen ohne Erweiterung an. Standard: “timeout” Typ: string |
Trade from Keyboard options
Tastenkürzel für schnelles Chart-Trading. Aktivieren Sie diese Funktion nur, wenn Sie eindeutig wissen, welcher Chart aktiv ist.
| Parameter | Beschreibung und empfohlene Verwendung |
| KeyBoardTrade | Verwendung der Tastatur für One Click Trading Für MAC-Nutzer: Um mit dem Panel über die Tastatur zu arbeiten, müssen Sie Control + Taste verwenden 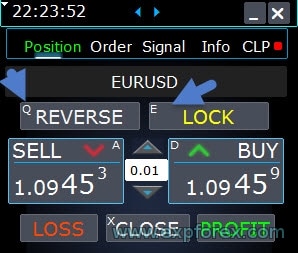 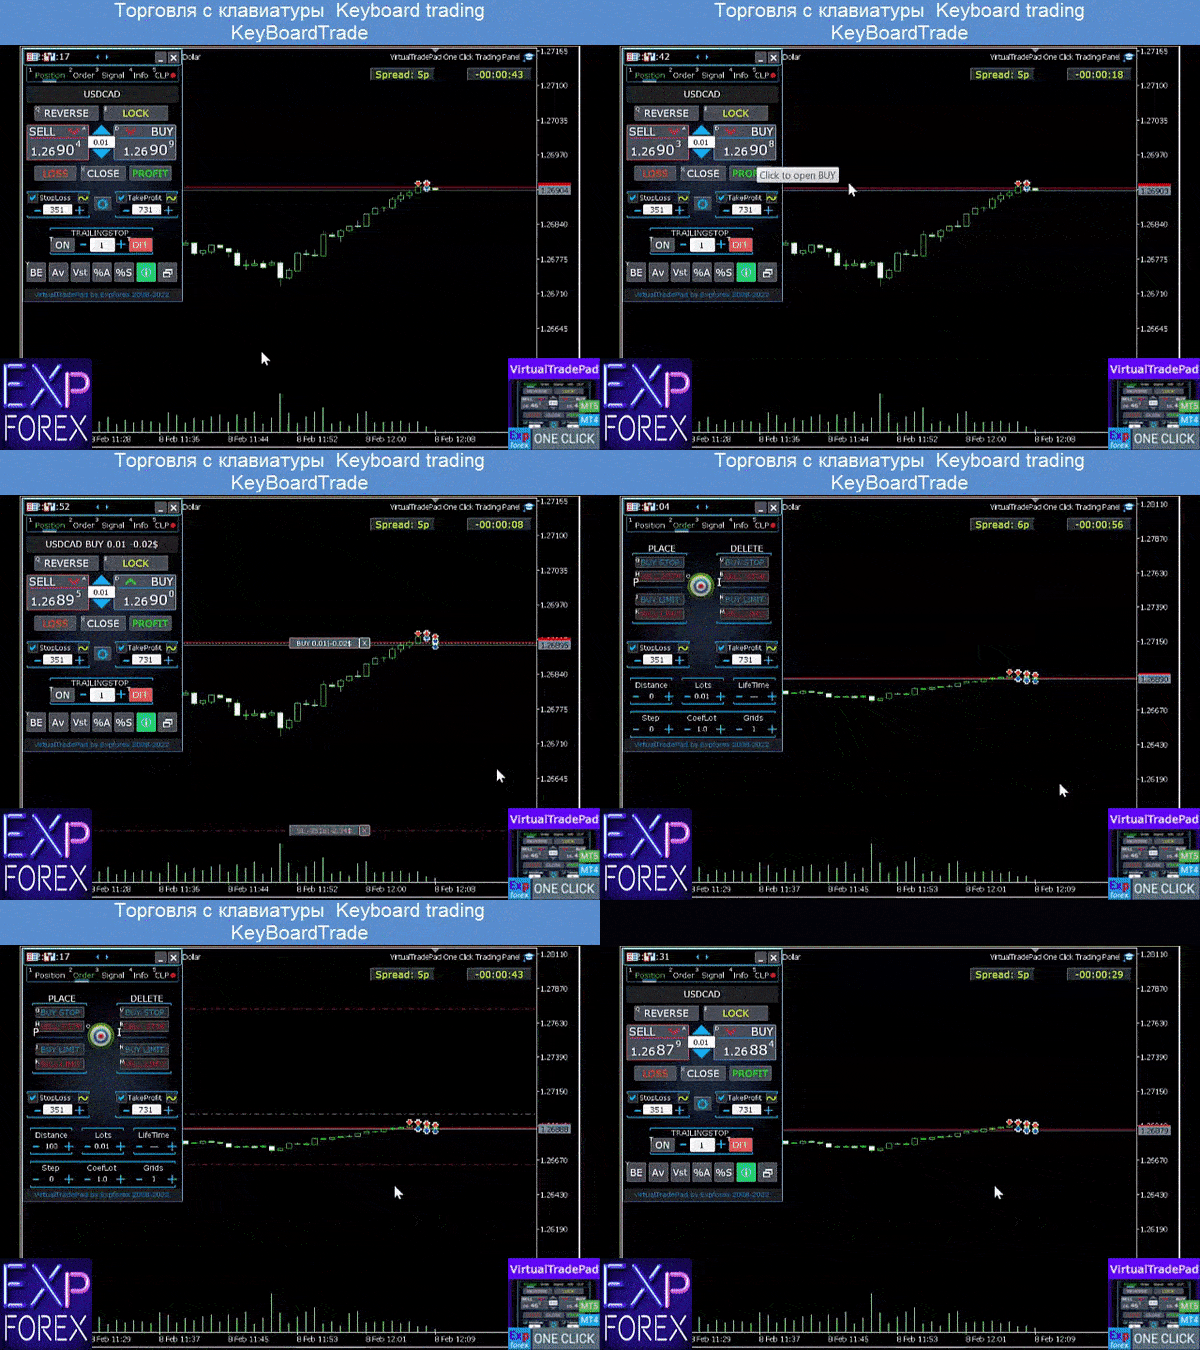 |
| Buy_KEY | Öffnet eine BUY-Position mit der Taste D Standard: BUTTON_D |
| Sell_KEY | Öffnet eine SELL-Position mit der Taste A Standard: BUTTON_A |
| Close_KEY | Schließt Positionen mit der Taste X Standard: BUTTON_X |
| LossCLOSE_KEY | Schließen nur verlustbringender Positionen ist keiner Taste zugewiesen Standard: NONE |
| ProfitCLOSE_KEY | Schließen nur profitabler Positionen ist keiner Taste zugewiesen Standard: NONE |
| Reverse_KEY | Dreht Positionen mit der Taste Q Standard: BUTTON_Q |
| Lock_KEY | Lockt Positionen mit der Taste E Standard: BUTTON_E |
| MagicTarget | Arbeit mit MagicTarget: Hotkey zum Aktivieren der MagicTarget / Cancel / Place Buttons MagicTarget_Button_KEY = BUTTON_O – Aktivierung von Magic Target, standardmäßig O. Die Orders-Registerkarte wechselt automatisch! MagicTarget_Place_KEY = BUTTON_P – Order nach den gesetzten Levels platzieren, standardmäßig P. MagicTarget_Cancel_KEY = BUTTON_I – Abbrechen anhand der angezeigten Levels, standardmäßig I. Möglichkeit, eine gesamte Order im Chart mit MagicTarget zu verschieben: Beim Setzen von Linien können Sie die Linienlevels durch Ziehen im Chart ändern. Wir haben die Möglichkeit hinzugefügt, die gesamte Order zu ziehen, indem Sie die SHIFT-Taste gedrückt halten und die Hauptlinie des Eröffnungspreises ziehen. |
| Orders | Möglichkeit, Stop-/Limit-Orders über die Tastatur zu platzieren/zu löschen: BuyStop_Open_KEY = BUTTON_G; // BuyStop_Open_KEY -> Button to Open BuyStop order; SellStop_Open_KEY = BUTTON_H; // SellStop_Open_KEY -> Button to Open SellStop order; BuyLimit_Open_KEY = BUTTON_J; // BuyLimit_Open_KEY -> Button to Open BuyLimit order; SellLimit_Open_KEY = BUTTON_K; // SellLimit_Open_KEY -> Button to Open SellLimit order; BuyStop_Delete_KEY = BUTTON_V; // BuyStop_Delete_KEY -> Button to Delete BuyStop order; SellStop_Delete_KEY = BUTTON_B; // SellStop_Delete_KEY -> Button to Delete SellStop order; BuyLimit_Delete_KEY = BUTTON_N; // BuyLimit_Delete_KEY -> Button to Delete BuyLimit order; SellLimit_Delete_KEY = BUTTON_M; // SellLimit_Delete_KEY -> Button to Delete SellLimit order; |
| CloseConfirm ReverseConfirm LockConfirm BuySellConfirm | CloseConfirm Funktion – Nutzerbestätigung beim Schließen von Positionen. Beim Klick auf die Buttons: Close, Loss, Profit. ReverseConfirm Funktion – Nutzerbestätigung beim Reversen einer Position. Beim Klick auf den Button: Reverse. LockConfirm Funktion – Nutzerbestätigung beim Locken von Positionen. Beim Drücken des Buttons: Lock. BuySellConfirm – Bestätigung des Öffnens von Positionen beim Klick auf BUY oder SELL; CloseLOSSConfirm = false; // CloseLOSSConfirm -> Ask for permission when closing Loss positions ClosePROFConfirm = false; // ClosePROFConfirm -> Ask for permission when closing Profit positions 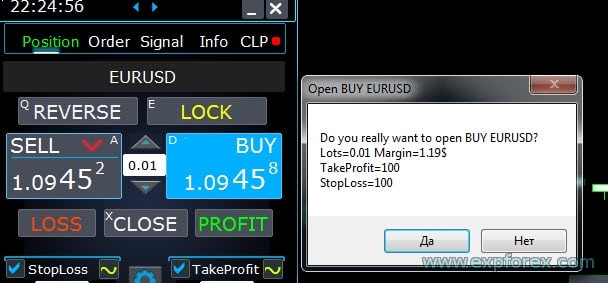 |
| BUYCLOSE_KEY | Hotkey zum Schließen aller BUY-Positionen gemäß aktueller Symbol-/Magic-Filterlogik. NONE bedeutet, dass der Aktion kein Tastenkürzel zugewiesen ist. Standard: NONE |
| SELLCLOSE_KEY | Hotkey zum Schließen aller SELL-Positionen gemäß aktueller Symbol-/Magic-Filterlogik. NONE bedeutet, dass der Aktion kein Tastenkürzel zugewiesen ist. Standard: NONE |
| StopLoss_USE_KEY | Hotkey zum Aktivieren oder Deaktivieren des Stop-Loss-Kontrollkästchens bzw. Nutzungszustands über die Tastatur. Nur verwenden, wenn Keyboard Trading aktiviert ist und der aktive Chart eindeutig ausgewählt wurde. Standard: NONE |
| TakeProfit_USE_KEY | Hotkey zum Aktivieren oder Deaktivieren des Take-Profit-Kontrollkästchens bzw. Nutzungszustands über die Tastatur. Nur verwenden, wenn Keyboard Trading aktiviert ist und der aktive Chart eindeutig ausgewählt wurde. Standard: NONE |
| TrailingStopONOFF_KEY | Hotkey zum Ein- oder Ausschalten von Trailing Stop direkt vom Chart. Das ermöglicht eine schnellere Steuerung des Trailing-Verhaltens ohne Klick auf das Panel. Standard: BUTTON_T |
| BreakevenONOFF_KEY | Hotkey zum Ein- oder Ausschalten von BreakEven direkt vom Chart. Nützlich, wenn ein Trader Breakeven-Schutz beim manuellen Trading schnell aktivieren möchte. Standard: BUTTON_Y |
| Position_Tab_KEY | Hotkey zum Umschalten des Panels auf die POS-Registerkarte. Standard: BUTTON_1 |
| Order_Tab_KEY | Hotkey zum Umschalten des Panels auf die ORD-Registerkarte. Standard: BUTTON_2 |
| CLP_Tab_KEY | Hotkey zum Umschalten des Panels auf die CLP-Registerkarte. Standard: BUTTON_3 |
| Part_Tab_KEY | Hotkey zum Umschalten des Panels auf die PART-Registerkarte. Standard: BUTTON_4 |
| AWG_Tab_KEY | Hotkey zum Umschalten des Panels auf die AVG/AWG-Registerkarte. Der Eingabename bleibt im Code aus Kompatibilitätsgründen AWG_Tab_KEY, während das sichtbare Nutzermodul AVG heißt. Standard: BUTTON_5 |
| ATM_Tab_KEY | Hotkey zum Umschalten des Panels auf die ATM-Registerkarte. Standard: BUTTON_6 |
| Signal_Tab_KEY | Hotkey zum Umschalten des Panels auf die SIG/Signal-Registerkarte. Standard: BUTTON_7 |
| Info_Tab_KEY | Hotkey zum Umschalten des Panels auf die INFO-Registerkarte. Standard: BUTTON_8 |
Lot options
Lotberechnung und Volumenlimits. Diese Einstellungen beeinflussen das Risiko direkt und sollten zuerst mit dem kleinsten sinnvollen Lot getestet werden.
| Parameter | Beschreibung und empfohlene Verwendung |
| DynamicLotStopLoss | Aktiviert die dynamische Lot-Berechnung anhand des gesetzten Stop Loss als Prozentsatz der freien Margin. Wenn die Position per Stop Loss geschlossen wird, entspricht der Verlust dieser Position dem festgelegten Prozentsatz der freien Margin.  Beispiel: DynamicLotStopLoss = true Feld Lots = 2 Feld Stop Loss = 500 Freie Margin = 9999 Möglicher Verlust = $ 200 Berechnetes Lot = 0.39 Nach Aktivierung dieser Funktion arbeitet das Feld lot im Panel als Prozentsatz des Autolots. 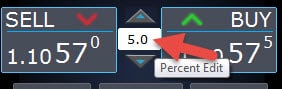 |
| DynamicLotAuto | Aktiviert die dynamische Lot-Berechnung als Prozentsatz der freien Margin und weiterer Faktoren. – Lots nach Prozentsatz des Kontostands berechnen; – Lots nach Prozentsatz des Eigenkapitals berechnen; Nach Aktivierung dieser Funktion arbeitet das Feld lot im Panel als Prozentsatz des Autolots. Um zu sehen, welches Lot geöffnet wird, geben Sie den Prozentsatz in das Feld lot ein und bewegen Sie den Mauszeiger über die Schaltflächen Buy oder SELL. Auf dem Chart sehen Sie das erwartete Lot, das mit diesem Prozentsatz geöffnet wird.  AUTOLOT Berechnung unseres Autolots. |
| RiskRate | Der Kurs Ihrer Kontowährung gegenüber dem Dollar. Standardmäßig ist RiskRate = 0. Das bedeutet, dass der Expert Advisor versucht, den richtigen Kurs in der Marktübersicht zu finden. Damit Autolot mit allen Symbolen korrekt funktioniert, müssen Sie in der Market Watch die Option „Alle Symbole anzeigen“ aktivieren. Standard: 0 |
| CoefLotForGridOrders | Multipliziert das nächste Lot im Raster der Pending Orders, wenn es auf der Orders-Registerkarte verwendet wird. Beispiel: CoefLotForGridOrders = 2, Grid = 5, dann werden die Lots wie folgt geöffnet: 0.1, 0.2, 0.4, 0.8, 0.16; Standard: 1 |
| AddLotForGridOrders | Zusätzliches Lot für jedes Element des Pending-Order-Rasters bei Verwendung auf der Orders-Registerkarte. Beispiel: AddLotForGridOrders = 0.1, Grid = 5, dann werden die Lots wie folgt geöffnet: 0.1, 0.2, 0.3, 0.4, 0.5; Standard: 0 |
| MaxLotToOpen | Maximales Lot, das bei den Berechnungsfunktionen DynamicLotStopLoss und DynamicLotAuto gesetzt werden kann. |
| MaxDigitsLots | Begrenzt die Anzahl der Dezimalstellen, die bei der Anzeige oder Berechnung von Lots verwendet werden. Dadurch werden berechnete Lot-Werte besser an den Volumenschritt des Brokersymbols angepasst, und das Lot-Feld im Panel bleibt nach dynamischen Lot-Berechnungen übersichtlich. Standard: 2 Typ: int |
Step options
Schrittwerte zum Ändern von Lot, SL, TP, Abstand, Trailing und CLP-Werten direkt aus dem Panel.
| Parameter | Beschreibung und empfohlene Verwendung |
| Nur in MT5: Es wurde die Möglichkeit hinzugefügt, den Wert im Eingabefeld auf den Registerkarten unseres Panels mit der Maus und Scrollen (mittleres Mausrad) zu ändern. Wenn Sie den Mauszeiger über ein Eingabefeld bewegen und scrollen, können Sie die Werte dieses Feldes verringern oder erhöhen! | |
| Step_Lots | Schrittweite zum Ändern des Feldes LOTS bei Verwendung von + – Standard: 0.01 |
| Step_StopLoss | Schrittweite zum Ändern des Feldes Stop Loss bei Verwendung von + – Standard: 1 |
| Step_TakeProfit | Schrittweite zum Ändern des Feldes Take Profit bei Verwendung von + – Standard: 1 |
| Step_Distance | Schrittweite zum Ändern des Feldes Distance bei Verwendung von + – Standard: 1 |
| Step_TrailingStop | Schrittweite zum Ändern des Feldes TrailingStop bei Verwendung von + – |
| AutoCorrect_Distance | Automatische Korrektur des Feldes „Distance“ für Pending Orders. Sie können diese Korrektur nun deaktivieren und Pending- sowie Limit-Orders zum aktuellen Preis mit einem Abstand von 0 eröffnen, sofern Ihr Broker dies erlaubt. |
| Step_CLP_TralOptions(Nur für MT5) | Schrittweite zum Ändern des Feldes Trailing Profit auf der CLP-Registerkarte mit dem Mausrad. |
| TrailingStop options | |
| StartPointsForTrailingStop | – Anzahl zusätzlicher Gewinnpunkte beim Setzen des Stop Loss. –Bei Verwendung des Trailing Stop setzt unser Expert Advisor zusätzliche Gewinnpunkte im Stop Loss. |
| Step_TrailingStep | Schrittweite zum Ändern des Trailing Stop bei der Positionsmodifikation. Dieser Parameter ist für die Arbeit mit der TrailingStop-Funktion vorgesehen. Beispiel: Step_TrailingStep = 1 Bei einem Trailing Stop wird der Stop Loss in Schritten von 1 Punkt geändert: 1.12345, 1.12346, 1.12347, …… Step_TrailingStep = 15 Bei einem Trailing Stop wird der Stop Loss in Schritten von 15 Punkten geändert: 1.12345, 1.12360, 1.12375, …… Standard: 1 |
| Step_Step | Schrittwert, der beim Ändern des Step-Feldes in Panel-Workflows mit Abstand-/Step-Werten verwendet wird, einschließlich Order-Grids und levelbasierter Logik. Standard: 1 Typ: int |
| UseCommission | Berücksichtigt Kommissionen und Swaps in punktbasierten Berechnungen, bei denen der Code die Kommission in Punkte für Trailing, Breakeven oder Durchschnittspreis-Schutzlogik umrechnet. Deaktivieren Sie diese Option nur, wenn Sie Berechnungen bewusst ohne Kommissionsanpassung verwenden möchten. Standard: true Typ: bool |
Breakeven options
BreakEven-Logik zum Verschieben des Stop Loss, nachdem eine Position eine festgelegte Gewinnentfernung erreicht hat.
| Parameter | Beschreibung und empfohlene Verwendung |
| MovingInWLUSE (Breakeven) im PAD: BE | Aktiviert die Breakeven-Funktion. Die Funktion modifiziert den Stop Loss um LevelWLoss Punkte, wenn die Position den Gewinnwert LevelProfit in Punkten erreicht hat. Funktionale Eigenschaften der Expert Advisors von www.expforex.com Beispiel: LevelWLoss = 50 LevelProfit = 200 Sobald die Position 200 Gewinnpunkte erreicht, wird der Stop Loss der Position auf den Eröffnungspreis der Position (+ Spread) + 50 Punkte verschoben. Beispiel: LevelWLoss = 0 LevelProfit = 100 Sobald die Position 100 Gewinnpunkte erreicht, wird der Stop Loss der Position auf den Eröffnungspreis der Position (+ Spread) verschoben. So aktivieren Sie Breakeven. 1. In den EA-Einstellungen (F7 drücken), 2. können Sie die Parameter in Punkten (Pips) anpassen. 3. Klicken Sie anschließend auf BE im VirtualTradePad Panel.  |
| LevelWLoss | Gewinnniveau (LevelWLoss) in Punkten, auf dem der Stop Loss gesetzt wird, wenn diese Funktion aktiviert ist. 1 = 1 Gewinnpunkt; 0 = Automatischer Mindestgewinn-Modus. Wenn der Wert 0 ist, entspricht die Anzahl der Gewinnpunkte für den Breakeven (Stop Loss am Break-even-Punkt) dem Spread des aktuellen Symbols. Standard: 0 |
| LevelProfit | Anzahl der Gewinnpunkte (LevelProfit), die eine Position erreichen muss, damit ein Stop Loss im Gewinnbereich LevelWLoss in Punkten (Pips) gesetzt wird. LevelProfit muss größer sein als LevelWLoss Standard: 0 |
Close by total profit or loss options
CLP-Einstellungen für das Schließen nach Gesamtgewinn, Gesamtverlust, Profit Trailing, Benachrichtigungen und VPS-bezogenes CLP-Verhalten.
| Parameter | Beschreibung und empfohlene Verwendung |
| Show_Future_BE_TP_SL | Zeigt Break-even-, Gewinn- und Verlustlevel auf dem aktuellen Chart an. Der Preis der Linien wird auf Basis der eingegebenen Werte in den Feldern Profit und Loss in Punkten/Dollar/Prozent berechnet. Achtung: Funktioniert nur auf dem aktuellen Symbol und wenn der Modus SEPARATE Orders deaktiviert ist. Die Linien werden an den Schnittpunkten der Funktion „Schließen nach Gewinn oder Verlust“ angezeigt. Die Linien werden getrennt für Buy- und Sell-Positionen oder als Durchschnittslinie angezeigt. Wenn die Linie nicht angezeigt wird, bilden die Positionen einen Lock, der nicht nach Gesamtgewinn oder Gesamtverlust geschlossen werden kann. Hinweis: Linien- und Preisdaten können bei variablen Berechnungen ungenau sein. Denken Sie daran! SELL wird zum ASK geschlossen, und BUY wird zum BID geschlossen. Wichtig ist auch, dass sich der Preis eines Punktes mit den Kursen anderer Symbole ändern kann. Beispiel: Wenn der Preis von 1 Punkt für EURJPY berechnet wird und die Kontowährung Dollar ist, wirkt sich eine Änderung des USDJPY-Kurses aus. Der Wert von 1 Punkt = 0.01 JPY. Wenn Ihr Konto in Dollar oder Rubel geführt wird, ändert sich der Symbolwert ständig. Das bedeutet, dass sich die Linie des zukünftigen Gewinns oder Verlusts ändern kann. Das genaue Schließniveau kann daher nicht vorhergesagt werden. Zusätzlich können Kommissionen und Swaps das zukünftige Gewinn- oder Verlustniveau beeinflussen. Ebenso beim Schließen. |
| CLP_TralOptionsStep | Schrittweite zum Ändern des Gewinnlevels, wenn Trailing Profit in konventionellen Einheiten arbeitet (Punkte, Einzahlungswährung, Prozent). Wenn die Funktion Trailing Profit arbeitet, merkt sich der Expert Advisor das Gewinnniveau jeder 1 Einheit (Punkte, Dollar, Prozent). Beispiel: CLP_TralOptionsStep = 1 Die Fixierung des Gewinnniveaus erfolgt jede 1 Einheit (Punkte, Dollar, Prozent). CLP_TralOptionsStep = 15 Das Gewinnniveau wird alle 15 Einheiten (Punkte, Dollar, Prozent) fixiert. Standard: 0 |
| CLP_DeleteStopOrders | Löscht Pending Orders beim „Schließen nach Gesamtgewinn oder Gesamtverlust“. |
| Use_Lots_in_CLP_Points | Bei der Berechnung von Gewinn- oder Verlustpunkten berücksichtigt der Expert Advisor auch das Lot (Volumen) dieser Positionen. Diese Option ist besonders nützlich beim Handel auf einem Hedge-Konto mit unterschiedlichen Lots. Beispiel: 2 SELL-Positionen für EURUSD sind geöffnet SELL 0.01 mit einem Gewinn von 20 Punkten und $ 0.2 SELL 0.02 mit einem Verlust von -12 Punkten und -0.24 Dollar. –Wenn Use_Lots_in_CLP_Points = false, berechnet der Expert Advisor die „reinen“ Punkte. In diesem Fall beträgt das Ergebnis -0.04 Dollar oder 8 Punkte. Wie man sieht, hat die Position in Punkten Gewinn erzielt, in Dollar ist es jedoch ein Verlust. –Wenn Use_Lots_in_CLP_Points = true, berechnet der Expert Advisor die Punkte unter Berücksichtigung der Lots. In diesem Fall beträgt das Ergebnis -0.04 Dollar oder -4 Punkte. Bei der Gewinnberechnung in Punkten und aktivierter Option „Lots in die Gewinnberechnung einbeziehen“ sucht der EA das kleinste Lot der vorhandenen Positionen und berechnet die Punkte auf dieser Basis. z. B.: Mindestposition 0.01, 1 „reiner“ Punkt = 1 Punkt, wenn eine Position mit Lot 0.02 geöffnet ist, dann entspricht 1 Netto-Punkt = 2 Punkten inklusive Lot. Wenn eine Position mit Lot 0.05 geöffnet ist, dann entspricht 1 Netto-Punkt = 5 Punkten inklusive Lot. |
| Use_Commission_in_CLP | Use_Commission_in_CLP – Kommission bei der Berechnung des Positionsschlusses berücksichtigen. True – Kommission in den Berechnungen berücksichtigen. False – Kommission in den Berechnungen nicht berücksichtigen. Achtung: Die Kommission wird aus einer offenen Position berechnet und mit 2 multipliziert, da beim Schließen einer Position ebenfalls eine Kommission berechnet wird. Das ist die standardmäßige Methode zur Kommissionsberechnung! In MetaTrader 5 ist es einem Advisor nicht möglich, den Typ der Kommissionsberechnung zu erhalten. Wenn Sie nicht möchten, dass der Advisor die Kommission automatisch berechnet, können Sie diese Funktion deaktivieren. Achtung! Diese Funktion betrifft nur die Berechnungen auf der CLP-Registerkarte. Alle anderen Registerkarten arbeiten im Standardmodus unter Berücksichtigung von Kommissionen. |
| AutoCorrect_LevelCLP | Im Verlustfeld können jetzt nur negative Werte eingegeben werden; wenn der Benutzer +10 eingibt, setzt das System den Wert automatisch auf -10. Im Gewinnfeld können jetzt nur positive Werte eingegeben werden; wenn der Benutzer -10 eingibt, setzt das System den Wert automatisch auf +10. Für CLP_TralOptions kann nur ein positiver Wert eingegeben werden. Andernfalls gibt der Expert Advisor einen Fehler zurück. Wenn AutoCorrect_LevelCLP = false ist, können Sie Trailing Profit auch aus dem negativen Bereich auslösen lassen. https://expforex.com/de/closeifprofitorloss/#faq Standard: true |
| CPL_AlerT | Sendet eine Nachricht über Gewinn/Verlust auf einem Terminal-Chart. |
| CPL_Mail | Sendet eine Nachricht über Gewinn/Verlust per Mail So richten Sie das Terminal für den Mailversand ein |
| CPL_Push | Sendet eine Nachricht über Gewinn/Verlust per PUSH. |
| CPL_CloseAllCharts_per CloseAllPositions | CPL_CloseAllCharts_per_CloseAllPositions = Charts / andere Charts vor dem Schließen von Positionen schließen. — Dieser Parameter hilft, das Problem zu lösen, wenn unser Panel beginnt, Positionen nach Erreichen des Gesamtgewinns oder -verlusts zu schließen, während andere Expert Advisors gleichzeitig neue Positionen öffnen. — Der Parameter CPL_CloseAllCharts_per_CloseAllPositions schließt nur die Charts, auf denen andere Expert Advisors installiert sind (außer VirtualTradePad), nur für MT5. — Der Parameter CPL_CloseAllCharts_per_CloseAllPositions schließt alle Charts (wenn All Symbols aktiviert ist) oder nur diejenigen, deren Chart-Symbol dem VirtualTradePad-Symbol entspricht. — Der Parameter CPL_CloseAllCharts_per_CloseAllPositions speichert Chart-Templates vor dem Schließen! Das Template kann später geladen werden. Template-Name: VTP_Symbol_Period_Name des Experts (nur für MT5). Wichtig: — In MT5: In MT5 werden nur die Charts geschlossen, auf denen ein Expert Advisor installiert ist. — In MT4: Es gibt keine Möglichkeit, den Namen des Expert Advisors zu ermitteln, daher werden alle Charts geschlossen. Wenn diese Funktion aktiviert ist, CPL_CloseAllCharts_per_CloseAllPositions = true, speichert VirtualTradePad vor dem Schließen von Positionen zunächst die Templates aller Charts, schließt alle Charts und schließt anschließend alle Positionen. https://www.youtube.com/embed/AVSjDDitclE |
| CPL_CloseTerminalAfterClose | Das Terminal wird geschlossen, nachdem alle Positionen geschlossen wurden. |
| CPL_AUTOOFF_AfterClose | Schaltet die Schaltfläche „Closing on the total profit or loss“ nach dem Schließen aller Positionen automatisch aus. Das Ausschalten erfolgt nur, wenn ALLE Positionen geschlossen sind. Die im Expert Advisor angegebene Magic Number wird berücksichtigt, ebenso wie das Symbol für das Schließen. Wenn Sie nur eine Währung zum Schließen auswählen und in diesem Fall der Parameter CPL_AUTOOFF_AfterClose aktiviert ist, wartet der EA, bis alle Positionen für diese Währung geschlossen sind. Erst danach kann der EA die Schaltfläche ausschalten. |
| ClosingCurrentTicketOnly | ClosingCurrentTicketOnly – Nur die aktuelle Ticketliste schließen. Diese Option hilft, Probleme zu vermeiden, wenn mein Programm Positionen auf Basis des Gesamtgewinns schließt und der Advisor des Benutzers gleichzeitig neue Positionen öffnet. ClosingCurrentTicketOnly = true. Dann schließt das VirtualTradePad-Programm bei erfüllten Gesamtgewinnbedingungen nur die aktuelle Liste der Positionen. Wenn neue Tickets zur Positionsliste hinzugefügt werden, ignoriert das VirtualTradePad-Programm diese. ClosingCurrentTicketOnly = false. Dann schließt das VirtualTradePad-Programm bei erfüllten Gesamtgewinnbedingungen alle Positionen, auch wenn ein anderer Advisor neue Positionen öffnet. |
| e05vps VPS_CLP_Activation=false;//VPS_CLP_Activation –> CLP activation for VPS VPS_CLP_AllSymbols=false; VPS_CLP_CurrentSymbol=false; VPS_CLP_SeparateBUYSELL=false; VPS_CLP_SeparateDEALS=false; e060=”===================================”; VPS_CLP_Profit_Currency=false; VPS_CLP_Profit_Currency_amount=0; VPS_CLP_Profit_Pips=false; VPS_CLP_Profit_Pips_amount=0; VPS_CLP_Profit_Percent=false; VPS_CLP_Profit_Percent_amount=0; e061=”===================================”; VPS_CLP_Trailing_Profit_Currency=false; VPS_CLP_Trailing_Profit_Currency_amount=0; VPS_CLP_Trailing_Profit_Pips=false; VPS_CLP_Trailing_Profit_Pips_amount=0; VPS_CLP_Trailing_Profit_Percent=false; VPS_CLP_Trailing_Profit_Percent_amount=0; e062=”===================================”; VPS_CLP_Loss_Currency=false; VPS_CLP_Loss_Currency_amount=0; VPS_CLP_Loss_Pips=false; VPS_CLP_Loss_Pips_amount=0; VPS_CLP_Loss_Percent=false; VPS_CLP_Loss_Percent_amount=0; | Einstellungen der CLP-Registerkarte in den externen Parametern des Trade Pad. Da MetaQuotes das Senden globaler Variablen an den VPS-Server aus MQL (MetaQuotes) verbietet, funktionieren alle Schaltflächen, Kontrollkästchen, Eingabefelder und Bedienelemente im Trade Pad Panel auf dem MQL5 VPS (MetaQuotes) nicht mehr. Sie können die Funktion zum Schließen nach Gesamtgewinn oder Gesamtverlust über die externen Einstellungen des Utility konfigurieren: Achtung! Wenn der Parameter VPS_CLP_Activation aktiviert ist (true), arbeiten alle Einstellungen dieser Funktion aus externen Variablen! Objekte auf der CLP-Registerkarte sind inaktiv! Standard: “================= VPS MQL5 CLP options |
| CloseTypebyPercentageof | Definiert die Kontobasis für CLP-Prozentberechnungen. Im MT5-Code verwendet der Wert 1 den Kontostand (Balance); andere Werte verwenden Equity, mit sicherem Fallback, falls die Kontobasis nicht verfügbar ist. Dies beeinflusst CLP-Gewinn-/Verlust-/Trailing-Werte, die in Prozent angegeben werden. Standard: 1 |
| CPL_CloseAllCharts_per_CloseAllDeals | Schließt Chartfenster, wenn CLP die ausgewählten Deals/Positionen schließt. Vorsichtig verwenden: Dies ist eine Workflow-Automatisierungsoption für Benutzer, die Charts nach dem Schließen eines Korbs bereinigen möchten. Standard: false Typ: bool |
| ClosebyFIFO | Schließt Positionen nach FIFO-ähnlicher Reihenfolge. Wenn aktiviert, sammelt der Code Tickets, sortiert sie und schließt Positionen in Ticket-Reihenfolge statt im üblichen rückwärts laufenden Scan. Nützlich für Konten oder Workflows, bei denen ältere Positionen zuerst geschlossen werden sollen. Standard: false Typ: bool |
| ShowCloseAllButton | Zeigt die Schaltfläche CLOSE ALL auf der CLP-Registerkarte an. Aktivieren Sie diese Option nur, wenn Sie eine direkte Alles-schließen-Aktion in CLP benötigen. Lassen Sie sie deaktiviert, wenn Sie eine große, wirkungsstarke Schließen-Schaltfläche im CLP-Arbeitsbereich vermeiden möchten. Standard: false Typ: bool |
Color options
Farben und Schriftgrößen für Linien, Labels, Gewinn-/Verlustwerte und Chartobjekte.
| Parameter | Beschreibung und empfohlene Verwendung |
| MAGIC_FONTSIZE | Textgröße auf dem Chart bei Verwendung von MagicTarget sowie Show_Future_BE_TP_SL und Show_Future_Line Standard: 12 |
| MAGIC_ORDER | Farbe der Mittellinie, des Eröffnungspreises der Position und der Order auf dem Chart. Standard: clrYellow |
| MAGIC_STOPLOSS | Farbe der Stop-Loss-Linien auf dem Chart Standard: clrRed |
| MAGIC_TAKEPROFIT | Farbe der Take-Profit-Linien auf dem Chart Standard: clrGreen |
| NULLColor1 | Farbe in den Panel-Informationen Standard: clrGray |
| PLUS_Color | Farbe für positive Werte in den Panel-Informationen Standard: clrLime |
| MINUS_Color | Farbe für negative Werte in den Panel-Informationen Standard: clrOrangeRed |
| TEXTColor4 | Textfarbe in den Panel-Informationen Standard: clrAqua |
Signals options
Signal-Matrix, Signalprozentsatz, Alerts und Berechtigungen für signalbasierte Aktionen.
| Parameter | Beschreibung und empfohlene Verwendung |
| Signals_Percent | Signals Percent: Wenn das Gesamtsignal auf der Signals-Registerkarte überschritten wird, wird der eingestellte Wert in Prozent angegeben.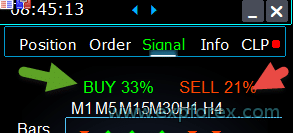 0 – deaktiviert; Standard: 0 |
| Percent_difference_Signals | Prozentuale Differenz zwischen zwei Signalen, um eine Aktion auszuführen (Alert, Positionen öffnen). Beispiel: Signals_Percent = 40% Percent_difference_Signals = 10%: Ein Signal für BUY kann nur entstehen, wenn das Gesamtsignal für Richtung BUY > 40% ist und das Gesamtsignal SELL < 30% ist. Ein Signal für SELL kann nur entstehen, wenn das Gesamtsignal für Richtung SELL > 40% ist und das Gesamtsignal BUY < 30% ist. |
| AutoTrade_by_Signals | Öffnet automatisch eine Position, wenn das aggregierte Signalniveau den Wert Signals_Alert_After_Percent in Prozent überschritten hat. Beispiel: Signals_Alert_After_Percent = 70 AutoTrade_by_Signals = true Wenn das aggregierte BUY-Signal den Wert 70% überschreitet, öffnet der EA eine BUY-Position. Wenn das aggregierte SELL-Signal den Wert 70% überschreitet, öffnet der EA eine SELL-Position. – false; – true All Positions; – true Only Buy; – true Only Sell; |
| AutoClose_by_Signals | AutoClose_by_Signals = Schließt die entgegengesetzte Position, wenn sich das Hauptsignal ändert. — Ermöglicht VirtualTradePad, Positionen auf Basis des aggregierten Signals in Prozent automatisch zu öffnen / schließen. |
| Alert_by_Signals | Separate Variable zur Anzeige einer Bildschirmmeldung, wenn die Bedingungen des allgemeinen Signals erfüllt sind. Alert_by_Signals – Anzeige eines Alerts auf dem Bildschirm aktivieren oder deaktivieren. |
| Shift | Barnummer für das Signal Artikel über Signal-Bars Standard: 0 |
| Signals_M1 – Signals_W1 | Aktiviert oder deaktiviert die Anzeige von Informationen auf der Signals-Registerkarte für den ausgewählten TF. |
| Signals_BARS – Signals_ALI | Aktiviert oder deaktiviert die Anzeige von Informationen auf der Signals-Registerkarte für die ausgewählten Indikatoren. |
Risk Manager Limiting losses / profits / Lots / Numbers Limiting options
Risikobegrenzungen für Verlust, Gewinn, Lots und Anzahl der Trades. Verwenden Sie diesen Abschnitt, um den Workflow vor unerwünschter Exposure zu schützen.
| Parameter | Beschreibung und empfohlene Verwendung |
| LimitFor | Risk Manager hinzugefügt: Risk Manager zur Begrenzung von Verlusten/Gewinnen / Lots / Anzahl. Wenn SIE die Verluste für die aktuelle Client-Magic begrenzen möchten, können Sie dies in einem neuen Block tun. Achtung: Dieser Block schließt die Position nicht! Er zeigt einen Alert an! Beim nächsten LimitFor wird dieser Parameter auf 0 zurückgesetzt. Außerdem können Sie das Senden von Nachrichten an Mail und Telefon aktivieren, wenn die Limits von NotificationMailSend erreicht werden. Achtung! Dieser Block funktioniert nur zum Sperren des Öffnens von Positionen aus unserem VirtualTradePad Panel! Er kann andere Expert Advisors nicht beeinflussen oder blockieren! Der Limiting-Block wurde aktualisiert und erweitert! Dieser Einstellungsblock ermöglicht es Benutzern, Gewinn/Verlust/Lots/Anzahl von Positionen für einen bestimmten Zeitraum zu begrenzen. Ein Risk Manager überwacht Ihren Handel und benachrichtigt Sie, wenn das Zeitlimit mit Current positions/today/week/month / all the time überschritten wurde. Es ist möglich, die Funktion der Schaltflächen BUY / SELL / LOCK / REVERSE / BUY STOP / BUYLIMIT / SELL STOP / SELLLIMIT zu deaktivieren, wenn das Limit überschritten wurde. Deaktiviert die Möglichkeit, Positionen/Orders auf dem aktuellen Symbol zu öffnen, wenn der aktuelle Wert Ihr Limit überschritten hat. Einstellungen: CurrentOpenPositions – Aktuell offene Positionen/Orders berücksichtigen; ClosedPositions – Geschlossene Positionen/Orders über die Zeit berücksichtigen: LimitFor – Zeitraum, in dem geschlossene Positionen/Orders in der Historie geprüft werden; LimitForLosses – Verlustlimit, bei dem der EA eine Nachricht senden soll; muss mit – angegeben werden; LimitForProfits – Gewinnlimit, bei dem der EA eine Nachricht senden soll; LimitForLotsPositions – Lot-Limit für Positionen/Orders, bei dem der Advisor eine Nachricht senden soll; LimitForCountPositions – Limit für die Anzahl der Positionen/Orders, bei dem der EA eine Nachricht senden soll; NotificationMailSend – Nachricht an Telefon (PUSH) und Mail senden, wenn das Limit überschritten wurde; ProhibitOpeningNewPositionsOrders – Deaktiviert die Schaltflächen BUY / SELL / LOCK / REVERSE / BUYSTOP / BUYLIMIT / SELLSTOP / SELLLIMIT, wenn das Limit überschritten wurde. Auswahlmöglichkeiten: DAY – Gewinn und Verlust für den aktuellen Tag berücksichtigen; WEEK – Gewinn und Verlust für die aktuelle Woche berücksichtigen; MONTH – Gewinn und Verlust für den aktuellen Monat berücksichtigen; ALLTIME – Gewinn und Verlust für die gesamte Zeit berücksichtigen. Beispiel: Sie möchten, dass ein Expert Ihnen eine Mail sendet und einen Alert auf dem Bildschirm anzeigt, wenn der Gesamtverlust für offene und geschlossene Positionen innerhalb von LimitFor kleiner als -100 Dollar ist: Ihre Einstellungen lauten dann: LimitFor = 0; LimitForLosses = -100; LimitForProfits = 0; Nach Erreichen eines Verlusts von -100 Dollar in der Tageshistorie zeigt der EA eine Bildschirmmeldung als Alert an und sendet eine Mail. Standard: 3 |
| LimitForLosses | Der Verlustwert |
| LimitForProfits | Der Gewinnwert |
| Spread-Begrenzung (Min Max) im Risk Manager beim Öffnen einer Position. Neue Parameter: LimitForSpreadMin = 0; -> Mindest-Spread für den Handel LimitForSpreadMax = 0; -> Maximaler Spread für den Handel | |
| NotificationMailSend | Außerdem können Sie das Senden von Nachrichten an Mail und Telefon aktivieren, wenn die Limits von NotificationMailSend erreicht werden. So richten Sie das Terminal für den Mailversand ein |
| ProhibitOpeningNewDealsOrders | Wenn aktiviert, kann der Risk Manager neue Eröffnungsaktionen blockieren, nachdem konfigurierte Limits erreicht wurden. Der Code prüft Limits für Verlust, Gewinn, Lots, Anzahl und Spread und verhindert dann BUY/SELL/LOCK/REVERSE sowie das Öffnen von Pending Orders, solange die Blockierungsbedingung aktiv ist. Standard: false Typ: bool |
| AlertRiskManager | Zeigt Alerts an, wenn Risk-Manager-Limits ausgelöst werden. Verwenden Sie diese Option zusammen mit Limits, damit der Trader sichtbares Feedback erhält, wenn der konfigurierte Schutzschwellenwert erreicht wurde. Standard: true Typ: bool |
| CurrentOpenDeals | Bezieht aktuell offene Deals/Positionen in die P/L- und Exposure-Berechnungen des Risk Managers ein. Deaktivieren Sie diese Option nur, wenn das Limit offene/floating Exposure ignorieren und sich nur auf die Historie geschlossener Trades stützen soll. Standard: true Typ: bool |
| ClosedDeals | Bezieht geschlossene Deals/Historie in die Risk-Manager-Berechnungen ein. Zusammen mit CurrentOpenDeals bestimmt dies, ob das Limit offene Trades, geschlossene Historie oder beides auswertet. Standard: true Typ: bool |
| LimitForLotsDeals | Maximales Lot-Exposure-Limit für Deals. 0 deaktiviert dieses spezifische Lot-Limit. Wenn der Wert gesetzt und überschritten wird, kann der Risk Manager einen Alert anzeigen und, falls ProhibitOpeningNewDealsOrders aktiviert ist, neue Eröffnungsaktionen blockieren. Standard: 0 Typ: double |
| LimitForCountDeals | Maximale Anzahl von Deals/Positionen, die der Risk Manager erlaubt. 0 deaktiviert dieses spezifische Anzahl-Limit. Wenn das Limit überschritten wird, kann das Panel einen Alert anzeigen und optional neue Eröffnungsaktionen verbieten. Standard: 0 Typ: int |
Other MT5 options
MetaTrader-5-spezifische Einstellungen wie Filling Mode und Ablaufzeit von Pending Orders.
| Parameter | Beschreibung und empfohlene Verwendung |
| TypeFilling | Ausführungstyp für Positionen und Orders. Wird für das MT5-Terminal verwendet. Im AUTO-Modus versucht der Expert Advisor, den Filling-Typ automatisch zu bestimmen. In manchen Situationen müssen Sie den Filling-Typ jedoch selbst festlegen. Wenn Sie beim Öffnen einer Position den Fehler 10030 TRADE_RETCODE_INVALID_FILL, An unsupported type of execution erhalten, ist ein nicht unterstützter Ausführungstyp für die Order angegeben. Legen Sie den Filling-Typ fest, den Ihr Broker unterstützt. Beispiel: FillOrKill Diese Ausführungsrichtlinie bedeutet, dass die Order nur im angegebenen Volumen ausgeführt werden kann. Wenn der Markt aktuell nicht über ausreichend Volumen eines Finanzinstruments verfügt, wird die Order nicht ausgeführt. Das benötigte Volumen kann aus mehreren aktuell verfügbaren Angeboten im Markt zusammengesetzt werden. ImmediateOrCancel Dies bedeutet die Zustimmung, eine Position mit dem maximal verfügbaren Marktvolumen innerhalb der in der Order angegebenen Grenzen auszuführen. Wenn eine vollständige Ausführung nicht möglich ist, wird die Order mit dem verfügbaren Volumen ausgeführt und der nicht ausgeführte Teil der Order wird storniert. Return Dieser Modus wird für Market-, Limit- und Stop-Limit-Orders und nur in den Modi „Market Execution“ und „Stock Execution“ verwendet. Bei teilweiser Ausführung wird eine Market- oder Limit-Order mit Restvolumen nicht zurückgezogen, sondern bleibt aktiv. Bei Stop-Limit-Orders wird bei Aktivierung die entsprechende Limit-Order mit dem Ausführungstyp Return erstellt. Standard: Auto |
| DayToExpiration | DayToExpiration = Anzahl der Tage bis zum Ablauf der Order. – 0 – ORDER_TIME_GTC Die Order bleibt in der Warteschlange, bis sie entfernt wird; – 1 – ORDER_TIME_DAY Die Order ist nur für den aktuellen Handelstag gültig; – X – ORDER_TIME_SPECIFIED Die Order bleibt bis zum Ablaufdatum gültig. Wenn Sie einen Rejected-Fehler erhalten und beim Überfahren der Order in der Historie Folgendes sehen: (incomplete FOK information of the order), und wenn Sie einen BCS-Broker oder Open Broker verwenden, müssen Sie Folgendes einstellen: TypeFilling= ImmediateOrCancel oder TypeFilling = Return DayToExpiration= 1 Standard: 0 |
Final Settings Notes
- Verwenden Sie Presets für unterschiedliche Workflows: manueller Handel, Strategy Tester, konservatives Demo-Testing und VPS-Betrieb.
- Lassen Sie PrintToLog aktiviert, wenn Sie Support anfragen. Ohne Logs ist eine technische Analyse deutlich schwieriger.
- Testen Sie virtuelles SL/TP und CLP-Logik nur, während Terminal, Chart oder VPS-Umgebung aktiv sind.
- Bei MT5-Konten sollten Sie immer berücksichtigen, ob es sich um ein Hedging- oder Netting-Konto handelt.
- Wenn Sie Symbolsuffixe oder benutzerdefinierte Symbolnamen verwenden, prüfen Sie, ob der Symbolname exakt mit der Marktübersicht übereinstimmt.
| Risikowarnung: VirtualTradePad PRO SE ist ein professionelles Trade-Management-Tool. Einstellungen können reale Handelsoperationen beeinflussen, einschließlich Öffnen, Schließen, teilweises Schließen, Modifizieren von Orders, virtuellem Schutz, Basket-Schließung und signalbasiertem Verhalten. Testen Sie Änderungen immer zuerst auf einem Demokonto, bevor Sie sie auf einem Echtgeldkonto verwenden. |
Beschreibung der externen Variablen der Indikatoren
Moving Average (MA)
- MAFastPeriod und MASlowPeriod – Perioden des MA;
- MAFastPrice und MASlowPrice – Durchschnittspreise;
- MAFastShift und MASlowShift – Verschiebung zur rechten Bar;
- MAFastMethod und MASlowMethod – Glättungsmethode: einfach, exponentiell, geglättet, linear gewichtet.
Moving Average Convergence / Divergence (MACD)
- MACDFast – Periode des schnellen MA;
- MACDSlow – Periode des langsamen MA;
- MACDSignal – Periode des Signal-MA;
- MAPrice – Preis zur Berechnung des Durchschnitts.
Stochastic Oscillator
- StochK – %K-Periode;
- StochD – %D-Periode;
- StochSlowing – Verlangsamung des Indikators;
- StochPrice – Berechnungspreis;
- StochMethod ist die Glättungsmethode.
RSI indicator
- RSIPeriod – Indikatorperiode,
- RSIPrice – Berechnungspreis
Commodity Channel Index (CCI)
- CCIPeriod – Indikatorperiode,
- CCIPrice – Berechnungspreis
Williams Percent Range (WPR)
- WPRPeriod – Indikatorperiode,
Bollinger Band (BB)
- BandsPeriod – Indikatorperiode;
- BandsShift – Verschiebung nach rechts;
- BandsDeviation – Abweichung;
- BandsPrice – Preis der Berechnung.
Alligator (ALI)
- JawPeriod – Periode der Kieferlinie, blaue Linie;
- JawShift – Verschiebung der Kieferlinie nach rechts;
- TeethPeriod – Periode der Zähne;
- TeethShift – Verschiebung der Zähne nach rechts;
- LipsPeriod – Periode der Lippen;
- LipsShift – Verschiebung der Lippen nach rechts.
VirtualTradePad PRO SE — Häufig gestellte Fragen

Unsere allgemeine FAQ
FAQ-Antworten auf die häufigsten Fragen
Diese FAQ beantwortet die häufigsten Fragen zu VirtualTradePad PRO SE, einschließlich Produktzweck, MT4/MT5-Versionen, manuellem Trading, Unterstützung im Strategy Tester, MQL5-VPS-Workflow, teilweisem Schließen, AVG, ATM, Signals, Einstellungen und Support.
Bevor Sie das Panel auf einem echten Konto verwenden: Installieren Sie es auf einem Demokonto, testen Sie die Hauptschaltflächen, prüfen Sie das Verhalten von SL/TP, kontrollieren Sie die Lotgröße und aktivieren Sie erst danach erweiterte Module wie CLP, PART, AVG, ATM oder signalbasierte Aktionen.
Produkt und allgemeine Fragen
Was ist VirtualTradePad PRO SE?
VirtualTradePad PRO SE ist ein professionelles Trading-Control-Panel für MetaTrader. Es wurde entwickelt, damit Trader Positionen direkt aus dem Chart öffnen, schließen, ändern und verwalten können. Zusätzlich bietet es erweiterte Module für Teil-Ausstiege, Basket-Management, Averaging, regelbasierte Automatisierung, Signalüberwachung, Arbeit im Strategy Tester und Live-Informationen.
Ist das ein Expert Advisor oder nur ein visuelles Panel?
VirtualTradePad PRO SE wird als Expert Advisor installiert, weil MetaTrader für Handelsoperationen einen EA benötigt. Der Hauptzweck besteht jedoch darin, als professionelles Trading-Panel und Trade-Management-Arbeitsbereich zu dienen.
Garantiert VirtualTradePad PRO SE Gewinn?
Nein. Das Panel ist ein Trading-Werkzeug und keine Gewinngarantie. Es kann helfen, Trades schneller und übersichtlicher zu verwalten, aber das Ergebnis hängt von Ihrer Strategie, Ihrem Risikomanagement, den Brokerbedingungen, der Marktvolatilität und den Einstellungen ab.
Für wen ist dieses Produkt geeignet?
Es eignet sich für manuelle Trader, Scalper, Intraday-Trader, Trader mit mehreren Positionen, Nutzer, die Teil-Schließungen benötigen, sowie für alle, die einen strukturierteren MetaTrader-Arbeitsbereich für Tests und Ausführung wünschen.
MT4, MT5 und Installation
Funktioniert VirtualTradePad PRO SE in MetaTrader 4?
Ja. Es gibt eine separate Version für MetaTrader 4.
Funktioniert VirtualTradePad PRO SE in MetaTrader 5?
Ja. Es gibt eine separate Version für MetaTrader 5.
Sind die MT4- und MT5-Versionen identisch?
Die Oberfläche und der Workflow sind bewusst ähnlich aufgebaut, aber MT4 und MT5 verwenden unterschiedliche Handelssysteme, Ordermodelle und Plattformlogik. Einige interne Funktionen können sich unterscheiden, weil die Plattformen Trades unterschiedlich verarbeiten.
Kann ich denselben Kauf für MT4 und MT5 verwenden?
MT4- und MT5-Produkte werden normalerweise als separate Market-Produkte veröffentlicht. Wählen Sie die Version, die zu Ihrem Terminal passt.
Kann ich das Produkt vor dem Kauf testen?
Verwenden Sie die Demoversion und testen Sie das Panel auf einem Demokonto oder im Strategy Tester. Beginnen Sie nicht mit echtem Handel, bevor Sie die Einstellungen und den Workflow verstanden haben.
Manuelles Trading und Positionsverwaltung
Kann ich VirtualTradePad PRO SE nur für manuelles Trading verwenden?
Ja. Sie können es als manuelles Trading-Panel verwenden, um Trades direkt aus dem Chart zu öffnen, zu schließen, zu drehen, zu sperren und zu ändern.
Kann ich nur einen Teil einer Position schließen?
Ja. Das Panel enthält Werkzeuge für Teil-Schließungen. Je nach Konfiguration können Sie einfache Aktionen für Teil-Schließungen oder erweiterte PART-Level verwenden.
Kann ich Stop Loss und Take Profit aus dem Chart verwalten?
Ja. VirtualTradePad PRO SE kann Stop-Loss- und Take-Profit-Werte über das Panel und, je nach ausgewähltem Modus, über Chart-Objekte und Zielsteuerungen verwalten.
Was ist der Unterschied zwischen realem und virtuellem SL/TP?
Reale SL/TP-Level werden auf dem Broker-Server platziert. Virtuelle SL/TP-Level werden vom Expert Advisor überwacht und erfordern, dass Terminal, Chart oder VPS-Umgebung aktiv bleiben.
Erweiterte Module: CLP, PART, AVG, ATM und SIG
Was ist CLP?
CLP ist ein Basket-Management-Modul für Close Profit, Close Loss und Profit Trailing. Es kann ausgewählte Positionen schließen, wenn die konfigurierten Gewinn- oder Verlustbedingungen erreicht werden.
Was ist das PART-Modul?
PART ist ein Manager für Teil-Schließungen. Das Modul hilft, mehrere Teil-Ausstiegslevel zu erstellen, damit der Trader eine Position schrittweise abbauen kann, statt den gesamten Trade auf einmal zu schließen.
Was ist AVG?
AVG ist ein Modul für Averaging und Trend-Add. Es kann zukünftige Level im Chart anzeigen und zusätzliche Einstiege gemäß konfiguriertem Modus, Abstand, Lot-Multiplikator, AddLot und Basket-Schutz verwalten.
Ist AVG riskant?
Ja. Averaging- und Trend-Add-Logik kann das Exposure schnell erhöhen, wenn sie falsch konfiguriert wird. Testen Sie AVG immer zuerst auf einem Demokonto und verwenden Sie konservative Einstellungen.
Was ist ATM?
ATM ist ein erweitertes, regelbasiertes Trade-Management-Modul. Es erlaubt dem Trader, Aktionen, Bedingungen und Regeldetails für strukturierte Handelsszenarien vorzubereiten.
Was ist die SIG-Registerkarte?
Die SIG-Registerkarte ist ein Signal Trade Manager. Sie hilft, Signalzustände, Alerts, Push-Benachrichtigungen und signalbezogene Berechtigungen in einem matrixartigen Arbeitsbereich zu überwachen.
Strategy Tester und MQL5 VPS
Funktioniert VirtualTradePad PRO SE im Strategy Tester?
Ja. VirtualTradePad PRO SE ist für die Arbeit im visuellen Strategy Tester ausgelegt, damit Sie Panel-Verhalten, manuelle Aktionen, Teil-Schließungen, AVG-Level, ATM-Regeln und Tester-Steuerungen testen können.
Was sind AP Open, AP Close, AP Modify und AP Bar?
Das sind Auto-Pause-Werkzeuge für die Analyse im Strategy Tester. AP Open pausiert, wenn eine Position oder Order geöffnet wird, AP Close pausiert beim Schließen, AP Modify pausiert bei einer Änderung eines Trades, und AP Bar pausiert, wenn eine neue Kerze abgeschlossen ist.
Kann das Panel auf MQL5 VPS arbeiten?
Das Panel ist für einen stabilen MQL5-VPS-Workflow vorbereitet, wenn es vor der Migration korrekt konfiguriert wird. Prüfen Sie nach der Migration immer die VPS-Logs und bestätigen Sie, dass der benötigte Chart, die Einstellungen und der Panel-Zustand korrekt wiederhergestellt wurden.
Funktionieren virtuelle Level, wenn das Terminal geschlossen ist?
Virtuelle Logik erfordert, dass der Expert Advisor aktiv bleibt. Wenn Sie virtuelles SL/TP, virtuelles Trailing oder virtuelle Management-Logik verwenden, müssen Terminal, Chart oder VPS-Umgebung weiterlaufen.
Einstellungen und Support
Sollte ich vor dem Start alle Einstellungen ändern?
Nein. Beginnen Sie mit den Standardeinstellungen und testen Sie das Panel Schritt für Schritt. Ändern Sie nur die Einstellungen, die Sie verstehen und wirklich benötigen.
Kann ich meine Einstellungen speichern?
Ja. Verwenden Sie MetaTrader-Preset-Dateien, um stabile Konfigurationen zu speichern. Es wird empfohlen, separate Presets für manuelles Trading, Strategy Tester, Demotests und VPS-Workflows zu erstellen.
Wo sollte ich Support-Fragen stellen?
Stellen Sie Support-Fragen bitte im Bereich Produktkommentare, nicht in den Bewertungen. Bewertungen sind für die Produktbewertung gedacht. Kommentare eignen sich besser für technische Fragen, Logs, Screenshots und die Analyse von Einstellungen.
Was sollte ich anhängen, wenn ich Support anfrage?
Fügen Sie einen Screenshot, das Expert-Log, das Journal-Log, Ihre Einstellungsdatei, die Produktversion, die MT4- oder MT5-Terminalversion, das Broker-Symbol und eine kurze Beschreibung der genauen Aktion bei, die nicht wie erwartet funktioniert.
Abschließende Warnung: VirtualTradePad PRO SE ist ein professionelles Trade-Management-Werkzeug. Es kann Workflow und Übersicht verbessern, aber es kann das Trading-Risiko nicht entfernen. Testen Sie Einstellungen immer auf einem Demokonto und verwenden Sie verantwortungsvolles Risikomanagement.
Changelog für VirtualTradePad PRO SE — Was ist neu?
Dieser Changelog erklärt die wichtigsten Verbesserungen in VirtualTradePad PRO SE auf eine benutzerfreundliche Weise. Das Update konzentriert sich auf einen professionelleren Trading-Arbeitsbereich, bessere visuelle Kontrolle, verbesserte Bedienbarkeit im Strategy Tester, Live-Positionsinformationen und neue erweiterte Module für ein strukturiertes Trade-Management.
| Wichtig: VirtualTradePad PRO SE ist eine große Weiterentwicklung des klassischen VirtualTradePad-Konzepts. Die Idee des schnellen chartbasierten Tradings bleibt erhalten, wird aber durch einen deutlich vollständigeren professionellen Workflow für manuellen Handel, Positionskontrolle, Tests, Automatisierungsregeln und Live-Überwachung ergänzt. |
Wichtigste Verbesserungen
| ⭐ Premium-Interface aktualisiert Das Panel erhielt eine sauberere und modernere visuelle Struktur mit mehr Abstand, klareren Button-Zuständen, besserer Lesbarkeit und einem professionelleren Layout für die tägliche Trading-Arbeit. |
| ⚡ Schnellere und flüssigere Chart-Interaktion Die interne Redraw-Logik wurde optimiert, um unnötige Chart-Aktualisierungen zu reduzieren. Das Panel soll sich flüssiger anfühlen, wenn Objekte, Linien oder Panel-Elemente auf dem Chart verschoben werden. |
| 🧪 Verbesserte Bedienbarkeit im Strategy Tester Die Interaktion im visuellen Tester wurde für Panel-Buttons, Chart-Objekte, Objektzustände, Tester-Steuerung und chartbasierte Aktionen verbessert. Dadurch werden manuelle Tests und Workflow-Analysen komfortabler. |
| 🧭 Stabilere Ereignisverarbeitung Das Routing von Chart-Ereignissen wurde überarbeitet, damit Klicks, Button-Zustände, Menüaktionen, Grafikobjekte und Panel-Steuerungen vorhersehbarer reagieren. Das hilft, verpasste Klicks, versehentliche Doppelausführungen und unnötige Neuzeichnungen zu reduzieren. |
Neue professionelle Workspace-Logik
VirtualTradePad PRO SE ist nicht mehr nur ein schnelles Trading-Panel. Es ist als verbundener Arbeitsbereich aufgebaut, in dem der Trader Handelsaktionen direkt vom Chart aus ausführen, verwalten, überwachen und testen kann.
| Bereich | Was geändert wurde |
| POS | Aktualisierter Workflow für manuellen Handel mit klareren Steuerelementen für BUY, SELL, Schließen, Reverse, Lock, SL/TP, Trailing und Breakeven-Logik. |
| Terminal / Live Details | Neue kompakte Informationsblöcke für Positionen, Pending Orders, Floating-Ergebnis, virtuelle SL/TP-Werte, Hedge-Exposure und Menüzugriff. |
| Chartbasierte Positionskontrolle | Verbesserte chartbasierte Informationen, Positionsdetails, Zugriff auf Teilschließungen und Level-Interaktion direkt aus dem Chart. |
| ORD | Aktualisierter Workflow für Pending Orders, Chart-Grid-Logik und Magic-Target-Platzierung für eine visuellere Orderplanung. |
Erweiterte PRO-SE-Module
PRO SE fügt mehrere erweiterte Module hinzu oder erweitert sie deutlich. Diese Werkzeuge sind für Trader gedacht, die ein strukturierteres Trade-Management benötigen, als ein einfaches One-Click-Panel bieten kann.
| Modul | Neuer / verbesserter Workflow |
| CLP | Close Profit, Close Loss und Profit Trailing für Basket-Kontrolle, ausgewählte Symbole und getrennte BUY/SELL-Verwaltung. |
| PART | Teilschließungs-Level, chartbasierte Level-Bearbeitung, Scaling-Out-Workflow und Smart-SL-ähnliche Schutzlogik. |
| AVG | Averaging- und Trend-Add-Level mit Chart-Vorschau, L1–L10-Levelstruktur, Lot-Multiplikator, AddLot und Schutz des Durchschnitts-Baskets. |
| ATM | Regelbasiertes Trade-Management mit Aktionsauswahl, Bedingungen, Konfigurationsschritten und Prüfung vor dem Start der Regeln. |
| SIG | Signal-Matrix, eigene Signalsets, Alerts, Push-Benachrichtigungen und optionale Handelsfreigabe-Logik. |
| INFO | Live-Marktinformationen, Exposure, Prop-Firm-ähnliche Überwachung, SL/TP-Ziele und Closed-P/L-Statistiken in einem kompakten Informationstab. |
Verbesserungen im Strategy Tester und bei Auto-Pause
Der Strategy-Tester-Workflow ist eine der stärksten Verbesserungen in VirtualTradePad PRO SE. Er erlaubt dem Trader, das Verhalten des Panels visuell zu testen, an wichtigen Ereignissen zu pausieren und die Trade-Management-Logik vor dem realen Einsatz zu prüfen.
| AP Open — pausiert den Strategy Tester automatisch, wenn eine neue Position oder Order eröffnet wird. |
| AP Close — pausiert automatisch, wenn eine Position oder Order geschlossen wird. |
| AP Modify — pausiert automatisch, wenn ein Trade, Stop Loss, Take Profit oder eine Order geändert wird. |
| AP Bar — pausiert automatisch, wenn eine neue Kerze abgeschlossen ist. |
Diese Funktionen sind für Analyse und Lernen gedacht. Sie helfen Tradern, während des visuellen Testens genau zu verstehen, wann und warum eine Aktion ausgelöst wurde.
Technische und Stabilitätsverbesserungen
- Verbesserte interne Redraw-Logik für eine flüssigere Chart-Interaktion.
- Vorhersehbareres Chart-Event-Routing für Panel-Buttons und Objektzustände.
- Bessere Verarbeitung von Strategy-Tester-Interaktionen, bei denen normales Tastatur- oder Mausverhalten eingeschränkt sein kann.
- Strukturiertere Panel-Zustandslogik für stabilen Workflow und VPS-ähnlichen Betrieb.
- Verbesserte Unterstützung für Chart-Objekte, Panel-Menüs, Live-Informationen und visuelle Trading-Level.
- Sauberere modulare Struktur für zukünftige Entwicklung und Wartung.
| Risikohinweis: Neue Module erhöhen Kontrolle und Sichtbarkeit, erfordern aber auch eine sorgfältige Konfiguration. Testen Sie neue Funktionen immer zuerst auf einem Demokonto oder im Strategy Tester, bevor Sie sie auf einem realen Konto einsetzen. |
Bewertungen zu VirtualTradePad PRO S
Danke für Ihr Feedback!
Feedback und Bewertungen von Tradern können neuen Nutzern helfen zu verstehen, wie das Panel in der Praxis verwendet wird. In der ersten Veröffentlichungsphase kann vorhandenes VirtualTradePad-Feedback als Produkthistorie angezeigt und später durch neue Bewertungen zu VirtualTradePad PRO SE ersetzt oder erweitert werden.


Fredi Sesarianto
⭐⭐⭐⭐⭐
i cant trade anymore without virtual tradepad.. edit, ALL 5 stars , quick response on quetion .Reply from ExpForex:Thank you ^-)

Chris Jacobs
⭐⭐⭐⭐⭐
since I've bought the virtual tradepanel my tradng improved alot and the developer just release an update and it is amazing Thanks for you hard work Vladislav and Vladislav is always available to answered questionsReply from ExpForex:Thank you 😊

Nguyen Tho
⭐⭐⭐⭐⭐
When I change the time frame to view on the chart, the trading history still displays, even though I have turned off this feature on the chart. Please guide me on how to disable it on your software.
Reply from ExpForex:
Xin chào! Với MT5, để tắt hiển thị lịch sử lệnh trên biểu đồ (và không bị bật lại khi đổi khung thời gian), bạn làm như sau: 1) Tắt hiển thị lịch sử lệnh trên chart Mở biểu đồ cần xem Nhấn F8 (Thuộc tính biểu đồ / Properties) Vào tab Common (Chung) Bỏ chọn Show trade history (Hiển thị lịch sử giao dịch) Nhấn OK

Nguyen Tho
⭐⭐⭐⭐⭐
When I change the time frame to view on the chart, the trading history still displays, even though I have turned off this feature on the chart. Please guide me on how to disable it on your software.Reply from ExpForex:
Xin chào! Với MT5, để tắt hiển thị lịch sử lệnh trên biểu đồ (và không bị bật lại khi đổi khung thời gian), bạn làm như sau: 1) Tắt hiển thị lịch sử lệnh trên chart Mở biểu đồ cần xem Nhấn F8 (Thuộc tính biểu đồ / Properties) Vào tab Common (Chung) Bỏ chọn Show trade history (Hiển thị lịch sử giao dịch) Nhấn OK

talavera.merced
⭐⭐⭐⭐⭐
He cambiado ordenador por rotura, trato de instalar en uno nuevo y dice que no quedan activaciones. Si el otro no funciona y no está en uso, no se puede usar el indicador en el nuevo? hay que comprarlo de nuevo?Reply from ExpForex:
Lamentablemente, no es posible transferir una activación del ordenador antiguo al nuevo. Sin embargo, el producto incluye 10 activaciones. ¿Has utilizado ya las 10 activaciones?
Chanon Chaichanachot
⭐⭐⭐⭐⭐
In the "Risk Manager/Prohibit Opening" please consider adding "deny trading during these time" "00:00-15:35, 22:55-24:00" for examples I'm currently using "AutoTrading Scheduler" as a work around. Thank You... Great Tool! ***I'm using autotrade/autoclose by signals(on VPS), so it would prevent EA from opening new trade during certain time while maintaining floating trade.Reply from ExpForex:
Hi, thank you. Do you mean to prevent opening from the panel?
Ivan Nedelko
⭐⭐⭐⭐⭐
Привет, почему при открытии позиции с мекджик баттон не видно на графике уровни стопов и тейка? И приходится потом вручную их добавлять! Раньше такого не было!Reply from ExpForex:
Приветствую. скорее всего стоплосс и тейкпрофит не включен в панели. нужно см отреть скриншот. Эти функции не изменялись
4131199
⭐⭐⭐⭐⭐
Hi, can please add me in friend list? I have some questions needed your support. ThanksReply from ExpForex:
Hello Yes. You can add questions about VTP on the Comments saction
Jose Antonio Camara Martinez
⭐⭐⭐⭐⭐
Buenas tardes, sobre el VirtualTradePad --¿ cuando se activa cierre por ganancias se podrían cerrar automáticamente tanto ordenes abiertas como ordenes pendientes?Reply from ExpForex:
¡Hola! Claro, puede habilitar la función para eliminar las órdenes pendientes una vez que se alcanza el beneficio total. Para ello, en la configuración del Asesor Experto (F7), establezca la opción en "true": CLP_DeleteStopOrders Eliminar órdenes pendientes cuando se cierra por “beneficio o pérdida total”. Esto garantizará que las órdenes pendientes se eliminen automáticamente al cerrarse la operación con ganancia o pérdida general.

Jose Antonio Camara Martinez
⭐⭐⭐⭐⭐
Jose Antonio Camara Martinez Buenas tardes, sobre el VirtualTradePad --¿ cuando se activa cierre por ganancias se podrían cerrar automáticamente tanto ordenes abiertas como ordenes pendientes?
Vladislav Andruschenko ¡Hola! Claro, puede habilitar la función para eliminar las órdenes pendientes una vez que se alcanza el beneficio total. Para ello, en la configuración del Asesor Experto (F7), establezca la opción en "true": CLP_DeleteStopOrders Eliminar órdenes pendientes cuando se cierra por “beneficio o pérdida total”. Esto garantizará que las órdenes pendientes se eliminen automáticamente al cerrarse la operación con ganancia o pérdida general.

Kalen
⭐⭐⭐⭐⭐
I've been using the MT4/MT5 versions for years now. I could not trade without this tool, its amazing. Otherwise it is a perfect app. Ok it also has a few formatting issues with previews and numbers on the chart, but cmon its an amazing EA and worth your money! One problem I'm having right now though is as follows: If I have my Stop loss set at 100, and my Take profit at 200, when I go to click the "Buy" button, and I show on the chart where my Take profit and Stop loss would be, they are reversed. So for a buy in this case, my Stop loss would show 200, and my Take profit 100, even though that is the opposit for what I have them set at. This goes for clicking the "Sell" button. Basically, the Take profit and Stop loss previews are backwards, which is very frustrating. -Edit: The issue is being worked on, and I'm sure will be fixed soon. Perfect product and great support from the developer 🙂

MarcieliRaimondi
⭐⭐⭐⭐⭐
Olá, uso o VTP já a bastante tempo, mas tem travado muito no meu PC, gostaria de instar ele na VPS, mas diz que não tenho mais licença para instalar, porém estou usando apenas em 3 MT5 e tenho disponivel 10 licenças, onde eu posso ver os locais em que estão sendo acessados minhas licenças? E, como instalar o VTP na VPS????? Olá! Você pode verificar quantas ativações ainda possui diretamente no seu perfil da MQL5.com. ???? Seu perfil:???? Vá até a aba “Mercado” e role a página para baixo para ver a lista dos produtos comprados e o número de ativações restantes.✅ Por favor, envie uma captura de tela dessa seção para confirmação.ℹ️ Informações adicionais:Você pode instalar o robô em até 10 computadores diferentes (PC pessoal, servidor VPS, notebook do trabalho, etc.).Não há limite para o número de contas ou terminais de negociação. No entanto, mudanças no hardware (como substituição do HD/SSD, processador ou até uma atualização do Windows) podem consumir uma nova ativação.Lembre-se de que cada instalação consome recursos do sistema (CPU/RAM), e executar muitos terminais ao mesmo tempo pode afetar o desempenho.

Kommentare vs. Bewertungen
Bitte verwenden Sie den passenden Bereich je nach Ziel:
| Bereich | Verwenden für | Nicht verwenden für |
| Kommentare | Technische Fragen, Hilfe bei der Einrichtung, Logs, Screenshots, Analyse von Einstellungen, Fragen zu Funktionen. | Nur Produktbewertung. |
| Bewertungen | Ihre abschließende Meinung und Bewertung nach der Nutzung des Produkts. | Ungeklärte technische Supportfragen. |
Kommentare zu VirtualTradePad PRO SE
Haben Sie eine Frage?
Support, Kommentare und Bewertungen
Wenn Sie eine technische Frage zu VirtualTradePad PRO SE haben, nutzen Sie bitte den Bereich Kommentare des Produkts. Kommentare sind der beste Ort für Supportanfragen, weil dort Logs, Screenshots, Einstellungen, Broker-Symbole und konkrete Trading-Szenarien besprochen werden können.
Der Bereich Bewertungen ist für Produktbewertungen und Nutzerfeedback gedacht. Wenn etwas nicht wie erwartet funktioniert, verwenden Sie eine Bewertung bitte nicht als Support-Ticket. Ein technisches Problem lässt sich in der Regel deutlich schneller lösen, wenn die erforderlichen Diagnosedaten in den Kommentaren bereitgestellt werden.
| Bester Support-Workflow: Beschreiben Sie die genaue Aktion, fügen Sie einen Screenshot hinzu, legen Sie den Expert-Log und den Journal-Log bei, senden Sie Ihre Einstellungsdatei und geben Sie an, ob Sie MT4 oder MT5 verwenden. |
Was Sie einer Supportanfrage beifügen sollten
Eine gute Supportanfrage sollte genügend Informationen enthalten, um das Problem nachzustellen oder zu verstehen. Ohne Logs und Einstellungen ist es oft unmöglich zu erkennen, ob das Problem vom Panel, von Brokerregeln, Terminalberechtigungen, Symboleinstellungen, Kontotyp oder Benutzerkonfiguration stammt.
| Erforderliche Informationen | Warum sie benötigt werden |
| Screenshot | Zeigt Panel-Zustand, Chart, Symbol, Buttons, Meldungen und sichtbaren Trading-Kontext. |
| Expert-Log | Zeigt Meldungen des Expert Advisors und der Trade-Management-Logik. |
| Journal-Log | Zeigt Terminalfehler, Meldungen zu Handelsberechtigungen und Ausführungsdetails. |
| Einstellungsdatei | Ermöglicht die Prüfung der exakten Konfiguration, statt Werte zu erraten. |
| Produktversion | Bestätigt, ob der aktuelle Build installiert ist. |
| Terminal- und Kontotyp | MT4/MT5, Hedge/Netting, Demo/Real und Broker-Ausführungsregeln können das Verhalten verändern. |
| Exakte Schritte | Eine kurze Abfolge der Aktionen hilft, die Situation schneller zu reproduzieren. |
Vorlage für eine Supportanfrage
Sie können diese Vorlage verwenden, wenn Sie eine Frage im Bereich Kommentare stellen:
Produktversion: VirtualTradePad PRO SE MT4 / MT5, Build-Nummer Terminal: MetaTrader 4 oder MetaTrader 5, Terminal-Build Kontotyp: Demo / Real, Hedge / Netting bei MT5 Broker-Symbol: zum Beispiel EURUSD, EURUSDm, XAUUSD+, XAUUSDr Was ich getan habe: genaue Schaltfläche, Modul oder Aktion beschreiben Was ich erwartet habe: erwartetes Verhalten beschreiben Was passiert ist: tatsächliches Verhalten beschreiben Angehängt: Screenshot, Set-Datei, Expert-Log, Journal-Log |
Dieses Format hilft dem Support, schneller zu arbeiten, und reduziert unnötige Rückfragen.
Wenn Sie nicht sicher sind, ob es sich um einen Fehler, ein Einstellun
Extra
Entdecken Sie die vollständige Landingpage von VirtualTradePad PRO SE
Öffnen Sie die visuelle Premium-Präsentation mit echten Modulvorschauen, Workflow-Screenshots, mobilfreundlichen Abschnitten, offiziellem Download-Zugang und direkten MT4-/MT5-Market-Links.
Premium-Landingpage öffnenNavigation durch Registerkarten
Dieser Beitrag ist auch verfügbar auf:
Leave a Reply